What is AMP? You may have this question irrespective of whether you are a blogger or a regular internet user. This tutorial will give you complete details about Google Accelerated Mobile pages which include Pro and Cons. This will also give you details about how to implement AMP on your WordPress website.
What is AMP?
AMP full form is Accelerated Mobile Pages. It is the Google project which aims the better internet experience on mobile or tablets. Google AMP pages will not load all java scripts and CSS. It will load only limited HTML, CSS and Java Scripts so that the page load will be lightening fast. AMP pages will be hosted on Google cache to give highest possible speed to your web pages. If you want you can read official Google AMP overview article for technical details.
Google AMP project built on three components.
AMP HTML: AMP HTML tags are somewhat different than usual HTML tags. You need to generate completely different HTML code for your website pages just by using AMP HTML tags. So you will be having two versions for your post one is desktop version and the second one is Google AMP version.
AMP JS: AMP JS library makes sure that your website AMP version loads from a single place so that it will give high performance. It will stop loading of unnecessary CSS and java scripts from your website.
Google AMP cache: Google fetches your AMP pages and cache them on their CDN network servers. So when visitor visits your AMP version, Google will load from Google servers. It will load everything like, JS,CSS images from a single place so your visitor will see a very fast loading web page.
How AMP pages will look?

When you search for any keyword in your mobile, you will see AMP symbol for the AMP pages. You will net see any symbol for normal pages. You can check above screenshot for AMP pages appearance in search results.
Sometimes, Google may show thumbnail image in a carousel at the top of search results. There is no guarantee for the appearance of your featured image as a thumbnail. If it appears, you will get high traffic.
You can check below screenshot for how actual AMP page will look.
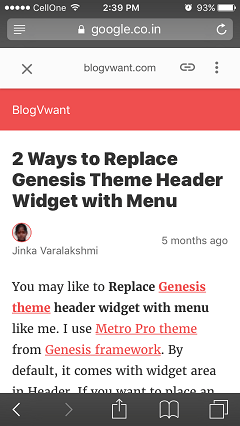
When you click the close button left to your website URL you will go back to search results.
Pros of Google AMP
- It is a Google product, so there is always a chance to get the good ranking with AMP.
- AMP pages will load very fast. You need not do any customizations for improving your mobile website speed. Google is considering page load speed for the SERP ranking. So you will get a good rank.
- You may get good CTR in search results because of AMP symbol.
- Your traffic may improve if your post featured image appeared in a Google news carousel at the top of search results.
- AMP pages load from Google cache so it will reduce your server load.
- Easy to implement Google AMP especially for WordPress.
- Readers will love your blog.
Cons of Google AMP
Google AMP has important problems. Every blogger must consider them. You can avoid most of the below issues by using a free plugin AMP for WP.
- AMP pages will not show your email popup optin forms, sidebar widgets, social share buttons, related posts and much more. So you may loose your email subscribers and you need to lose other things also.
- If you don’t like AMP pages in the future, Getting back to normal pages is not the easy task.
- AMP pages load from Google cache servers. So you are depending on Google. You can not control their server.
- You can not customize AMP pages. Google default format will appear.
- Not every content work on AMP. For example, Google AMP loads text content of your website fast but not videos.
- You will see Duplicate content if you don not set it properly.
- No ads will cause the reduction in your revenue.
- Navigation in your website is the tough task. Because there is no menu.
Should I implement AMP?
When you want to give better user experience, you must go with AMP. Remember, you must lose other features like lead generation, ads, widgets, and much more. I wanted to give better user experience, so I am using Google AMP.
If you don’t want to implement AMP, make sure that your website is mobile friendly. Google always give priority to mobile friendly websites. To generate a mobile-friendly website, You can use jetpack mobile theme feature or WP Touch plugin or responsive themes like Genesis themes.
How to Implement Google AMP on WordPress website?
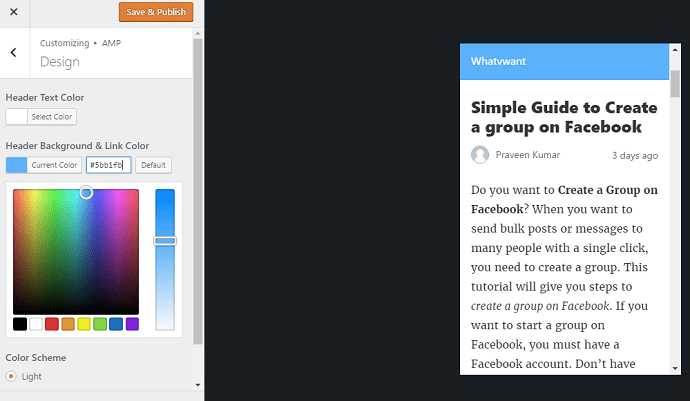
It is very easy to implement AMP on your WordPress website. Just install AMP plugin and activate. It is a free plugin developed by Automattic. It has no extra options other than selecting header text color and header background color. To change them go to Appearance -> AMP.
Update: Now AMP for WP can work without installing AMP plugin. You need not use AMP plugin. I recommend you to use only one plugin AMP for WP.
Video Tutorial:
Do you like to watch a video tutorial, instead of reading a chunk of text? If so, then play this video. Else you can always free to continue with the steps mentioned after the video.
You just need to install the AMP plugin. It is a free plugin developed by AMP Project Contributors. So it is the official plugin to implement Google AMP on WordPress.
Log in to your WordPress dashboard.
Go to Plugins -> Add New. Search with the word AMP.

Install the plugin and Activate the plugin. That’s it you have all done.
This plugin has no settings. You can just change some color options.
Go to Appearance -> AMP. You will see the Design option. Click on that. Just select your required Header Text color and Header Background & Link Color. Click Save & Publish.
How to perform Google AMP Test for Validation errors
After Implementing AMP on your website, it is must to test your AMP pages. If you did not implement AMP properly, your pages might not be crawled by Google. Google has a special tool to validate your AMP pages. And there are some more methods to test AMP pages.
You can perform the test to check whether AMP is working or not. You can also validate AMP pages for errors.
Video Tutorial:
We have explained all 4 ways to test the AMP in this video tutorial below. If you like to watch all methods at once, continue watching the video. Else you can skip the video and continue with the steps mentioned after the video.
1.Check URL by appending /amp
This method will work to check your AMP website appearance. After implementing AMP, just open any of your URL on your desktop browser. Append URL with /amp. You will see AMP version. Check below URLs for the example.
- Desktop version URL: https://blogvwant.com/what-is-amp-pros-cons-details/
- AMP version URL: https://blogvwant.com/what-is-amp-pros-cons-details/amp
When you try the AMP version on the desktop, you will see Mobiles AMP version on your desktop also. It is very useful when you customize your AMP pages using AMP for WP plugin. You can check changes on the live website immediately.
2.Google Validator
Google officially announced an AMP validator tool. Just visit Google validator page and paste your AMP version URL. If you test with normal URL, you will get that your URL is not a valid AMP page. Make sure that you have appended your URL with /amp.
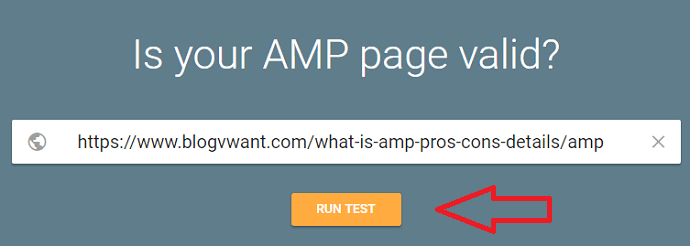
After pasting the URL just hit RUN TEST button. If you have errors, you will see errors. Otherwise, you will see a screen shown below.
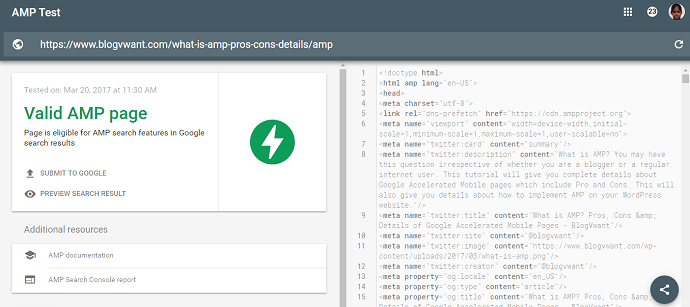
You will see three main options at the left side.
- Preview search results option will show your page appearance in mobile search results.
- SUMIT TO GOOGLE option will submit your page to Google crawler immediately.
- AMP Search Console report will return you to your Google webmaster tool and it will show you errors if you had.
3.Google HTML validator
There is another validator page from Google which checks for your AMP version HTML code. Just visit AMP project Validator page. Paste your AMP version URL and click Validate button.

You will see test results at validation status as Pass or fail.
4.Use Google webmaster tool
Google webmaster tool has an option to see AMP results. Login into your Webmaster tools. Select your preferred domain. Go to Search Appearance -> Accelerated Mobile Pages. This section will show you errors on your AMP pages if they had.
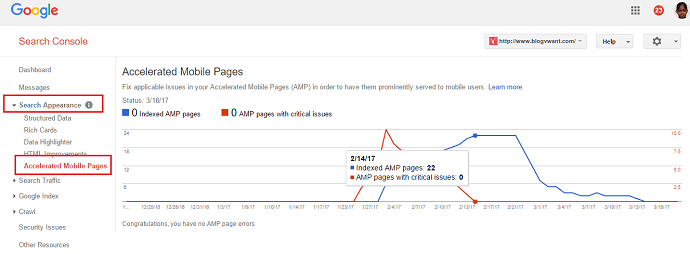
Remember, webmaster tool section will not show AMP pages reports immediately. If you activate AMP now, you need to wait at least one or two days to see results. You can regularly check this section for your AMP errors.
If you perform any one of above tests, you may probably get structured data errors. Just use AMP for WP plugin. It is a free plugin which gives you an option to set structured data logos and many options like showing ads, related posts, comments, social share buttons, etc.,
How to Track AMP pages?
You can not track AMP pages with existing Google analytics tracking code. Create a separate property for your AMP website and place tracking code in your AMP pages. You should not place entire tracking code in the header of AMP pages. Google has defined the separate procedure to place analytics tracking code.
Create a new property for AMP in Google analytics
First, you need to create a new property in your Google analytics.
Login into your Google Analytics dashboard. Select Admin from the left menu. Select your account. Click drop-down at PROPERTY option. Select Create New Property.
Fill all the required fields and select Get Tracking ID.
Note down your tracking code which is like UA-123456-1
Now you have created your property. You need to add this to your AMP pages.
1. How to manually add Google analytics to AMP pages
Video Tutorial:
In this method, you need to make changes in the AMP plugin PHP code. You should watch the video tutorial in order to avoid any mistakes. If Any thing goes wrong your amp plugin may get crashed. It is best to follow a video tutorial. For your convenience, we have also mentioned steps after the video.
You need to edit the AMP plugin template file.
Go to Plugins -> Editor. Select AMP from the drop-down at the top right and click Select.
Select amp/templates/single.php file
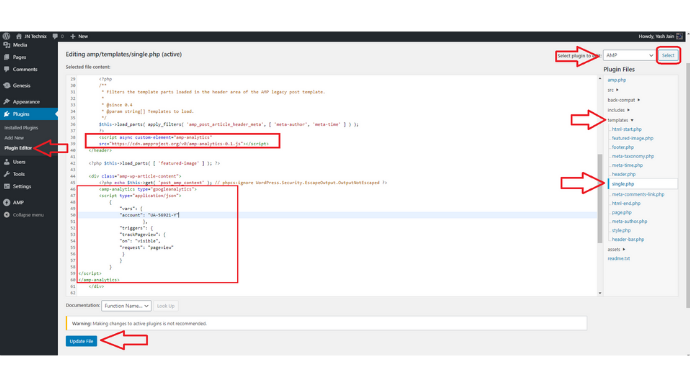
Now you need to place two codes, one is at the end of the header section and the second one is at the end of the “amp-wp-article-content” class tag. You will get those codes from This Google support topics also.
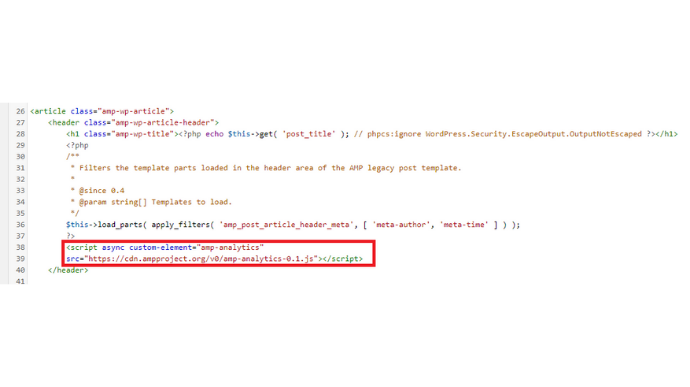
Copy the below code and paste it in the head section.
<script async custom-element="amp-analytics"
src="https://cdn.ampproject.org/v0/amp-analytics-0.1.js"></script>
You can check the below screenshot for the exact placement.
Copy the below code and paste it at the end of the “amp-wp-article-content” class. Check the below screenshot for the exact placement details. Before placing the below code, replace UA-XXXXX-Y with your Google Analytics tracking code.
<amp-analytics type="googleanalytics">
<script type="application/json">
{
  "vars": {
    "account": "UA-XXXXX-Y"
  },
  "triggers": {
    "trackPageview": {
      "on": "visible",
      "request": "pageview"
    }
  }
}
</script>
</amp-analytics>
You can check the below screenshot for the exact placement.
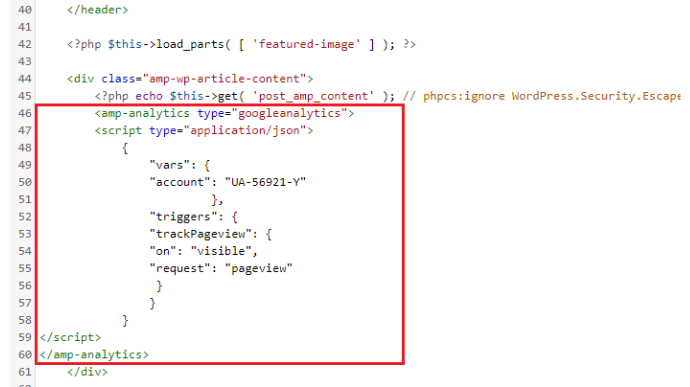
Update the file. Now you can track your page views in Google analytics.
2. How to add Google analytics to AMP pages using a plugin
You can use WordPress plugins to add analytics tracking code. You can use Glue for Yoast SEO & AMP plugin. It will give some customization options along with an option to place an analytics code. But my choice is AMP for WP plugin. Because it will give many customization options like adding social share buttons, comments, related posts, menu, search options, and much more.
Install and activate the AMP for WP plugin.
You will see the AMP option on the left menu. Open that one. Select the Analytics option in the left menu. Paste your analytics tracking code and Save changes.

You can also change other options as you like.
If you want to check that your tracking code working or not, just open any one of your website URLs by appending with /amp in your web browser. Just like,
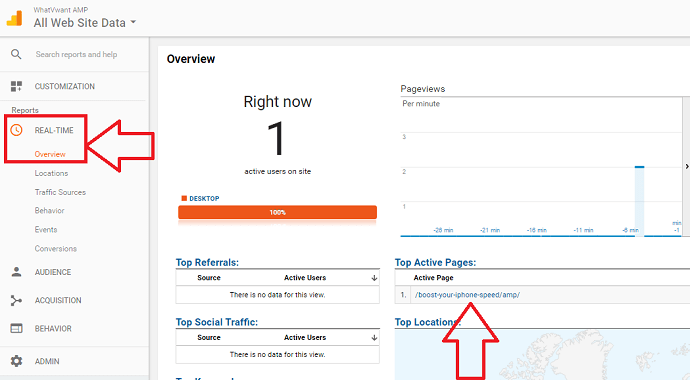
Now open your Google analytics. Select your property. Select Real-time and Overview option you will see your opened page under active pages.
Complete Guide to Customize Google AMP on WordPress Using AMP for WP?
The Basic AMP plugin will not give you many options. But AMP for WP plugin will give you many options to customize AMP. It works even without installing the AMP plugin. This is a free plugin which gives you options to add ads, sticky social share buttons, comments, related posts, menu, search option, and much more.
Video Tutorial:
AMP for WP plugin has a lot of settings to configure. We recommend watching a video tutorial to follow step by step process. But no problem if you are in hurry, you can skip the video and continue with the steps mentioned after the video.
Just download, install, and activate AMP for WP plugin. It is a free plugin. You can install it from the WordPress dashboard also. This plugin will give you many options with the free plugin. If you want more options like placing ads within the content, star rating, DFP, woo-commerce, comments forms and much more you can use AMP for WP extensions. Here I am showing you details about some of the important options which must be configured before using the AMP website.
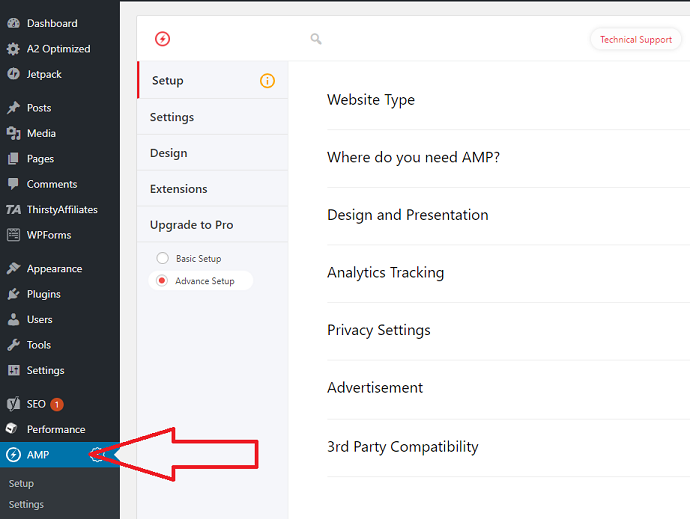
You will see AMP option in the left menu. Click on that you will see all available options.
Setup
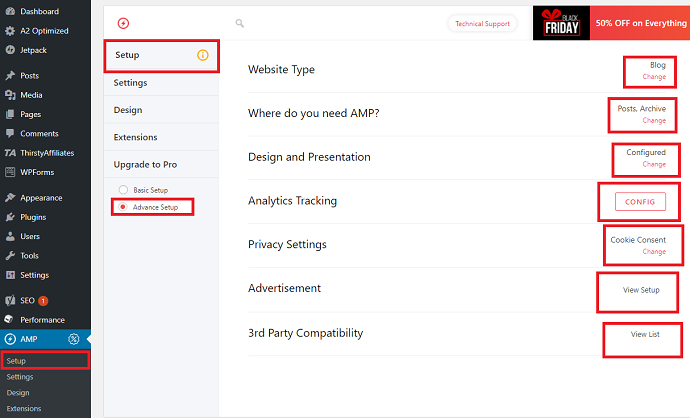
After navigating to the AMP for WP settings, make sure to click on the advance setup as shown in the screenshot below. This will expand all the options. First, configure the settings mentioned besides the setup tab.
Setup > Website Type
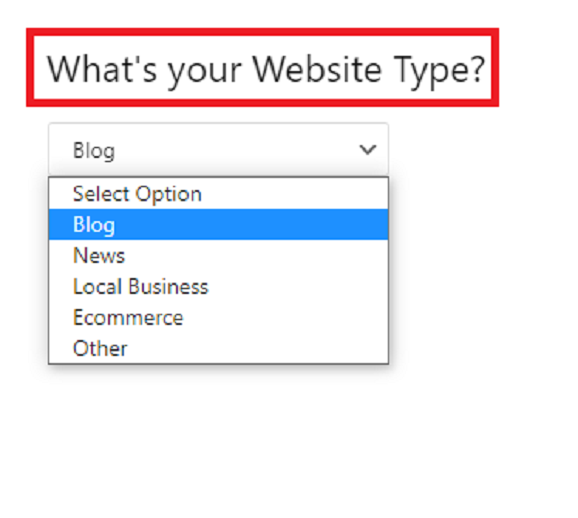
In this, you need to specify your website type from the given available options including Blog, News, Local Business, eCommerce, and others.
Setup > Where do you need AMP?
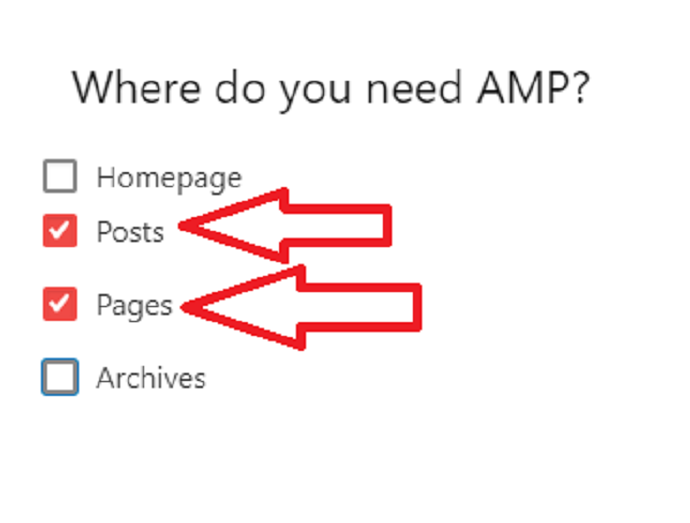
From this option, you can specify where you want to apply the AMP version. It has 4 options: Homepage, Posts, Pages, and Archives. We recommend only check Posts and Pages. Usually, nobody likes to apply AMP on the homepage and archive category pages.
Setup > Design and Presentation
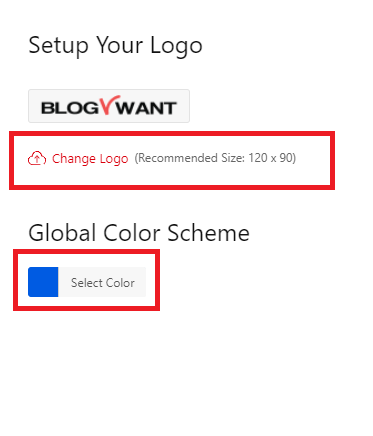
In this section, only two options are there to configure. First set your logo and define the global color scheme. The recommended size for the AMP logo is 120*90 pixels. You can easily resize your original logo with any tool such as Microsoft paint or by canva.com.
Setup > Analytics Tracking
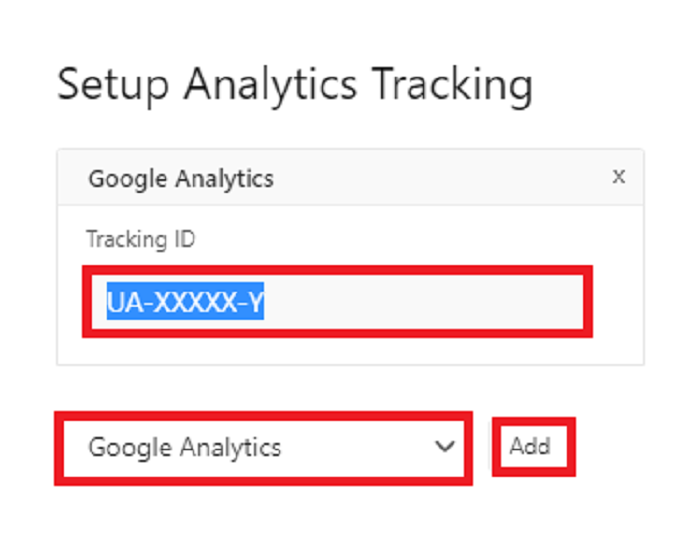
This section will help you to add Google analytics code to your AMP pages. It is must to track AMP pages. For that, you need to create a separate property for your website AMP version in Google analytics. Note down your tracking ID which is like UA-123456-1.
Go to Analytics option, paste your Google Analytics tracking code and save changes.
Setup > Privacy Settings
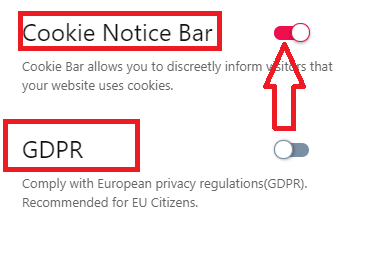
Under privacy settings, you can enable the cookies notice bar or GDPR bar. Remember you can only enable one notice bar at a time.
Setup > Advertisement
We will configure AMP advertisement settings in the later section.
Setup > 3rd Party Compatibility
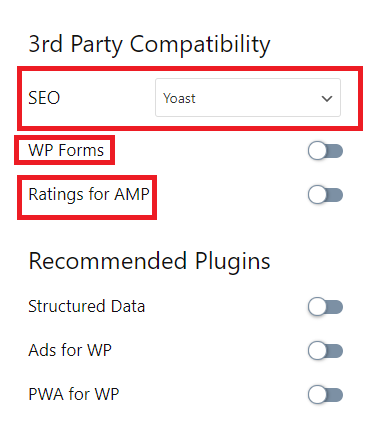
In this section, you can configure the SEO plugin with the AMP and other important plugins including WP forms, Ratings for AMP. Under recommended plugins, you can also set up other plugins such as Structured data, Ads for WP, and PWA for WP. I am selecting Yoast SEO under the SEO plugin. If you are using a different SEO plugin on your website for example Rankmath then you can select it from the drop-down box.
- Related: What is an SSL certificate? How a Blog Gets Benefit from it
- How to enable free SSL certificate on Siteground server
Settings
Next move forward to the settings tab.
Settings > General
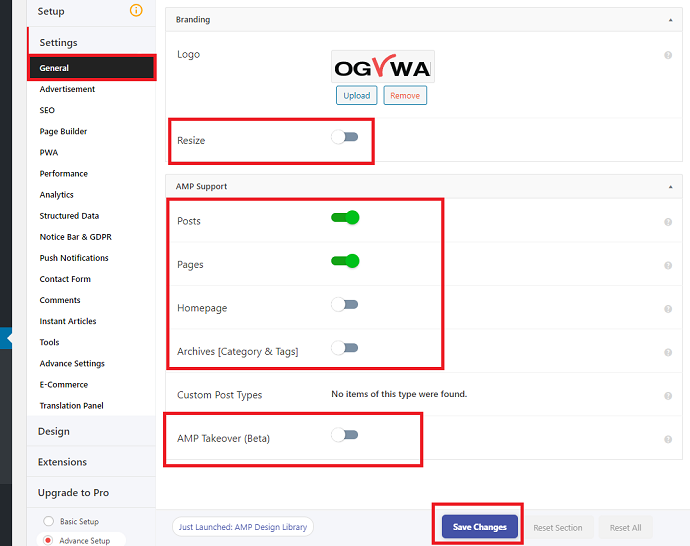
Under general settings, you can find some options as you already configured in the setup tab such as Logo, enable AMP on a post, pages, and Homepage. If you have already configured these options in the setup tab then you don’t need to reconfigure again. However, you may see an option called “AMP Takeover” if you enable this option, both AMP or Non-AMP pages will be load in the same design. We do not recommend you to enable this option.
Settings > Advertisment
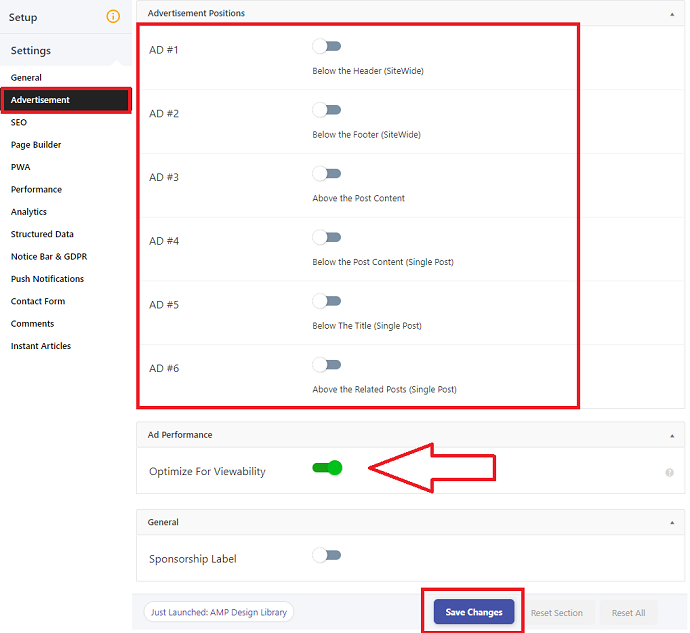
This section is very important for users who want to place AdSense or other advertisement network ads on the AMP website. AMP for WP makes life easy by providing a simple way to place ads on the AMP website without manual coding. There are a lot of places on which a user can place ads for example below the header, below the footer, etc. For example, when you enable ads on any of the given positions you need to enter the “Data AD Client & Data AD Slot” code. Then don’t forget to switch on the “optimize for viewability” option. This will improve the loading speed of the ads on the AMP website.
Settings > SEO
Although you have already configured the SEO settings in the above section, here you can find more options which you might like to configure for example you can add additional HTML into the Head section.
Settings > Page Builder
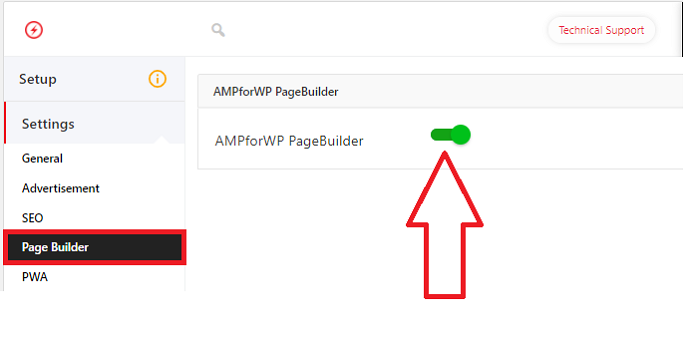
AMP for WP offers users an easy to use drag and drop page builder which is available on the post editor. This is helpful when a user wants to design a custom AMP design for a particular post rather than using pre-built AMP layouts. The AMP for WP page builder supports a variety of modules including contact forms, video, slider, map, lists, etc. Make Sure to switch on the AMP page builder feature.

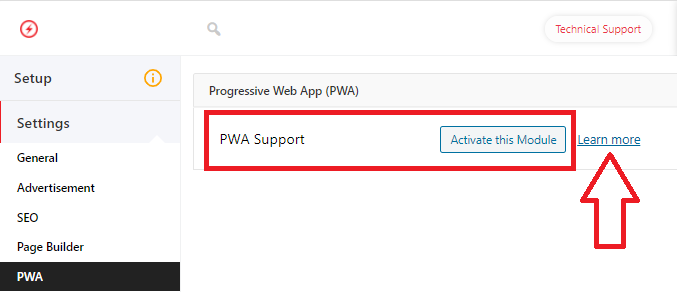
Settings > PWA
AMP for WP plugin also supports PWA (Progressive web apps) technology. Basically this technology converts your website into a web app, and with the AMP support, all the content in that web app will be loaded into AMP version. For a beginner, you should not enable this module. However, you can learn more about PWA by tapping on the learn more button.
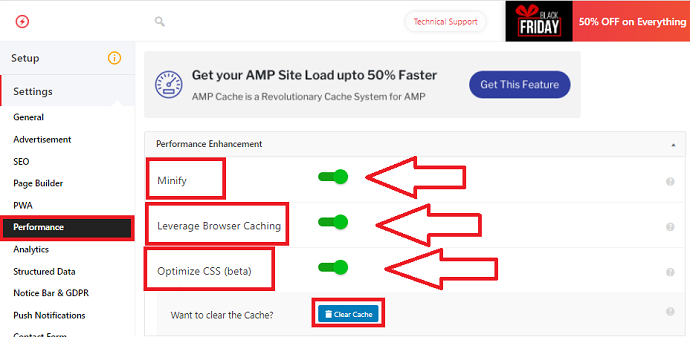
Settings > Performance
Do you want to enhance the speed of the AMP pages of your website? Then this section is for you. All the options mentioned in performance settings should be enabled. After enabling the browser caching and minify feature you can check the AMP page speed score in google page speed insights, it must be 85+ for both mobile and desktop devices. Also, don’t forget to press the “clear cache” button after turning on the performance enhancement functions.
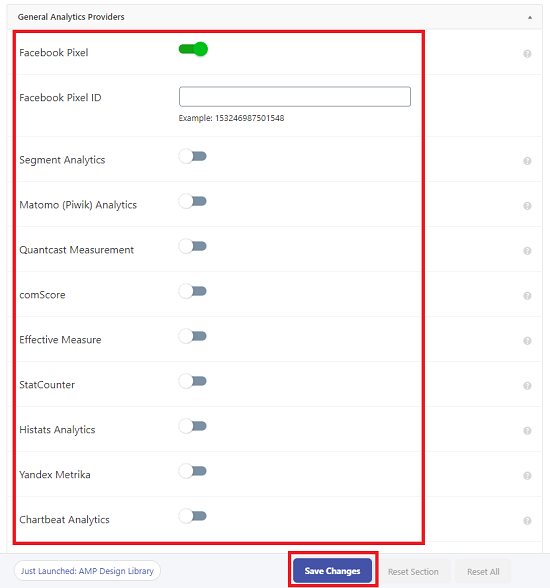
Settings > Analytics
As you know we already covered analytics configuration in the setup section, but you get more options here in this analytics section. Under this, you not only configure google analytics but also integrate other analytics services with your AMP website including Facebook pixel, Quantcast measurement, Alexa metrics, etc. Whichever analytics you want to integrate with the AMP, just turn it on then enter the tracking code and you’re good to go.
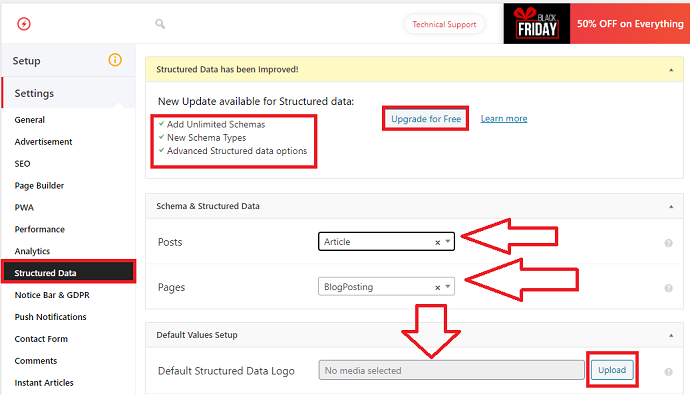
Settings > Structured Data
In a free AMP for WP plugin, you can configure or apply 1 schema markup to posts and pages. For more than one structure data you can upgrade to the pro version. Also, you can set a logo which will appear in the google structured data.
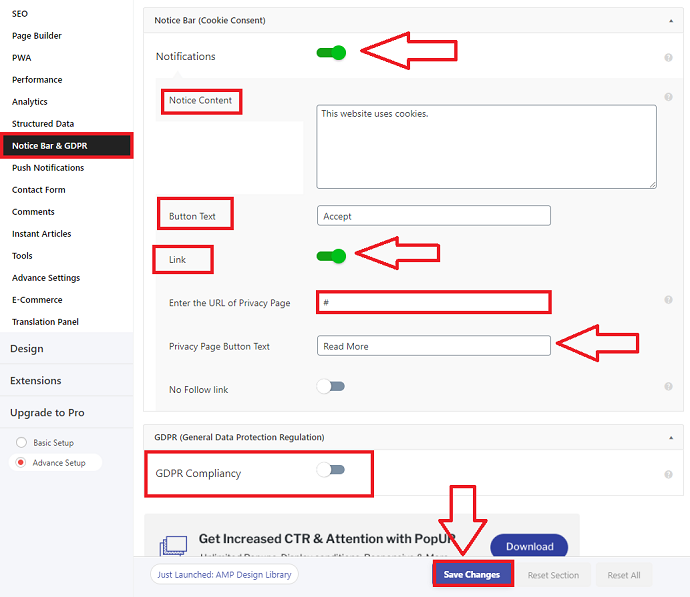
Settings > Notice Bar & GDPR
In the above section, you must enable or disable the cookies bar and GDPR bar. Now in this section, you can customize the cookies bar content, box text, and add a link to the detailed privacy disclosure page. Also, if you want to enable the GDPR bar instead of the cookies bar, just switch on the GDPR switch and then customize the headline text, accept button text, and reject button text.
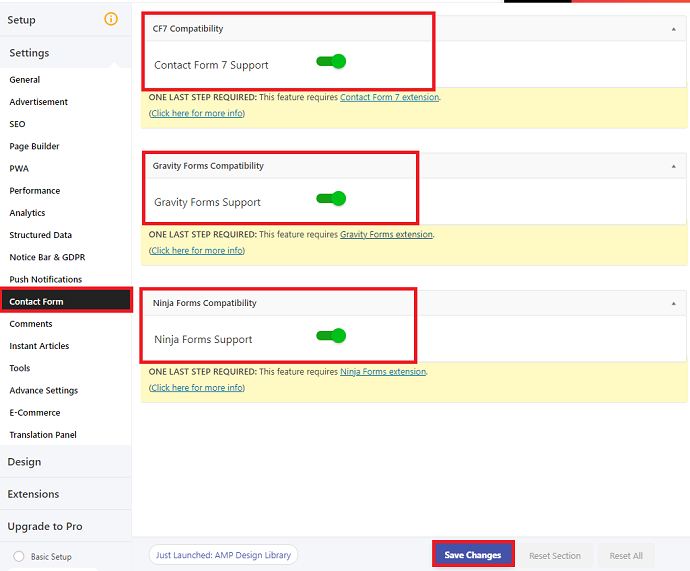
Settings > Contact Form
AMP for WP plugin provides a contact form support in the AMP pages. It supports major contact form plugins including Contact Form 7, Gravity Forms, and Ninja forms. You must have installed the contact forms extensions before adding in the AMP.
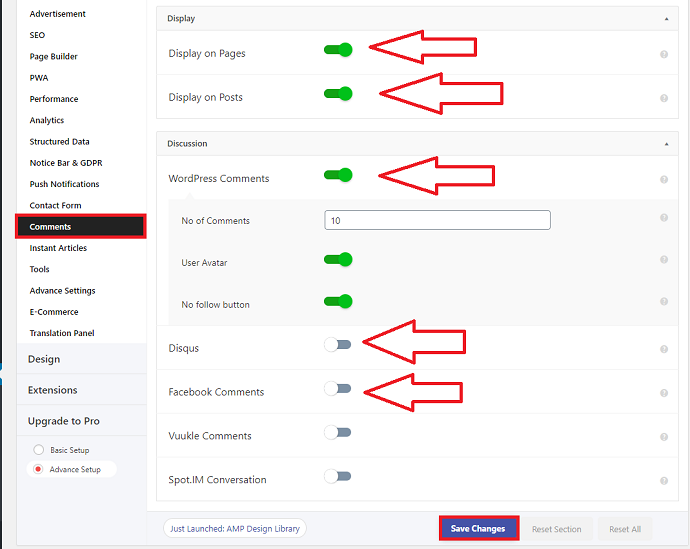
Settings > Comments
In the comments section, you can easily disable or enable comments on the pages and posts. AMP for WP plugin not only supports WordPress defaults comments but also have the option to include Disqus comments and Facebook comments.
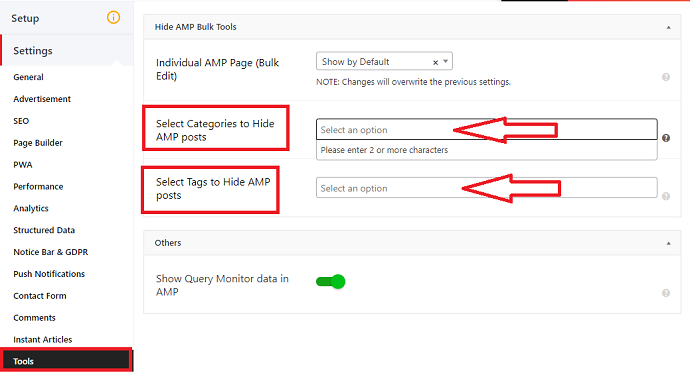
Settings > Tools
Under the tools section, you can specify the categories or tags on which you want to hide the AMP view. Just type the category or tag name, it will automatically search and then press enter.
Settings > Advance Settings
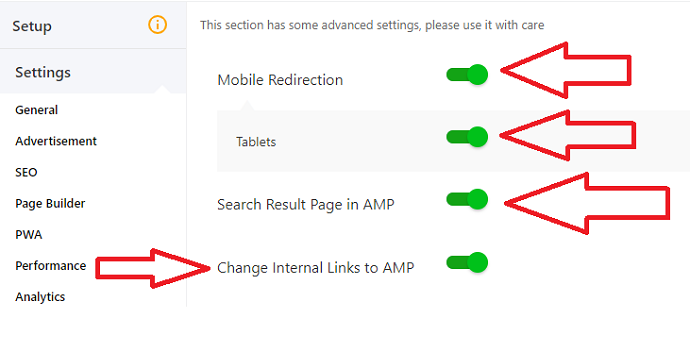
Under this section, you will see a lot of advanced settings but as a beginner, only a few options are relevant and require change. First enable mobile redirection, Enabling the Mobile Redirection option will convert your entire mobile website to the AMP version. Then it is a must to enable the “search result page in AMP” option, by enabling this option your website content will appear in AMP mode in the search engine. Then enable the “change internal links to AMP” option.
Settings > Ecommerce
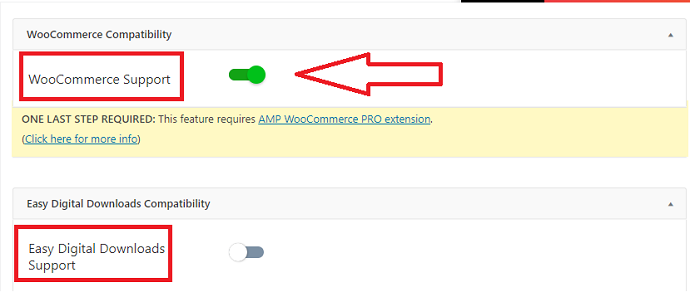
AMP for WP plugin has totally compatible with WooCommerce and Easy digital downloads plugin. By installing these external extensions you can create, sell, and display products through AMP pages.
Settings > Translation Panel
The name defines it all. In this section, you can change or define the name for various AMP fields including 404 error page message, Related post text, Recent posts text, footer text, comments text, etc.
- Related: 2 Ways to Add Google Analytics to AMP pages
- 4 Ways to perform Google AMP test or Validation for Errors
Design
Now, this is the most crucial section a user needs to configure in the AMP for WP plugin. Under this, we configure the design and appearance of the AMP pages. Still, there are a lot of options we need to configure, so follow me!
Design > Themes
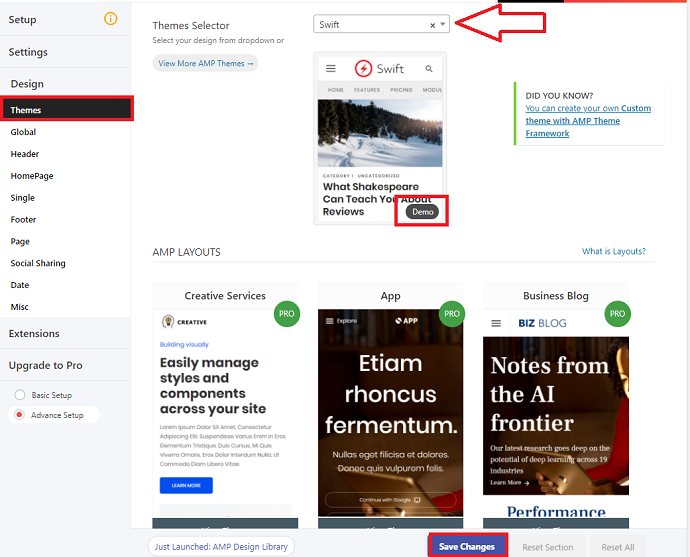
Under design, the first section is the theme. AMP for WP has some professionally designed AMP templates that can enhance the look and feel of your AMP pages in a single click. However most themes are paid, but for smaller sites, we prefer to choose a free theme swift from the drop-down menu. Also, you can click the demo button to first see how the theme will look like and then tap on the save changes button.
Design > Global
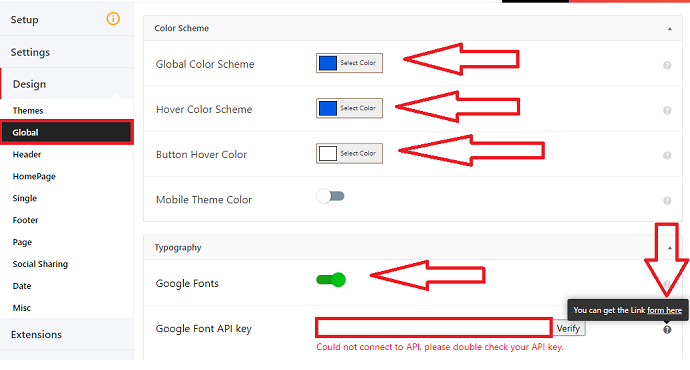
In the Global design section whatever you make changes will apply to the whole AMP website. The first section is
Color Scheme:
- In the global color scheme, you can set the color for the title and anchor link.
- In the hover color scheme, choose a color for hover on links and title.
- In the button hover color, choose a color for hover on the buttons present in the AMP pages.
Typography:
The AMP for WP plugin supports google fonts. To use google fonts, you first need to enable google fonts and then enter the API key. To generate an API key, click on the question mark symbol located in the right corner.
General:
In the general tab, you have the option to add sidebars on the AMP website. After enabling the sidebar, specify where you want to add the sidebar including homepage, single (posts), and pages.
Advanced:
Under advanced tab, you can enter custom CSS code or additional CSS code which will directly impact on the AMP design.

Design > Header
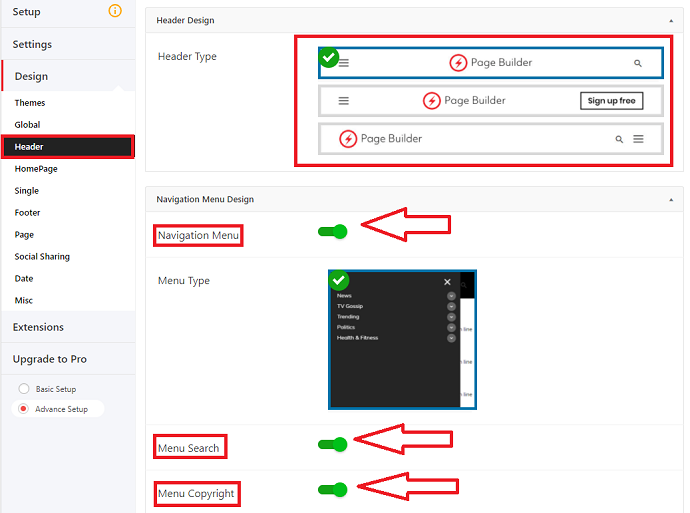
In an AMP header created by AMP for WP plugin, you have a lot of options to configure such as header design, menu design, etc. Consider the below points and make changes to the header section.
- First, specify the header type from the 3 available designs
- Then if you want to add a navigation menu in the AMP make sure to switch on the navigation menu. Then enable menu search to add a search box and then turn on the menu copyright button to add a copyright bar in the Menu.
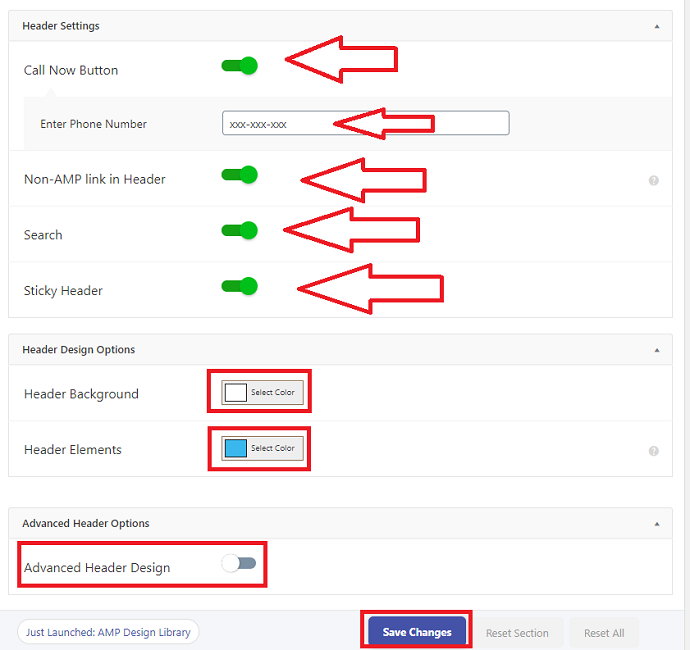
- Then Under header settings, switch on the call now button to add a phone number in the header. Then make sure to enable “Non-AMP link in header”. After that switch on the search button, this will also add a search box in the AMP header. Lastly, turn on the sticky header which makes your header stick to the place.
- In the header design tab, you can change the header background-color as well as header elements color.
- AMP for WP also has advanced header options, in which you can adjust header width, height, padding, menu color, border color, etc.
Design > Homepage
In the setup section, we have disabled the AMP on the homepage. So Leave homepage settings as it is. It is recommended to disable AMP on the homepage.
Design > Single
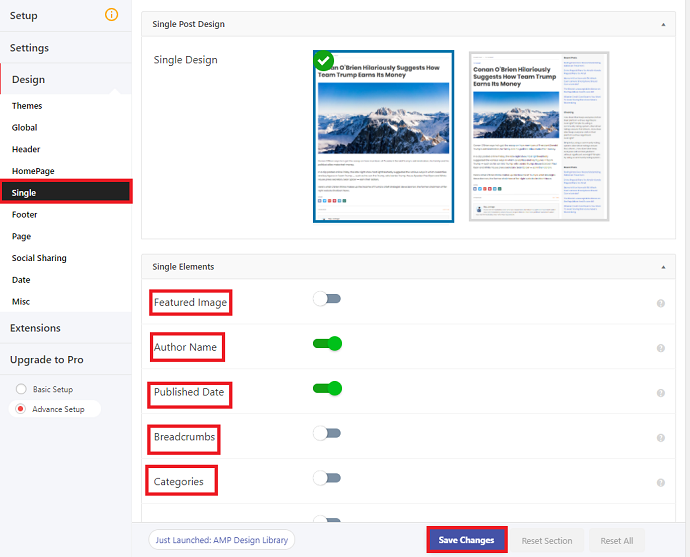
After theme design, this is the second most important section. In this, you can design and configure the appearance of the AMP post. In this, you can enable/disable a featured image, author name, published date, Breadcrumbs, categories, tags, excerpt, author bio, author name, author description, recent posts, related posts, etc. If you have used WordPress editor previously, then these options can easily be configured. There is not rule to follow here, you have full freedom to switch any option here according to your AMP design preference.
Design > Footer
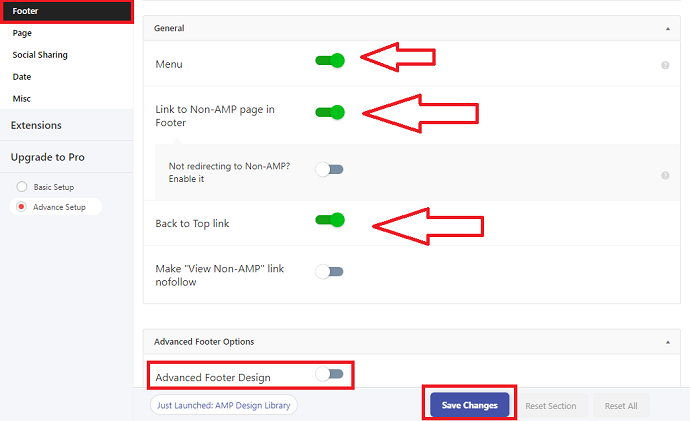
Now from this section, you can design the footer of the AMP pages. You can add a menu, link to Non-AMP mode as well as back to top button. Then in the advance footer section, multiple settings are available such as footer text color, link color, background color, font size, menu position, etc.
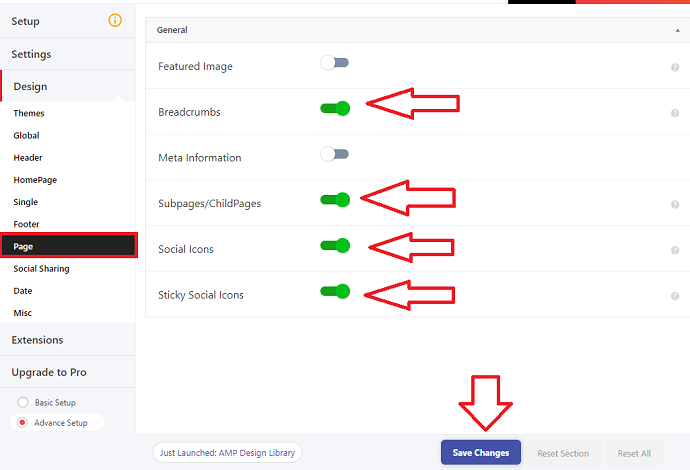
Design > Page
Just like an AMP post design, here you can configure the design for AMP pages. We do not enable AMP on our website pages. So we keep all the options off. But for the information, you can keep these options on. If you are confused about what these options are just hover on the question mark.
Design > Social
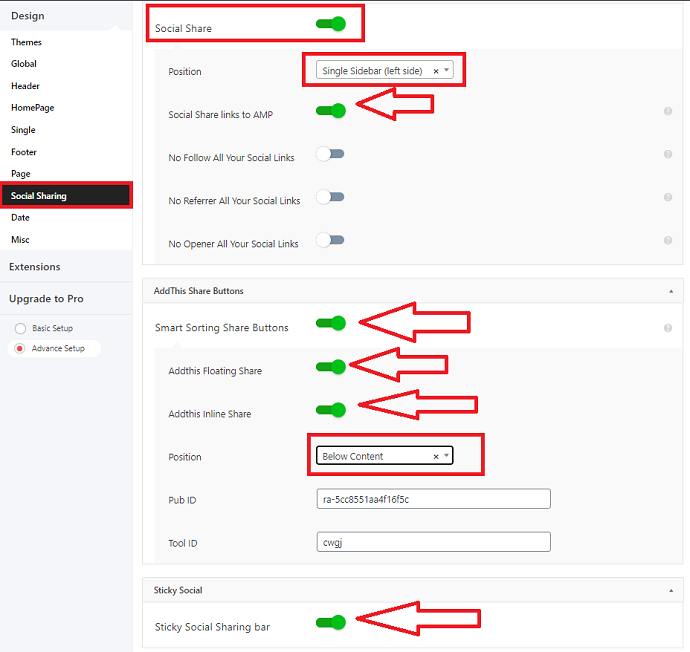
This section will give you an option to control social share networks. You can enable or disable available networks. After configuring social share buttons positions, Make sure to turn on these options:
- Social share
- Social share links to AMP
- Smart share buttons
- Add this floating share button
- Add this Inline share button
- Sticky social sharing bar
And then under the social sharing section, you can turn on the social sharing buttons for given social media platforms including Facebook, Twitter, Pinterest, WhatsApp, etc.
Then don’t forget to enter links of the social media pages/profiles under “Social media profile links section”.
Design > Date
Under the date section, you can specify how date and time will appear on the AMP post and pages.
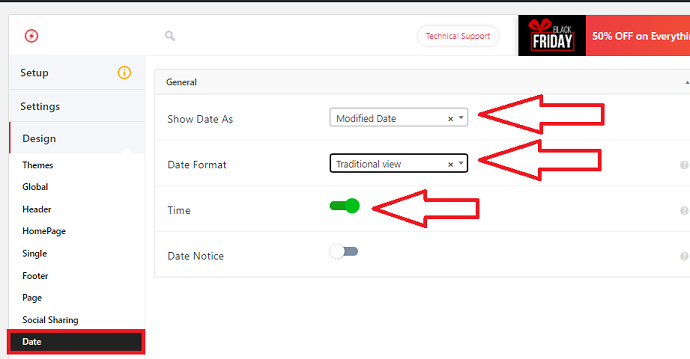
After configuring date settings, only miscellaneous and extensions settings are left. Leave miscellaneous settings unchanged and from the extension section, you can expand the functionality of AMP for WP plugin by purchasing the given extensions.
I think now you may know details about What is AMP? and its features. If you are using it, please let us know through the comment section. Please consider sharing this article. Want more blogging tips, follow BlogVwant on Facebook and Twitter.
