Are you facing problems to enable GZIP compression on a WordPress Site? Are you looking for the right .htaccess code? Whether it is GTMetrix or Google PageSpeed Insights, no one wants to see the speed-related errors and warnings in website speed testing tools. By making your website GZIP compression friendly, you not only improve the website speed but can see a significant improvement in the search engine rankings.
In this article, you will learn a lot about HTML compression, the GZIP compression implementation process, and much more. We will show you the 4 best methods to enable GZIP compression. Whether you want to do this automatically or like to dive into the manual coding way, the choice is yours. Both solutions are available.
Let’s start with a short overview.
What is GZIP Compression? – The Meaning of GZIP Compression Explained with Example
GZIP or say GNU zip format is the HTML compression algorithm used to compress the world wide web content before it is sent from the server. GZIP comes after the deflate algorithm with the better compression results and hence, it becomes the widely used compression algorithm among servers.
GZIP is not rocket science. You can easily understand the diagram below. In easy language, the task of the GZIP algorithm is to examine the webpage HTML code and look for similar strings. When it finds similar strings, then it will be compressed into shorter references which is a result of lesser code.
If we want to describe a GZIP compression algorithm in one line: It is the technique of representing information in fewer bits.
In the given example below, you can see there are 12 closing div tags which equal to 72 characters. “A” represents uncompressed data. But when this string goes into the GZIP compression, it will be reduced to 14 characters in total.
After GZIP compression, Upon user request, the server will send the compressed data to the browser which will again be decompressed by the browser before provided to the users.
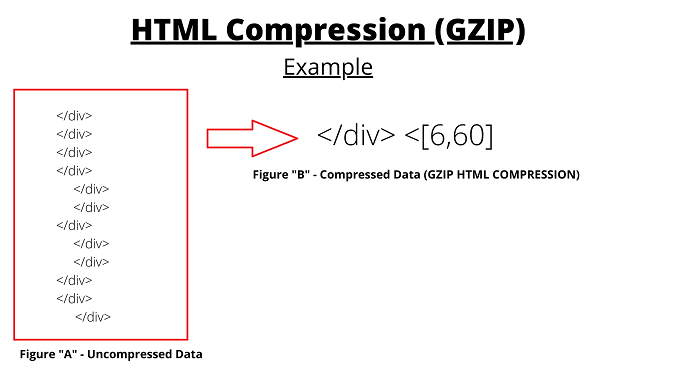
This is just a simple explanation for demonstration, but when we apply the GZIP compression to the whole webpage which consists of all types of tags such as images, styles, body, href’s, JS, etc. You will notice a huge improvement in the website loading speed.
GZIP Compression Vs Minification: Are they Same?
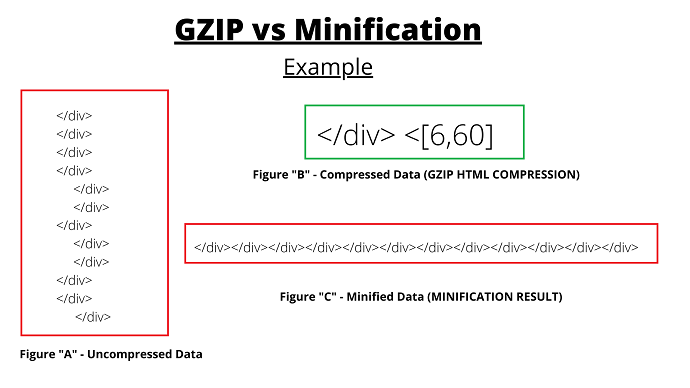
The goal of the GZIP compression & minification process is the same, i.e to improve page speed. However, their working, as well as compression level, are totally different.
You may hear about the term CSS minifiers or JS minifiers in WordPress. But the job of these minifiers or minification technique is different from HTML compression algorithm like GZIP.
The minification technique helps to eliminate the unwanted characters within the code to make the code appear neatly and readable to humans. It eliminates indents, spaces, line breaks, comments, empty lines, etc. Ultimately after eliminating such characters, the file size will reduce, and hence page speed is improved.
Consider the above example, when we apply the minification instead of GZIP compression, the final string we have left after deleting the line breaks, indents, space, etc can be shown in the diagram below. You can clearly see a huge difference in character count or file size reduction.
Note: Both GZIP compression and minification can be enabled on the WordPress website with a single plugin. Example WP-Rocket.
GZIP Compression: Proof
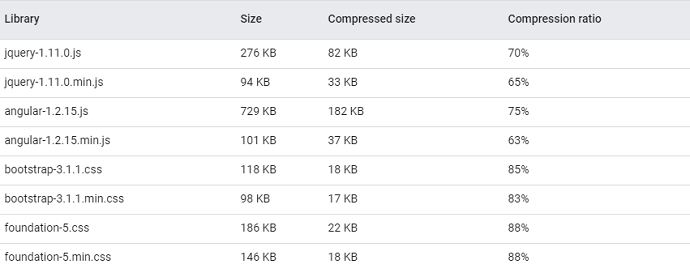
What would be a better proof than provided by Google itself? The Google Developers had mentioned in their report that with GZIP compression, the CSS frameworks and JavaScript libraries can reduce up to 60-80% from their original size. You can clearly see this in the table below.
However, Google developers have also stated that images or videos which are using other compression algorithms will not produce lesser size after being compressed again by the GZIP algorithm.
When to use GZIP compression algorithm?
There could be many possible reasons when you must think of applying the GZIP compression on your WordPress website. Some of them are:
Running on Shared Hosting:
Needless to say, but if your website is operating on the shared hosting plan, the first thing you need to do after configuring WordPress is to set up a caching plugin that supports both browser caching and GZIP compression. Example WP-Rocket.
Because in shared hosting plans the server is capable to handle much lesser requests as compared to dedicated hosting plans. And when you run a gigantic website on shared hosting without HTML compressions, the loading time will have gone much higher.
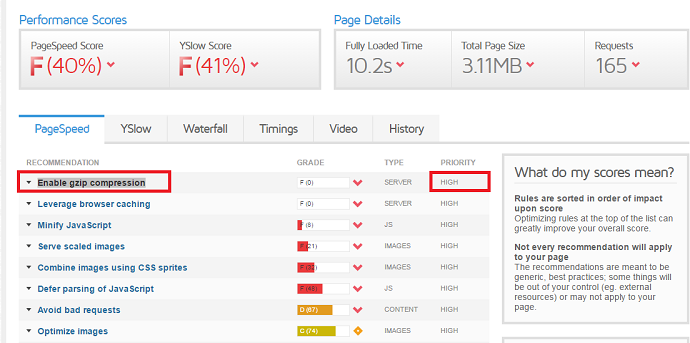
Scored less on Speed Testing Tools:
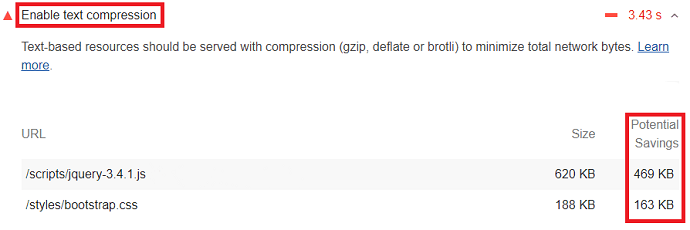
Your website speed score might be in trouble due to the disabled compression. Every speed testing tool such as Google PageSpeed Insights, GTMetrix, and Pingdom will show the warming if the user doesn’t optimize their site with the HTML compression techniques such as GZIP.
To avoid errors such as “enable text compression” and “enable gzip compression”, the user must apply HTML compression on its website.
- Also Read: How to Compress Images on WordPress Website
- 2 Ways to Leverage Browser Caching of Static Assets
What are the Best Ways to Enable GZIP Compression on WordPress Website
To enable a GZIP compression on a WordPress website, there are 3 popular ways available on the internet.
- Using a Hosting server that offers HTML compression by default in their plans. Example Kinsta and Rocket.net
- Using a WordPress plugin that handles the GZIP compression task automatically. Example WP-Rocket
- Using the manual approach
In the next section, we are trying to explain all methods thoroughly, so that you can easily pick out the best one according to your preference and finally implement the GZIP compression.
Method 1: Using Kinsta Hosting Server
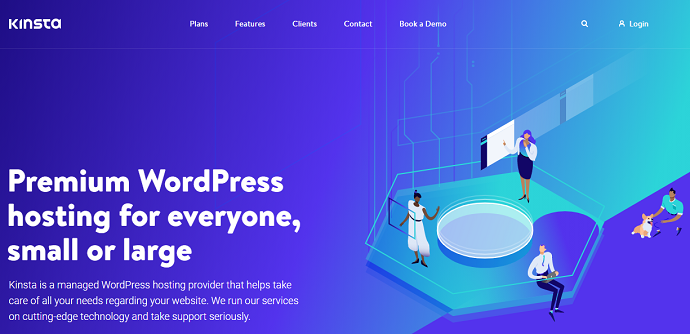
Kinsta hosting server includes GZIP compression by default in their managed hosting plans. Since 2013, Kinsta has been serving power to the websites. Apart from the GZIP compression, Kinsta is using the Google cloud platform and offers KeyCDN services in their hosting plans which again takes your website speed to the next level.
When we talk about GZIP compression, Kinsta states that a user doesn’t need to install any caching or HTML compression plugin to optimize their WordPress website.
This support of the Kinsta Hosting provider will automatically reduce the manual work of installing external site optimization plugins.
Finally, to implement the GZIP compression with this method, you only need to change or migrate your website to the Kinsta Managed hosting server started from only $30 per month.
Method 2: Using Rocket.net Hosting Server
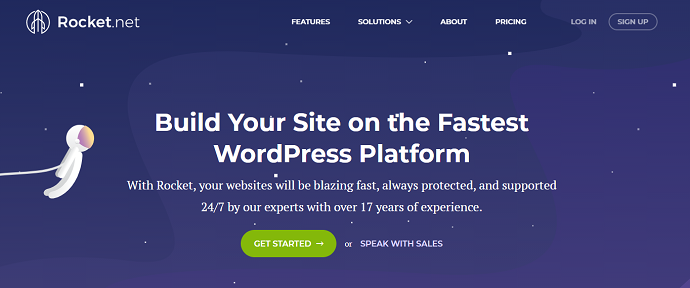
Rocket.net is the second managed hosting server in our list that featured HTML compression by default in their servers. Instead of optimizing the WordPress website with the GZIP compression algorithm, Rocket.net servers are fully optimized with the Brotli compression algorithm.
Rocket.net is really amazing WordPress managed hosting platform that gives you Cloudflare enterprise plan for free. You can read Cloudflare free Vs Pro Vs Business Vs Enterprise.
By the time of writing this article, this website is hosted on Rocket.net. You can read our complete review about Rocket.net.
By migrating your WordPress website to the Rocket.net managed servers, you don’t need to implement the GZIP compression at all.
Rocket.net is one of the rarest hosting providers which supports Brotli compression and also includes other benefits for users such as free access to Cloudflare Enterprise services, Cheapest managed hosting plans, etc.
In Rocket.net managed hosting, the user doesn’t need to install any site optimization plugin. Rocket.net is providing automation support for compression, caching, image optimization, minification, etc.
The main reason to go for Brotli based servers than GZIP is the higher compression ratio. In the case of Brotli, you will find better-compressed data than the GZIP. But when we talk about compression speed, the GZIP algorithm is ahead of Brotli.
Related: Kinsta vs Rocket.net detailed comparison
Method 3: Using a WP-Rocket Plugin
WP-Rocket plugin is the savior for users who want to enable a GZIP compression with a plugin without editing the .htaccess file manually. WP-Rocket plugin is the fantastic and cost-efficient WordPress plugin that optimizes your website in a way like no other plugins could do.
W3 total cache, HummingBird, WP fastest cache, and other free site optimization plugins are nothing when we compare with WP-Rocket.
To implement a GZIP compression on a WordPress website with the WP-Rocket plugin, you only need to do one thing: Install and activate the plugin. No manual configuration is required. Even you cannot able to find the GZIP compression option inside WP-Rocket settings. Everything is fully automated.
By installing a WP-Rocket Plugin all site performance warnings and errors can be avoided that are showing in tools like Google PageSpeed Insights and GTMetrix.
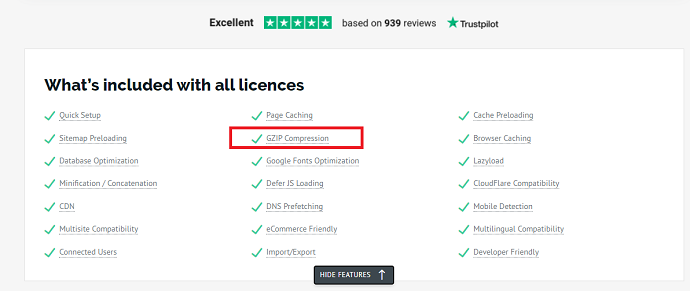
WP-Rocket Plugin other features:
- Automatic GZIP compression
- Easy and fast setup
- Minification
- Sitemap Preloading
- CDN Integration
- Page Caching
- Google Fonts Optimization
- Defer JS Loading
- Cache Preloading
- Browser Caching
- Lazy load
- Cloudflare integration
- Much more
Method 4: Using the Manual Approach
The manual method is the only method of enabling GZIP compression in which a user doesn’t need to install any third-party plugin or upgrading the hosting service. GZIP compression can be possible by adding a few lines of code in the website configuration file.
Warning: Before attempting any change to the website configuration file, you must backup your WordPress website. If by chance something goes wrong, your website will be crashed and become dead.
Things You Need Before Implementing the Manual Coding Method:
Before implementing the manual coding method to enable GZIP compression on a WordPress website you must know these 5 things:
1. cPanel Access: Ask your hosting provider, if you do not have one. To add the programming code in a website configuration file, you first need to get cPanel access.
2. Server type: Getting to know the right server type will directly affect the success of GZIP compression. Most websites are operating either on the Apache server or NGINX server. Some of the rarest ones are running on the IIS server. The instructions for GZIP compression to follow are varied with each server.
How to find the server type your website is running on?
To find the server type your website is running on: follow the steps mentioned below.
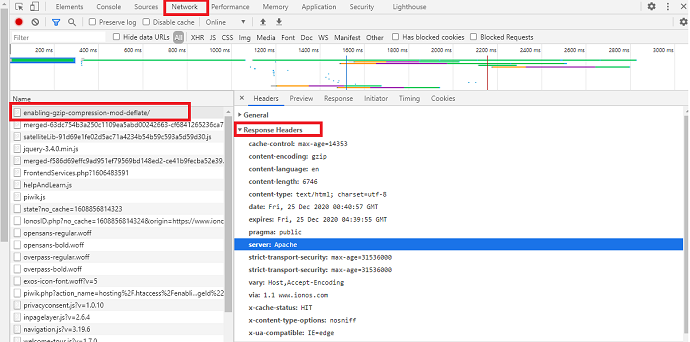
Step 1: Open up your website in google chrome. Open the Inspect element window and go to the Network tab.
Step 2: Refresh the network tab by pressing ctrl + R and click on the top main document file and locate the server name under response headers.
3. Configuration file: The configuration file is the file where you need to add a line of code to enable GZIP compression. If the website is running on an Apache server, you need to edit the .htaccess file or if the server is NGINX then your configuration file would be named as “nginx. conf”. Always remember, you need to place the GZIP compression code after the last line.
4. Configuration file location: After getting know about the right configuration file (.htaccess or nginx.conf), you need to find their location in the cPanel > File Manager. Generally .htaccess file can be located in the public_HTML directory. And nginx.conf file can be found in the server location: /etc/nginx directory
5. GZIP Compression codes: The lines of code to be added in the configuration file varies with its type. Codes for the .htaccess file and nginx.conf are mentioned below.
Note: Below you will see two sets of lines of codes for the .htaccess file. First, try the general .htaccess code. If it won’t work then go for the Apache .htaccess code.
<ifModule mod_gzip.c>
mod_gzip_on Yes
mod_gzip_dechunk Yes
mod_gzip_item_include file .(html?|txt|css|js|php|pl)$
mod_gzip_item_include handler ^cgi-script$
mod_gzip_item_include mime ^text/.*
mod_gzip_item_include mime ^application/x-javascript.*
mod_gzip_item_exclude mime ^image/.*
mod_gzip_item_exclude rspheader ^Content-Encoding:.*gzip.*
</ifModule>
GZIP Compression code 1 – .htaccess general code
<ifModule mod_gzip.c>
AddOutputFilterByType DEFLATE text/plain
AddOutputFilterByType DEFLATE text/html
AddOutputFilterByType DEFLATE text/xml
AddOutputFilterByType DEFLATE text/css
AddOutputFilterByType DEFLATE application/xml
AddOutputFilterByType DEFLATE application/xhtml+xml
AddOutputFilterByType DEFLATE application/rss+xml
AddOutputFilterByType DEFLATE application/javascript
AddOutputFilterByType DEFLATE application/x-javascript
</ifModule>
GZIP Compression code 2 – .htaccess Apache server code
<ifModule mod_gzip.c>
gzip on;
gzip_comp_level 2;
gzip_http_version 1.0;
gzip_proxied any;
gzip_min_length 1100;
gzip_buffers 16 8k;
gzip_types text/plain text/html text/css application/x-javascript text/xml application/xml application/xml+rss text/javascript;
# Disable for IE < 6 because there are some known problems
gzip_disable “MSIE [1-6].(?!.*SV1)”;
# Add a vary header for downstream proxies to avoid sending cached gzipped files to IE6
gzip_vary on;
</ifModule>
GZIP Compression code 3 – nginx.conf – NGINX server code
So at this point, must have gathered 5 things from the above section:
- cPanel login credentials
- Website server type (Apache or NGINX)
- Configuration file ( .htaccess or nginx.conf)
- Configuration file location
- GZIP Compression code
Now it’s time for the final implementation. The website we are taking for the demonstration purpose is running on the Apache server, so we are going to add the GZIP compression code to the .htaccess file.
The procedure is almost the same in the case of the NGINX server except for the “configuration file” type to be edited.
How to Enable GZIP Compression on WordPress Website Manually – Using .htaccess configuration
Video Tutorial:
For the reader’s convenience, we always create a video tutorial. Either you can watch and learn or simply skip the video and continue with the steps mentioned afterward.

In this section you will learn how to Enable GZIP Compression on WordPress Website Manually – Using .htaccess configuration.
In brief, the following steps are involved here:
1. Log in to cPanel
2. Locate the .htaccess file
3. Take a backup of the .htaccess file
4. Open the .htaccess file
5. Edit the .htaccess code
Total Time: 5 minutes
Step 1: Log in to cPanel

Open your hosting provider website and simply login to cPanel with the login credentials and navigate to the File Manager option
Step 2: Locate the .htaccess file

.htaccess file is stored in the public_HTML directory. Most servers have hidden the .htaccess file by default. If you are accessing the file manager the first time, chances are good that .htaccess has hidden. To unhide the .htaccess file simply open up the settings and click on the show all files option.
Step 3: Take a backup of the .htaccess file
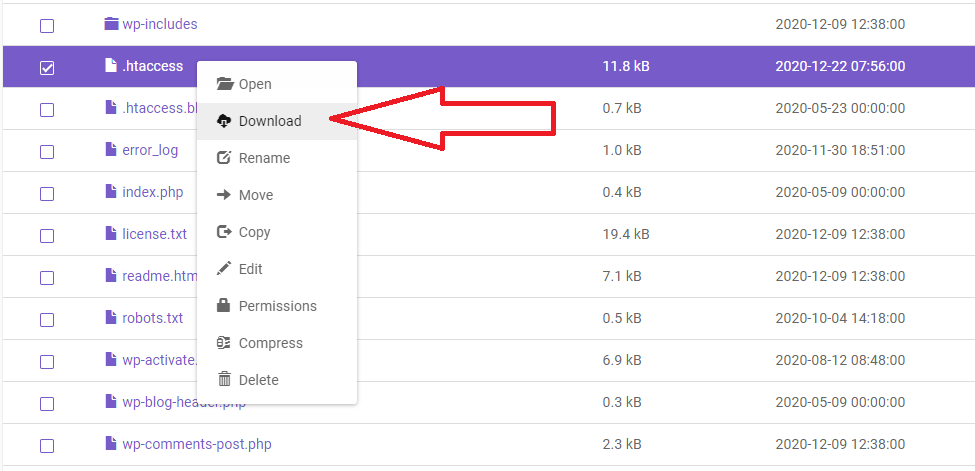
It is good practice to download the original .htaccess file to your local drive before making any change. In case something goes wrong we can easily replace the .htaccess file code.
Step 4: Open the .htaccess file
When you locate the .htaccess file on the file manager, open it by right-click and tap on the preview button.
Note: the instructions to open up the files within the cPanel may be different according to your hosting server. Generally, all of the hosting providers allow uses to edit the files within the cPanel directly. If you won’t able to open up the .htaccess file then you need to access your website files through FTP.
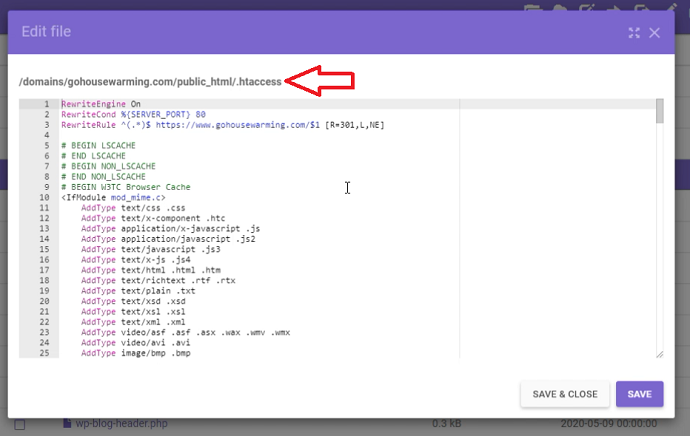
Step 5: Edit the .htaccess code
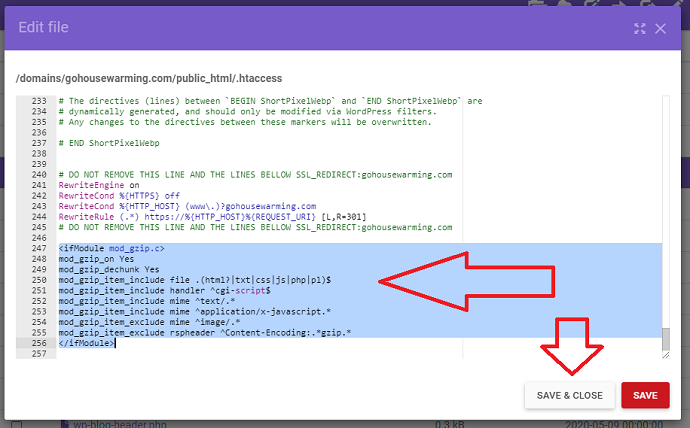
After open up the .htaccess file, scroll down to the last line. Then paste the GZIP compression code. After that save the .htaccess file. Congrats the GZIP compression has been enabled on your WordPress website.
How to Verify GZIP Compression after Implementation?
To check if your website is using the GZIP algorithm or not for the compression you can use 2 easy methods below:
- By Google Chrome Inspect Element
- By Online GZIP Compression Test
Verify GZIP Compression using Google Chrome Inspect Element
You must have google chrome to use this method to verify the GZIP compression:
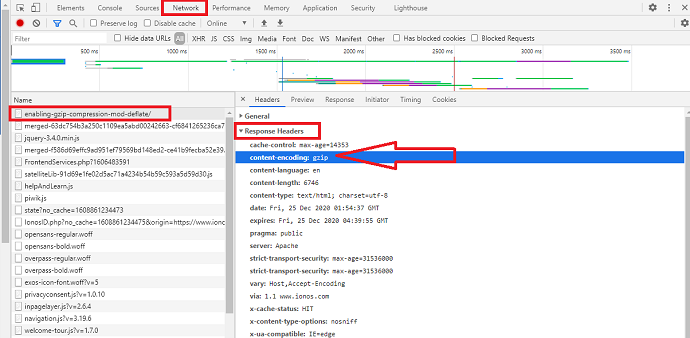
Step 1: Open up your website in google chrome. Then right-click with the mouse and choose the inspect element option. This will open up the inspect element window.
Step 2: Under the inspect element window, navigate to the Network tab. If the network window is empty, then press ctrl+R simultaneously. Now you need to open the file that displays your website URL. It appears on the top. Finally, check the status of the file encoding property under response headers. If it shows GZIP, then it means that the GZIP compression is enabled on your website.
Verify GZIP Compression Online
To test GZIP status online, lots of websites are available when you search on google. Out of them, we have picked varvy.com, because it also shows the saving percentage.
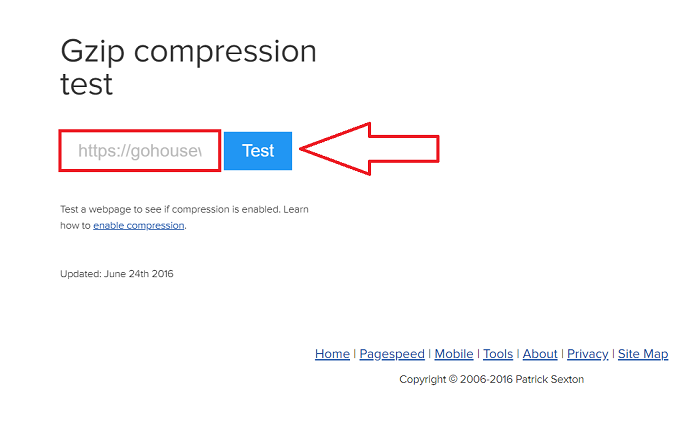
To verify GZIP compression online with varvy.com simply insert your website URL and tap on the test button. If the GZIP compression is activated on your website, you will see the success status like this:
Conclusion : Best Wayt to Enable GZIP Compression
If you have made it this far, that is awesome. For users who are still confused to make a final decision on a method to implement the GZIP compression on the WordPress website, Consider the quick summary mentioned below.
Go for Kinsta managed server and migrate your existing website when you don’t want to setup GZIP compression manually. The GZIP compression is included by default in Kinsta servers. Apart from that, you get free SSL, CDN, and the fastest speed environment because of Kinsta’s integration with Google Cloud Platform
Go for Rocket.net managed server when you want to compress your website with Brotli HTML compression algorithm rather than GZIP. Further, no manual configuration is required to enable compression on a website. All of the things could be handled by the Rocket.net servers automatically. Rocket.net is cheaper than Kinsta, plans start from only $25 and you also get a free integration with Cloudflare Enterprise CDN network.
Go for the WP-Rocket plugin when you want to optimize your website with a single high-performance plugin. This is also a cheap solution for websites that are running on shared hosting. With WP-Rocket, you don’t need to change settings or edit the .htaccess file code manually to achieve GZIP compression. Apart from that by installing the WP-Rocket plugin, you can avoid multiple site optimization plugins for tasks like image optimization, browser caching, minification, etc.
Go for the Manual method to implement the GZIP compression code on a website configuration file, when you do not want to spend money on paid site optimization plugins and upgrade your hosting server to powerful managed hosting services like Kinsta or Rocket.net
- Read Next: 9 Ways To Make An HTML Page Compatible With All The Browsers
- Best Managed WordPress Hosting Providers
I hope this tutorial helped you to enable the GZIP Compression on the WordPress website. If you like this article, please share it with your friends. If you want more blogging tips, follow BlogVwant on Facebook, Twitter, and YouTube.
FAQ – How to Enable GZIP Compression on WordPress Website
How to enable a GZIP compression on an IIS Server?
To enable a GZIP compression on Microsoft’s Internet Information Services (IIS), you don’t need to edit any configuration file.
What should I do if the .htaccess method doesn’t work?
There can be a lot of reasons for GZIP compression failure such as:
You have already installed a third-party plugin on your WordPress website for site optimization. The code you enter manually in the .htaccess file may conflict with the script of these plugins. Try disable those plugins first and run the GZIP compression test again.
You have used the wrong .htaccess code for the type of server your website is running on.
What should I do if my hosting provider doesn’t allow me to edit the .htaccess file directly within the cPanel?
Connect your website with FTP software such as FileZilla then download the .htaccess file, open it with notepad, paste your code, and upload it to the website server.
Does Minification produce better compression results than GZIP compression?
No. Minification is used for removing unwanted characters from the code such as indents, line breaks, etc while the GZIP compression technique reduces the character length much better than Minification.
Should I install a free WordPress plugin to enable GZIP compression?
Yes, you can find lots of free plugins on a WordPress repository for GZIP compression. Example “Check and Enable GZIP Compression”. But they aren’t as powerful as WP-Rocket.