
Want to Migrate WordPress site to the new host? Reson might be anything from price to server speed or security, you might want to change your hosting provider. But the big issue is moving your website without downtime. Because of this many might continue with the old service provider. Don’t worry, here you will see the simplest method to Migrate WordPress site to a new host. While there many methods, I choose to use Duplicator plugin which is the free and simple plugin to migrate WordPress website.
Why should I change the Host?
Price: Every web host gives the discount at first purchase. But the renewal charges are very high. So inorder to avoid the huge renewal charges, you might change your hosting provider. So that you will get the same service for very less price. iPage(75% Discounted Link) is the cheapest web host provider. If you want the better server for the less price, you can go with Bluehost(60% Discounted Link) or Hostgator(60% discounted link).
Fast and secure servers: Your old hosting provider might give slow speed. You might want the better servers with good page load speed. I suggest you Siteground(60% Discounted Link) for those who need the high-speed servers.
Huge Traffic: If you get a good amount of traffic, your shared hosting might not work. At that time you need to shift to the better hosting plans like VPS or Cloud hosting. KnownHost(Special Discounted Link) is the well-known service in the VPS industry. Siteground Cloud hosting or HostGator Optimized WordPress Cloud hosting(50% Discounted Link) gives you high-quality servers for the good traffic.
WordPress Support: If you want the best support for your WordPress website, I suggest Siteground is the best. Bluehost is also very good in the support.
Only to save the amount, I have moved one of my website from Siteground Cloud Hosting to Hostgator Cloud hosting. I will explain the migration process with simple steps. If you want to do the same, I suggest you stick with Siteground. Because the HostGator support is not at all good.
- Related: Siteground Cloud Hosting review
As you might know that every web host provider like Bluehost, Siteground, HostGator, iPage, etc., gives you free WordPress migration service. But there might be some limitations like they transfer only one website or they might take too much time.
I wanted to use the HostGator free migration service. I made the support ticket. But they took one month. Even after one month, they could not complete the migration process. They take 3 to 7 days to give the simple answer to support ticket. So I have migrated my website. Let us see the procedure.
Migrate WordPress Site
Step1: Download Files & Databases from Old server
You need to download all your files and the databases. Before that, it is better to Clean the database with wp-optimize. It is one of the Must have WordPress plugins which reduces your database size by removing unnecessary data.
It is better to Remove unnecessary plugins, files, and themes. Because it takes very less time to reinstall the plugin than downloading and uploading to your new host.
Login into your WordPress website dashboard.
Install and activate the Duplicator plugin. It is the free plugin which works great for the migration.
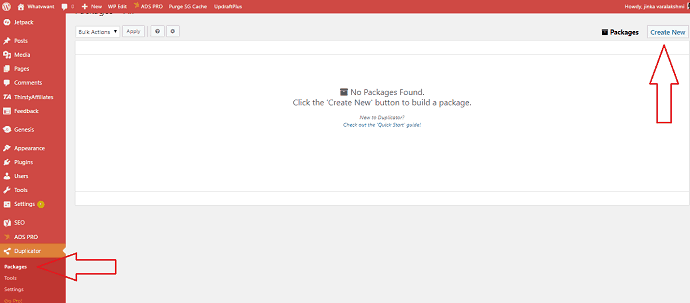
Go to Duplicator -> Packages.
Click on Create New option at the top right.
No need to change anything on the next screen. Just select Next option.
It will start scanning the site. Wait for some time.
It is better to start the migration after seeing Good in all scan results. If you see any issues, you need to solve them by click on that option.
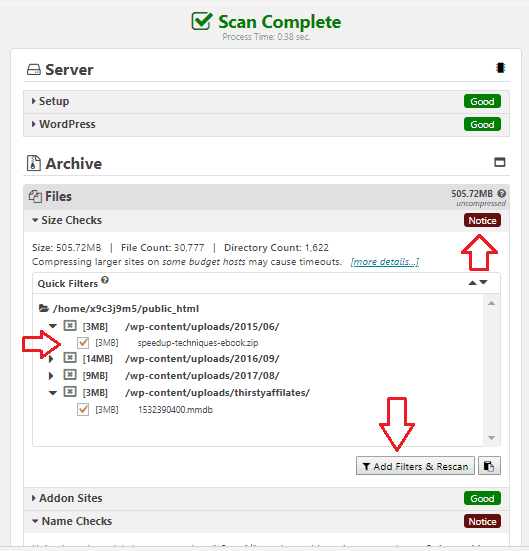
I have some big files. So I got notice.
You can delete those files by going to your File manager. Or You can add the large files to filter and rescan.
I have deleted some unimportant files. I have also added some important file to filter so that I could upload them to the new host server at the same location.
If you add some files to the Filter, you will not see the Good option. You will see Notice at that option. No need to worry, just click on Build option at the bottom.
Now it will start building, you must keep open that window until the process completes.
You will see two files Installer and Archive. You must download both files.
Just click on One-Click Download option to download both files.
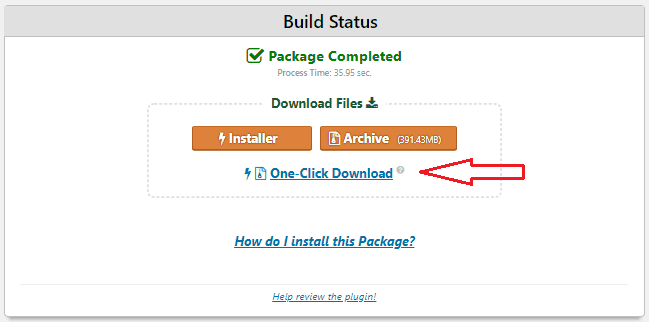
Wait until you download both files to your PC or Mac.
Now you have downloaded all your website files and databases.
Step2: Create Database & Upload Files to New Server
You need to create the new database in your new host.
Login into your new host cPanel.
Go to Databases -> MySQLDatabases
Create a database with your website name.
Create New user. Note down the username and password.
Add user to the database. Give all privileges while assigning the user.
Upload files using FTP
Login into your new host. Go to cPanel. Go to File Manager.
Upload two files (Installer and archive) downloaded in step 1.
You can use cPanel uploader or FTP. It is always best to use FTP like FileZilla to upload the files. Because cPanel uploader works slower than FTP.
Step3: Install Duplicator and Unzip files in the new server
Now you have every data like Duplicator installer and your website data on your new server. You need to install duplicator first on your new server using the installer.php file.
Open your computer browser check yourwebsitename.com/installer.php. I have opened whatvwant.com/installer.php
You will get not found error.
You need to access your new server from your computer browser to install everything. For that, You need to change your computer hosts files with your new server IP to install Duplicator and files on the new server. You can find your server IP in your new cPanel. If you don’t know how to check your IP, you can ask your new host support team.
Edit hosts file
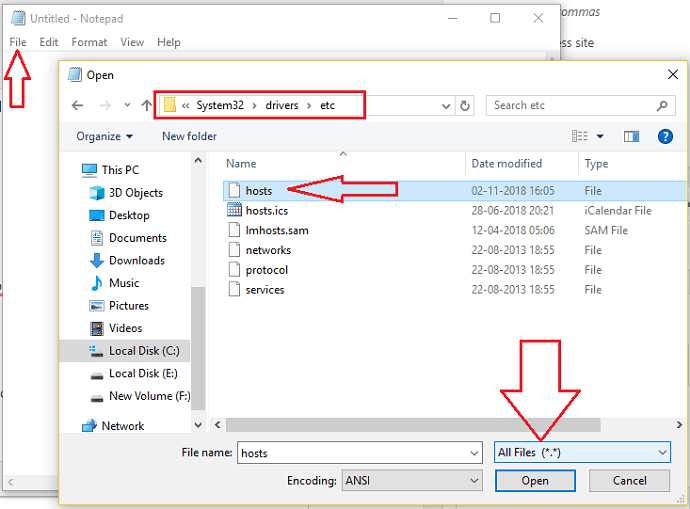
Open Notepad app as Administrator.
Go to File -> Open.
Browse to C: Windows/System32/Drivers/etc/hosts. You need to use All files option to see the hosts file. Otherwise, you will not see the hosts file.
Add your new server IP and website url to the end of the hosts file to access your website from the new server. Just like shown in below screenshot.
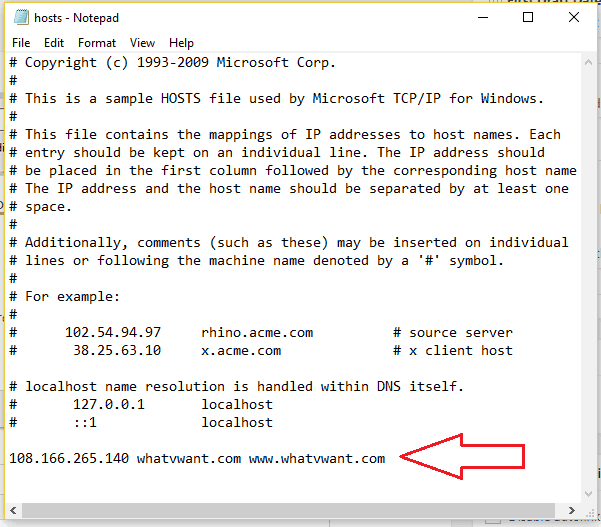
Save file.
Install Duplicator
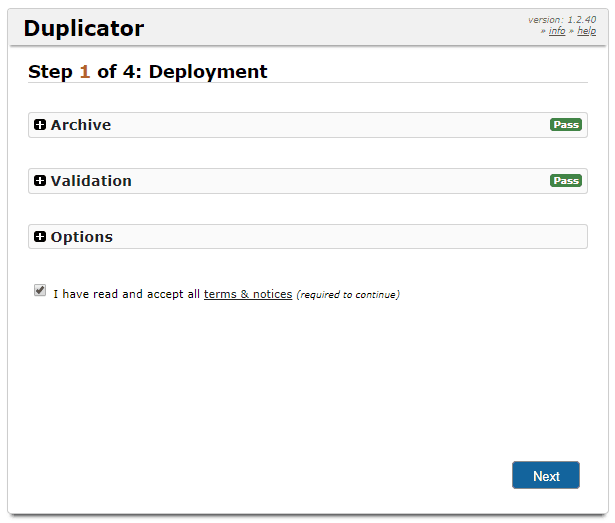
Access yourwebsitename.com/installer.php(ex:-www.whatvwant.com/installer.php) from your browser. You will see below screen.
Check the terms and Click Next.
Enter the new database details what you had created in the Step 2.
Select the Test Database.
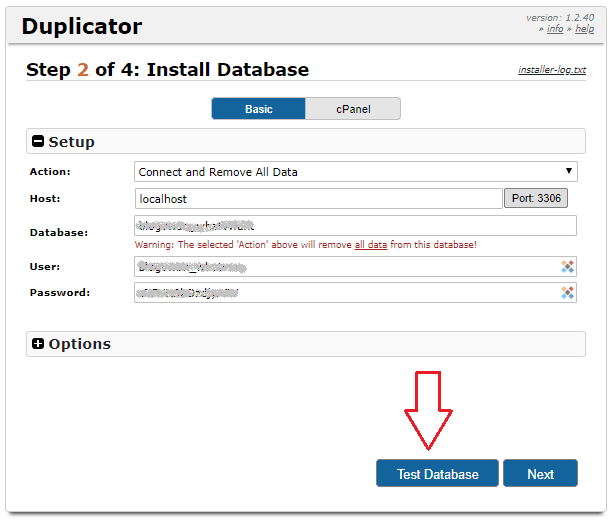
If you get a success message then click Next.
If it is failed, probably, you might have entered the wrong details.
Check the New settings in the next window. Click next. You will see below screen.
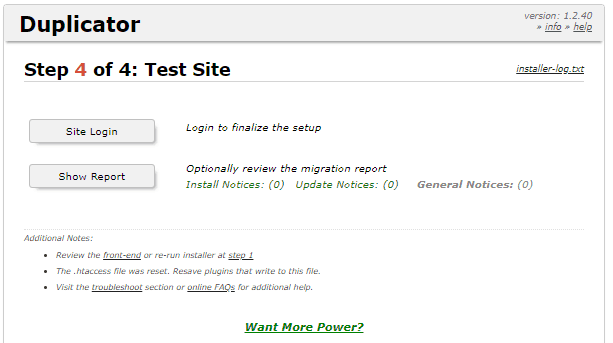
You can check by logging and you can also check whether your website is working fine or not.
Now your website will work. Check your website and WordPress dashboard by logging in. If everything is fine, you need to change your name servers.
Before that, remove the extra line added to your hosts file. When you remove that extra line, you will access your website from your old server.
Step4: Update Nameservers & MX Entries
Change the Nameservers at the domain registrar. Sometimes it will have the little downtime. Don’t worry, it will take 24 to 48 hours to propagate DNS completely.
If you had MX Entries, you can add them in new cPanel.
Now the migration process is completed. If you find everything is fine after 48 hours, you can close your old hosting service.
Bonus Tip
You migrate your website even without using the Duplicator plugin. Though I don’t recommend it if you want you can follow below procedure.
Login into cPanel.
Backup manager.
Download All three Home directory, Databases, and Mail forwarders.
Or Go to the File manager. Archive all files and download.
Go to PHPMyAdmin, Export your databases.
You can also use FTP to download.
Upload the files to new server root folder using FTP instead of cPanel.
Create a database in new server, note down database Name, Username, and Password
Edit wp-config file with new database details. You will find wp-config.php file in public_html folder.
Edit table prefix in wp-config file.
If you had MX Entries, you can add them in new cPanel.
Change the Nameservers at the domain registrar. Sometimes it will have a little downtime. Don’t worry, it will take 24 to 48 hours to propagate DNS completely.
Conclusion
Using the Duplicator plugin is the best and simple method to Migrate WordPress site.
If you like this tutorial about how to Migrate WordPress site to a new host, please don’t forget to share it. Just follow BlogVwant on Facebook and Twitter for more tips.
This was really helpful to me.