So do you want to add a button to WordPress Menu, right? Well, guess what, you came to the right place. Today first we are going to discuss the top common reasons to add a button in Menu, then we will show you 3 practical methods to put a standard as well as an attractive blinking button on your WordPress menu (like what you see on this website menu). Whatever method type you are looking for, plugin or non-plugin we’ve got you covered.
Why Should I Add a Button to Menu in WordPress
The common purpose to add button to WordPress menu is to grab a reader’s attention and encouraging them to take a particular action on your website. These are the popular situations where you should add a button to your website menu:
- To redirect users to the latest discount offers and coupons page
- To redirect users to the latest product page
- To redirect users to the affiliate product page
- To encourage customers to give you a call directly
There could be infinite possible situations for which you can add a button to the navigation menu of your website. Similar to the social icons on the website, adding a button to the menu also grabs user attention and boosts the conversations. Your readers might not find your special deal in the body of the article, but they will surely notice the blinking button situated at your navigation menu bar. Further with the help of Google Analytics custom event tracking, you can track the conversions or clicks receiving from such types of buttons.
- Must Read: Best WordPress Push Notification Plugins
Best Methods to Add a Button to WordPress Menu
The button in WordPress Menu could be added by the following methods:
- Manual Method by tweaking the CSS styles
- Plugin Method
Go for the manual method when you have knowledge of CSS styles. For non-coders, the plugin method would always be recommended. However, you cannot create a blinking menu button with the plugin approach.
Hint: Everyone loves to have a fast and secure website. We suggest Rocket.net, the most secured and fastest managed WordPress hosting service that gives you a Cloudflare Enterprise plan for free. Our readers get a special 50% discount on all Rocket.net plans using the coupon code: VWANT50.
Method 1: Manual Method to Add Standard Button to WordPress Menu
Video Tutorial:
For the reader’s convenience, we always create a video tutorial. Either you can watch and learn or simply skip the video and continue with the steps mentioned afterward.
In this section, we are going to use CSS code to add button to WordPress menu. This method could work on all WordPress themes.
Total Time: 5 minutes
Step 1: Enable CSS Classes
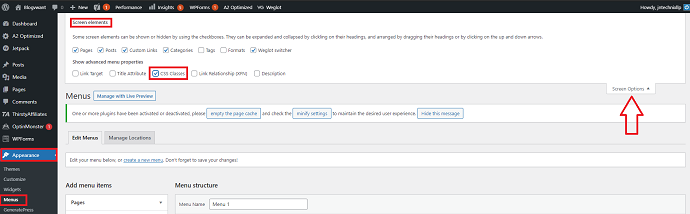
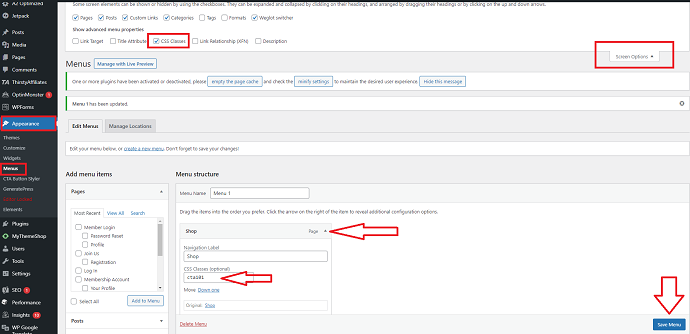
First navigate to WordPress dashboard > Appearance > Menus. Now find the screen options at the top right beside the help option. Tap on it and enable CSS classes as shown in the image. Then click on the save menu.
Step 2: Give a CSS class name to the Menu Button
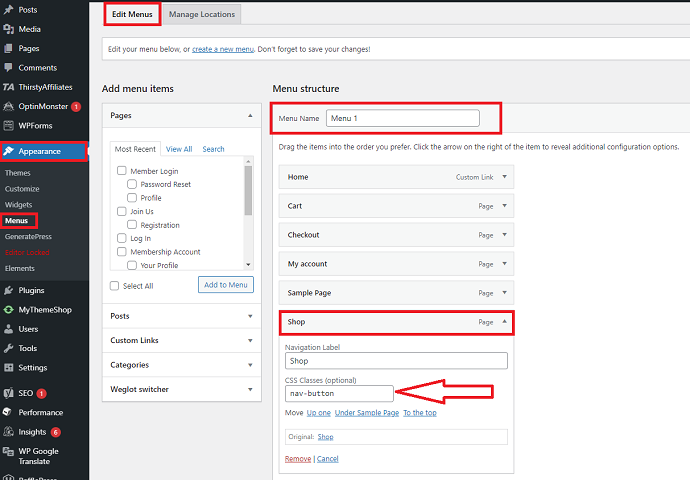
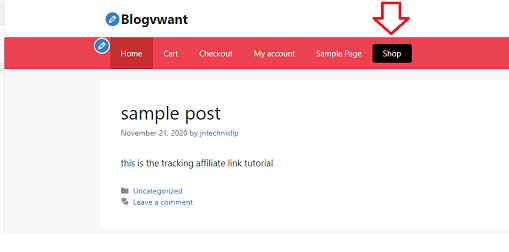
On the same page, you will find all of the website menus along with menu items. Now you have to click on a menu item that you want to convert into a standard button. In my case, the menu item is “Shop”. After expanding the menu item, you will find a “CSS classes” text box. Insert any class name for it and if you are using more than 2 words make sure to separate them with a hyphen. I am typing: nav-button.
Step 3: Apply a CSS style to the Button
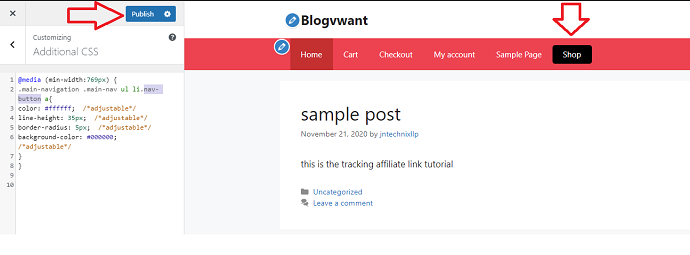
Now it’s time to styling the Menu item that you want to convert into the button. This can be easily done by the CSS code. Navigate to Appearance > Customize > Additional CSS. Here you need to place a CSS script.
You can insert the exact code we have mentioned below. Remember, you need to use the exact CSS class name that you have inserted as a CSS class name for the menu item in step 2. In our case it is nav-button.
Replace the nav-button in the below code if you have mentioned the different “CSS class name” for your menu item which you wanted to convert into a button.
@media (min-width:769px) {
.main-navigation .main-nav ul li.nav-button a{
color: #ffffff;
line-height: 35px;
border-radius: 5px;
background-color: #000000;
}
}
After that tap on the publish button to save the changes.
The CSS properties: Color, line height, border radius, and the background color are totally adjustable. You can change according to your wish. The @media rule is used to control the appearance of the button. The above menu button CSS style code only be effective when the device screen width size is equal to or more than 769px. Again this is also adjustable.
Method 2: How to Add Blinking Button to Menu in WordPress Manually

The procedure to add a blinking button to Menu in WordPress is almost similar to the method we saw earlier. You just need to tweak 3-4 lines in a CSS code and you are good to go.
Follow the steps 1 and 2 mentioned in the above method. In third step, navigate to appearance > customize > additional css. Then add the below css code:
@media (min-width:769px) {
    .main-navigation .main-nav ul li.nav-button a {
        color: #ffffff;
        line-height: 35px; /*this number will likely need to be adjusted*/
border-radius: 5px;
-webkit-animation: colorchange 1s infinite alternate
    }
}
@-webkit-keyframes colorchange {
  0% {
    background-color: #f16334;
  }

  50% {
    background-color: #f16334;
  }
100% {
    background-color: #000000;
  }
}
Remember if your menu item CSS class name is different, then make sure to replace it with nav-button
Method 3: Using CTA Button Styles Plugin to add button to WordPress Menu
“CTA Button styles” is the newly launched WordPress plugin that helps you to convert your normal menu item into a Call to action button. This plugin exactly works like the manual method, but users don’t have to mess their heads with the CSS code. With this plugin, you can apply CSS styles to the menu item in a visual way. The plugin is simple and lightweight, however, you cannot create multiple styles for multiple menu buttons. But since the plugin has recently been released in the market, the users can expect more features in the upcoming version.
How to Add Buttons to your Navigation Menus using WordPress Plugin – CTA Button Styles
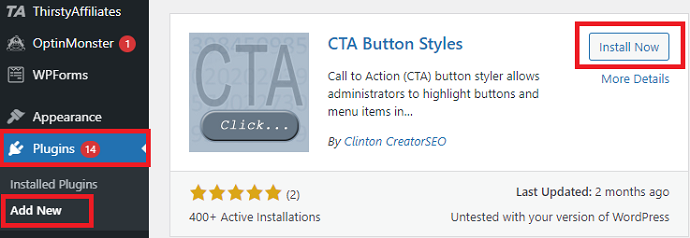
Step 1: Install CTA Button Styles Plugin
The user has the option to install the plugin either from the WordPress plugin repository directly or manually by downloading and uploading from the plugin’s official site.
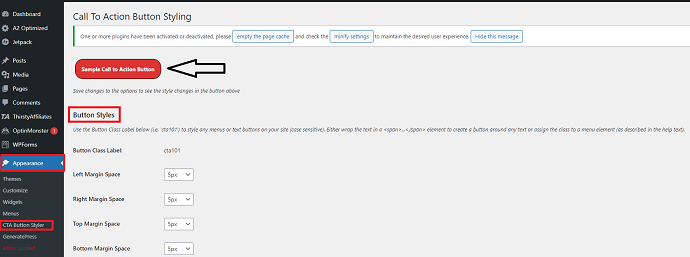
Step 2: Stylize the Menu Button
After installation, navigate to Appearance > CTA Button Styler. Now here on the top, you will see your menu button. To stylize you can use given CSS properties including button color, background color, padding, margin, etc. To preview the changes, each time you have to tap on the save changes button.
Step 3: Add Button to WordPress Menu
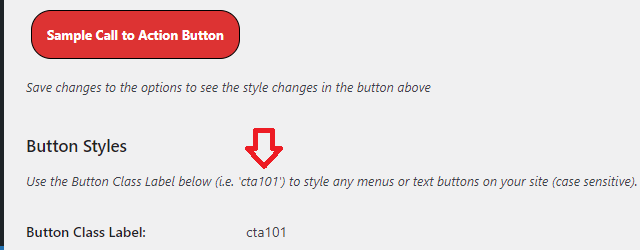
Now you have configured the look of your menu button. To add this button to the menu, you have to copy the button class label (cta101) that is mentioned over the button styling page.
After that head over to Appearance > Menus. First, tap on the screen options and enable CSS classes. Next from the below tap on the menu item that you want to convert into the button. For example Shop. Then paste the button class label you copied earlier into the CSS classes text box of the desired menu item. Finally hit on the save menu button and reload your website page. This is how you can add a button to the WordPress menu.
CTA Button Styles Pros:
- Easy to use
- No coding knowledge required
- No need to change in website code manually
CTA Button Styles Cons:
- Only 1 style can be generated for all menu buttons
- No live preview feature available. The user has to press the preview button each time to preview the changes.
- The blinking menu button cannot be created with this plugin.
Conclusion: Which is the Best Way to Add a Button to WordPress Menu
Now, what are you waiting for? You can implement any of the techniques mentioned above. In our opinion, the second method is the best method and we are using it on this website. Capture visitor’s attention with the attractive menu button and drive them to your deals pages, product pages, etc as soon as they landed on your site. Further, in the future, you can use MonsterInsights custom event tracking to track the number of clicks of your menu button and make changes accordingly.
- Read next: How to setup Google analytics Custom event tracking on WordPress
- How to Add Back to Top Button in WordPress
- How to add social media follow buttons to WordPress website
I hope this tutorial helped you to add a button to WordPress Menu. If you like this article, please share it with your friends. If you want more blogging tips, follow BlogVwant on Facebook, Twitter, and YouTube.
FAQ: Add a Button to WordPress Menu
How to add a menu button in non WordPress websites?
You can follow the manual CSS method. This method works on all sites. You just need to apply a CSS style to the menu item.
Does CTA Button Styles work on all WordPress themes?
Probably yes.
Should I take a backup of my website before proceeding with the manual method?
No. The CSS used in the manual method won’t break your site in any case.
What should I do if the above code won’t work on my website?
We can help you out. Mention your website link URL in the comment section. We will help you out.