Do you want to grow your email list in no time at an affordable price? Now go through this article to learn about 7 great sign-up tools offered by Constant Contact to grow your email list easily, quickly, and automatically.
Constant Contact offers numerous different sign-up tools to grow your list. And it won’t charge any additional fee to use these sign-up tools.
What is Constant Contact?
Constant Contact (60 Days Free Trial) is a powerful, leading expert in email marketing for small businesses for over 20 years. It provides all the powerful tools, marketing advice, and more to make your email marketing easy. And it has the following outstanding features.
- It is very easy to use.
- The drag and drop editing is easy.
- It has a ton of different sign-up tools to help you to grow your contact list.
- It provides everything you require to turn leads into contacts into loyal customers.
- It provides numerous customizable and responsive email templates.
- It offers a 2GB free hosting for images and documents.
- Its email marketing automation aids you to drive more sales in less time.
- You can send as many emails as you need. and there is no limit on this.
- It provides e-commerce tools to grow your online store.
- Its real-time tracking tools make it easy for you to view, who’s opening, clicking, and sharing your emails.
- It gives Subject Line A/B Testing.
- And more.
Constant Contact Price and Plans
Constant Contact offers two plans to buy. And its price depends on list size.
- Email Plan
- This plan starts at $20 per month.
- Email Plus Plan
- This plan starts at $45 per month.
Constant Contact Discount Coupon
Vwant Special Offer: They might run the special offers time to time. You can check our Constant Contact discount coupon page for the latest offers.
- You Might Like: How to Use Constant Contact: The Complete Guide
- 6 Outstanding Mailchimp Competitors for Email Marketing
How To Grow Your Email List Using Constant Contact: 7 Simple and Great Sign-Up Tools To Do This
Constant Contact offers a ton of different sign-up tools to help you to grow your contact list in no time. Out of these, the seven great sign-up tools are discussed here. Those are:
- Pop-up Sign-up Form
- Inline Sign-up Form
- Lead Generation Landing Page
- Facebook Lead Ad
- Facebook Join My List App
- Inline Sign-up Form
- Text-to-Join
Now lets learn about each one in detail.
1. Pop-up Sign-up Form
- If you have own website or blog, then Pop-up Sign-up Form is the best option to collect new email addresses quickly.
- You can add this form to any webpage and multiple webpages. And you can also create and customize multiple forms for different webpages of your site.
- Further, you can set the timing for when you desire this form to pop, like:
- When users land on your website,
- After users have spent a specific amount of time on your site, or
- When users intent to leave.
- Constant Contact, by default, provides one pop-up sign-up form with a triggering time of 5 seconds. But you can create as many pop-up sign-up forms as you require with customized timing and no Constant Contact branding.
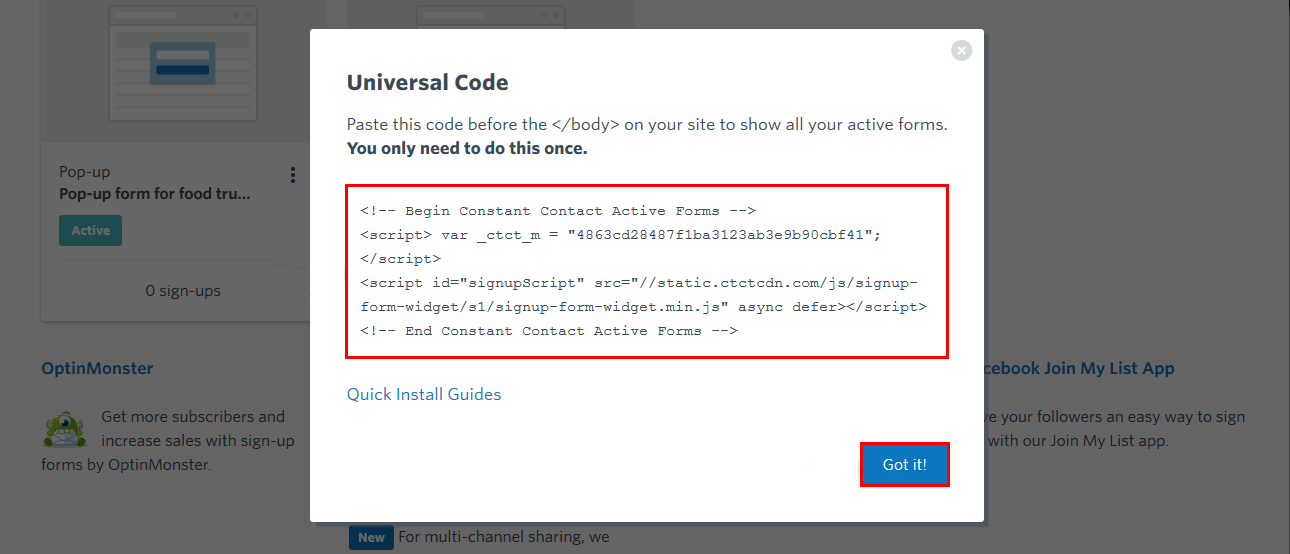
- Here, you can create and activate pop-up sign-up forms right in your Constant Contact account. Once the form is created and activated, then a Universal code is generated. Then you need to embed that code anywhere on your website. After you embed this code, then a pop-up sign-up form appears on your website.
- Suppose, in the future, if you change or modify this form in your Constant Contact account, then these changes automatically reflect on your website.
- That means you need to add this code only once on your website.
- Constant Contact charges no additional fee to use pop-up Sign-up forms.
1.1 How To Create Pop-up Sign-up Form Using Constant Contact
In this section, you can learn how to Create, Activate, and Install Pop-up Sign-up Form.
Total Time: 2 minutes
Step1: Login to your Constant Contact
Go to the Constant Contact website and log in.
Step2: Go to Sign-up Forms page
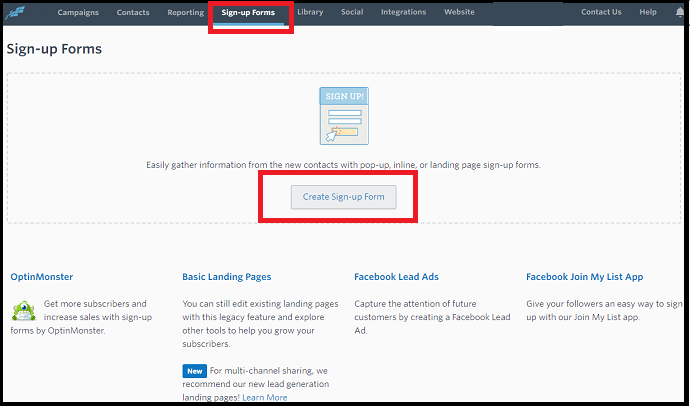
After sign in, click on the Sign-up Forms tab, present on the top of the website. And then on the Create Sign-up Form.
Step3: Select Pop-up

Next, various sign-up forms appear. In that select Pop-up. Then various fields appear on the left side to customize your pop-up sign-up form.
Before start customizing, first, assign a unique name to your pop-up sign-up form so that you can identify it in your account later if you want to create multiple forms.
Step4: Click Content to customize what you would like to appear on your pop-up sign-up form
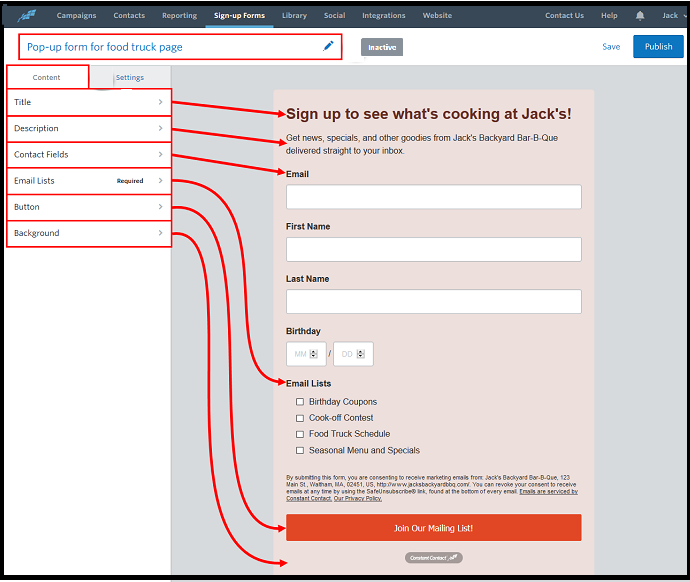
Next, click Content. Then you can view the following fields under it. Now you need to customize these fields to create your desired pop-up sign-up form.
Title: Click this to type the title and choose the color to this text title.
Description: Click this, to add the description of your form and choose the description text color. Use this description as an opportunity for you to tell your contacts about the type of content they can expect. And how often they will be contacted.
Contact Fields: Click this, to choose the fields like Email, First Name, Last Name, Phone Number, and more.
Here, an email address field is always required and it is selected by default.
Next, to select additional fields, check the box of those fields and then click the toggle switch next to them.
Here, keep in mind that you should not select a lot of fields. Because these lot of fields scare people away from the sign-up forms.
So, select only essential fields in your form. And you can always ask for more details later.
Email Lists: Click this to add certain fields like Birthday Coupons, Seasonal Menu and Specials, Wedding Flower Events, and more. So that your contacts can pick the lists they desire to add themselves to.
Button: Click this, to change the text color and background color of the button. You can also change the text.
Background: Click this to change the background color of your pop-up Sign-up form.
Step5: Set when your form has to display to your users
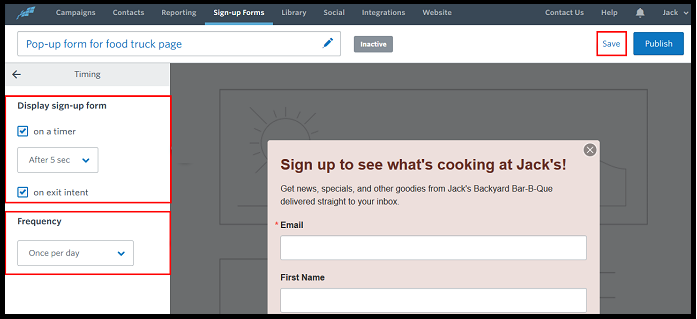
Next, click Settings and then Timing. Then you can view:
On a timer: Choose this, to display your form after a specific time like 5 seconds when users land on your website.
On exit intent: Choose this, to display your form, when users intent to leave your website.
You can also choose both.
Frequency: Under this choose anyone like Once per day, Once per 30 minutes, Once per hour.
Step6: Remove the Constant Contact logo at the bottom of the pop-up form. And ‘Publish’ or ‘Activate’ your form.
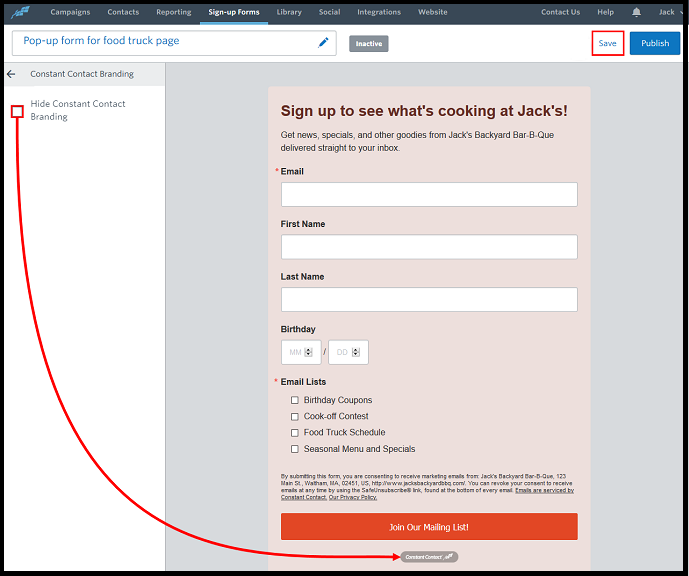
Next, go back and click on Constant Contact Branding. Then select ‘Hide Constant Contact Branding’ to remove the Constant Contact logo at the bottom of your pop-up form.
Next, click on Save and then on Publish.
That’s it! You have now created and activated your desired pop-up sign-up form.
Step7: Click on Universal Code to get code for your pop-up form
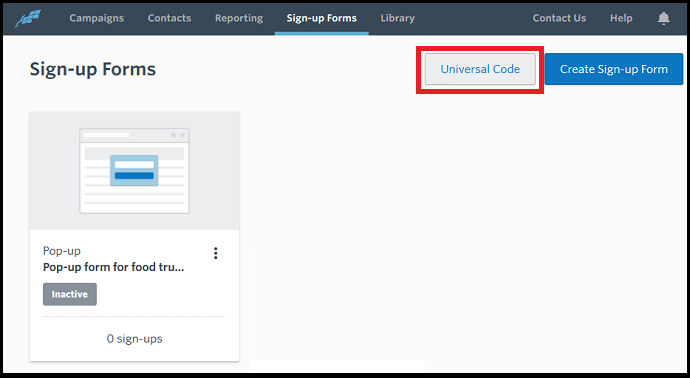
Next, click on the Universal Code, present on the top right side of the website, to get code for your pop-up sign-up form.
Step8: Copy the form code. And Install the form code on your website

Now the Universal code is displayed. Click on it. Then the Universal code is copied.
Next, paste this code anywhere on your website. You can also paste this code on multiple pages.
After pasting this code on your website, then the created pop-up sign-up form is displayed on your website.
Suppose, in the future, if you change or modify this form in your Constant Contact account, then these changes automatically reflect on your website.
That means you have to paste this code only once on your website.
That’s it! You have now created your desired pop-up form on your website using Constant Contact.
2. Inline Sign-up Form
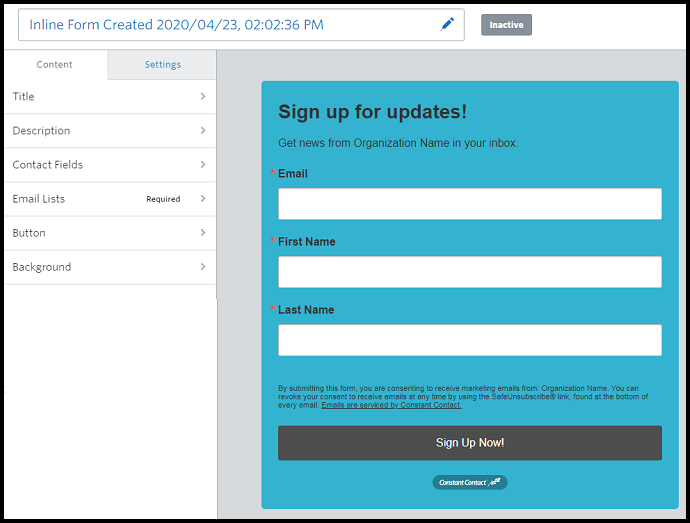
- An inline sign-up form is another great way to easily and quickly collect email addresses of people when they visit your website.
- You can place the inline form in a perfect spot on your website. So that you never miss a chance of collecting the new email addresses of people when they visit your website.
- Constant Contact provides one inline sign-up form by default. But you can create as many different inline sign-up forms as you require. And you can embed them on multiple pages of your website.
- You can customize, create, and activate inline sign-up forms right in your Constant Contact account. Once the form is created, then two codes are generated like Universal code and Inline code. Then you need to embed the Universal code to the footer of your site and Inline code on anywhere on your website.
- After you embed these codes, then an inline sign-up form appears on your website.
- Constant Contact charges no additional fee to use Inline Sign-up forms.
2.1 How To Create Inline Sign-up Form Using Constant Contact
Video Tutorial:
For the reader’s convenience, we always create a video tutorial. Either you can watch and learn or simply skip the video and continue with the steps mentioned afterward.
In this section, you can learn how to Create, Activate, and Install an Inline Sign-up Form using Constant Contact.
Step1: Go to the Constant Contact website and log in.
Step2: After sign in, click on the Sign-up Forms tab, present on the top of the website. And then on the Create Sign-up Form.
Step3: Next, various sign-up forms appear. In that select Inline. Then various fields appear on the left side to customize your Inline sign-up form. These fields are similar to those that you have seen earlier in the pop-up sign-up form. First, customize the fields under Content.
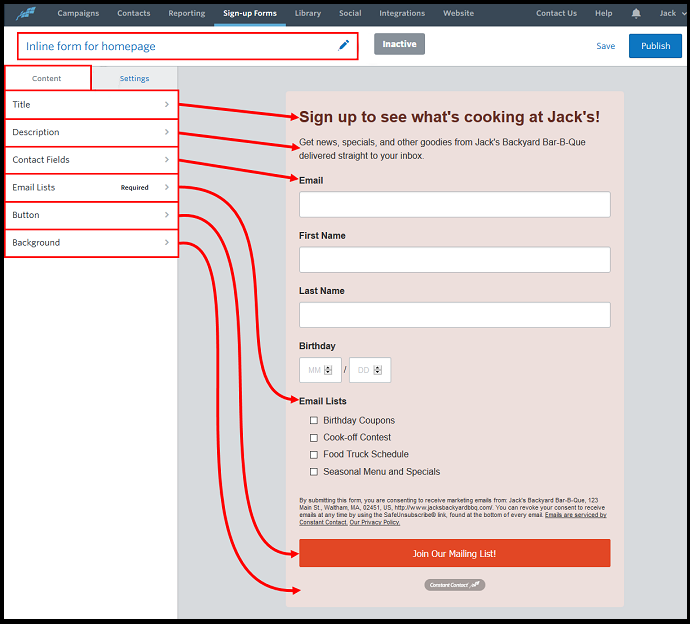
Step4: Click on Settings and then on Constant Contact Branding. Then select ‘Hide Constant Contact Branding’ to remove the Constant Contact logo at the bottom of your form.
Step5: Next click on Save and then on Publish.
That’s it! You have now created and activated Inline Form. Then you need the Universal Code and Inline Code to install the Inline form on your website. But for pop-up form, only Universal code is sufficient.
Step6: Next, click on the Universal Code. Then Universal code is displayed. Copy that code.
Step7: Next, click on Signup Forms and then on Three Vertical Dots and Inline code.
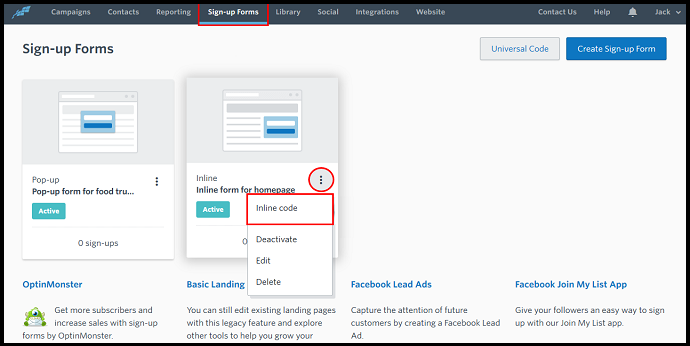
Step8: Next, Inline code is displayed. Copy that code.
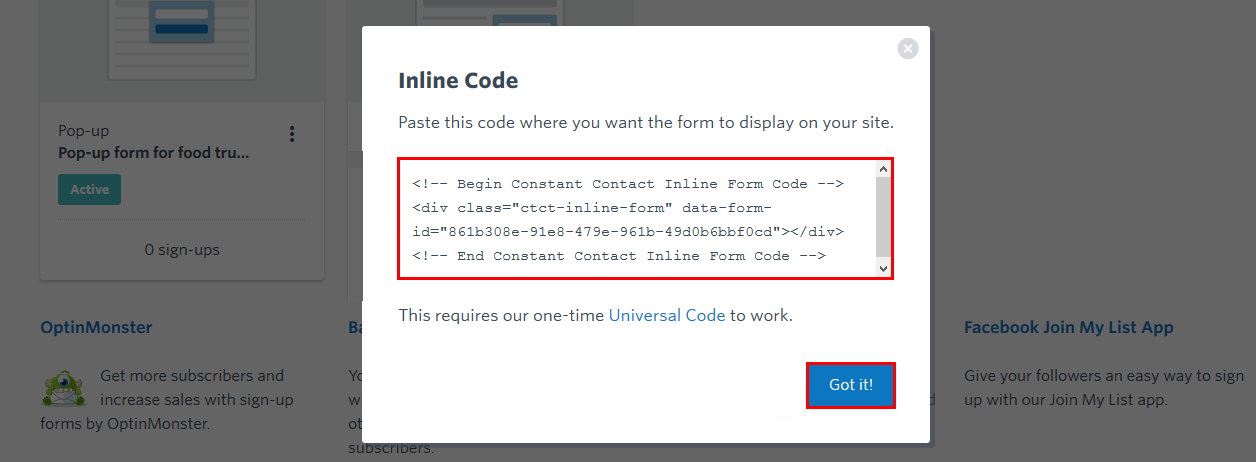
Step9: Next, you need to paste the copied Universal code into your website’s footer section, somewhere between the <footer> tags that fall before the </body>tag.
Then paste the Inline code anywhere or in several different places on your website.
Suppose, in the future, if you change or modify this form in your Constant Contact account, then these changes automatically reflect on your website.
That’s it! You have now learned how to create, activate, and install Inline sign-up form using Constant Contact.
Read It: 5 Best Email Marketing service providers & Newsletter Companies
3. Lead Generation Landing Page
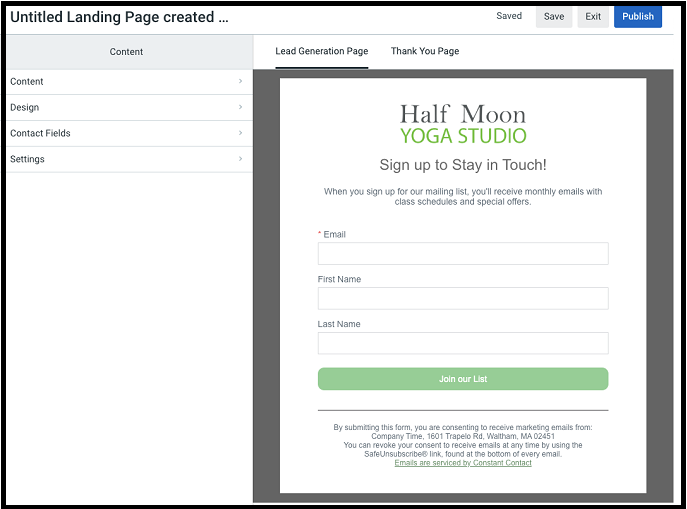
- Constant Contact provides another sign-up tool Lead Generation Landing Page to generate new leads through social media and email.
- If you don’t have a website, then this approach is the ultimate solution for you to generate new leads quickly.
- A lead generation landing page is a customizable page, that is to some extent similar to a stand-alone website.
- With a Lead Generation Landing Page, you can:
- Customize the appearance of the page,
- Add an image,
- Decide which data you desire to collect from visitors, and
- Even give your landing page a custom URL.
- Further, Constant Contact charges no additional fee to use Lead Generation Landing Pages.
3.1 How To Create Lead Generation Landing Page In Your Constant Contact Account
Step1: Go to the Constant Contact website and log in.
Step2: After sign in, click on the Sign-up Forms tab, present on the top of the website. And then on the Create Sign-up Form.
Step3: Next, various sign-up forms appear. In that select Lead Generation Landing Page. Then various fields appear on the left side to customize your lead generation page.
- Content: Click this, to add the following to your Lead Generation Page:
- Logo,
- Headline,
- Description,
- Button (like “Join Our Mailing List,” or “Sign Up for Monthly Emails”)
- Under the Content section, you also need to add Headline and Description of your Thank You Page.
- Design: Click this, to customize the following to beautify your Lead Generation Page:
- Backgrounds: To choose the perfect colors for the Outer Background and Inner Background of your Lead Generation Page.
- Fonts: To choose the font and font color for the Heading, Body, Links, and Buttons on your landing page.
- Accents: To choose a perfect color for your button so that the text is easy to read.
- Contact Fields: Click this to add the necessary fields to your landing page like:
- Email (By default, it is added),
- First Name,
- Last Name,
- Phone Number,
- Birthday,
- And more.
- Settings: Under this, you can view:
- ‘Choose list’: To choose a list where you would like to save contacts when people provide their email address upon sign-up. You can also create lists here.
- Customize URL: Click the toggle switch to customize your landing page URL.
Step4: Next, click on Publish. Then your landing page is created.
Now you can share your landing page URL via email and social media pages.
That’s it! You have now learned how to create a beautiful Lead Generation Page using Constant Contact.
4. Facebook Lead Ad
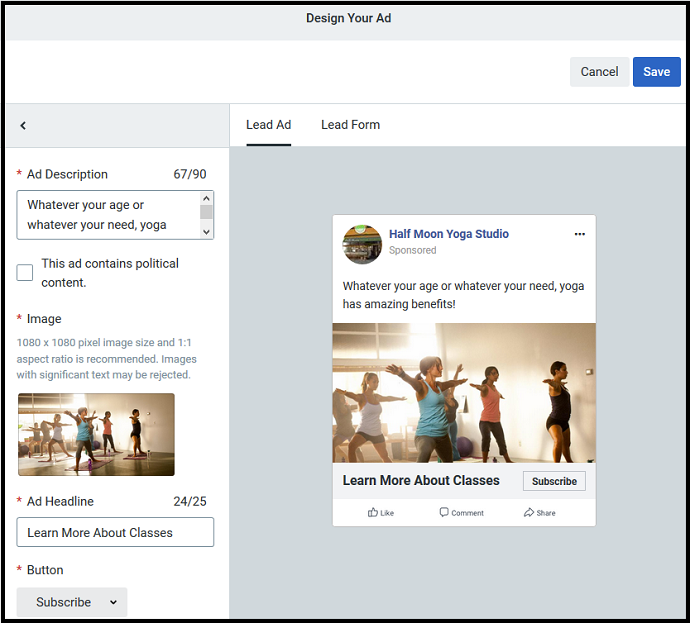
- Facebook Lead Ad is also a great way to reach new audiences.
- If you want to attract and target specific Facebook users based on their interests and age, gender, and location demographics, then Facebook Ads are a great way to accomplish this task.
- With Facebook Lead Ad, you can easily create a Facebook Ad at your budget, with certain criteria. Once you have created a Facebook ad, then Facebook puts your ad in front of the people who match your criteria on Facebook.
4.1 How To Use Facebook Lead Ad Using Constant Contact
Step1: Go to the Constant Contact website and log in.
Step2: After sign in, click on the Sign-up Forms tab, present on the top of the website. And then on the Create Sign-up Form.
Step3: Next, various sign-up forms appear. In that select Facebook Lead Ad.
Step4: Next, click Connect to connect your Facebook account. If you have already connected, then go to the next step.
Step5: Next, enter your desired name in the Lead Ad Name field. This is for your purpose only. Customers or supporters can never see this name.
Step6: Next, click Save.
Step7: Next, you need to edit and customize the following categories.
- Select Social Pages
- Design Your Ad
- Select Audience
- Budget & Schedule
After customizing all the above categories, then click on Publish to post your ad on Facebook.
Later, at any time, you can check Total Leads Collected and Cost per Lead under the Reporting section.
5. Facebook Join My List App
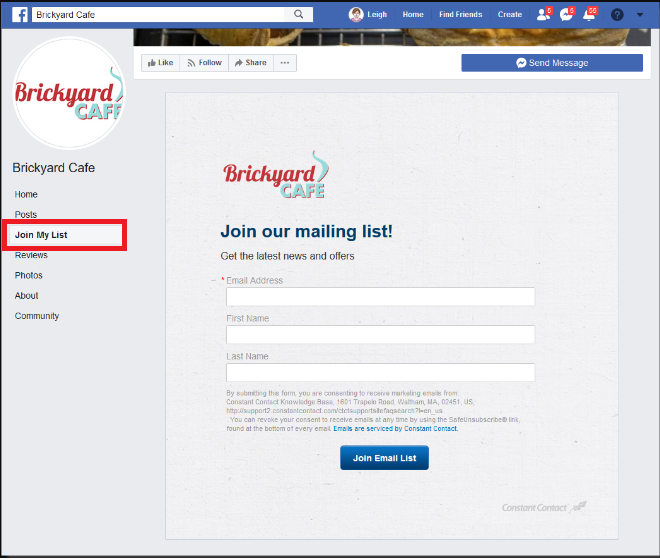
- The Facebook Join My List App is another sign-up tool offered by Constant Contact which provides your Facebook Business Page followers with a simple way to sign up for your Constant Contact mailing lists.
- To accomplish this task, you need to:
- Add the Join My List App to your Facebook Business page,
- Customize the Join My List Sign-up Form Content with an image and Thank You message.
- Constant Contact won’t charge any additional fee to use the Facebook Join My List App.
5.1 How To Add the Constant Contact Join My List App to your Facebook Business page
- In your Constant Contact, click the Sign-up Forms tab. And then the Facebook Join My List App.
- Next, log in to your Facebook account. And then click on Add App.
- Next, choose the business page that you want to add the app to. And then click the Add Page Tab.
- Next, click the ‘Go to Facebook’ button. And select the business page that you have added the app to.
- Next, click on Join My List. And then on Connect.
That’s it! You have now connected your Facebook Business Page and your Constant Contact.
5.2 How to customize the Join My List Sign-Up Form Content
- Go to your Facebook business page and click the Join My List tab.
- Next, click the Customize button. And then choose the Default list.
- Next, click the Upload Image button to add your logo. You can browse it on your computer. And add it.
- Next, click Page2. And customize the Thank You message.
- Next, click the Save Changes button.
6. Text-to-Join
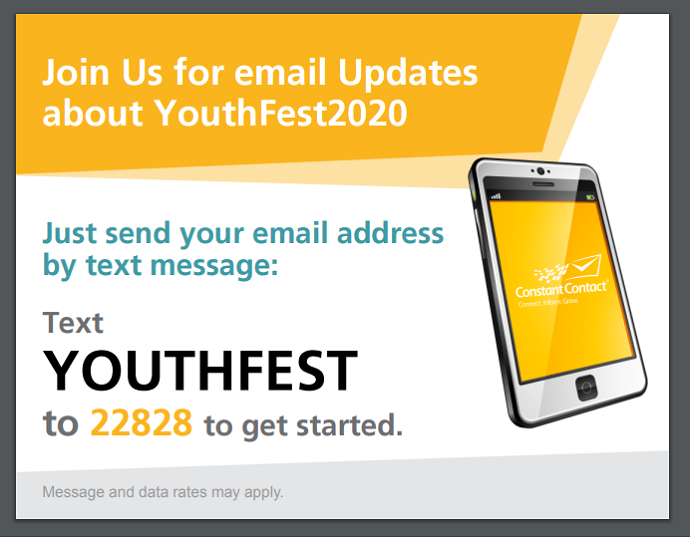
- Text-to-Join permits people to quickly and easily join your mailing list through a text message.
- Here, people will text a keyword you choose to a special number that Constant Contact generates for you.
- Next, people will receive a text back that will walk them through joining your contact list.
- Currently, Constant Contact is offering Text-to-Join services only in the US. And it is not providing this service to international users.
- Constant Contact won’t charge any additional fee to use Text-to-Join.
6.1 How To Use Text-to-Join To Collect New Contacts Through a Text Message
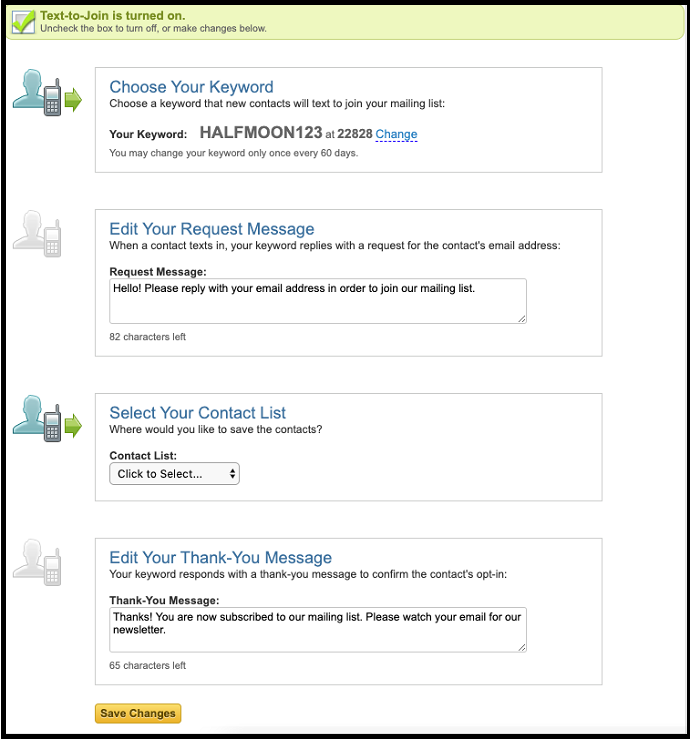
- In your Constant Contact account, click the Sign-up Forms tab. And then the Basic Landing Pages.
- Next click on Text to sign-up under More Tools.
- Next, check the box of Text-to-Join to turn it’s on.
- Next, enter the keyword of your choice under Choose Your Keyword section.
- Next, under Edit Your Request Message, enter the request message that you want to send to people when they text in with a keyword.
- Next, under the ‘Select Your Contact List’ section, choose the list where you would like to save the contacts.
- Next, under ‘Edit Your Thank-You Message‘ section, enter a text message that your contacts can receive once they have replied to your “Request Message” with their properly formatted email address.
- Next, click on Save Changes.
- Next, you are given a five-digit access number that subscribers can text your keyword to this number.
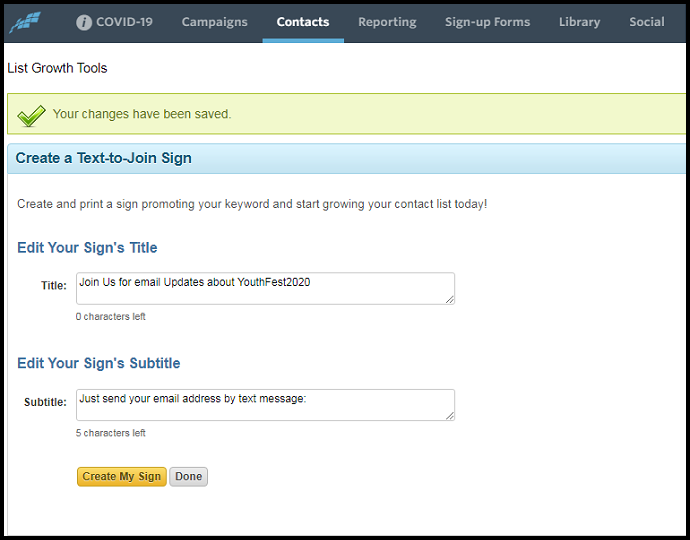
- Next, to get a print copy to promote this number, along with your keyword, customize the following under Create a Text-to-Join Sign section.
- Edit Your Sign’s Title: Enter a title like “Join Us for email Updates about YouthFest2020“.
- Edit Your Sign’s Subtitle: Enter subtitle like “Just send your email address by text message:“
- Next, click on Create My Sign. Then sign is created and opens in pdf format. Download it and print it. And hung it wherever you get the most foot traffic.
7. ListBuilder App
- Constant Contact ListBuilder App is an app available on both Android and iOS devices that will permit you to collect sign-ups straight from your device.
- The Constant Contact ListBuilder App is a great option when you:
- are face-to-face with your customers, clients, and supporters,
- spend a lot of time at trade shows.
- Constant Contact charges no additional fee to use its ListBuilder App.
7.1 How To Use ListBuilder App
- Download and Install the Constant Contact ListBuilder App for Android and iOS from Google Play Store and Apple App Store respectively.
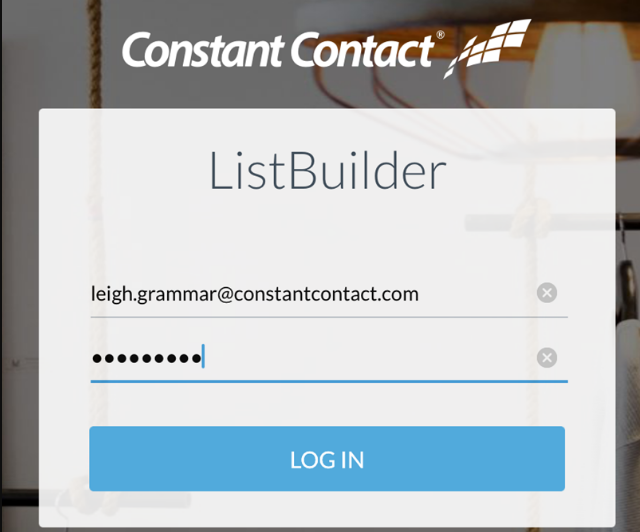
- Next, open the ListBuilder app and login with your Constant Contact Username and Password.
- Next, to set the Admin PIN, tap the toggle.
- Next, tap Choose List to choose a list. So that your contacts are added to that list upon sign up.
- Next, tap on the Background to add a background to your ListBuilder Sign-up Form.
- Next, tap on Logo to add a logo to your ListBuilder Sign-up Form.
- Next, add a message to your ListBuilder Sign-up Form.
- Next, under the Collect this information section, select the fields like Email Address, First Name, Last Name, Phone Number, and more.
- Next, tap on Next, present in the top-right, to switch to the sign-up form. Now you are ready to collect sign-ups.
Final Thoughts On Constant Contact’s Sign Up Tools To Grow Your Contact Lists
Now you have seen Constant Contact ‘s 7 great sign-up tools that aid you to grow your contact lists in no time. You can use all 7 sign-up tools and decide which one works better for your business. Then you can use one or a combination to grow your business in no time.
Further, email marketing experts all over the world recommend Constant Contact for small businesses. So, you can use Constant Contact for your business to grow in no time.
- Read Next: An Epic List of 7 Best Free Email Newsletter Services
- 7 Best Amazon SES Email Marketing Software Or Services to Send Emails For Very Low price
I believe that this article, Constant Contact’s 7 Sign-up Tools To Grow Your Email List, is a great aid for you to grow your contact list in no time. If you like this article, do a favor by sharing this article and follow BlogVwant on Facebook, Twitter, and YouTube for more tips.
Constant Contact Sign-up Tools To Grow Your Email List: FAQs
Does Constant Contact charge an additional fee to use its sign-up tools?
No. Constant Contact won’t charge any additional fee to use its sign-up tools except for few like Facebook Lead Ad.
How do I add a Constant Contact form to my website?
To add a pop-up sign-up form to your website, you need to embed Universal code anywhere on your site.
To add an inline sign-up form to your website, you need to embed the Inline code anywhere on your site and Universal code to the footer at once.
Here, both the Universal code and Inline code are available in your Constant Contact account. You can copy those codes from there to paste on your site.
How do I link Constant Contact to Facebook?
In your Constant Contact account, you can use Facebook Join My List App to connect your Constant Contact to your Facebook Business page.
For complete details go through this article once.
Is Constant Contact good?
Yes. Constant Contact is good for Small businesses. It is a powerful, leading expert in email marketing for small businesses for over 20 years. It provides all the powerful tools, marketing advice, and more to make your email marketing easy.
Is there a free version of Constant Contact?
No. Forever free version is not available. But you can use its 60 days free trial without submitting your credit card details.
