Want to backup WordPress site? You must use any one of the Best WordPress backup plugins to secure your data in the cloud or on your PC.
Hackers and malware are everywhere and website crash hits without you even knowing. This can be even worse if you do not have a backup WordPress Plugin or have a regular backup plan but it is not enough. The only thing you will realize is that you lose not only all visitors and potential sales but also content, databases, and everything on the website. Then, the nightmare begins when you have to start over the website literary from scratch.
Well, that is just an extreme example, but it still has the possibility to happen. As being said that preparing for malware and hackers is the best thing that you can do to prevent any damage to happen to your website.
You must use any one of the Top WordPress Security plugins like Sucuri to protect your website.
There are plenty of backup plugins available to protect websites from data loss. The tremendous choice may give you another headache for you do not know which one to choose.
If you are just not sure yet what backup plugins to choose, keep on reading because I have collected the top 9 Best WordPress backup plugins.
Why Backup WordPress site?
Backup is nothing but the insurance to your hard work. At any time you might see the issue on your website. Even some updates of your existing plugins or themes might corrupt your website and you might not be able to see or log in to your website. In that case, If you have the backup in your hand, you can restore to the previous known good configuration.
The backup plugin is one of the Must-have plugins for WordPress websites. There are numerous premium and free WordPress backup plugins available to take the backup of your WordPress website. The most popular premium plugins are Vaultpress by Jetpack and Backupbuddy. You have very few options for free backup. UpdraftPlus is the best among the free plugins. No other free plugin works like the UpdraftPlus plugin.
What is the Best way to backup WordPress site?
Many hosting providers like Bluehost or Siteground give you offsite backups for 30 days. If you have any issues with your site, you need to contact your hosting provider, they will restore your site to the last backup retention date. You can restore the entire site or a particular file or folder. Still, it is not recommended to completely depend on your hosting providers. You must have your website backup in your hand.
If you have a very big website with a lot of images and videos, you must use Vaultpress from jetpack which will give you one month of backup with unlimited storage. It is the cheap and best option for big websites.
When you have a small blog you can use your Google Drive storage space to store your website backup files. Usually, Google drive gives you free 15GB of storage space for a Gmail. If you are using a professional Gmail from G Suite, you will get 30 GB of free storage. You can use this space to store your website backup files.
You can also use the free plugin Updraftsplus. Usually, other backup plugins like Updraftplus create the entire backup of your website every day. It consumes your storage space. Suppose, your website backup needs 1GB and you wanted a one-month backup. So other plugins take 30GB of your storage space. They need huge server resources every day while doing the backup of your entire site.
So the best way to backup the WordPress site is by taking Incremental backup by using the WP Time Capsule plugin.
What is Incremental Backup?
Incremental means, just doing the backup of modified files only. So with this method, you need only 1GB of storage space to store 30 days’ backup. And it needs fewer server resources because it backs up only modified files. It does not back up the entire website each time you hit the backup button.
Best WordPress Backup Plugins
1.WP Time Capsule: WordPress Incremental backup

WP Time Capsule is a fantastic plugin that takes incremental backup of your entire site. It can store your backed-up data on remote servers like Google Drive or Dropbox or Amazon S3. The setup process is very easy. It has only a premium version. You can create restore points from thirty days to 365 days depends on the plan.
It takes the complete backup of your site only once. After that, it will take only incremental backup. It will have very little impact on your server resources because it takes backup of only updated files.
It is at the top of my list because it comes with a lifetime license so that you don’t need to pay recurring charges. It does not provide you storage. You need to use other storage services like Google drive. Due to incremental backups, it does not take much space. A Free Gmail plan is enough.
Bottom Line: Go for the WP Time Capsule when you want a lifetime or one-time payment backup tool.
WP Time Capsule Features
- Daily automatic backups at the preset time.
- Supports Dropbox, Google Drive, and Amazon S3.
- You can set the backup schedule.
- You can restore the entire site or specific files or database with a click. Restoration is very fast.
- High-end plan supports unlimited sites.
- Quick setup. Setting up this plugin is very easy. It hardly needs 5 minutes to set up.
- 30 days restore points.
- You can create staging site to test plugin updates or any updates.
- Automatically backs up your site before manual or auto updates. If any plugin update breaks your website, you need not worry. It automatically backup before updating.
WP Time Capsule Pricing & Plans
It got 3 yearly plans and 3-lifetime payment plans. The yearly plans start from $49 and the lifetime plans from $149. Click here to see what features do these plans included.
How to do WordPress incremental backup with WP Time Capsule
Video Tutorial:
For the reader’s convenience, we always create a video tutorial. Either you can watch and learn or simply skip the video and continue with the steps mentioned afterward.
First Visit WP Time Capsule website. Create a free trial account with your Email.
You can add your site from the manage sites section in the WP time capsule website. OR
Go to your WordPress dashboard -> Plugins -> Add New.
Search with the word WP Time Capsule. Install the plugin and Activate the plugin.
It will ask you to connect to your account. Enter your login details.
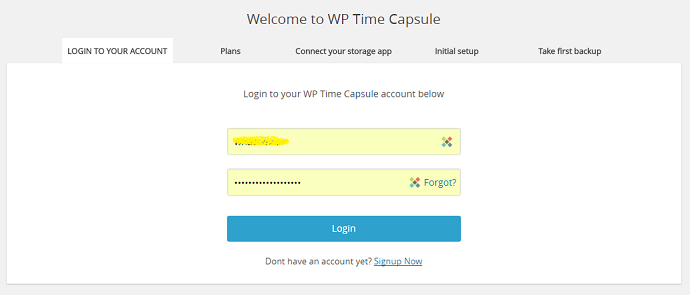
You will see plans. If you want you can select premium plans Or go with the trial.
Select your cloud storage and Click Connect option. I prefer to use Google drive.

After clicking on Connect to Google Drive option, it will ask you to select your Email if you have logged into more than one Email. Select Email. Next Select Allow option in next window.
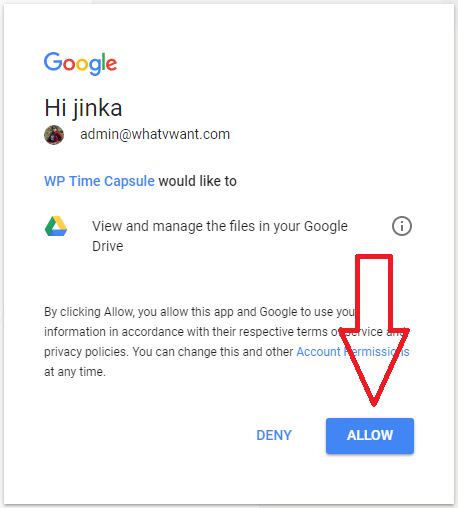
It will return you to the next step Initial setup in WordPress dashboard.
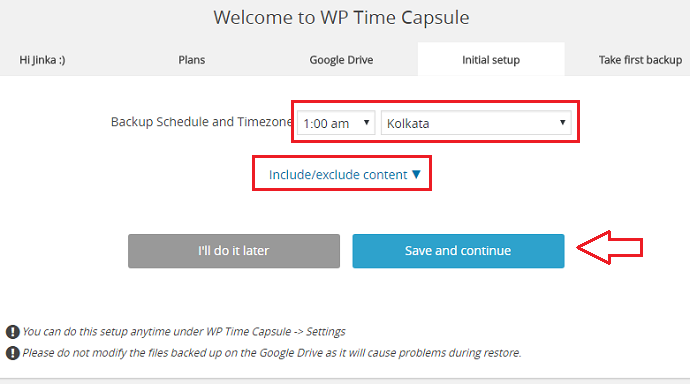
Just change your Backup Schedule time and Timezone. I recommend you to select the backup time at which your website get low traffic in the day. Because when you have less traffic, your server resource usage is also less and there will be no effect even if your backup process takes some server resources. You can check your less traffic time in Google Analytics.My website gets low traffic between 1:00 AM to 4:00 AM. So I have selected 1:00 am as my backup schedule time. Every day at 1:00 AM WP Time Capsule will back up my website to Google drive.
My website gets low traffic between 1:00 AM to 4:00 AM. So I have selected 1:00 am as my backup schedule time. Every day at 1:00 AM WP Time Capsule will back up my website to Google drive.
If you are a new blogger, I don’t recommend you to select the Include/exclude content option. Through this option, you can include or exclude your website files or database tables from backup. You need not change those settings. Because the plugin will automatically select required files and deselect not required files from backup.
Click Save and Continue.
Now it will start backing up your website. It will not zip your backup so it takes much time for the first backup. From the second backup onwards, it will spend only a few minutes because it takes backup of only changed files. You will have only one backup at any time in your Google drive. So you save a lot of storage space. Make sure you don’t make any changes to the backup folder in Google drive. It will create only restore points.
You can close the window during backup. It will continue the backup process of your website files and database.
If you want to see your backup, Login into your Google Drive account. You will see a folder with the name WP Time Capsule. Open the folder, you will see your website name. If you use this plugin on more than one website, you will see all your website folders.
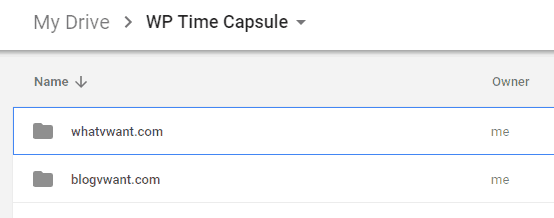
Click on any one of your websites, you will see all your files.
Your database will be saved in the location WP-Content -> Uploads -> tCapsule -> Backups.
How to Restore your website to backup date?
As I mentioned, this plugin creates restore points. You can restore your website to backdate. It creates 30 days restore points. It restores your website files and database very quickly.
Go to WPTimeCapsule -> Backups. You will see available restore points.

Select any one of your restore points. Select Restore Site to this restore point.

If you want to see the backed-up files, you can select three horizontal lines symbol at left. You will see modified files and databases. If you want, you can restore only a particular file or folder. I have restored this site. It was restored very quickly.
I have restored my site. It was restored very quickly.
2. Updraftplus: (Best Free WP Backup Plugin)

Updraftplus is one of the popular backup plugins and it is considered as the highest rated on WordPress.org. It has been recorded that more than half a million people install this plugin and it reaches almost a 4.9-star rating. Many people choose this plugin since it offers both free and premium versions. The free version of Updraftplus works great and the premium version is even better as it has more advanced features.
The free version of Updraftplus allows users to make a backup as well as restore. Surprisingly, the premium version does more than just backup and restoration but also migration. You can back up both specific files and the entire installation with just one easy click. This plugin is great if you want to set it then forget it.
The backup can be stored in third-party storage or directly sent to your email. Also, you can store your backup in their own storage called “Updraft Vault”.
If you are a developer, you can also make the plugin works on the client’s sites as well. In this way, clients do not have to be bothered with backup notifications.
Every day it takes the complete backup of your website at a preset time. The only downside is, It takes huge server resources to take the complete backup.
Note: Go for the Updraftplus when you want a free backup plugin. Also when you have no problem with the non-incremental backup process.
Updraftplus Free version features
- Full website scheduled and automatic backups.
- Supports Remote storage services like Google Drive, Dropbox, etc.,
- Restore website.
- Download backup files to your Computer.
- etc.,
Updraftplus Premium Version Features
- All free version features Plus
- Multisite compatible.
- Gives you Updraft Vault storage.
- Backups limitless external files and databases.
- You can set Backup time.
- Automatic backups before WordPress updates.
- Encrypted transport to Cloud storage.
- etc.,
Click Here to Check UpdraftPlus complete features
When you need the extra features, then only you need to go with the premium version. Otherwise, the free version is more than enough for most bloggers.
The only issue with UpdraftPlus is, every time it takes the complete backup of your website which consumes a lot of your server resources.
Updraftplus Pricing
The premium Updraftplus plans start from $42/year. To see complete packages, click here.
How Backup WordPress Site to Google Drive free Using Updraftplus
Video Tutorial:
For the reader’s convenience, we always create a video tutorial. Either you can watch and learn or simply skip the video and continue with the steps mentioned afterward.
Recent updates made the setup process is very easy.
1. Install and Activate UpdraftPlus WordPress Backup Plugin. If you are new to blogging and WordPress, you can read 4 Ways to Install and Activate the WordPress plugin.
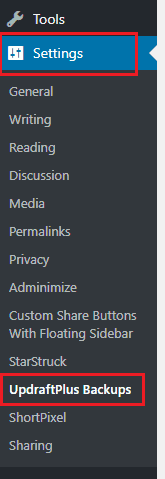
2. Go to Settings -> UpdraftPlus Backups from the left menu.
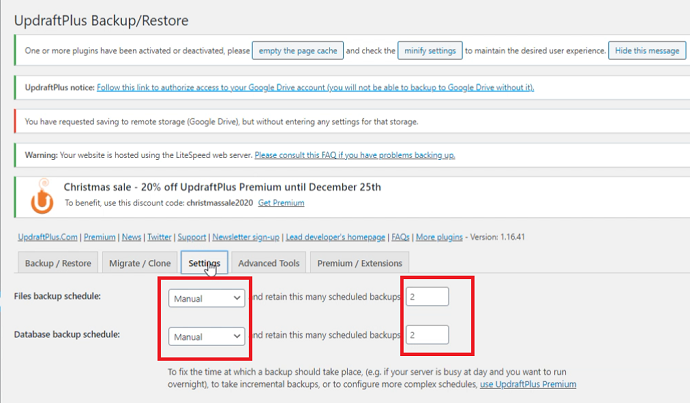
3. You will see UpdraftPlus Backup/Restore window. Select the Settings tab.
4. You need to change the Files backup schedule and Database backup schedule from Manual to Daily or 12 hours or anything you like from the dropdown list at two options.
5. You also need to change the number of backups to retain. You can retain 10 or 20 or 30 or anything you like depends on your cloud storage. The Free version will not give you the option to control the time at which it takes your website back up.
6. Scroll down the settings page to select Remote Storage. Just select Google Drive to use the 15GB storage given by your Gmail account. If you need more storage, Just use GSuite to get the professional Email along with 30GB of Storage.
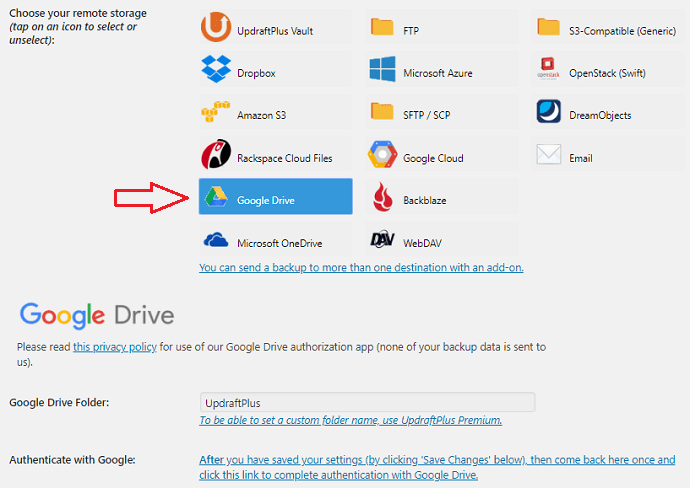
7. After selecting the Google Drive option, you will see the Folder name which you can not change with the free version.
8. You will also see the link to authenticate Google Drive. But before authenticating, you need to save the settings.
9. Just scroll down the settings page and select Save Changes at the end. Now you will see a popup which is shown below screenshot.

10. Just click on the link given in the popup.
11. Select your Email id. It is better to go with Gsuite Email.
12. Select Allow in the next window.

13. Click on Complete Setup in the next window.
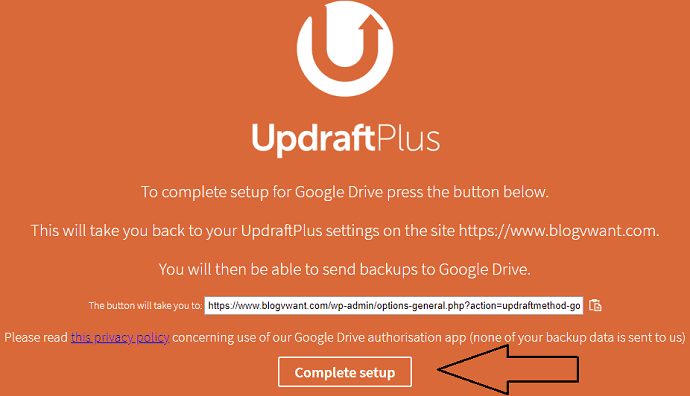
14. Now you will return back to your WordPress dashboard. You need to just click on the Backup Now button under the Current Status tab to take the first backup. It will automatically take the next backups.
You can check the backup files in the UpdraftPlus folder under MyDrive in your Google Drive.
If you had already used UpdraftPlus earlier. It might give you trouble to authenticate. Then you need to reset the earlier settings.
Go to Settings of UpdraftPlus
Click on the link given in the below screenshot to remove the existing settings.

Once again click on Save Changes.
Once again click on the link in the popup and follow the same procedure to authenticate.
Now take the first backup without worries.
- Related: How to show user star rating on WordPress posts, coupons, etc.,
- 5 Top WordPress Security Plugins
How to Restore the Backup?
If you had any issues with your website, you can restore it with the previous good backup.
If you can not log in to your WordPress dashboard, you need to download the files and database from your Google Drive and upload them to your website using cPanel or File Manager.
If you are able to login into your WordPress dashboard, it is very easy to restore the backup using the UpdraftPlus plugin.
Go to UpdraftPlus Backups Settings – > Existing Backups.
You will see the backups shown that in the below screenshot. Select the Restore option and follow the instructions to restore the files.

How to download the backup files to Computer?
You can download the files to your computer directly from your Google Drive.
You can also use the UpdraftPlus plugin to download the files.
Go to UpdraftPlus Backups Settings – > Existing Backups. You will see the below screenshot.
If you want to download the Plugins folder, click on Plugins. You will see the option to download the folder.
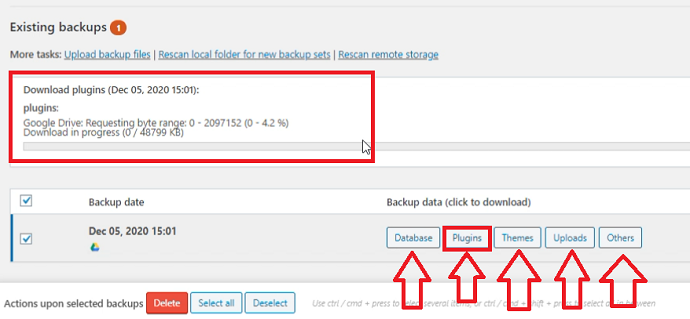
Likewise, you can click on other options to download every file to your computer.
3. WPVIVID (5-Star Rated Free Backup Plugin – Highly Recommended)

WPVIVID is the 5 stars rated free WordPress backup plugin waiting for you in the WordPress plugin repository. When I was checking its features, I was shocked. It got everything in the free plugin that you would ever wish for.
It is almost similar to the Updraftplus. In terms of rating, WPVIVID has beaten the Updraftplus. Further its premium plans are a lot cheaper than Updraftplus. So in a nutshell go for WPVIVID when you want the current best free backup plugin. Although the free plan consists of everything but for an incremental backup you have to upgrade. The premium plans are very pocket-friendly and have lifetime plans included too.
And yeah there is 14 days free trial (without credit card) available on all of their paid plans. So I suggest why don’t you go for the premium version rather than the free version? This way you will learn the benefits of this plugin in a much deeper manner.
Bottom Line: Go for the WPVIVID backup plugin when you want to enjoy the 5-star rated free backup plugin service. This is the most popular backup plugin currently available in the WordPress space. Also, go for this plugin when you want the cheapest lifetime-based premium backup plugin plans.
WPVIVID Plugin Free Version Features at a Glance
- Auto migration
- Staging site (subdirectory domain)
- Scheduled backups
- Unused images cleaner tool
- Offsite backup
- One-click backup & restore option
- Multiple backup storage options (Local disk, Google Drive, Dropbox, One Drive, Amazon S3, DigitalOcean Spaces, FTP & SFTP)
- Up to 7 backups could be retained in the free version
- Logs
WPVIVID Plugin Premium Version Features at a Glance
- Multisite Support
- White label
- Roles and Capabilities
- Staging Pro
- Backup & Migration Pro
- Image Optimization Pro
- 24*7 Ticket Support
WPVIVID Pricing
So in case you want to try out the WPVIVID premium version, check out the “trial” plan and start running the WPVIVID premium version for 14 days without any advance payment.
Apart from the “trial” plan, WPVIVID has 4 subscription and lifetime-based plans. The Subscription plans are as follows:
- Blogger – $49/year
- Freelancer – $69/year
- Small Business – $99/year
- Ultimate – $149/year
Note: The subscription plans license could also be used for a lifetime. But for regular updates and customer support, you have to renew it every year.
The WPVIVID lifetime plans include:
- Blogger – $99
- Freelancer – $139
- Small Business – $199
- Ultimate – $299
Note: The lifetime plans license includes lifetime updates and customer service. No need to renew yearly.
How to Backup & Restore WordPress Site using WPVIVID Plugin
In this section, I am going to show you the backup procedure with the WPVIVID free plugin. So similar to other plugins this one is also accessible directly from the WordPress plugin repository.
Install it & activate it.
To prepare for manual backup, navigate to WPVIVID backup > backup & restore section. Here you have to specify 2 things: First, the type of data you want to backup (database + website file OR only WordPress files/database. I am going to select the “database + files option”. The second is the location of the backup. Apart from the local disk option, you will see plenty of options to save your WordPress site backup including FTP, SFTP, GDrive, Dropbox, One-drive, and whatnot. Currently, only the local disk option is visible. To select other options, first, you have to configure them under the “Remote Storage” tab. The process is very simple.
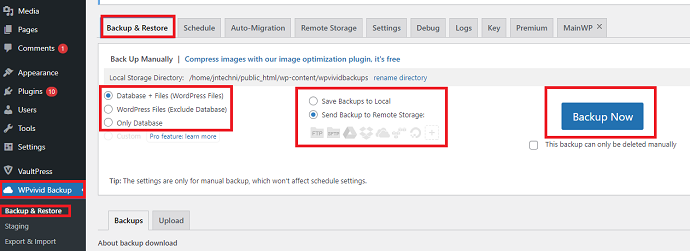
So when you’re ready to go just tap on the “backup now” button. After that backup process will be initiated. The completion time depends on the size of the website files.
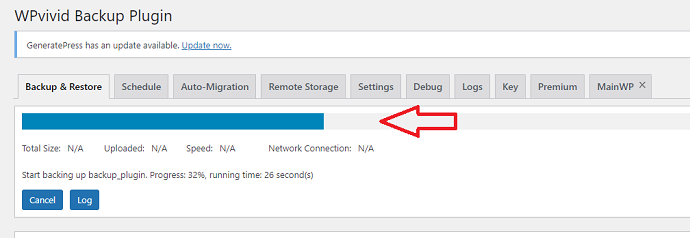
When the backup process finishes, you will see your final backup on the same page under the backup tab. In this tab, all backups will be shown. To download the backup, tap on the download button. Also, the restore option is also available in the same tab.

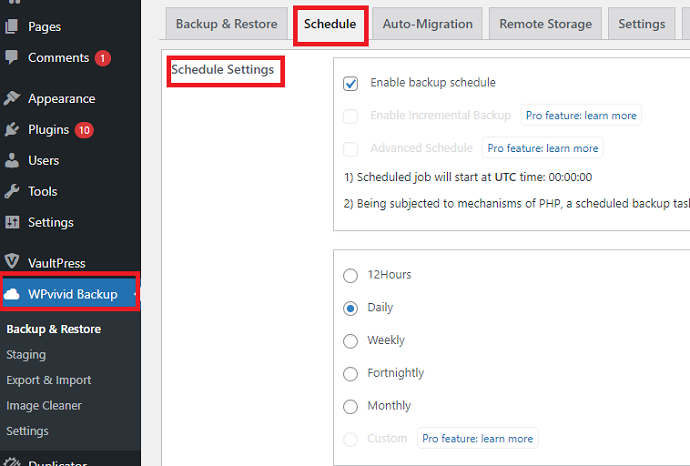
This is all about the manual backup. In case you want to schedule backup, navigate to the schedule tab. In the free version, you have a few time options: 12 hours, daily, weekly, fortnightly, and monthly. To schedule backup based on a custom time, then you have to upgrade to the WPVIVID premium version.
4.Vaultpress

Vaultpress is a product of Automattic which provides a premium backup service. To be able to enjoy Vaultpress, you need to purchase the Jetpack plugin which costs around $3.50 a month but if you need more security features, you will need a premium subscription. Among other backup security, Vaultpress is more powerful because it has a cheap price for high-powered security.
For those who already purchase Jetpack premium, you can simply activate the backup plugin. Vaulpress is also available as an add-on to the free Jetpack plugin.
One thing that you should know about Vaultpress is that it has different plans and pricing with different features. For example, the business plan which includes some types of automatic backup service. Further, it also comes with one-click restore and migration features. The package also includes security scanning to prevent spam, malware, hacking, as well as uptime monitoring.
Note: Go for the VaultPress when you want the storage facility included in the backup plugin.
Frequently WordPress runs promotions on their products. You can check Our WordPress coupon page for the latest offers.
5.BackupBuddy

BackupBuddy may be the most expensive choice of plugins on the list. It costs around $80 per year but you are going to get actually premium and useful service. BackupBuddy is a great choice if you run a large network that needs a secure backup.
It only takes a few steps to restore, migrate, and also backup a website. In addition, it also enables you to customize what kind of data that you want to back-ups such as a full WordPress website or only your database. The backup data can also be stored in various third-party services including Google Drive, Dropbox, or you can simply save it into a zipped folder.
Note: Go for the BackupBuddy when you’re looking for a backup tool with storage included.
6.Duplicator
Duplicator is another popular backup plugin. It helps you not only to duplicate but also to migrate the WordPress website. Basically, this plugin is a migration plugin but it comes with backup functionality in both a few parts and the entire website.
The free version, however, comes with a limited feature as it does not have automatic backup and does not allow you to save the backup to a third party. Meanwhile, the premium version enables you to schedule the backup and gives you access to save it on third-party service. Overall, the plugin does a good job as you can use fancy tools for cloning and copying the website.
How to Backup WordPress Site using Duplicator Plugin
The process to take a backup of your WordPress website with Duplicator is very simple and straightforward. Just follow along:
First thing first install the VaultPress either by clicking this link or directly from the WordPress plugin repository.
As I mentioned earlier that inside a free version, you would not get the feature of scheduled or automated backup, so we have to manually trigger the backup every time. So installing part is done.
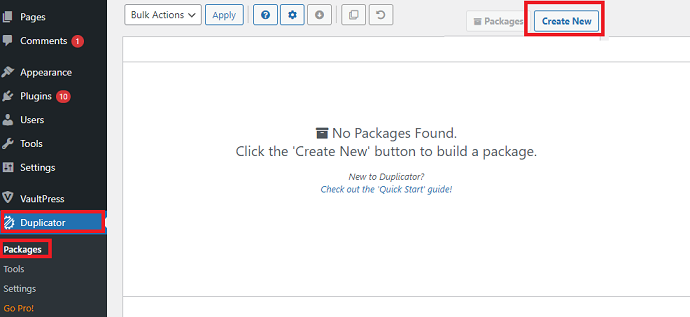
After that, Navigate to Duplicator > Packages. As a new user here you don’t see anything. To generate your first backup, just tap on the “Create new” button. Next hit on the “next” button.
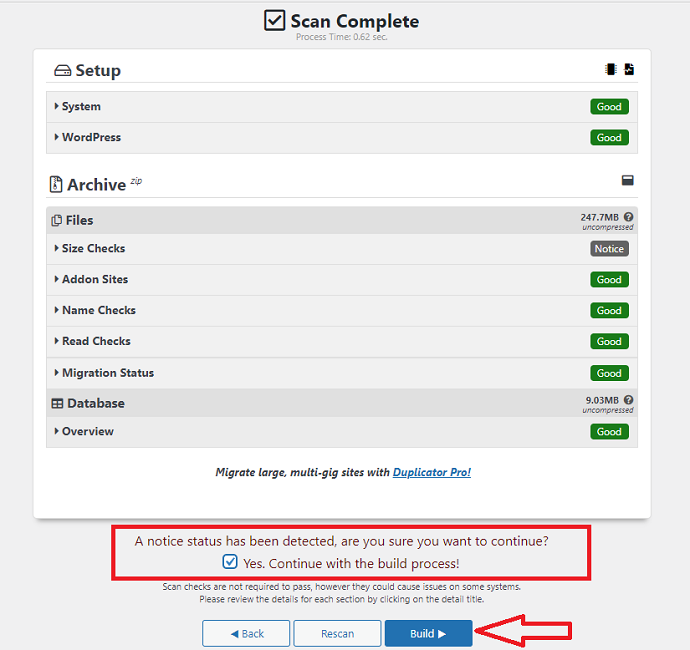
As soon as you tap on the start button, the duplicator plugins scan your website. Let the process finish. It only takes a minute.

When scanning finish, tap on the build button to generate a backup.
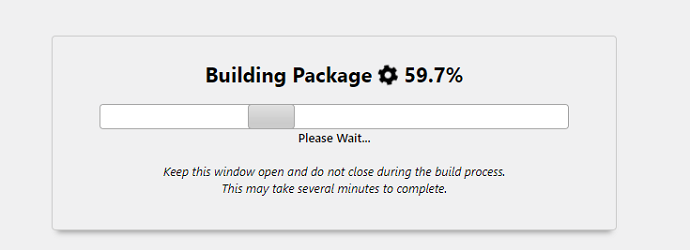
After hitting the build button, the backup generation process will be initiated. This will take a while depending on the size of your website. Let the process finish.
Finally, download the backup by pressing the “archive” button.
7.BackUpWordPress

BackUpWordPress is a simple backup solution. The free version of BackUpWordPress is available with limited features and the premium version gives you more control over where you want to store the backup data such as third-party service, send it to your email, or even download it on zipped folder. You can also create a schedule for different backup frequency. The best thing is premium version offers priority support.
Note: This plugin has not been updated for the last 8 months.
8.BackWPup
BackWPup comes with free and pro versions of the backup service. But if this is your first time using BackWPup, it is best to try the free version. However, the real difference between the free and pro version is the type of updates and supports as well as the number of websites it can cover.
The best thing about BackWPup is it has an intuitive and interesting page compared to other backup plugins. There are descriptions, icons, and also visuals for every tabs and button. Also, the backup command is called “jobs” and it uses unique terminology for another command. Even though it can be confusing, but once you are used to it; you will love this plugin.
How to Backup WordPress Site using BackWPup Plugin
With this plugin, the Backup Process is very easy to follow along. All the instructions are mentioned in every setting and option.
The first step is to install the BackWPup Plugin. Just search it directly from your plugin dashboard and install it.
After activation, Navigate to BackWPup > Add new job. Job is basically a type of task you want to run with this plugin. So under the general tab here you will see plenty of options.
- First, give a job name. It’s just for the label.
- Choose a job task from the available options. Although there are numerous options available to select here but we are going to check only on the “Database backup” and “file backup” options.
- Next, ignore the archive name option.

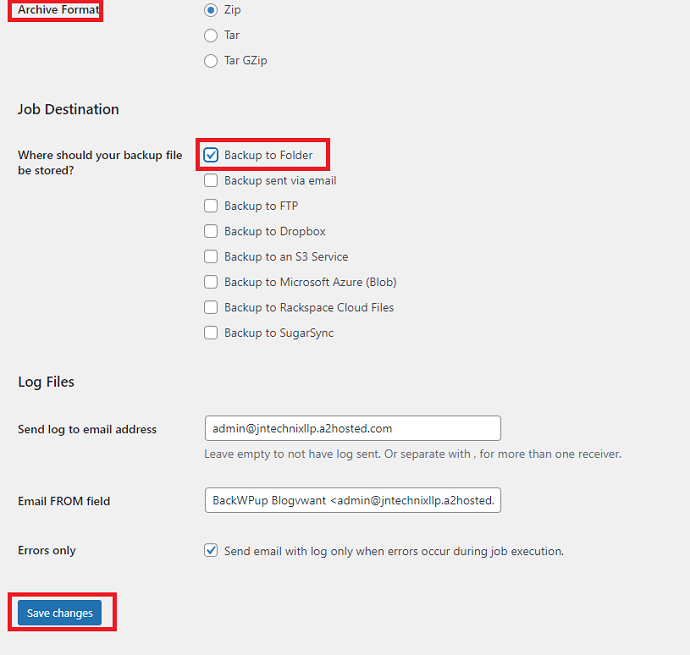
- Next, choose the backup archive format.
- After format, you have to define the backup storage location. Numerous options are available to choose.
- Finally, tap on the save changes button.
Now the only part left is to run a backup job we have created. Navigate to BackWPup > Jobs. Here you will see your job, hover on it, and tap on the run now button. That’s it. The backup process is now running and takes a little bit of time. Meanwhile don’t close or refresh the page.

9.Snapshot Pro

Snapshot Pro is beneficial for all your restore and backup needs. If you are a member of WPMU DEV, you will automatically have the access to Snapshop Pro. Not only it is fast, but Snapshop Pro is also safe and convenient. Basically, there are two options for backup available which are backing up the entire website and specific files only. If desired, the automatic backup can be scheduled from a daily to monthly basis. Besides backup, this plugin also allows you to restore as quickly as one click.
The data storage choice is available in many options such as Dropbox, Google Drive, or simply stores in WPMU DEV cloud storage. One main drawback, perhaps, is Snapshot Pro is not yet available in the free version.
Conclusion
When you want the cheap and best incremental backup solution, I suggest you go with the WP Time Capsule lifetime license. When you need the backup along with storage, you can go with Vaultpress or BackupBuddy. If you need the free one, you can go with Updraftsplus or WPVIVID.
- Next Read: 3 Methods to Scan WordPress Website for Malware Free
- 6 Top WordPress security plugins (Free&Premium)
If you like this Best WordPress backup plugins list, please share it with your friends. Let us know about your preferred backup solution through the comment section. Want more blogging tips, follow BlogVwant on Facebook, Twitter, and YouTube.
FAQ: Backup WordPress Site
How to backup the WordPress site to the computer?
To backup the WordPress site (files+database) to the local computer, one can use a backup plugin like WPVIVID which has an option to download or save a backup in a local disk.
How to backup WordPress site without plugin?
The best alternative for backup plugins is to use a backup service provided by the Webhosting server. Nowadays almost every web hosting company is offering a daily or weekly backup service that you can use to save WordPress website files directly into your computer.
How do I backup my WordPress site for free?
The ideal way to backup a WordPress website free of cost is by using the free backup plugins available within the WordPress plugin directory. The best free backup plugins are Updraftplus and WPVIVID.
How do I backup my entire WordPress website?
To backup a complete website either you can use the backup service provided by the hosting server or take the help of WordPress backup plugins.
How to restore a backup on a WordPress site?
The backup plugins mentioned in this article list also have an option to restore the backup. Or you can also use an FTP approach to directly upload website files into the root directory of your website.
