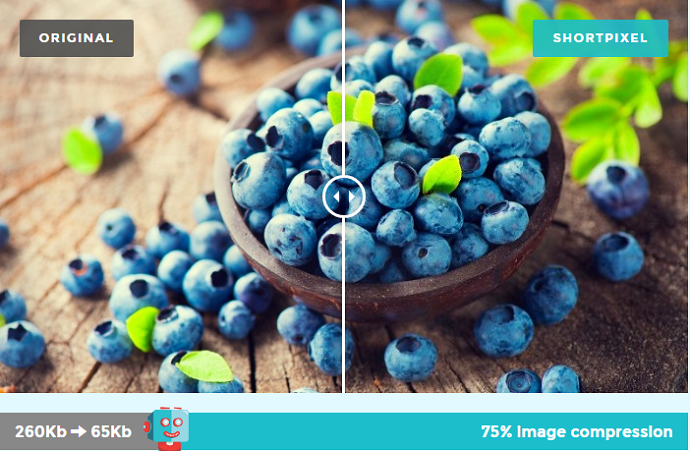
Through my Shortpixel image Optimizer Review, I can say Shortpixel is the best image compressor plugin for WordPress among what I have used before it. Because it has one-time purchase plans, free 100 image credits every month, Less expensive, excellent image compression ratio, and excellent image quality after compression.
Before it, I have used EWWW Image Optimizer and Smush it. They are good. But expensive compared to ShortPixel(50% Extra Image Credits). I found a little bit of quality difference in the image after compression with EWWW. But I am very much satisfied with the image quality and compression ratio with ShortPixel.
What is the use of the Image compression?
Before going into the Shortpixel Image Optimizer review, I will tell you the importance of Image compression. As a blogger, You must use screenshots or free stock images from Shutterstock. When you use more images, your website page size will be getting more. When page size is more, your page load speed will be less. So that Google may give less ranking to your post.
If you have 5 images of 250KB each. Only images contribute 750KB to your post and the entire post size may become up to 1MB. If you use the Shortpixel plugin, each image size will become up to 50KB or less. So your entire page size comes under 300KB. It may load very quickly than the actual one.

When your page loads quickly, you have a good chance to get the top ranking. It also advised using the fastest web host servers like Siteground(60% Discounted link) or Bluehost(60% discounted link) to get the good website speed to improve your ranking.
Note: I need to mention that Resizing an image is different than compressing the image.
Hint: ShortPixel comes in 2 different plugins: ShortPixel Image Optimizer Plugin (For image compression) and ShortPixel Adaptive Images Plugin (For image scaling to the right size)
- Must Read: Don’t You Resize Image, You Must do. Read Why?
- 5 Sites for Royalty Free Stock Images for Commercial Use
Why Shortpixel?
I need to mention that, before using Shortpixel I have used EWWW Image Optimizer which is a premium plugin to compress my images. It was working very well, but expensive compared to Shortpixel and I did not find any difference in image quality after compression.
Note: After using Shortpixel, I must say it is the best. As soon I installed this plugin on my website, these GooglePage Speed Insights tool errors had vanished: “Serve images in next-gen formats” and “Properly size images”
The best features of the Shortpixel image optimizer plugin are given below.
Reduce image size up to 80%: Don’t think that it is just a statement. I have seen this many times. I have uploaded 190 KB image, after compression, its size became 30 KB.
Image Quality is excellent: Shortpixel manages the real quality of the picture. You don’t find quality reduction ever after compression.
Pro features for Free: Shortpixel is different from other premium plugins. It gives 100 free image credits every month. You will get the same pro features for free images also. Even if you buy image credits, they will be used only for your free 100 images. That means you will get 100 images every month.
One-time purchase plans: It gives you a monthly plan as well as a one-time purchase plan. I recommend you go with a one-time purchase plan. Because that will be cheaper, compared to monthly plans. Your credits will never expire.
A single license on multiple websites: Whether you use free credits or purchased images credits, you can use them on unlimited sites.
Cheap & Best: It is very cheap compared to other premium plugins. You will get at most 1500 image credits for $1. But you need to go with one-time purchase plans.
Let us continue with my Shortpixel image Optimizer Review.
ShortPixel Image Optimizer Review
I have been using it for a long time. I made a good decision for switching to ShortPixel. It automatically compresses the image after uploading it to your WordPress post editor.
Note: As I mentioned earlier that ShortPixel has 2 types of plugins to choose from. Their working procedure, pricing are slightly different from each other. However, the goal is the same – optimizing the website images.
So let’s learn about both of them one by one… and don’t forget to check the next section where we have mentioned the procedure of how to use the ShortPixel plugin.
ShortPixel Image Optimizer Plugin Review

Features of Shortpixel Image Optimizer
It has an impressive features list.
- Lossy, Lossless, and Glossy compression options. The glossy option is the best for photographers.
- It can save the original images in a separate folder. If you want, at any time you can restore the original image.
- Option to remove EXIF tag.
- It can resize the image to predefined width and height. If you don’t want, you can uncheck that option.
- Bulk image optimization will help you to compress all existing images.
- Quick installation process. You can use it within 10 minutes.
- It can compress JPEG, PNG, Retina images and PDF also.
- It can convert PNG to JPEG if you need.
- It can generate WebP versions of the images if you want.
- You can exclude certain images based on patterns.
- It automatically optimizes image while uploading to the media library.
- Supports unlimited websites. You can use single API Key on as many websites as you want. At present, I am using it on two websites.
Plans, Pricing & Discount
It has both free and premium plans. The best part is, this will give you 100 free image credits every month. In the free plan, you will get all premium features for free up to 100 image credits every month.
Note: BlogVwant readers get a special 50% more credits. You will get 150 free image credits per month through this discounted link.
It has monthly plans and one-time purchase plans. I recommend buying one-time purchase plans. Because image credits will not expire. You can use one-time purchase plans credits for your lifetime.
BlogVwant readers get 50% more credits in every plan.
- Click Here to Activate 50% Extra Image Credits for Monthly plans
- Click Here to Activate 50% Extra Image Credits for One-time purchase plans
Monthly Plans
Shortpixel monthly plans (50% more image credits) pricing and image credits will be shown in the below screenshot. Remember they are discounted image credits. Actual pricing and image credits may be different.

If you don’t use your credits in a month, they will be expired. It is the reason I suggest one-time purchase plans.
One-time purchase plans
Shortpixel one-time purchase plans (50% more image credits) pricing and image credits are shown in the below screenshot. They are also special credits for BlogVwant readers. Actual image credits will be different.

I have bought a $99 plan and I have got only 170K image credits plus 85,000 free images per month with my discount link. The great thing here the images credits of the lifetime plan will never expire 🙂
Compression ratio & Image quality after Compression
I have seen that it compressed my images up to 80%. Of course, it depends on the image and colors in the image. But you will definitely get a very high compression ratio. I did not find any quality difference
Usually, you may find a little bit of quality difference after compression with other plugins. I found a negligible quality difference in the image after compression with Shortpixel. Image quality is amazing even after compression. You can check all images in this blog for quality.
- Related: How I compress images up to 80% using Shortpixel
- 10 Essential WordPress plugins list you must have
ShortPixel Adaptive Images (Plugin 2) Review

Before jumping to the features of this plugin, let me tell you quickly the difference between this and the first plugin you saw above.
Well, the ShortPixel adaptive images don’t compress your images. But it will smartly scale or crop the images, optimize them and serve into next-gen format (WEBP & AVIF) through their powerful CDN to users depending on their screen size.
And with ShortPixel adaptive images, you get the extra advantage of their fastest CDN inbuilt service.
Now you may be wondering about the quality? No, after scaling the quality will remain the same. That is the benefit of scaling an image over compression.
Let’s see the example to understand the working of this plugin:
Suppose your webpage image’s original resolution is 640*480. And then a visitor lands on a page with the desktop device. So first ShortPixel plugin analyzes the device resolution, in this case, the device (desktop) viewport is larger than the image’s original dimension. So here no scaling is required. Hence without making any change in image dimensions, ShortPixel just optimized the image and serve through their rocket fuel-powered CDN.
For instance, if suppose the user is using their phone and the viewport (screen) size is for example 300*300. Then ShortPixel performs the scaling operation here and then delivers the scaled optimized image with their CDN.
Features of ShortPixel Adaptive Images
- The working procedure is different. Scaling over-compression – Hence no reduction in image quality.
- Supports both WEBP and AVIF formats for delivering an image.
- Lazy loading
- The optimized images would be served from a ShortPixel global CDN.
- Caching support is available. It doubles the image serving speed.
- Optimize images sliders, galleries, and any other blocks which include images.
- Compatible with JPEG, BMP, PNG, GIFF, and TIFF image formats
- Automatic optimizing support. No manual work is required.
Pricing & Discount of ShortPixel Adaptive Images Plugin
Similar to the ShortPixel image optimizer here you will find both monthly and one-time payment plans.
The plans of the ShortPixel Adaptive Images plugin are based on the CDN bandwidth and number of visitors, not the number of images. It also has a free plan in which you get 500 MB CDN bandwidth and 500 visitors/month. (After using our discounted link you will get a bonus of extra 250 MB CDN bandwidth)
Offer: BlogVwant readers get a special 50% more CDN bandwidth on both monthly and one-time plans through this discounted link.
Apart from the free plan, these are the pricing and plans of the ShortPixel Adaptive Images plugin: Note the prices shown below are has discounted. The original prices may vary.
Monthly Plans – ShortPixel Adaptive Images
Click here to get the 50% extra CDN bandwidth on monthly plans.

One time Plans – ShortPixel Adaptive Images
Click here to get the 50% extra CDN bandwidth on one-time plans.

How to Use Shortpixel
Video Tutorial:
For the reader’s convenience, we always create a video tutorial. Either you can watch and learn or simply skip the video and continue with the steps mentioned afterward.
It is very easy to use Shortpixel. You don’t even have to spend 10 minutes to start using it.
Free signup to Shortpixel(50% more image credits link) using your Email. If you update your blog rarely, You need not purchase any plan. You can use your free image credits. But I prefer buying one-time purchase plans by going into plans section.
You might easily use free image credits. One image credit is not equal to one image. When you upload one image to your WordPress, WordPress will generate four to five images of different sizes. Shortpixel will count every image size. That is the reason why they call image credits not images.
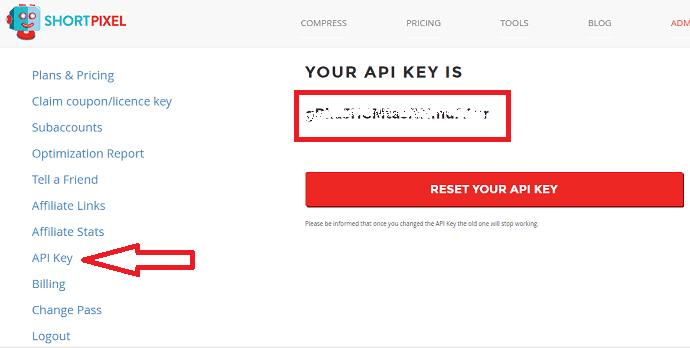
After logging into the Shortpixel dashboard, click on API Key in the left menu. you will find API Key. Copy this key.

Login to your WordPress dashboard. Go to Plugins -> Add New. Install the Shortpixel Image Optimizer plugin.
Shortpixel settings
Go to Settings -> Shortpixel from your WordPress dashboard. Paste the APY Key under General Tab. Click on Validate.

I recommend you to select Compression type as Lossy. It will give you good compression level. Even though it is lossy compression, you will not find the loss in the image quality.
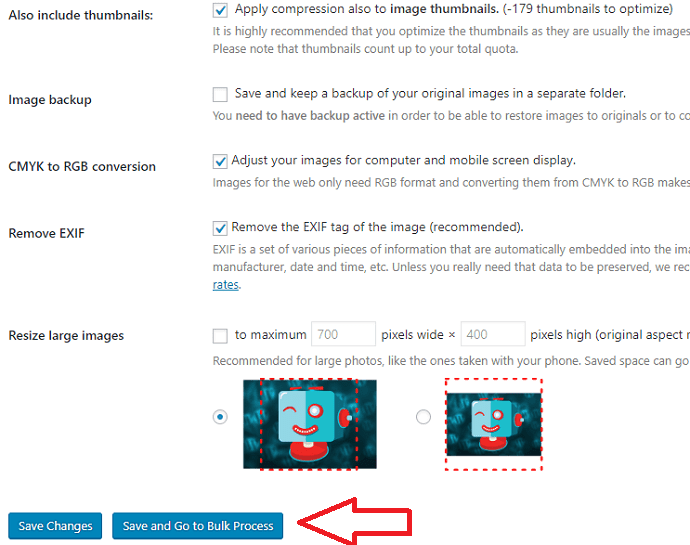
My remaining settings are shown below. If you want, you can change them according to your need.

You need to select Save and Go to Bulk Process option which will compress all your existing images.
I suggest you go to the Advanced section and select the below options
- Optimize retina images.
- Optimize PDF.
- Optimize Media on Upload.
The last option is very important. After selecting the last option. You need nothing to do with this plugin. It will automatically compress all your images when you upload them to Media.
Conclusion
You must use the image compressor plugin to get better speed. Shortpixel is definitely the best one to use.
If you like this Shortpixel image Optimizer Review, please share it with your friends or family. Want more blogging tips, Please follow BlogVwant on Facebook, Twitter, and YouTube
FAQ: ShortPixel Image Optimizer Review
What is the difference between the ShortPixel Image Optimizer plugin and the ShortPixel Adaptive Images plugin?
The main difference between these two plugins is their working procedure of optimizing images. ShortPixel image optimizer applies the compression algorithm whereas ShortPixel adaptive images apply to scale. Next is the CDN factor, the CDN facility is only available with the ShortPixel adaptive version.
Do I have to install the ShortPixel image optimizer plugin in order to use the ShortPixel adaptive images plugin?
No. Both plugins are separate.
Can I use ShortPixel on non-WordPress websites?
Yes. They have API available for both tools.
Which compression mode should I choose in ShortPixel configuration settings?
Lossy – for balanced optimization.
How credit is calculated?
For ShortPixel image optimizer, 1 credit equals 1 optimized image. For ShortPixel adaptive images, 1 credit equals 5 MB of CDN bandwidth.
Will ShortPixel works on the website having Cloudflare?
Yes. You need to change a few settings. The ShortPixel team would assist you with this.
Which payments modes do ShortPixel accepts?
PayPal & Credit Card.
Will errors related to images go from the Google PageSpeed tool after installing ShortPixel?
Yes.