Do you host website on DreamHost? And want to easily install any type of DreamHost SSL certificate on your DreamHost website? Just like: Let’s Encrypt SSL (Free), Comodo (Sectigo) SSL and Third-Party SSL certificates.
Then this article is the most reliable one for you. Go through this article to learn how to install DreamHost SSL certificate like Let’s Encrypt SSL (Free), Comodo (Sectigo) SSL, and Third-Party SSL certificates on your DreamHost website.
What is an SSL Certificate?
- An SSL (Secure Sockets Layer) certificate is a kind of digital certificate that provides authentication for your website and enables an encrypted connection.
- In short, an SSL certificate encrypts and protects all data exchanges between your website and visitors.
- Once you have installed an SSL certificate on your domain. Then if you open your website using https. Then you can see a lock icon displayed by the browser. This confirms that your connection is secure. And the installed SSL certificate is working.
Related: What is an SSL certificate? How a blog gets to benefit from it
Why do you need an SSL certificate for your site?
An SSL certificate is needed to secure information related to your users on your website like:
- Login Details.
- Credit card transactions and bank account details
- Personal information like full name, address, date of birth, mobile number, and others.
- Proprietary information.
- Medical records.
- Legal documents.
- Contracts.
- And more.
What are the types of SSL Certificates?
The following are the two types of SSL certificates you can add to your domain within the DreamHost panel.
- Let’s Encrypt SSL (FREE).
- Comodo (Sectigo) verified SSL ($15/year).
Suppose, if you have purchased a third-party SSL certificate from another company. Then you can install it manually on your domain within the DreamHost panel.
- You Might Like: How to Install/Use Free Bluehost SSL Certificate on A New Blog
- 4 Simple Steps to Setup Siteground SSL certificate Within 2 Minutes
How To Install DreamHost SSL Certificate (Let’s Encrypt SSL, Sectigo verified SSL and Third-Party SSL certificates) on DreamHost Website
As you have seen, basically there are three DreamHost SSL certificate types available to add to your domain using DreamHost panel. Go through the following to add any of the three certificates to your domain using DreamHost panel.
1. How To Install Let’s Encrypt SSL (Free) Certificate on DreamHost
- Let’s Encrypt SSL (Free) is just as secure as a paid certificate.
- The only difference is, it won’t provide any seal of trust which some users prefer to display to their visitors.
- Now, go through the following steps to install Let’s Encrypt SSL (Free) certificate on your domain using your DreamHost panel.
Step1: Go to DreamHost Panel webpage and log in. Then your DreamHost panel webpage opens.
Step2: Next, on the left of the webpage, click on Domains. Then on SSL/TLS Certificates.
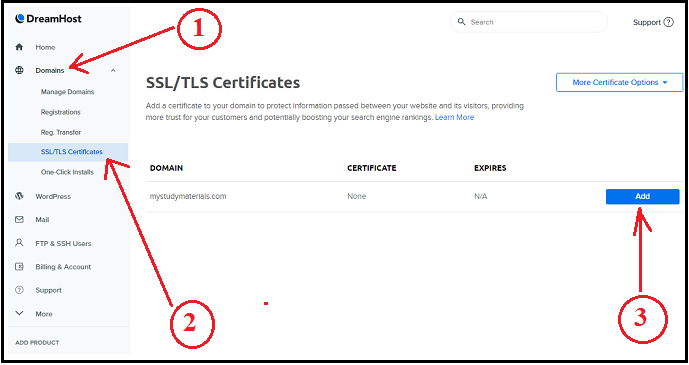
Step3: Next, a list of your domains appear.
Step4: Next, click on the Add button, visible on the right of your domain for which SSL certificate to be installed.
Step5: Next, click on the Select this Certificate button below the LET’S ENCRYPT SSL CERTIFICATE.
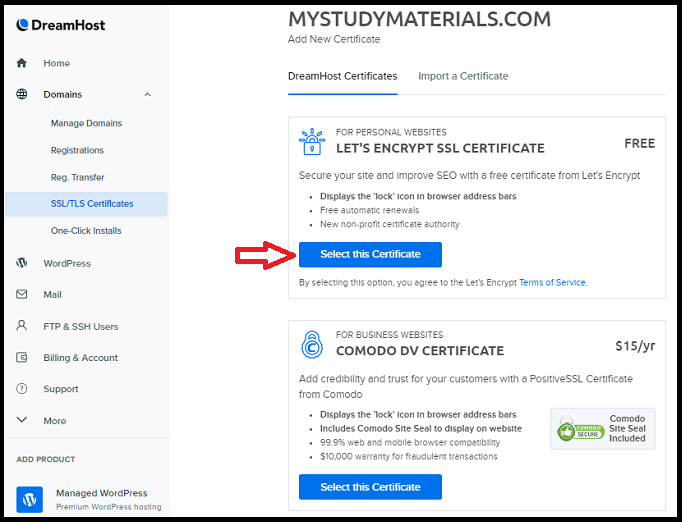
Step6: Next, a success message displays.
- Once you have installed an SSL certificate on your domain using DreamHost panel. Then you need to wait for a few hours for it to update online.
- Once the Let’s Encrypt SSL certificate is installed on your domain, then you can view the following next to your domain on the SSL/TLS Certificates page.

1.1 Test if the Let’ Encrypt SSL (Free) certificate is working
- You have now installed Let’s Encrypt SSL (Free) certificate on your domain.
- Now, if you want to test whether the SSL certificate which you have now installed is working or not. Then simply type the URL of your website on the browser like:
- https://example.com and hit the enter button on your keyboard.
- Then your website opens.
- Now, if the browser bar displays a Lock icon, then your connection is secure.

That’s it! You have now installed Let’s Encrypt SSL Certificate (Free) on your domain using DreamHost panel. And you have tested it too.
2. How To Install Sectigo verified SSL Certificate on DreamHost
2.1 How do I purchase a professionally-signed SSL certificate?
| Prerequisite: Before you begin to purchase an SSL certificate, ensure that you have created an email@yourdomain.com. Just like: admin@example.com administrator@example.com hostmaster@example.com postmaster@example.com webmaster@example.com Once you have created an email, then you can use this email as confirmation email. And you can begin the process of purchasing an SSL certificate for your domain. |
Step1: Go to the DreamHost panel webpage. And log in.
Step2: Next, on the left of the webpage, click on Domains. Then on SSL/TLS Certificates.
Step3: Next, a list of your domains appear.
Step4: Next, click on the Add button, visible on the right of your domain for which SSL certificate to be installed.
Step5: Next, click on the Select this Certificate button below the COMODO DV CERTIFICATE.
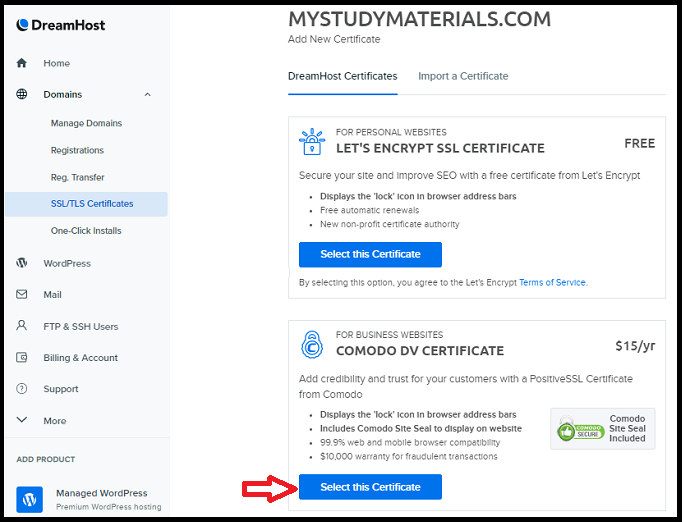
Step6: Next, a form appears to enter your personal and website information.
- Here you need to fill all the fields to go the next step.
- Suppose if you don’t have company/organization name, then you can fill this field with your first and last name.
- This information is essential to generate the Certificate Signing Request (CSR). And this is used to generate your new professionally-signed SSL certificate.
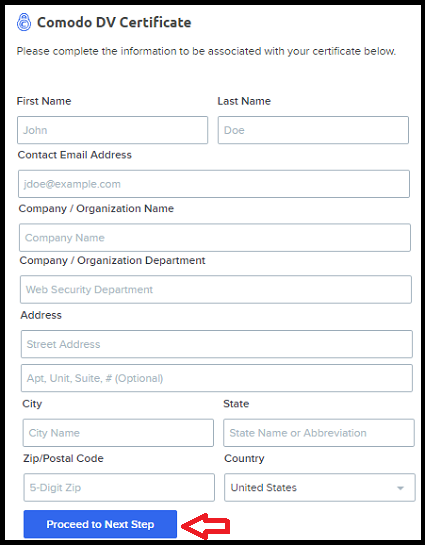
Step7: Once you have entered all your personal and website information. Then click on the Proceed to Next Step button.
Step8: Next, choose one of your domain’s emails from the dropdown. Then Comodo sends verification to this email to verify your ownership.
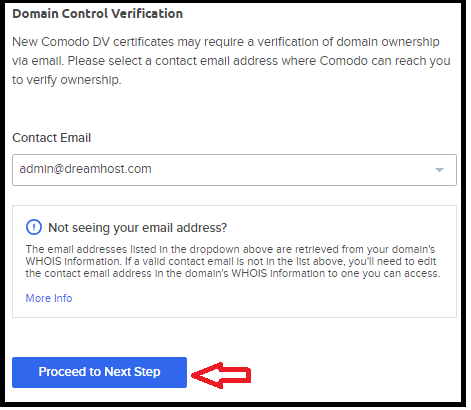
Step9: Next, click on the Proceed to Next Step button.
Step10: Next, the last page opens. That is the payment page. Choose any payment method and fill the fields with your information.
Step11: Next, click on the Submit Payment Now button.
That’s it! You have now purchased a signed certificate for your domain on your DreamHost panel.
2.2 What happens after you purchase a Signed Certificate?
Email from DreamHost:
- Once, you have purchased a signed certificate for your domain, then support@dreamhost.com sends a confirmation mail to your email that you have selected previously.
- This is just a confirmation of your purchase.
- And it can also ask you to click a link to verify your contact information.
Email from Sectigo:
- You can also receive a second email from Sectigo. This is part of the DCV (Domain Control Validation) process to verify your domain.
- Suppose, if you receive this email from Sectigo, then you can continue through the steps to complete the verification of your domain.
- In most cases, this email from Sectigo can come within 2 hours after you have purchased the Comodo (Sectigo) certificate.
2.3 Installing the Sectigo certificate on your website
You have now purchased the Sectigo certificate and received an email from Sectigo. Then the next step is you have to install this purchased Sectigo certificate on your website. Go through the below steps to perform this task.
Step1: Go to the DreamHost Control panel. And log in.
Step2: Next, on the left of the webpage, click on Domains. Then on SSL/TLS Certificates.
Step3: Next, a list of your domains appear. Here, next to your domain you can view ‘Order Pending‘. That means you have not yet installed the Sectigo certificate on your website.
Step4: Next, to the right of it, click on the Settings button.
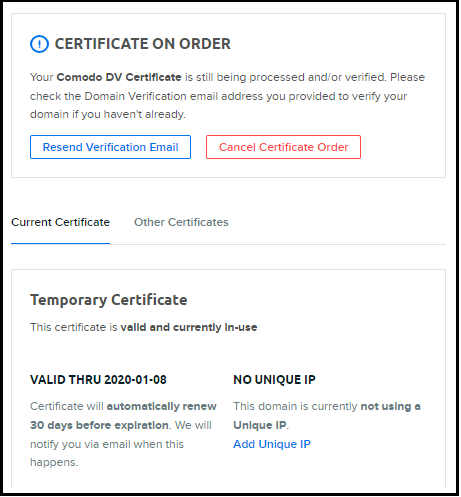
Step5: Next, you can view the Temporary Certificate that is currently installed on your website.
- This certificate remains active until your Sectigo certificate is in the process of installing.
- Once your Sectigo certificate is installed, then this certificate replaces the temporary certificate. And it becomes the only active certificate on your domain.
- Once your Sectigo certificate is active, then you can view the following on the right of your domain on the SSL/TLS Certificates page.

2.4 Test if the Comodo DV certificate is working
- You have now installed the Comodo DV certificate on your domain.
- Now, if you want to test whether the SSL certificate which you have now installed is working or not. Then simply type the URL of your website on the browser like:
- https://example.com and hit the enter button on your keyboard.
- Then your website opens.
- Now, if the browser bar displays a Lock icon, then your connection is secure.

That’s it! You have now installed the Comodo (Sectigo) SSL Certificate on your domain using DreamHost panel. And you have tested it too.
2.5 Use the PositiveSSL secure site seal for the Signed SSL Certificate on your website
- Once you have purchased and installed the Comodo (Sectigo) SSL certificate on your domain. Then you have to use the PositiveSSL secure site seal for this certificate by visiting the Positive SSL website.
- Here, you might think Why Use a PositiveSSL TrustLogo?
- The answer is here.
- Visible trust indicators, like the PositiveSSL Trust Logo, are proven to improve your site’s performance in:
- Transaction completion rate.
- Form completion rate.
- Revenue per shopper.
- Shopping cart fulfillment
- Average order value (AOV) and items per cart.
- New services signups.
- And more.
3. How To Install Third-Party SSL certificates on DreamHost website
3.1 Create a CSR at DreamHost
- If you want to purchase an SSL certificate from another company, then you need to create a CSR (Certificate Signing Request) at DreamHost first.
- Next, that company will use this CSR to generate your SSL certificate.
3.2 What if I already have my certificate information?
- Suppose, if you already have a private key, intermediate certificate, and signed SSL certificate. Then you will still need to create a CSR at DreamHost before installing.
- Next, your Certificate Authority uses this CSR to generate your SSL certificate.
- Next, you can use these new files to install into your DreamHost panel.
3.3 Installing Third-Party SSL certificates on DreamHost website
Step1: Go to the DreamHost control panel. And log in.
Step2: Next, on the left of the webpage, click on Domains. Then on SSL/TLS Certificates.
Step3: Next, a list of your domains appear.
Step4: Next, to the right of your domain, click on the Add button.
Step5: Next, click on the tab Import a Certificate, at the top.
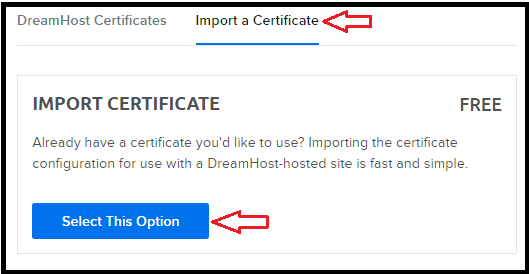
Step6: Next, click on the Select This Option button.
Step7: Next, a new page opens displaying four empty boxes related to:
- Certificate Signing Request.
- Certificate.
- Private Key.
- Intermediate Certificate.
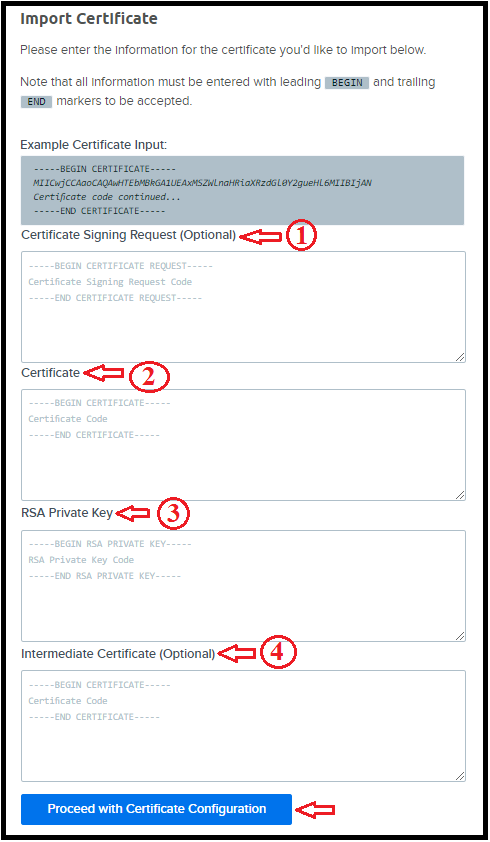
Step8: Next, enter your third party certificate information in all these boxes.
Step9: Next, click on the Proceed with Certificate Configuration button.
Step10: If there are no errors, then within 15 minutes, your new SSL certificate is pushed out to the live servers.
- Next, if you go back to SSL/TLS Certificates page. Then you can view Imported to the right of your domain.
- Next, using https, load your site in a browser.
- Then you can notice the padlock icon at the beginning of the URL.
- Suppose if you click this icon, then you will see that the certificate is verified and active.
4. Is there any special procedure if my Nameservers are not hosted at DreamHost?
- Yes.
- Suppose, if your Nameservers are not hosted at DreamHost. Then you must add CAA (Certification Authority Authorization) records at your current DNS hosting company before adding an SSL certificate in the DreamHost panel.
- And you have to ensure that the added CAA records must be compatible with DreamHost before you add an SSL certificate to your domain.
- Now, CAA record you add depends on:
- whether you want to install a purchased a Comodo (Sectigo) SSL Certificate.
- or you want to install a Let’s Encrypt certificate from DreamHost.
Suppose, if you would like to install a Comodo (Sectigo) SSL certificate, then go to Sectigo website to add CAA records.
Or if you would like to install a Let’s Encrypt Certificate, then go to the let’sencrypt website to add CAA records.
Once you have added CAA records, then you have to install Comodo (Sectigo) SSL certificate or Let’s Encrypt SSL certificate (Free) on your domain within the DreamHost panel.
Now, the procedure to install Let’s Encrypt SSL certificate (Free) or Comodo (Sectigo) SSL certificate is the same as you have already seen in the previous sections of this article.
Conclusion
Now you have gained the full knowledge on how to easily install any type of DreamHost SSL certificate like:: Let’s Encrypt SSL (Free), Comodo (Sectigo) SSL, and Third-Party SSL Certificates on your DreamHost website using your DreamHost panel. So, you can now install any kind of SSL certificate on your own easily on your domain using DreamHost panel.
- Read Next: DreamHost Review: Is DreamHost a Good Web Host?
- DreamHost Webmail Login, Settings, Usage, etc.,
I assure that this article can definitely aids you to install any type of DreamHost SSL certificate on your domain using your DreamHost panel. If so, do a favor by sharing this article and follow BlogVwant on Facebook and Twitter for more tips.
DreamHost SSL Certificate – FAQs
-
How long does it take to update an SSL certificate on your DreamHost site after installation?
Suppose you have just now installed an SSL certificate on your domain using DreamHost panel. Then it will take a few hours to update online.
-
Is Let’s encrypt a trusted authority?
Yes. Let’s Encrypt is a free, automated, secure, and open certificate authority (CA), work for the public’s benefit. It is a free service offered by the Internet Security Research Group (ISRG).
-
Is Let’s encrypt trusted?
Yes. Because it has received cross-signatures from IdenTrust, which means that its certificates are now trusted by all major browsers.
-
How long is let’s encrypt valid for?
SSL certificates generated by Let’s Encrypt are free and valid for 90 days. And after 90 days these certificates can renew automatically.
-
How do I install a third party certificate?
You can install a third-party SSL certificate on your domain using DreamHost panel. For details, just go through this article.
