Want to Migrate the website to Rocket.net? Rocket.net provides you free migration service. But after migrating, you need to do some modifications to your DNS. Since Rocket.net is a new WordPress managed hosting company, they have little documentation. Here the complete guide.
I have migrated my two sites, and I have seen some issues. I will explain what are steps to follow to migration your site to Rocket.net.
When you don’t have an account in Rocket.net, Just Signup to Rocket.net.
Why I have migrated to Rocket.net?
I wanted to use Managed WordPress hosting. Usually premium managed hosting services like WPEngine, Kinsta price is high.
I came across Rocket.net. The price surprised me for the features they are providing. And the important thing is they provide you CloudFlare enterprise service for free. No other managed WordPress hosting will give you Web Application Firewall or complete features equal to CloudFlare enterprise. It is the major reason I have shifted to Rocket.net.
Even if you use any other Managed WordPress hosting services, they don’t guarantee you 100% protection. You must pay extra to use any other security services like Sucuri or Cloudflare. But when you use Rocket.net, you need not use them.
How to Migrate website to Rocket.net
Step1: Contact Rocket.net Support
Login into your Rocket.net control panel. Go to Support and open support ticket with Migration request.

Just select Support under Department, your hosting plan under Related Service. You can select the Priority according to your need for High or Medium. It is better to use Migration request as a subject.
Now give your old host cPanel or control panel login details in the message field. And submit the ticket.
Step 2: Stop working in your site
They inform you when they start the migration process. You need to stop working on your site. If you work anything while migration process, you lose that information.
Step 3: Check your site on Rocket.net with temporary URL
You will receive a mail when they complete the migration process. You will get a temporary URL on your Rocket.net dashboard to check whether your site is working from Rocket.net server.
Just go to Sites section on Rocket.net dashboard. You will find the option at the top menu. Check the Site information section.
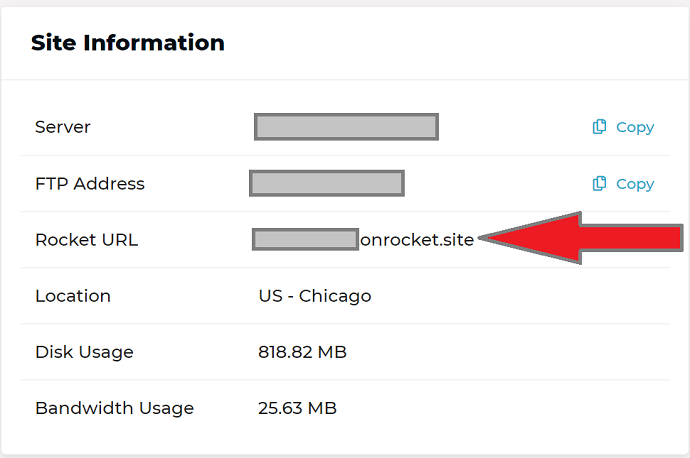
Copy the Rocket URL and paste on the browser new tab. You will see your complete site.
If you see any issues on your site, you can contact their live chat. Otherwise continue with the next step.
Now you need to update DNS records on your domain registrar.
All domain registrars will not give you the option to add DNS records. They will give just an option to change name servers. In that case, you need to create an account in CloudFlare, add the domain to CloudFlare, CloudFlare will give you the option to add DNS records.
In my case, I host domains on HostGator, so I had to add my sites to CloudFlare.
If your domain registrar gives you the option to add DNS records, you can skip the below step 4, and continue with Step 5.
Step 4: Open CloudFlare account or Sign in
You just need to sign up to CloudFlare free account. If you have the account on CloudFlare, just sign in to CloudFlare dashboard.
Click on Add Site option.
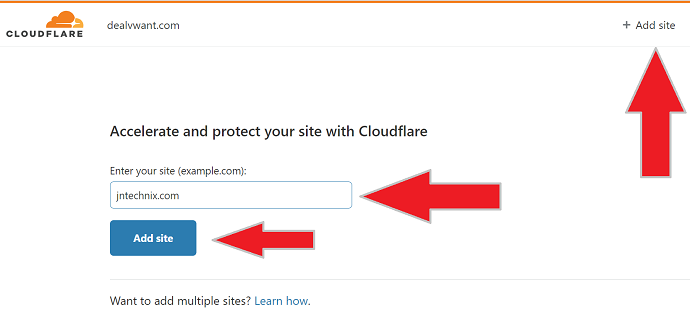
Enter your domain name and click on Add site option.
You will see all CloudFlare plans.
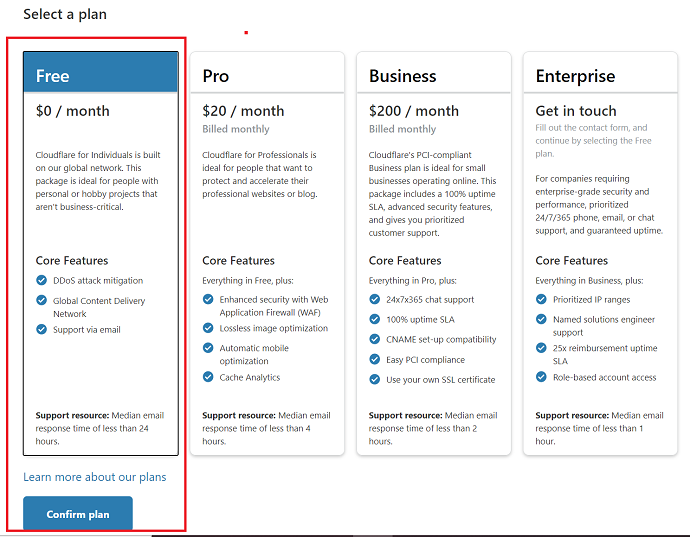
You just need to select the Free plan. And click on Confirm plan.
It will show you all your domain records like, A record, MX record, DNS, etc.,
Check whether CloudFlare populated all your records correctly.
Click Submit option.
CloudFlare will give you name servers. Copy them and paste on your Domain.
Wait for 8 hours before doing next step.
Step 5: Setup in Rocket.net Control panel
Login into Rocket.net control panel.
Click on Get Started near Ready to go Live.
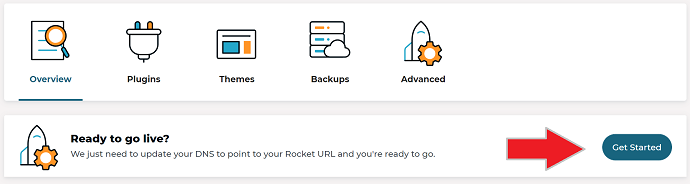
You will see three steps. You need to complete them.
Step 1 Change Domain Name
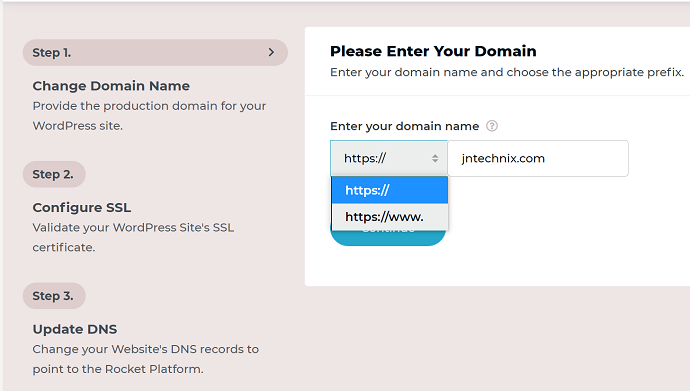
Just select your domain prefix https// or https://www.
Enter your domain in the empty field.
Step 2: Configure SSL
You will see the required txt values on the screen. You need to create two new txt records in CloudFlare.
Login into your CloudFlare account. Select your website and Go to DNS section.
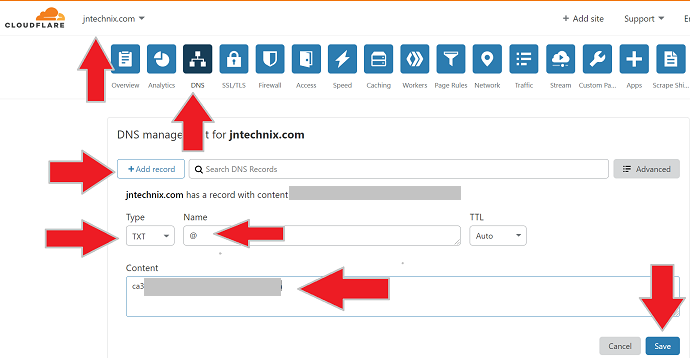
Click on Add record. Select TXT in the Type. Type the @ in the Name field. Copy the value from Rocket.net control panel and paste in the content field. Click Save. Now you will see a new TXT record with the name yourdomain.com.
You need to add the second TXT record in the same manner. After adding two TXT records, you will see two extra records shown in the below screenshot.

Now click on I’ve added TXT records, Continue button in Rocket.net control panel.
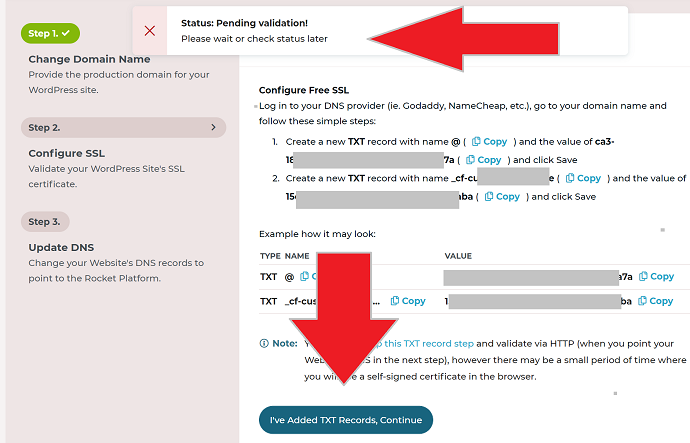
You will see a Status message about Pending validation. It takes some hours. Wait and come back later. If you done everything right you will see green check mar at Step 2 and continue with the Step 3.
Step 3: Update DNS
Now you need to add two DNS records as you did in the previous step.
Go to CloudFlare DNS section. Click on Add record option.
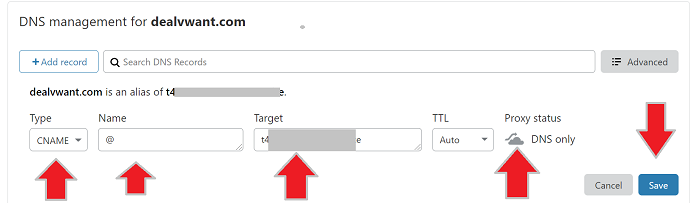
Now select CNAME as Type, type @ in Name field, paste the value in the Target field, click on Proxy status cloud symbol to disable Proxy and make it DNS only.
You need to add the second record as well.
Now your traffic routes through Rocket.net servers. Their servers will provide you CloudFlare enterprise plan.
If you like this tutorial about How to Migrate your website to Rocket.net, do a favor by sharing this article and follow BlogVwant on Facebook, Twitter, and YouTube for more tips.