Want to create your online course curriculum and plan lessons visually with an intuitive and drag-and-drop customizer without touching a single line of code? Then you need to install and activate the MemberPress plugin and MemberPress Courses Add-on on your WordPress site.
Nowadays e-learning has become popular and the norm. And offering online courses is a must for many educational institutions and content creators. But building this functionality from the scratch can be tricky for anyone, even for experienced developers. Because it requires massive amounts of complicated coding.
However, with the MemberPress Courses add-on, you can easily build your curriculum and plan lessons with an intuitive and drag-and-drop customizer without touching a line of code or hiring a developer. All you need is your existing WordPress site and the MemberPress plugin.
In this article, we will give you a quick overview of MemberPress Courses and show you how to easily build your course curriculum in just 4 steps using the MemberPress course add-on. And we will also unveil all the new Classroom mode features in MemberPress Courses.
What is MemberPress?
MemberPress is an easy to use and all-in-one membership plugin for WordPress. It aids you to build impressive WordPress membership sites, accept credit cards securely, sell online courses, build curriculum visually, control who sees your content, sell digital downloads, etc all without the difficult setup and touching a single line of code.
- You Might Like: Top 6 Best WordPress Membership Plugins In Friendly Budget
- Top 8 WordPress Affiliate Plugins To Skyrocket Your Sales:
Check out all-new Classroom mode in MemberPress Courses!
MemberPress is a great and easy platform to create and sell your online courses. With this, you can say goodbye to complex coding. With the MemberPress Courses add-on, you can build your course curriculum visually and organize your lessons without any code. You can set various rules to restrict your content based on subscription, taxonomy, etc. Now go through this article to view the quick overview of the MemberPress Courses and know how to build your course curriculum visually using the MemberPress Courses add-on.
Introducing MemberPress Courses
MemberPress Courses is an add-on to the MemberPress plugin. This is a great way to easily build and sell your online courses without touching a single line of code. If you wish to turn your WordPress website into a fully functional Learning Management System (LMS) without hiring a developer. Then it is an excellent tool. And no other tool can replace it in this case.
With MemberPress Courses, you will get excellent features such as:
- Create effective coupons and dynamic pricing pages.
- Simple payment gateway integration and subscription management.
- Powerful access rules to control who can view your content.
- An intuitive visual builder that aids you build your course curriculum visually and organize your lessons.
- Use the sales feature to build subscriptions.
- Enable course progress tracking.
Further, it works with any WordPress theme. And it is also compatible with popular page builders including Divi and Elementor.
How to Build Your Curriculum Visually with MemberPress Courses (Just In 4 Steps)
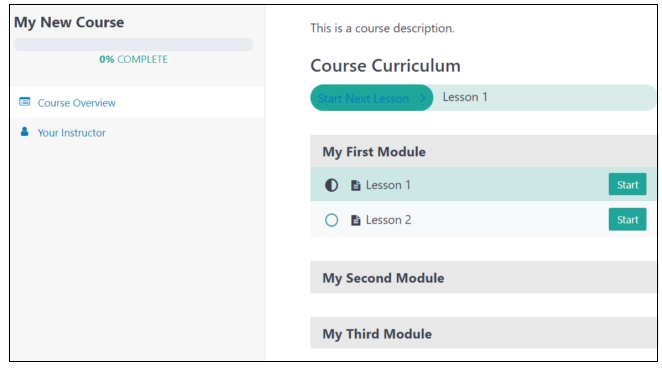
In this section, you can view how to build your curriculum visually for your e-learning material or online course using MemberPress Courses Add-on.
In brief, the following steps are involved here.
1. Subscribe to MemberPress. Then install and activate the MemberPress plugin and MemberPress Courses Add-On (Ignore this step, if you have already activated the MemberPress plugin and its Courses Add-On)
2. Create your course page.
3. Build and Add your Curriculum using the MemberPress Courses visual builder.
4. Manage your settings and access rules.
5. Enable Classroom Mode to customize colors, logo, and Featured Image.
Total Time: 10 minutes
Step1: Subscribe to MemberPress. Then install and activate the MemberPress plugin and MemberPress Courses Add-On.
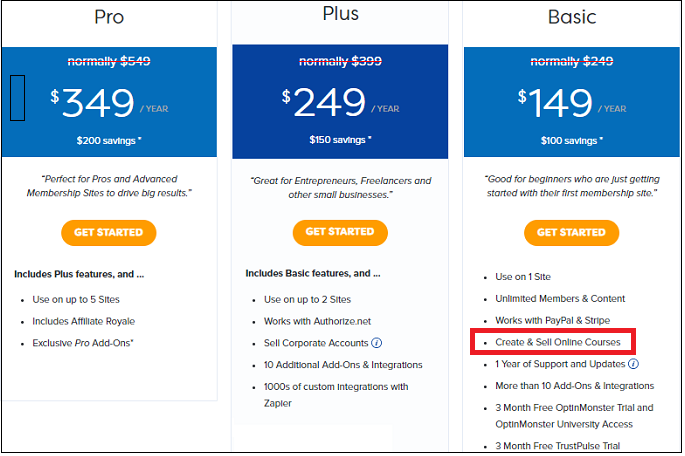
1. The very first step is you need to subscribe to any one of the premium plans of MemberPress plugin like Basic, Plus, and Pro. Here its Basic plan is enough for you to create and sell online courses. The cost of its basic plan is $149/Year.
2. After purchasing, go to the MemberPress website and log in. Then download the zip file for the plugin.
3. Go to your WordPress site dashboard. And navigate to Plugins >> Add New >> Upload Plugin.
4. Choose the just now downloaded “MemberPress.Zip” file and upload it.
5. Click on Install Now and then on Activate Plugin. Now MemberPress plugin activates on your WordPress site.
6. Next, navigate to MemberPress >> Courses, and click on Activate Courses Add-On
That’s It! Now you have successfully installed and activated the MemberPress plugin and MemberPress Courses add-on on your WordPress site.
Suppose you have already installed and activated the MemberPress plugin and MemberPress Courses add-on on your WordPress site. Then skip this step and jump to step2.
Step2: Create your course page
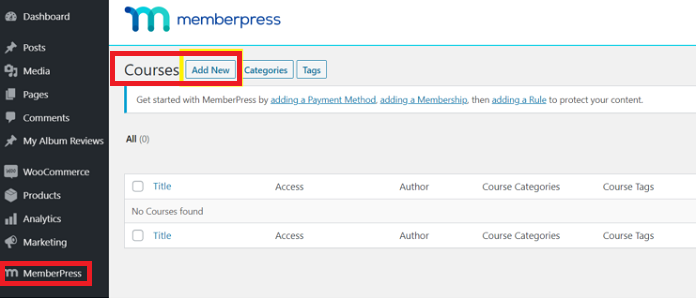
1. Navigate to MemberPress >> Courses. And click on Add New.
2. Then you are directed to the MemberPress course editor for your primary course page. Here you can add your course title and description. Note that the actual lesson plan section doesn’t belong in this section. 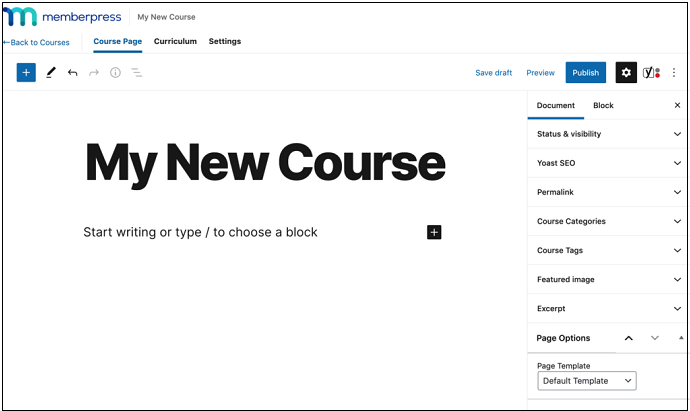
3. On the right-hand side of the screen you can see the menu under the Document tab. Using this menu, you can fill in additional details like Course Categories, Course Tags, etc. We highly recommended that you must take enough time to fill out this information. Because it can aid you to keep your classes organized and restrict access to them later.
4. Here, you can also add the Featured image if you wish. Once you have made all the changes, then click on Publish.
Step3: Build and Add your Curriculum using the MemberPress Courses visual builder

1. Click on the Curriculum tab of the course editor. Here, you can add the contents of your course using the MemberPress Courses visual builder.
2. Click on the Add Section button to create your First Module. Enter the title and click on Add. Repeat this to create as many modules as you like.
3. To add your lessons, expand each section with the arrow button. Click on Add Lesson and enter the title.
Then click on Add.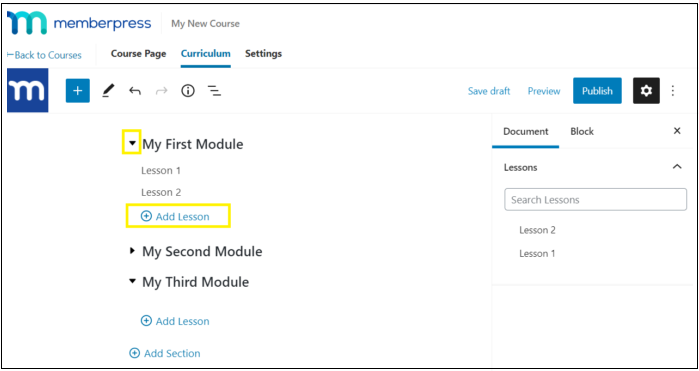
4. To begin adding your content, hover your mouse over one of your lessons. And click on the pencil icon in the toolbar that appears.![]()
5. Next you are directed to the lesson editor. Here, you can add content just like you would do in the WordPress Block Editor. 
If you want, you can also preview or delete a lesson from the same toolbar in the course editor. But to remove the item altogether, you will need to do so from the Document tab. Save changes once you have made all the changes.
That’s It! You have now successfully built your course curriculum.
Step4: Manage your settings and access rules

1. Now head to the Settings tab in the course editor. And turn on the Include in Course Listing setting. Then MemberPress will automatically create a courses URL slug where your users can access your educational content.
2. If you want to sell your online course or restrict access to it. Then there are some additional steps you will need to follow. In this way, students will need to register and pay before they can view lessons.
3. Add the URL for your class’ registration page in the Sales Page field. If any unauthorized users try to access your course then they will be redirected here, so they can sign up.
4. Move back to your dashboard and go to MemberPress >> Rules to restrict your new course. Here you can use tags or categories to easily do this. 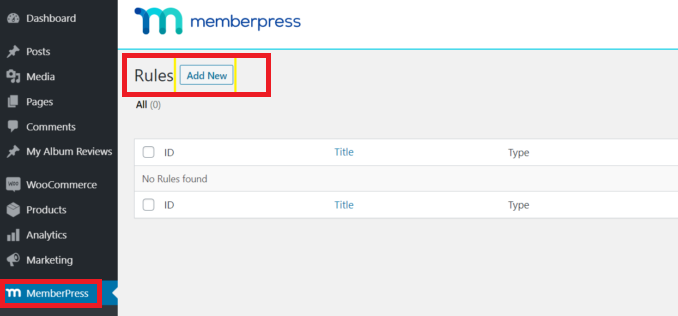
5. Click on Add New and go to Protected Content.
6. If you wish to restrict your course based on this taxonomy, then select All Content With Course Tag from the drop-down menu. You can also choose to protect a single course, all content, and other options if you prefer.
7. Next, enter the tag for your course that you want to protect. And move to Access Conditions, to grant access to selected membership tiers or individuals. Then click on Save Rule once you are done.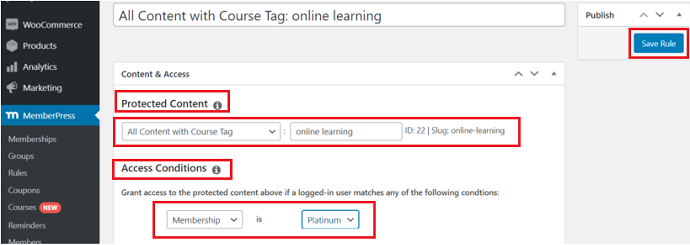
Step5: Enable Classroom Mode to customize colors, logo, and Featured Image
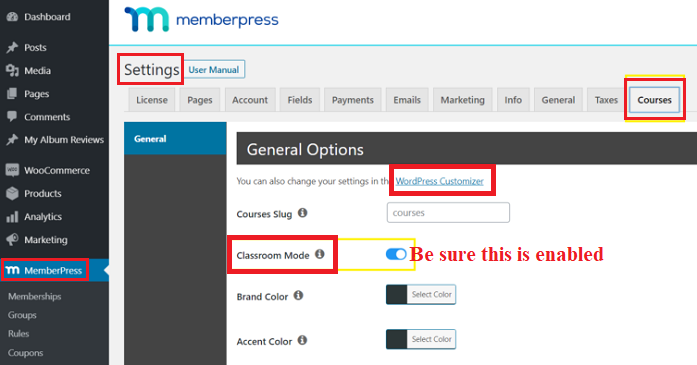
Now you need to enable Classroom Mode to make your course page look sleeker and more visually appealing.
Here, you can have options to pick which colors to use, add a logo, change the Featured Image used, and even incorporate custom CSS to fully personalize the look of your course page. You can also leave these options as their default settings if you wish.
Now just go through the following steps to do this:
1. Navigate to MemberPress >> Settings >> Courses tab. And ensure the Classroom Mode is enabled.
2. If you want to see your changes live, then we recommend using the Theme Customizer.
Once you enable the Classroom Mode, then you will see a link to WordPress Customizer.
Simply click over it. Then you are directed to the front-end Customizer settings. 
3. Now you can view whatever changes you made live. So that you can quickly select the suitable colors and logo to give elegant look to your course page.
4. If you want to change the Featured Image for your course page, then you can do easily do this.
Head to WordPress Dashboard >> MemberPress >> Courses. And edit the Course for which you want to change the featured image.
Next, on the right-hand side of the screen, click on the Featured Image section and then on Set featured image under the Document tab to update your image.
5. If you are a designer and wish to apply CSS to the buttons/links in the Courses Classroom Mode. Then you can set some CSS classes for your Next/Previous buttons and the breadcrumb links.
For doing this, navigate MemberPress >> Settings >> Courses tab. And scroll to the bottom. Then you will see the following options. 
Next, add your CSS classes. And don’t forget to save the settings.
Estimated Cost: 149 USD
Supply:
- MemberPress Plugin
- MemberPress courses Add-on
Tools:
- MemberPress Courses Add-On
Materials: Software
- Also Read: How To Skyrocket Your Sales And Increase ROI: WPForms+Active Campaigns Can Do This
- How to Get Crazy Engagement With Popular Posts Lists In WordPress: Only MonsterInsights Can Do This
Conclusion
Offering online classes these days is an excellent source of income for businesses as well as a handy solution for educational organizations looking to stay connected with students or employee training. But building a virtual curriculum visually isn’t easy. It requires a massive amount of complex coding.
Fortunately, with the MemberPress Courses add-on, you can easily build your course curriculum and plan lessons visually with an intuitive and drag-and-drop customizer without touching a single line of code or hiring a developer. All you need is your existing WordPress site and the MemberPress plugin. Further, you can easily configure access control, sell online courses, sell digital downloads, etc.
Finally, you must say thanks to MemberPress Courses visual builder for making the complex task of building a virtual course curriculum visually and organizing lessons easy. And with this plugin, you can now easily add your e-learning materials to your WordPress site without touching any code.
I strongly believe that this tutorial, Check out all-new Classroom mode in MemberPress Courses, helped you to know how to build your course curriculum visually using MemberPress Courses visual builder. If you like this article, please share it with your friends. If you want more blogging tips, follow BlogVwant on Facebook, Twitter, and YouTube.
MemberPress Courses: FAQs
Is MemberPress free?
No. This is a premium membership plugin for WordPress.
Can I use MemberPress to create and sell online courses?
Yes.
Can I use MemberPress with any WordPress theme?
Yes.
What payment gateways does MemberPress work with?
PayPal, Stripe, and Authorize.net.
Does MemberPress work with any email marketing system?
Yes. It works with numerous email marketing systems.
What is the best membership plugin for WordPress?
MemberPress.
