Facebook is the biggest fish in the sea of social media marketing. In recent years, Facebook has emerged as a formidable competitor to Google’s creation. Take a look at the eye-widening statistics: Facebook has a whopping 1.92 billion monthly active users, with approximately half of all active Facebook users visiting the site multiple times per day.
And, while the site’s burgeoning demographics have skewed older in recent times, it’s undeniable that Facebook continues to remain one of the most popular social platforms for staying in touch with friends and associates, chatting with family, promoting products, and, of course, watching tons of video content. (To be precise, Facebook receives over 4 -5 billion video views per day.)
This pretty much sums up the significance of Facebook and its video ads.
They are not only entertaining but also inexpensive. Facebook video ads are the most excellent way to ensure that people remember your brand and return to your website. Video isn’t just a Facebook phenomenon; it’s a strategy for engaging and converting website visitors, as well as pushing leads down the funnel.
Whether you’re using native clips or video ads, Facebook should be at the top of your video marketing strategy plan. If you haven’t yet realized the realities of the situation, it’s time to wake up and take advantage of Facebook’s massive reach to enhance your video ad campaigns.
But do you often wonder how marketing professionals and small businesses use this potent medium to their advantage?
Or If you’re not sure where to begin, don’t worry – we’ve got your back! In this blog post, I’ll walk you through a step-by-step guide to creating Facebook videos like a champ.
Facebook Video Ads Prerequisites: Things to keep handy before sitting for creating a video Ad
The better you prepare the better the video ad will be generated. Before opening up the Facebook video maker few things you should prepare in advance.
Storyline and Ad Copy:
90% of the people directly sit in front of their video ad maker before doing homework. Instead, they should first prepare an ad copy and storyline. If your ad required a video shoot then still ad copy and storyline play a vital role and should be focused on first.
If you skip these things there are chances that you would stuck or be completely zoned out in the middle of the video ad creation process.
Ad copy included a lot of elements you should plan in advance such as ad heading, CTA, main body, etc.
The storyline is nothing but a sequence of events that is going to happen in your video ad. Again planning in advance is crucial and helps you to record and generate a video easily.
If you haven’t created a storyline before, check out google. The internet has tons of free resources where you can learn the process to create an engaging storyline. For example, consider reading this storyline article on Wikipedia.
Footage/Recording & Other Media
Well, not everyone relies on stock videos and images to form an ad video. Instead, they record their own video and put it up for the ad. Manual shooted videos perform 10 times better than stock videos. But still, if your budget is less and you don’t have a proper setup to shoot a video then stock footage is the only option left.
So either record or collect a stock video for your project before jumping to the video ad maker tool. Make sure to follow the Facebook video ads guidelines while producing a video for the ad.
Hint: The Facebook Video Ads guidelines are mentioned in the next section.
Note: Skip the footage or recording part if you are planning to form an ad video with the images like a slideshow.
Facebook Video Ad Maker tool
Without editing a video, you cannot give the final touch to your ad. These tools can be available online or offline but definitely help you to add elements, animations, music and perform other editing tasks which make your Facebook ad video better. One of the greatest benefits of using these online video editing tools is readymade highly engaging templates.
Note: There are millions of Facebook ad maker tools available on the internet. Out of them, we have selected the best 3 tools for you. So you don’t have to worry about filtering the best one.
The process to create a Facebook ad video with each tool is mentioned after the guideline section of this article.
Facebook Video Ads Official Guidelines
Every social media platform has its own set of ads guidelines which we have to keep in mind while creating content for ads. Facebook has listed in-detail guidelines for video ads on its website. The guidelines may vary and usually depends on the placement location of the video ads.
So before jumping to the actual process of Facebook video ad creation it is a must to have a look at the guidelines. This way mistakes could be avoided in the early stages.
Facebook has a long list of options where you can place your video ads including:
- Facebook Feed
- Facebook in-stream video,
- Facebook Stories
- Facebook Instant Articles
- Facebook Marketplace
- Facebook search results
- Facebook Video Feeds
- Instagram Stories
- Instagram Feed
- Instagram Explore
- Instagram Reels
- Instagram in-stream videos
- Messenger Stories
- More…
Writing down the guidelines of all Video ad types here is not possible. You can find guidelines for all formats on this page of Facebook.
We are going to mention the guidelines for the top 3 formats: In-stream, Feed, and stories.
Please continue reading…The Methods to create video ads for Facebook free are waiting for you in the next section.
Facebook Feed Video Ads Guidelines:
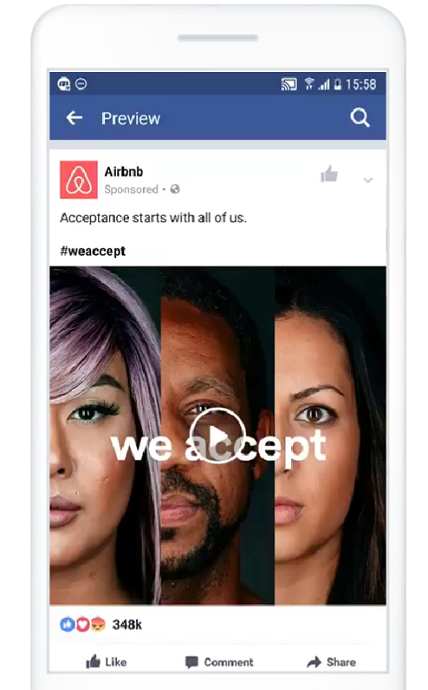
Feed video ads will be shown inside a regular news feed where users are more likely to spend their time on Facebook.
Design:
- Supported file type: MP4, GIF, and MOV
- Ratio: 1:1 (desktop or mobile) and 4:5 (for mobile devices only)
- Resolution: at least 1080*1080 pixels
- Captions and Sound: Optional but recommended
- Other video settings: H.264 Compression, fixed frame rate, and square pixels
Text:
- Primary text length: Up to 125 characters (After that it may truncate)
- Headline: 40 characters
- Description: 30 characters
Technical:
- Video Duration: 1 second – 241 minutes
- Maximum file size: 4 GB
- Minimum width and height: 120*120 pixels
- 360 videos supported: ✓
Facebook In-Stream Video Ads Guidelines:
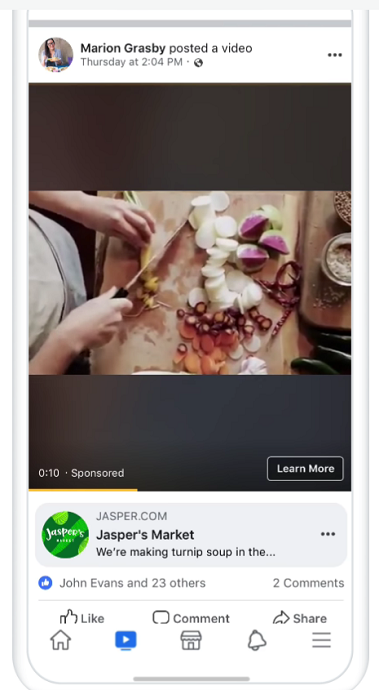
Design:
- Supported file type: MP4, GIF, and MOV
- Ratio: 16:9 or 1:1
- Resolution: at least 1080*1080 pixels
- Captions and Sound: Optional but recommended
- Other video settings: H.264 Compression, fixed frame rate, and square pixels
Text:
- Primary text length: 125 characters
- Headline text length: 40 characters
- Description text length: 20 characters
Technical:
- Video duration: 5 seconds – 10 minutes
- Maximum file size: 4 GB
Facebook Stories – Videos Ads Guidelines
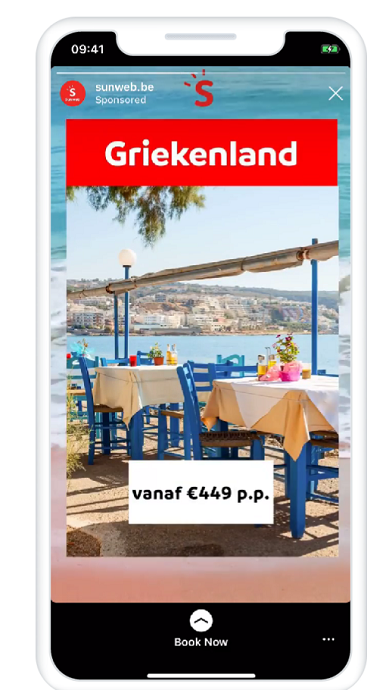
Design
- Supported file type: MP4, GIF, and MOV
- Ratio: 9:16
- Resolution: at least 1080*1080 pixels
- Captions and Sound: Optional but recommended
- Other video settings: H.264 Compression, fixed frame rate, and square pixels
Note: Leave 250 pixels from the top and the bottom of the video. This space is used for CTA generated automatically by Facebook Ads
Text
- Max 125 characters: Primary text length
- Max 40 characters: Headline
Technical
- Video Ad duration: 1 second to 2 minutes
- Maximum file size: 4 GB
- Minimum width: 500 px
- Aspect Ratio Tolerance: 1%
What are the Best Methods to Create Videos for Facebook Ads
In this section, you will be introduced to the best 3 methods to create videos for Facebook Ads. All has its own perks.
So these are the 3 best methods we are going to discuss today:
- Using Invideo.io (Recommended)
- Using Movavi video suite (2 approaches are there — Recommended)
- Using Facebook In-House Video Ads Creation Tools (Basic)
Whether you want to create an ad video either online or offline, everything is available in this section.
Note: All methods discussed below are absolutely free. If you are in a hurry just skip all methods and either go with Invideo.io or Movavi Facebook Ad video creation method. They are the best of all. The step-by-step process is mentioned in the next section.
Note: At this point, I believe you have prepared/arranged an Ad-copy, storyline, footage/stock video for your Facebook video ad.
Method 1: Using Invideo.io (Online & Free)
Invideo.io is a layer-based online Facebook video ad maker. This tool has been gaining popularity day by day because of its tremendous features and simplicity. This video ad maker is so easy to operate helps us to produce ad videos for every platform in every format. Invideo.io has rated 5 stars on major review companies such as Capterra and it has been awarded by Product hunt as a product of the month in 2020.
In a nutshell, if you want to create a Facebook ad video in a short time without any help and also free of cost then the invideo.io tool is all you need.
Note: Invideo.io is the recommended method when you have already finalized an ad video, other media and you want to quickly generate a Facebook ad video with the help of readymade editable video ads templates.
Why should you create videos for Facebook ads with Invideo.io?
These are some of the benefits I personally like about the “Invideo tool” while creating a Facebook ad video:
Diverse Templates: Well, Invideo.io has divided their Facebook ad video templates into 3 major categories: “blank templates”, “readymade 5,000 templates (covered all industries)”, and “text to videos templates”. The third category is highly advantageous for those creators who don’t have actual footage for the ad.
Ratios Supported: Whether you want to create a wide formatted ad video (16:9), or vertical (9:16), or square ad formatted video. Everything is possible with the Invideo.io Facebook ad maker tool.
Forever Free High-Quality Templates: I was shocked when I got to know that Invideo.io offers all its 5000 templates in a free plan.
Single Template Available in Multi Dimensions: I have seen with other video maker online tools that if they have a single template is available in wide (16:9) format then it won’t be available in for example vertical (9:16) format. And vice-versa. But Invideo templates ain’t ordinary. All templates come in all ratios (16:9, 1:1, 9:16). The benefit of these multi-dimensions supported templates is that we can use the same template on all formats of Facebook video ads.
Essential Effects: Effects are one of the things which make a Facebook ad maker tool robust and useful. Nowadays online video editing tools becomes very powerful. Invideo.io also has a few amazing effects and filters that you can apply to any element of your ad video.
The great thing with invideo.io effects is that they all are available in a free plan. Some of the best essential effects I found inside this tool are:
- 50+ animations
- 100+ transition effects
- Image/Video Mask
- Remove Background
- Overlays
- Image filters
- Blur
- Crop
- Drop Shadow
Voiceover Benefit: For low-budget advertisers or beginners this feature could be a goldmine. In case you want to add voiceover on your Facebook ad video but could not able to afford a professional vocal artist then Invideo.io voiceover helps you for sure. Just type a text and it will automatically be converted into voice. Or you can also import a VO file as well as record your own voice directly.
iStock Media: Invideo.io is integrated with the iStock media service so apart from the free images and videos you will find premium iStock stock media directly within a video editor. Don’t worry you don’t have to buy these premium media unless you want to remove a watermark.
Color Palettes: Well I personally like this feature most. Plenty of times bad colors were the reason for low interaction and engagement rates. Choosing perfect colors for the ad video elements is very confusing. To solve this problem invideo.io tool has predefined color palettes that change your entire ad video colors in a single click.
Manual Fonts Supported: Sometimes we want to add text in our own custom fonts. Well, it is possible here.
How to Create Facebook Ads Free Online Using Invideo.io
Video Tutorial
For the reader’s convenience, we always create a video tutorial. Either you can watch and learn or simply skip the video and continue with the steps mentioned afterward.
In this section, I am going to show you the exact steps for creating a Facebook video ad that would appear in the “stories” (9:16 ratio) of other users. The process would be similar in the case of another Facebook ad video format including in-stream, news feeds, and whatnot.
Total Time: 10 minutes
Step 1: Free Signup to Invideo.io
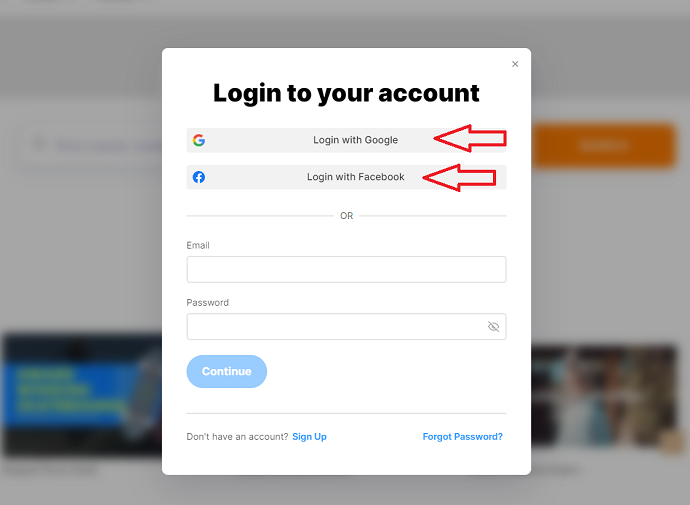
If you are a new user then you have to signup for Invideo.io. Don’t worry. It’s free. You can also signup with Google or Facebook with a single click.
Step 2: Choose Video Ads Category
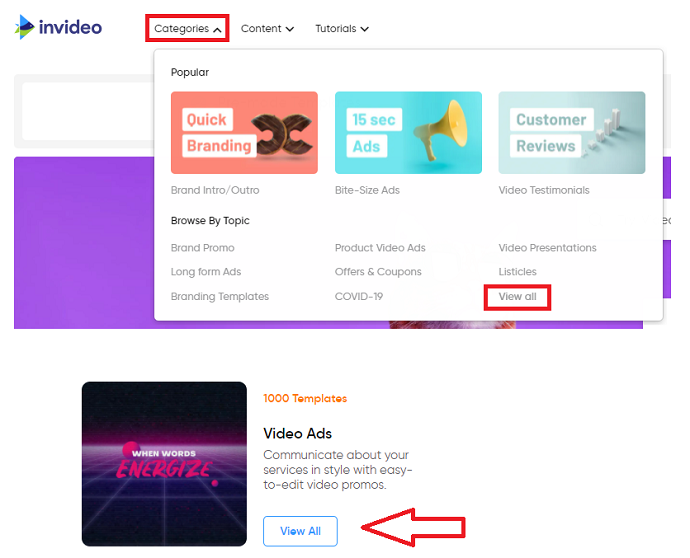
Invideo.io has distributed its video templates into different categories. Hover on the top “categories” menu option and select video ads. If you haven’t found video ads in this top menu box tap on the view all button to open up the category page. Here select the “video ads” category.
Step 3: Define a Template Dimension (Ratio)
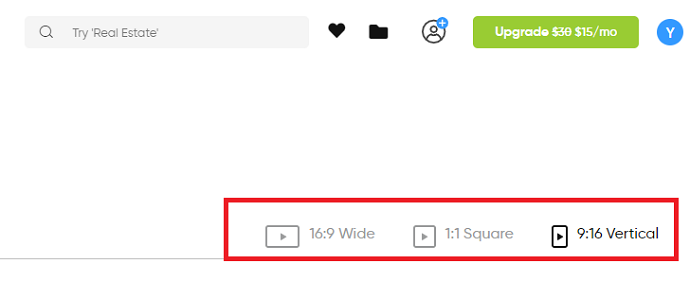
Based on the video format you have to configure a dimension. If you don’t know about the dimension for your Facebook video ad check the guidelines section of this article. I have selected “stories video ads” for this tutorial and for that, I have to choose a vertical (9:16) dimension.
After selecting a dimension, you will see templates loaded on the screen.
Step 4: Select the Facebook Ad Video Template
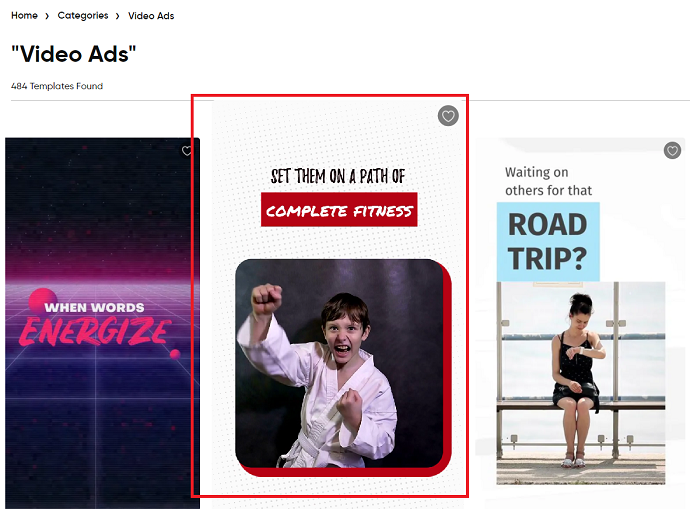
Now your screen will be flooded with tons of templates. So you have to make a decision and choose a template. Well, here storyline plays a major part. Based on it you can decide which template would be a better fit for the events that going to happen in your video.
Note: You can preview any video template by hovering on it and remember you can keep or replace the video/audio attached with your template.
So tap on any template you like, finalize the dimension (ratio) and click on the “use this template” button.
Step 5: Explore or Study the Invideo.io Facebook Video ad Maker Options
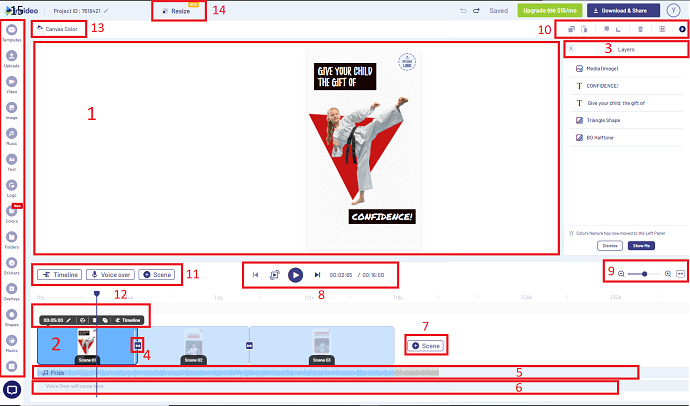
Well for users who have never seen a video editor interface might get scared from so many options displayed over this dashboard. But let me tell you Invideo editor interface is so user-friendly that even a newbie can comfortably use it after 1-2 try attempts.
Before making any change in the ad video template you should check all options available to use in this tool.
I have marked all-important options that help you in operating this Facebook ad video maker. Just follow along and trust me it is very simple to understand and work with the Invideo.io tool.
Canvas (1): It is the largest area shown in the image. You will be mostly interacting with this area only. Here you will find all the layers (elements) available in the current scene of your Facebook ad video template. All the elements are clickable and give you more editing options when you select them. You can add more layers and edit the existing ones according to your need.
Scene (2): The Facebook ad video template you have chosen probably has existing scenes. This scene is nothing just a part of the video included a set of layers. You can add more or delete/duplicate the existing scenes of your video. By tapping on the timeline button all layers of the selected scene with their duration will have appeared. From here you can adjust the duration of each layer associated with a particular scene.
Layers (3): Here you will find all layers in a currently selected scene of the video. The layers of the invideo.io tool work similar to the layers of any common editing tool such as Adobe Photoshop, After Effects, etc. The position of all layers is changeable and you can also duplicate them. Any new element you add would be shown in the layer column as well.
Transitions (4): The smallest box which is connecting all scenes is called a transition effect. Invideo.io has amazing transitions (100+) that make your video appearance wonderful. To change the transition of any scene just tap on this small box and select a transition effect from the list.
Music Layer (5): Inside the timeline window, The music layer will always be shown beneath the video layer. If your Facebook ad video template already has music it can be accessed from here. If you hover on it the editing options like volume, trim, delete, duplicate, etc will appear. Yes, you can delete the existing audio and add a new one from the “Music” option situated at the left toolbar.
Voice Over Layer (6): If you add a voice-over to your video, it will show in this layer.
+Scene button (7): Hit it to add a new scene in your Facebook ad video.
Playback controls (8): With these controls, you can preview/pause the video.
Zoom (9): To zoom in/out the scenes/layers.
Layers controls (10): These layer controls (copy, paste, front, back, delete, grid) come in handy when you select a particular layer.
Timeline (11): This timeline button helps you to toggle between the scene window and timeline window.
Voiceover (11): To add voiceover use this button. 4 options are there to add a voiceover in your Facebook ad video: Automated text to speech, Import from disk, VO file, Record using a device microphone.
+Scene button (11): Tap it to add new scenes from any template.
Scene tools window (12): When you select any scene, a small black rectangle window will be attached at the top of it. The options available here are Scene duration (for changing the duration of the entire scene), Trim scene to remove blank, delete the scene, duplicate scene, and open scene timeline (to adjust the duration of individual layers associated with the scene)
Canvas color (13): This option allows you to change the background or the canvas color of your video.
Resize (14): This option is very useful and the “Invideo.io Facebook video maker” provides inside a free plan. Suppose if you want to upload the same ad video on other platforms with different dimensions then with the resize button you can change the aspect ratio of the entire video.
The left toolbar (15): Just left to the canvas screen there is a toolbar with a bunch of options waiting for you. Lots of important options are available here which help you during the building of the Facebook Ad video. The available options are Templates (to access the Invideo.io templates library), upload media, video (to access video library), image (to access image library), music (to access music library), text, logo, color palettes, folders, stickers, overlay effect, shapes, masks, and collage.
Step 6: Edit the Existing Elements/Layers of Facebook Ad Video

So after going through the available options of the invideo.io tool it’s time to move forward. Your ad video template has a lot of existing layers that you want to change or modify as per your project. For example, editing the existing text layer shown inside an image or the sample video.
To change/replace any existing layer, just tap on it. Once you select the layer few options associated with it will appear on the top toolbar. These options may vary depending on the nature of a selected element. For example, by selecting a text layer these options come in handy: Font, Text color, Alignment, style, animation, shadow, etc. Play around with these according to the desired output.
You can also move/scale the selected layer with a mouse.
Step 7: Add New Layers to the Video

90% of the time we have to make changes in the Facebook ad video template to make it according to our plans. Apart from editing the existed layers, you can add as many layers as you want. The left toolbar has options to include different types of layers in the Facebook ad video.
For example, I want to add an overlay layer to my artwork. So for this, I am gonna select the overlays option and pick any from the available ones. And by drag and drop, this new layer could easily apply to the artwork. You should follow the same approach to add other types of layers to your scene. Remember each element act as a single layer. After adding it this new layer will be shown under the layers column.
Step 8: Add New Images
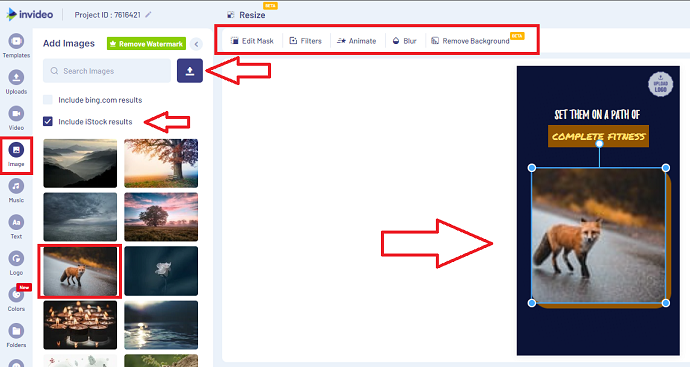
You might be wanna change or add a new image to your Facebook ad video template right? Well, it could be easily done. Just from the left toolbar navigate to the image section. Here you have the option to either upload your image or choose from the invideo.io image library. In a library, you will find lots of free stock images as well as premium images supplied from the iStock website. Even if you are using a free version, you can still add iStock premium images (with watermark) on the ad video.
Just drag and drop the image to the artwork and you are good to go. You can either paste the image into a new location as a new layer or replace it with the existing image present in a Facebook ad video.
After uploading the image, you will see a few more options such as edit mask, filters, animate, blur, and remove background. Well, these are the operations you can apply or use on your image. Apart from the edit mask, all options are easily understandable. I will discuss that mask operation in the later steps.
Step 9: Add a Video
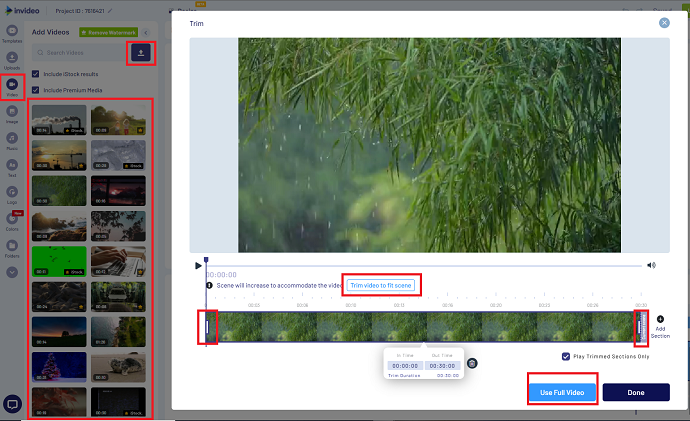
90% of the time we advertisers record or create videos for Facebook ads rather than rely on a stock video included in the template. So if the same case is with you then you can easily add a video from your PC into the ad video. The process is the same as you saw with the images.
Just tap on the video from the left toolbar and either upload or choose a stock video from the library and by drag and drop the video will be added in a template.
As soon as you place it the trimming window will open. From here you can control how much part of the video you want to add to your Facebook ad video.
With video, you will see different attributes in the toolbar located just above the canvas area. The options available here are Edit mask (explain in the next step), Trim (used to trim a video), Animate (used to apply the animation on a video), Speed, loop, and blur.
Step 10: Apply Mask
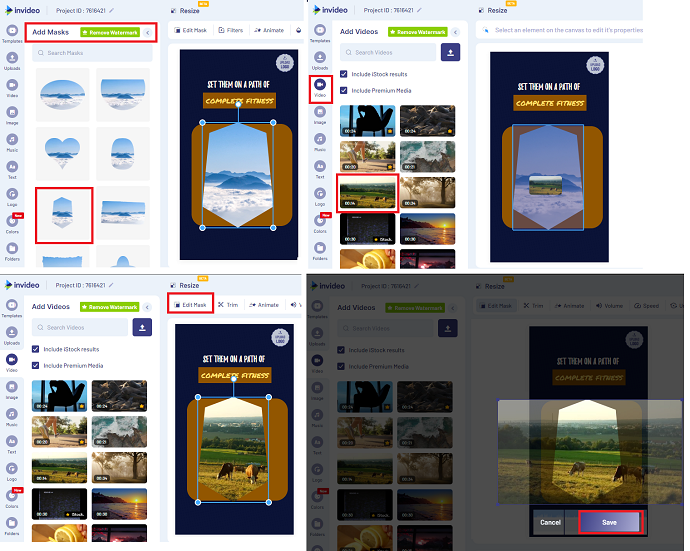
Well, have you heard about masking in Photoshop? Invideo.io mask is exactly the same. It is used to alter the visibility of the image/video or other types of layers. Let’s understand with an example.
The first thing first navigate to the masks section from the left toolbar. Here you will see lots of shapes. Whatever mask shape you pick and apply on a video/image or anything then that image/video will appear as in the shape of the mask. All the remaining parts of the image/video will be hidden. Don’t worry you can edit the mask easily.
For example, I am placing a hexagon-shaped mask on my Facebook ad video canvas. As soon as you drop it into the artwork it will appear as a new layer in the layers column. The next step is you have to place an image/video on the top of it on which you want to apply this mask. After applying the mask to an image/video you have the option to edit the mask.
Step 11: Add Music to the Facebook Ad Video
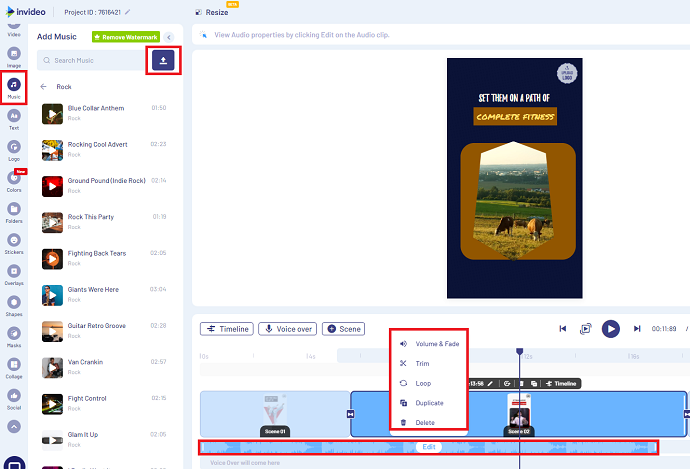
Music audio will boost the engagement of your ad video for sure. In fact, the Invideo.io music library has thousands of free music categorized based on Genre, Mood, and SFX filters. Also if you have your own audio then you can upload it and use it with the Facebook ad video.
To add music audio, open up the Music tab from the left toolbar and pick your desired audio. The music layer will be shown just beneath the scene layer. Editing options such as volume, trim, etc would appear when you hover on the newly added music layer.
Step 12: Apply Animations to Facebook Ad Video Elements
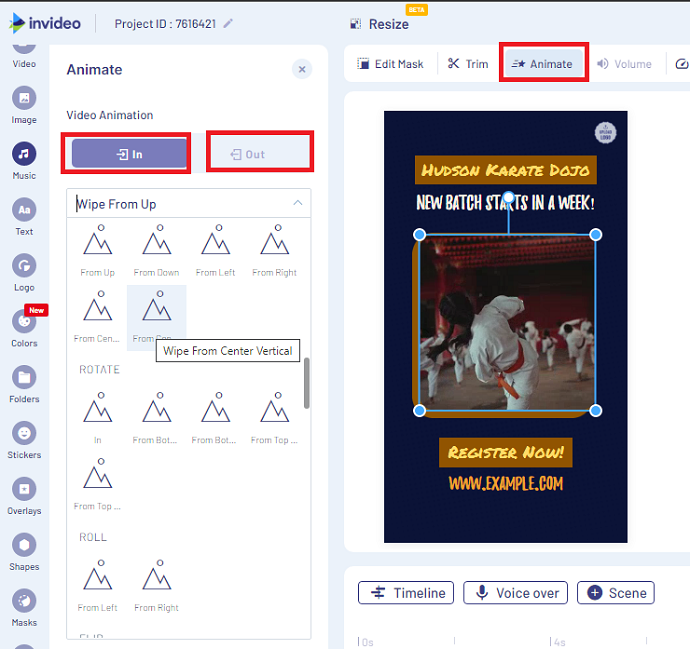
Animations are one of the major factors that plays role in making your video visually pleasing and eye-catching. Gladly Invideo.io has supported more than 50+ animations (both in & out) that could be applied to any element of your Facebook ad video such as image, text, video, etc.
To apply animation to any layer for example video, then first select it and you will see the “animate” option at the above toolbar. Tap on it. This will open up the animate tab at the left. Now you have to choose In-out animations separately from the list.
To preview the animation effect, simply hover on it, and if you like the animation appearance just tap on it to apply on your selected video layer. Also, don’t forget to set the animation duration.
Step 13: Add a new scene to the Facebook Ad Video
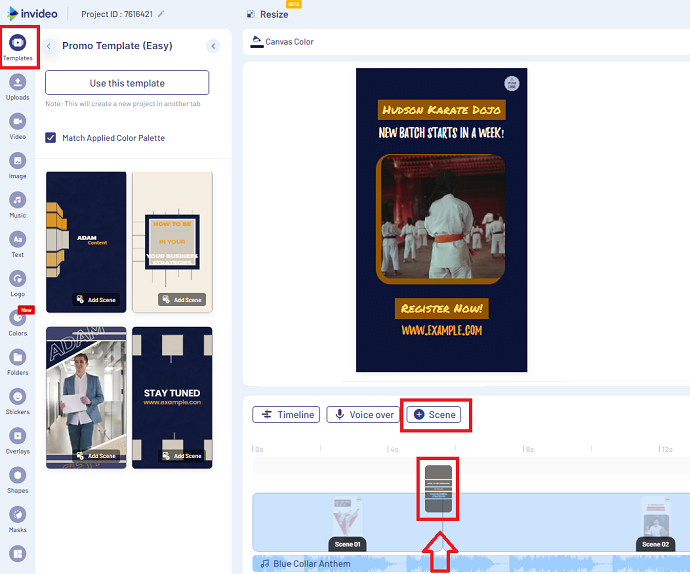
There is the possibility that you require new scenes in your video. Well, you can easily add new scenes with a single click. Just tap on the “+scene button” located at the end of the last scene in your timeline or beside the voiceover button. Then either add a blank scene or choose from any available template.
If you prefer to add a new scene from templates, then you have to drag and drop it to the scene tab.
Step 14: Change Duration of Scene or Layers
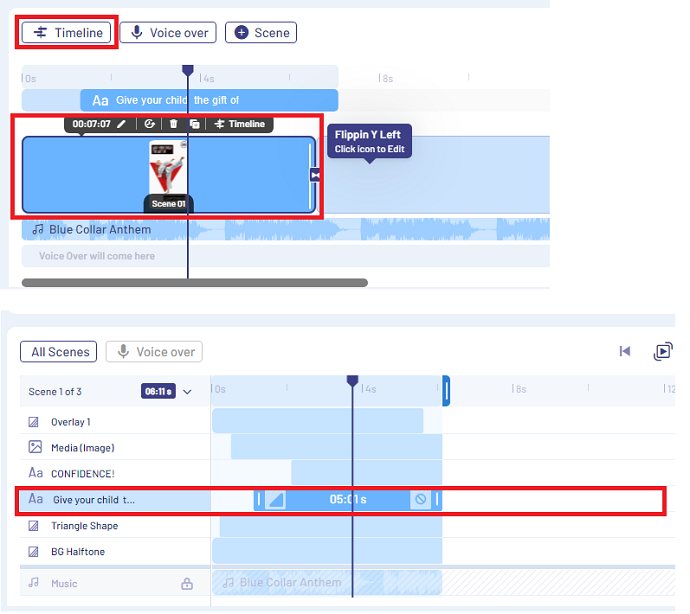
Well without adjusting the duration of elements/scenes there is no way we can proceed, right? Well if you want to adjust the duration of the whole scene at once then simply select a scene and hover a mouse arrow at the end of it. When the mouse arrow will turn into 2 sided arrows you can adjust the length of the whole scene by sliding left and right.
Remember when you adjust the whole scene length at once all layers included associated with it would be adjusted automatically.
But if you want to adjust the duration of the single layer then tap on the “timeline button” and select a layer you want to adjust and by sliding left and right with the mouse you can control its duration.
Step 15: Change Color Palettes

Don’t you like the colors of the Facebook ad video template? Are you confused? Well then don’t worry. Invideo.io has one of the many great features and its name is Color Palettes.
Just tap on the colors option available in the left toolbar and the Color Palettes tab would open for you. Here tons of predefined color palettes are available. Just choose anyone and it will change the colors of all elements of your Facebook ad video in a single click.
You can create your own custom color palettes as well.
Step 16: Preview and Export the Facebook Ad Video
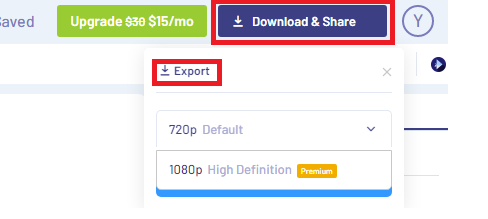
So play around with the Invideo.io tool and complete the editing according to your Facebook ad storyline. All the major things I have explained in the above steps.
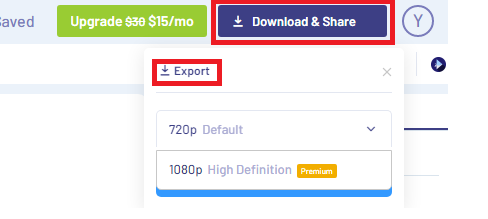
When you are done with the editing part simply preview the whole video once and tap on the “download and share button” to export the Facebook Ad video into your PC.
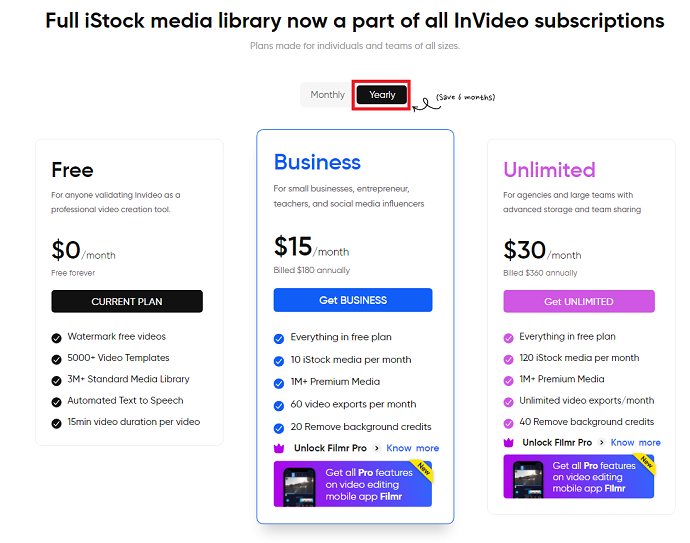
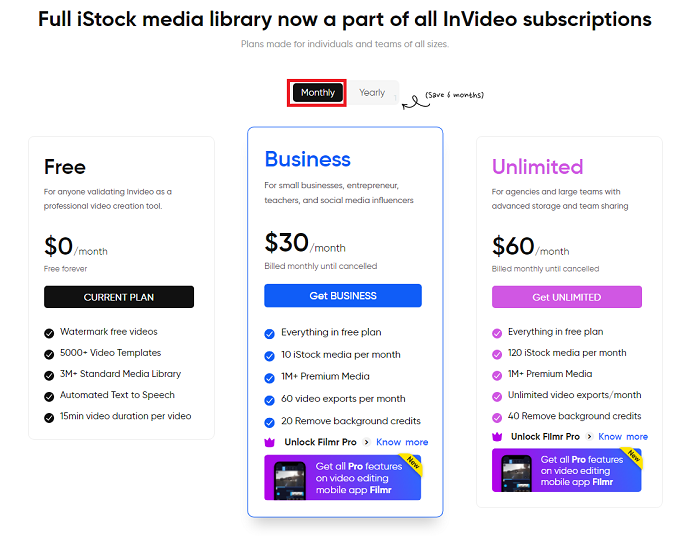
Remember: The free version only allows you to export the ad video in 720p resolution. To get rid of this barrier, kindly upgrade to the Invideo.io premium plans starting from just $15/month
Invideo.io Pricing & Plans
Well to be honest I didn’t feel the need to upgrade this Facebook ad video maker to its premium version. But I think it’s better to upgrade it because the 1080p resolution is the biggest advantage we get in premium plans.
Don’t worry the Invideo.io plans are quite affordable.
Invideo.io Pros
- Watermark is not applicable on free Facebook ad video templates. Only premium media and iStock media comes with a watermark.
- The interface is really user-friendly. Even newbies could create videos for Facebook ads without any trouble.
- Premium stock media (with watermark) can be used in a free plan
- All essential features required to produce a Facebook ad video are present in this free tool.
- Premium transitions and animations can be seen inside a free plan
- Voiceover feature is inbuilt
- Unlimited team members can access or edit the video design
- Apart from Facebook ads, templates of other categories including intro, outro, testimonial, offer, slideshow, presentations, branding, listicles, etc are available.
- New features could be seen from time to time. The latest best feature is color palettes.
- 1 GB free cloud storage
- Very affordable monthly and yearly plans
- Chat support is available in a free plan
Invideo.io Cons
Well, when we talk about features, design process, user interface, etc I haven’t found anything which we considered as a limitation. However, a few of the limitations I found in a free plan are:
- 1080p resolution for exporting a video is not available.
- The only feature of removing background from the image is absent in a free version.
- Lifetime plans aren’t available.
- The splitting feature is not available.
Method 2: Using Movavi Video Suite (Offline)
Movavi Video Suite is the PC software or says a complete package for video production. Well, it’s not as advanced and complex as Adobe After Effects or other professional video production software. This video suite is the perfect solution when an individual is looking for simple offline video software for their day-to-day video-related tasks.
The Movavi video suite software is highly popular among YouTubers, Social Media Marketers, and Bloggers. Even we have been using it for like a year for the production of BlogVwant YouTube videos.
When we had tried it for a very fast time we thought it was complex software but we got easy hands on it after practicing 3-4 times.
Movavi video suite is the complete package of video editing tools. The great thing is these all tools could be used and purchased individually. Yes, you need to purchase Movavi after the expiration of 14 days trial.
Note: For creating a Facebook ad video you don’t have to purchase an entire video suite (But you must check it once. It has a lot of essential tools which simplify your video content creation work). For Facebook ad video, you can either go with a complete Movavi video suite or these individual tools: [Movavi Video Editor or Movavi Slideshow Maker]
So in a nutshell, there are 2 approaches here to produce a Facebook ad video. The first one is to edit recorded ad footage and customize it by applying advanced video editing operations. For this, you required a Movavi video editor. And the second approach is to convert images into a slideshow (when you want to use images to convert into the slideshow-based video). For this, Movavi slideshow maker is all you need.
So after this section, I am going to show you a live demonstration of generating a Facebook ad video with both approaches.
Keep reading…
Compared to Invideo.io, the Movavi video suite won’t give you readymade templates. This video suite is great when you have ad footage and you want to edit in a very professional way. Yes, you can also use any stock video and edit it in the Movavi video editor.
Highlighted features like filters, transitions, color adjustments, reverse video, pan, and zoom, stabilization, custom animation, highlight & conceal, chroma-key, scene detection, slow motion, audio editing, 1080p export, etc are the main highlights of the Movavi video editor. Remember these features are very easy to use. You hardly need 2-3 attempts to get used to it.
Why should you create videos for Facebook ads with the Movavi video suite?
There is only one primary reason which makes the Movavi video suite a recommended Facebook ad video maker – “Full Control and Advanced Video Editing Tools”.
Just follow the below method and you will be agreed with me on the above statement.
How to Create Facebook Ads Offline on PC using Movavi Video Suite (Editing Approach)
Earlier we have created a Facebook ad video in the 9:16 format. But now let’s create an ad video in a 16:9 ratio format or in other words for in-stream Facebook ads.
In this section, I am going to show you the step-by-step process for creating an engaging ad video using the Movavi Facebook Ad Video Maker (offline video editor).
Step 1: Download and Install the Movavi Video Suite
Movavi video suite is completely free for the first 14 days. So just go to the Movavi official website and download it. It is available for both Windows and mac os.
Step 2: Run Movavi Video Suite
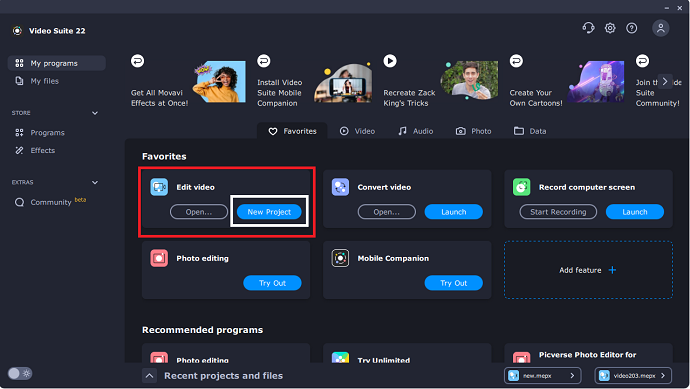
As soon as you have done the installation part, run the Movavi video suite from the desktop. The first thing that would be open is the Movavi dashboard. Here you will see all Movavi tools that come with the video suite such as Movavi screen recorder, Video Editor, Converter, and whatnot.
For creating a Facebook ad video we have to open up the video editor. So just tap on the “new project button” shown under the “Edit video” tab.
Step 3: Configure Facebook Ad Video Ratio
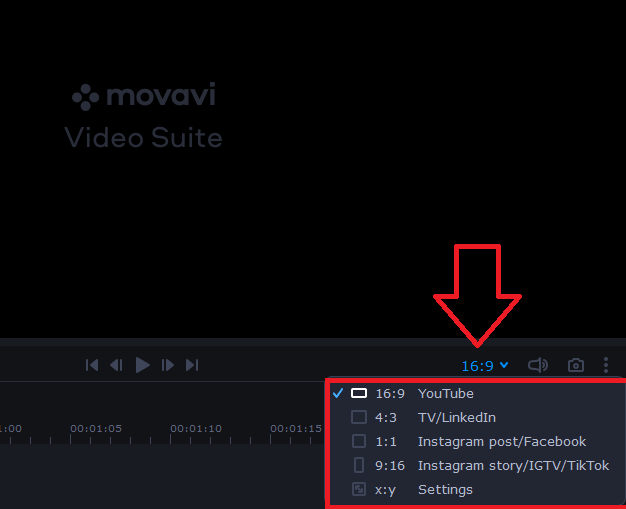
The first thing you need to ensure is that the Movavi video editor is configured in the right video dimension. By default, the editor has enabled a 16:9 ratio. You can see it from the bottom of the player window. The great thing is Movavi has “saved presets” according to all popular platforms including Facebook, Linkedin, etc.
And in case you don’t find the desired ratio, just click on the settings and define a custom aspect ratio.
Anyways for this example, I am going to leave it as 16:9. This format is perfect for creating an ad video for Facebook in-stream video ads.
Step 4: Import Media
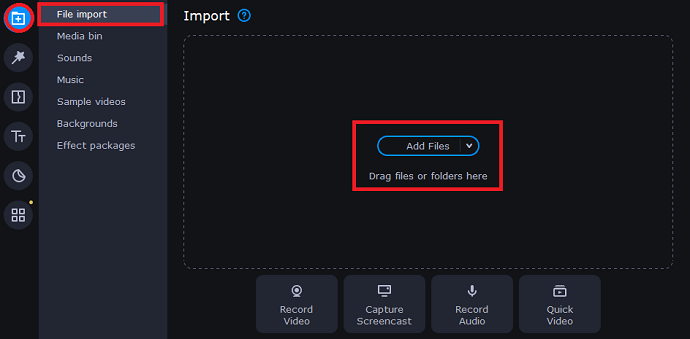
So after configuring the aspect ratio we can move ahead to the Facebook video ad creation process. First thing first import all media (image, videos, etc) associated with the ad. To import files into the Movavi editor navigate to the import tab > file import and tap on the add files button.
Step 5: Add Facebook Ad Video & Other Media to the Timeline
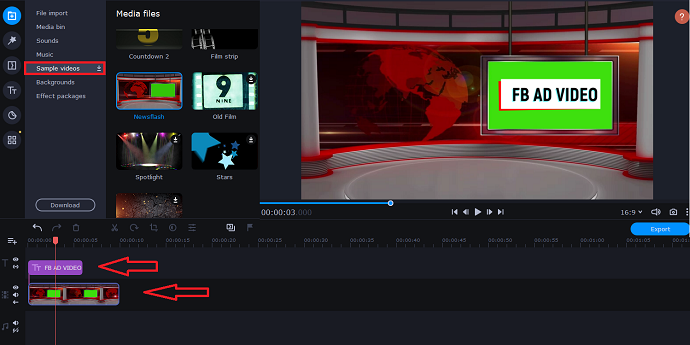
Movavi video editor supports 3 types of timeline tracks: Text/Title, Video, and Music. So if you have your Facebook ad video handy you can drag it from the imports tab to the video track. Do it for other media as well. Movavi considers image files as video so images should also be placed on the video track.
Since I am showing you the demonstration, that’s why I am going to work with ” Movavi Sample videos“. Movavi by default provides a few sample videos, background videos, and intro videos.
As soon as you place the media into its respective timeline track, it will appear in the player window as well. You can adjust the duration of all timeline elements by stretching their ends.
There is no limit on the number of clips (elements) to be added under each timeline track. Just remember Movavi also works on the layers-based mechanism so if you suppose to add any clip above another clip then the topmost clip will be visible.
With clip, we meant a single media element.
“For example, I have added one sample video to the video track and just above that I also place a title element picked from the Movavi title library“.
Step 6: Play around with the Timeline Controls

Just above the timeline, there is a toolbar available. This toolbar includes a lot of important clip-specific and additional tools which you will need often times during the course of preparing the Facebook ad video.
Most of the tools will be accessible only when you select an element of any timeline track. For example, selecting a video clip gives you these tools:
- Undo and Redo.
- Split: For cutting the selected clip from the current position.
- Rotate: For rotating the clip 90 degrees clockwise.
- Crop: For cropping the image/video
- Color Adjustments: For modifying the colors of the selected clip.
- Clip Properties: Under this, you will be able to see the all effects that have been applied to your clip yet. Also, additional tools such as speed, reverse, fade-in, and fade-out are present here.
- Transition wizard: A dedicated option to apply a transition to all clips at one click.
- Add Marker: Tap on the flag icon to add a marker on the timeline. Helps in navigation.
- Record video & audio: For recording a video from the device webcam and microphone.
So work with these tools and edit your Facebook ad video accordingly. We will cover most of the tools lately. So for example, I am going to make a cut on the sample video with the split tool.
Step 7: Apply Filters to the Facebook Ad Video
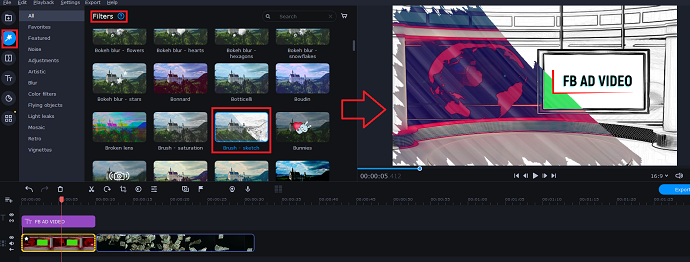
Movavi video suite has tons of predefined filters which could be applied easily to both images and videos. To access filters, navigate to the filters tab. To preview any filter just tap on it, it will display over the player. When you find your desired filter just drag it and drop it over the clip-on which you want to apply it. For example, I have applied a brush-sketch filter on my Facebook ad video.
Note: More than 1 filter can be applied on a single clip. To adjust the filter position and density just double tap on the clip to access the clip properties window and navigate to the applied effects tab.
Step 8: Apply Transitions to the Facebook Ad Video
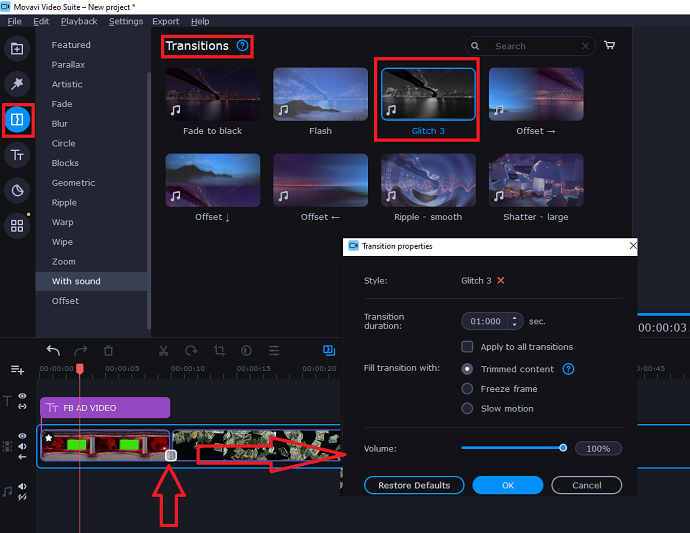
So does your Facebook ad video consists of more than one scene? Then you should have joined them with amazing Movavi transitions effects. Well compared to invideo here you get sound transitions as well. Yes, this is the new feature in Movavi and helps you in making your ad video more classy and engaging.
So to apply a transition to the individual scene, navigate to the transitions tab and pick one of the transitions from the list. To preview any transition just tap on it and it will play over a player window. To apply the transition between two scenes just drag the transition of your desired choice and drop it between the scenes.
Although Movavi gives you more than 100+transitions, but you always have the option to acquire more transitions from the Movavi store.
For this example, I am applying the “Glitch 3” sound transition. The applied transition would be highlighted in a “white square icon”. Double-tap on this icon to control transition duration, transition content, etc.
Step 9: Use Movavi Titles to Convey Facebook Ad Message
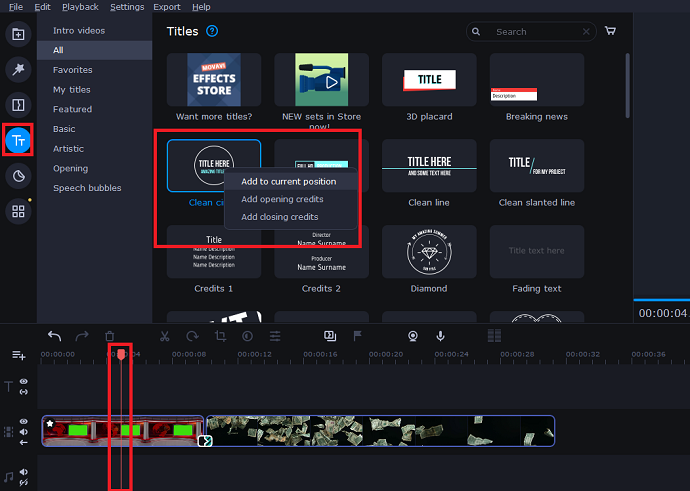
So to express the Facebook ad message, you must have required a nice animated text. Well, Movvai has a bunch of them. In the previous steps, you have seen an example already. So to access all titles, navigate to the titles tab from the left toolbar.
Here you will see titles divided into categories. Well, I had used all of them at some point, so I must suggest playing with each and every title before finalizing. To preview any title, just tap on it.
So for this example: To add a title in your Facebook Ad video there could be 2 ways possible. First, the, as usual, drag and drop approach, and the second way is by right-clicking on the title element and selecting “Add to current position”.
Step 10: Edit a Title Clip
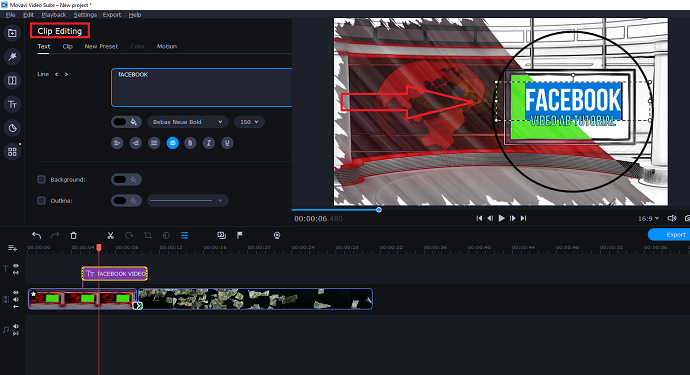
So in the previous step, we have placed a title track on the timeline. These titles are fully customizable. You can change text color, BG color, outline, and also control the animation speed & duration.
Double-tap on the tile layer from the timeline window to active the edit mode. As soon as you hit the title layer twice, you will notice the bounding box appears around it on a preview window.
With the mouse, you can resize, move and edit the text of the title layer easily. Now there might be multiple text elements associated with one title layer. So to edit them individually just double tap on it and it will open up the coloring, alignment options, animation controls on the left window.
It is very difficult to explain in a text but trust me it is a straightforward and hassle-free process. If you ever used paint in life then there won’t be any trouble for you.
So play around with the text title and stylize until you achieve the desired output.
Step 11: Enable Motion Tracking for Titles
Ignore this step if there is no use of motion tracking in your Facebook ad video.
Motion tracking is one of the advanced animation features that has been added recently in the Movavi Facebook ad maker. It is very helpful. Basically, this feature allows you to track the movement of an object and apply the same movement data to the second object.
You can use Motion Tracking for various purposes, for example, Stabilizing the motion of an object, adding elements (titles or stickers) to composition, replacing screens on a TV, Mobile, or any other screen device.
Currently, Movavi supports motion tracking only for titles and stickers.
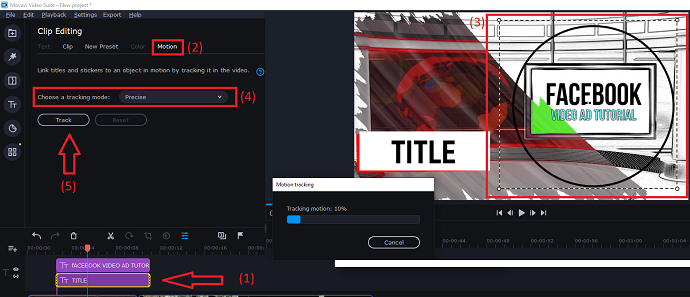
Let’s see the example to understand this clearly. You can see that currently there are 2 titles present in my Facebook ad video. I want to track the movement of the “Facebook Video Ad Tutorial” title and apply it to the “Title” layer. By doing this the “title” element will move and follow the movement of the “Facebook Video Ad Tutorial” element.
So to enable motion tracking on the “title layer” first I have to double tap on it to access the clip editing tab. Here you will see the motion tab. As soon as you access the motion tab the new bounding box will appear on the preview window. Well, this bounding box is used to define the tracking area. As I said I am going to use a “Facebook Video Ad Tutorial” element as a tracking element so I am adjusting the tracking area on it.
Note: I am using a title as a tracking element in this example. But you can select anything in your whole Facebook ad video and define it as a tracking area.
Theoretically, motion tracking is difficult to understand. But believe me, it is very easy to workaround.
Then after defining the tracking area. Just set the tracking mode to “precise” and hit the track button. Tracking data points takes some time.
When motion tracking is finished, play your ad video you’ll notice the title element has now followed the movements of the tracking element. Finally, tap on the apply button to save changes.
Step 12: Add Stickers, Shapes, and Graphics
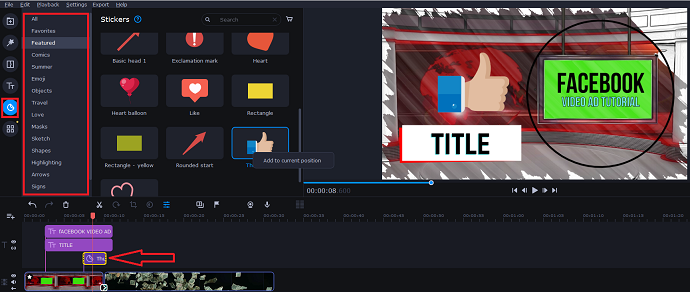
Consider adding cool graphics from the Movavi stickers tab. In the stickers tab, you will find all kinds of social media icons, shapes, and smileys. And remember these stickers support motion tracking too.
So to add any sticker into the ad video timeline follow the same drag and drop technique or use the mouse right click and tap on the “add to current position”. Also, you can resize/move the sticker with the help of a mouse.
Step 13: Insert a Background Video
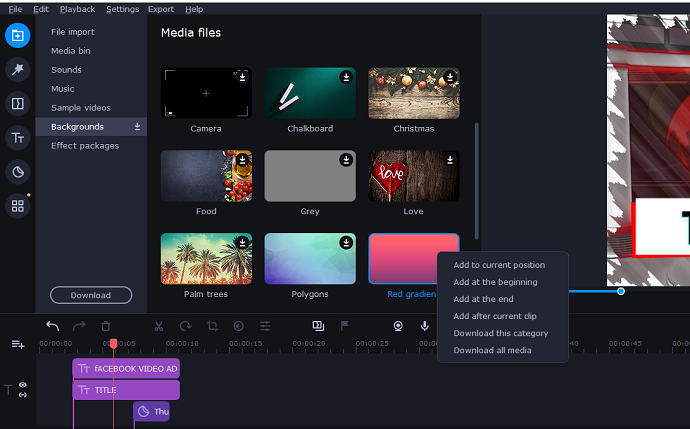
In case you want to add a background video, Movavi got your back. Navigate to the import tab > backgrounds. In this tab, you will see a few free background videos. However, you can always buy more videos from the Movavi store.
These free background videos are 100% copyright-free. You can add them anywhere in your ad video by the drag and drop approach.
Step 14: Add Sounds to the Facebook Video
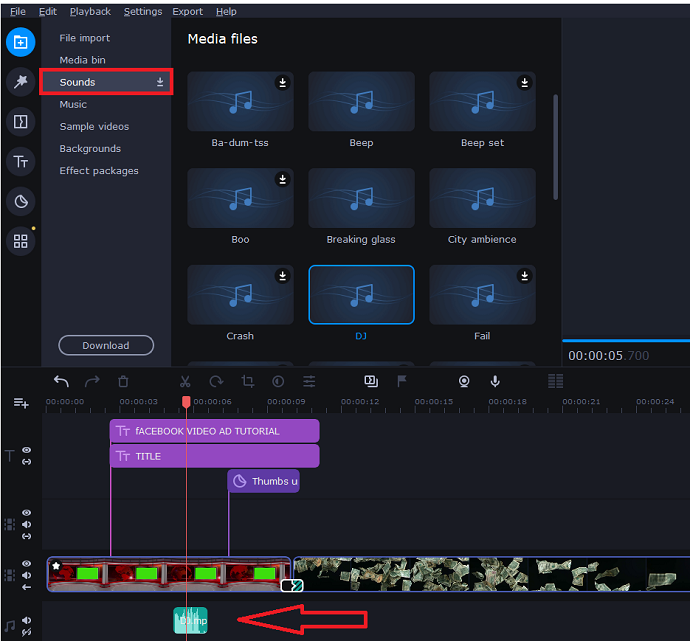
In the Import tab, you will see Sounds. Sound effects are different than music files and in Movavi you will get a lot of them. We personally use these sound effects regularly on our videos. Sounds of breaking glass, city ambiance, animals, gunshot, police, clapping, etc are available here.
Try to align these sound effects with your Facebook ad video. These small sounds effects would be added to the “audio track”.
Step 15: Add Special Video Effects to the Facebook Ad Video
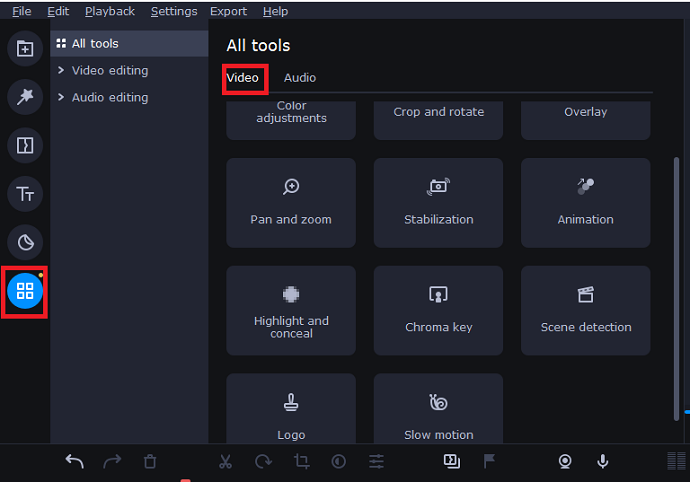
Inside the last “more tools” column you will find extra advanced tools for both videos and audio. So in this step, I am only going to share the purpose of these tools. But yes after this step we will discuss a few of the tools in detail.
Under the video section these tools are mentioned:
- Color Adjustments: Used to adjust the colors (brightness, contrast, hue, etc) of the selected video. Templates are available or you can also adjust manually.
- Crop and Rotate: To fix the crop and rotation of the video.
- Overlay: To apply an overlay effect on the clip.
- Pan and Zoom: To control the camera movement in the frame.
- Stabilization: To fix the stabilization (camera shaking) of the selected clip.
- Animations: To apply predefined animation templates or custom animations on the object.
- Highlight and Conceal: To highlight and mask the object (frame) in a clip.
- Chroma Key: To remove any color from the image or video clip.
- Scene detection: To detect changes in the scene and split the scene whenever changes occur.
- Logo: To add a logo on the entire Facebook ad video.
- Slow-motion: To slow down the clip
Each tool listed above is simple to understand work with.
Step 16: Apply Animations to the Facebook Ad Video
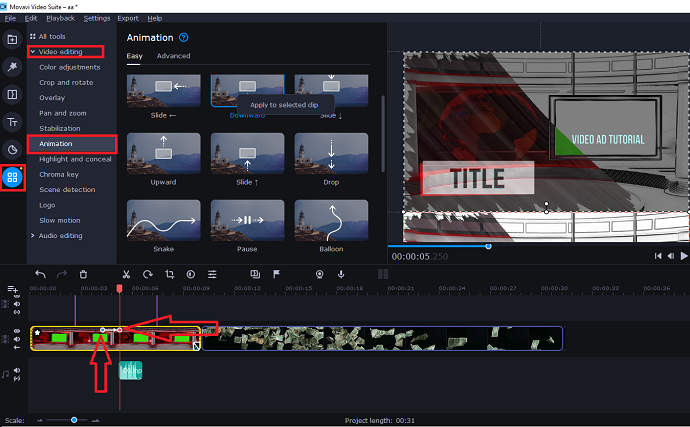
With Movavi you can either use animation templates or apply custom animations to the object. The great thing here is that you have more control over the animation speed and animation length.
To apply the animation (template) first select the clip/object on which you want to apply the animation and then navigate to the more tools > video editing > animation. Select any animation template from the available ones, right-click on it, and hit on the “apply to selected clip” option.
As soon as you do this, you will see the 2 keyframes points would be attached to the current position on the selected clip. Well, these 2 keyframes are defining the starting point, ending point as well as length of the animation. You can adjust everything with the mouse.
When you double-tap on any keyframe (small circle), the custom animation mode would be activated. In the custom animation mode, you can adjust the animation starting and ending frame (camera) over the preview player with the mouse.
Note: Animations can be applied to any object (title, sticker, video, image, etc.)
So play with animations and make your Facebook ad video engaging.
Step 17: Adjust the Camera Angle
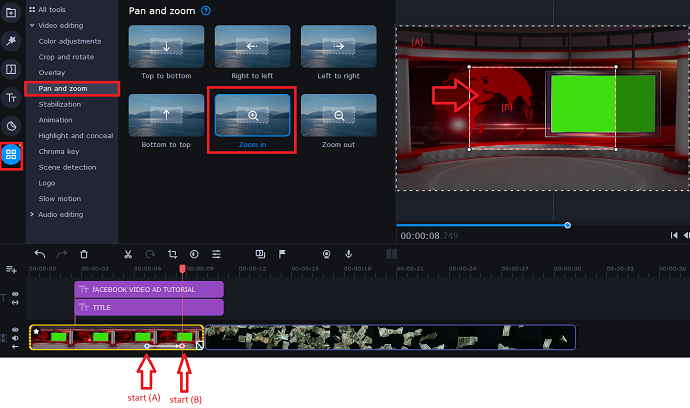
With the Movavi pan and zoom camera movement control feature, you can smooth or improve the presentation of the Facebook ad video. Pan and Zoom can be used in various situations. One of the common examples is to focus on the product by zooming.
Movavi currently offers 6 templates for camera movements. However, you can control the camera in any way you want by following the custom animation approach we have discussed in the above step.
So let’s say I want to zoom the camera on the “Facebook Video Ad Tutorial” element. So I just select my scene, navigate to the Pan & zoom tab, select “zoom in” preset, right-click on it and select “apply to selected clip”.
Then you will see 2 keyframes attached to your clip. This is nothing but keyframes to control the “zoom in” animation. Double-tap on each keyframe adjust the zoom-in animation area and finally preview the Facebook ad video.
Step 18: Refining the Voiceover of Facebook Ad Video
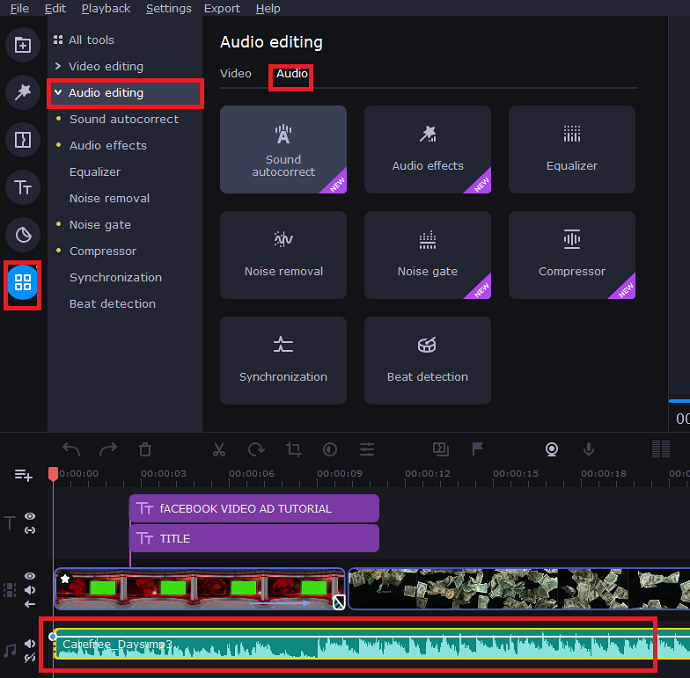
So have you added a voiceover or some kind of audio to your advertisement video? Do you want to refine it? Well in that case you can use Movavi audio editing advanced tools.
Under the audio editing tab these advanced tools are mentioned:
- Sound autocorrect: To improve the sound based on the predefined preset.
- Equalizer: To adjust audio frequency levels. Presets are available
- Noise Removal: To remove the unwanted noise from the audio
- Noise Gate: Related to noise blocking
- Compressor: To compress the loud sounds and amplify the quiet sounds
- Synchronization: To sync 2 audios.
- Beat detection: To adjust the rhythm based on the beat detection technique.
- Audio effects: To apply different audio effects to the track for example low pitch, high pitch, telephone, radio, robot, etc.
The above tools will definitely improve your audio and voiceover. To use any above tools first select an audio track and then edit accordingly.
Movavi also allows you to record voiceover directly from your device’s microphone. Use it to first add voiceover then edit accordingly.
Pro tip: Don’t forget to add subtitles to your Facebook ad video if you include voiceover in it. Use “titles” for this purpose.
Step 19: Add Music to the Facebook Ad Video
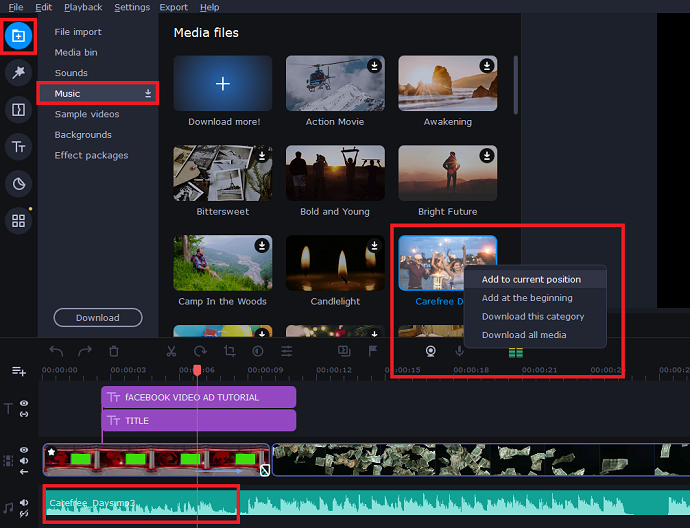
Similar to sample videos, Movavi has a bunch of free music tracks that you can add to your Facebook video anytime. Navigate to Import tab > Music to access all the available tracks. To add these tracks just drag and drop them over the music track of the timeline. To adjust volume, speed, etc just double tap on the layer.
Step 20: Preview and Export the Facebook Ad Video
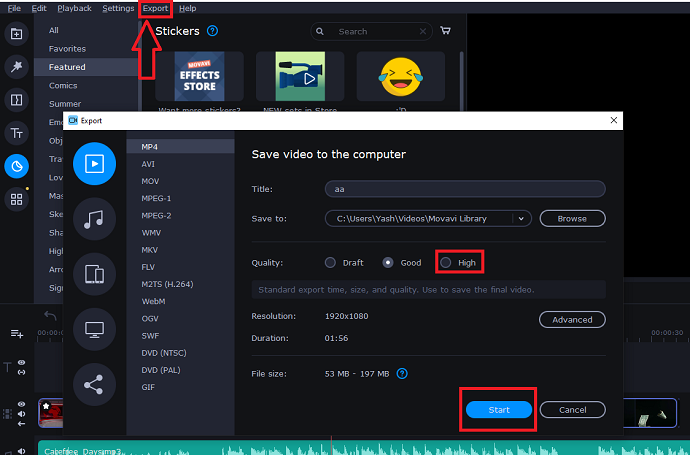
When you’re done with the designing and editing part just preview the video once and export it from the export tab. Make sure to export the video in high quality.
So this is how you can create videos for Facebook Ads with this amazing offline PC software.
How to Create Facebook Ad Video with Images using Movavi Slideshow Maker Approach
So you don’t have a recorded video? Don’t worry you can still make a Facebook ad video with this simple and straightforward approach.
Plenty of times creators doesn’t have a budget to shoot or record their ad video. In such cases, the only best way to produce a Facebook ad video is to convert images into slideshow format and export them into the video format.
So enough talking. Let’s create videos for Facebook Ads with the help of images and Movavi Slideshow Maker.
Video Tutorial
For the reader’s convenience, we always create a video tutorial. Either you can watch and learn or simply skip the video and continue with the steps mentioned afterward.
Step 1: Keep Images Handy for Facebook Ad
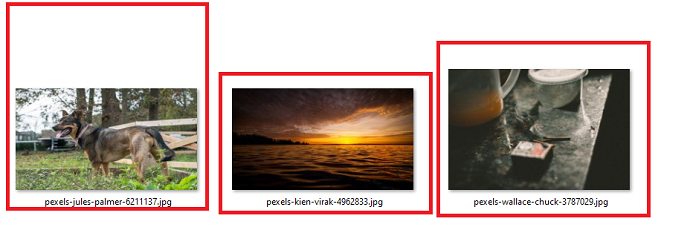
Before jumping to the Movavi slideshow maker tool first you have to gather all images which you are going to use. You can create engaging ad images in any tool. The best and free one is Canva.com.
Make sure your images matched the Facebook video ad guidelines. For this example, I am going to create an ad video for “Facebook in-stream ads format”, and for that, the video must be in a 9:16 aspect ratio.
The 3 images which I am using are in 9:16 ratio and 1920*1080 resolution.
Step 2: Download and Run Movavi Slideshow Maker
We always recommend our users download Movavi’s complete video suite because it gives you additional essential tools such as a video editor, slideshow maker, and whatnot. However, you can always download and use individual tools of the video suite.
So anyway either download an entire video suite or just Movavi slideshow maker. Both are free for the first 14 days. After downloading it install the package on your system and run the program from the desktop.
Step 3: Choose Slideshow Wizard
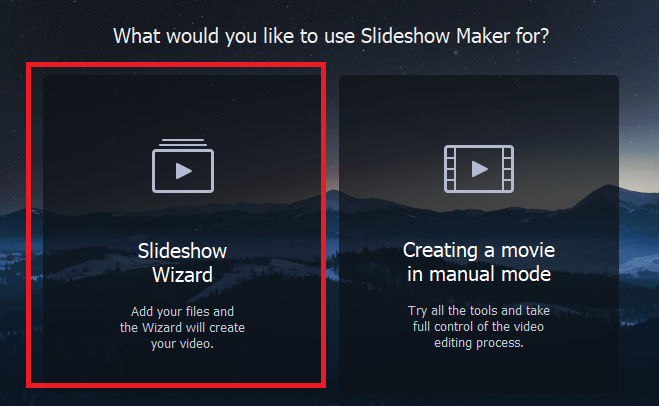
As soon as you run the program you will see this dashboard. Now if you want to generate a slideshow-based Facebook ad video automatically then select “Slideshow Wizard”. Else go with the manual mode where you have full control on video editing tools.
For this example, I am going with Slideshow wizard which helps me to quickly generate a Facebook ad video.
Step 4: Add Images for Facebook Video Ad
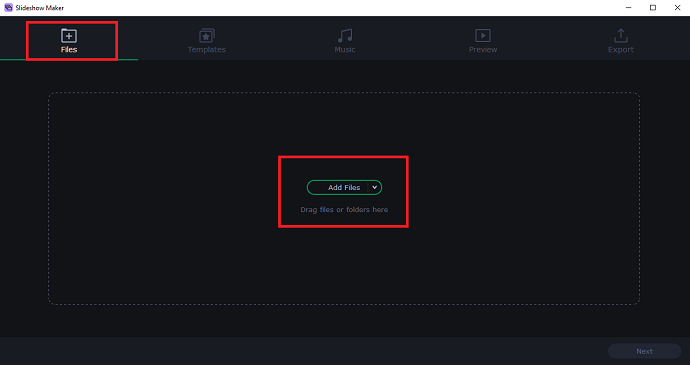
On the startup, it will ask you to add files (images/videos) that you want to convert into a slideshow. So tap on the add files button and select as many images as you want. Then hit on the next button to move on to the next step.
Step 5: Pick Predesigned Facebook Video (Slideshow) Ad Template
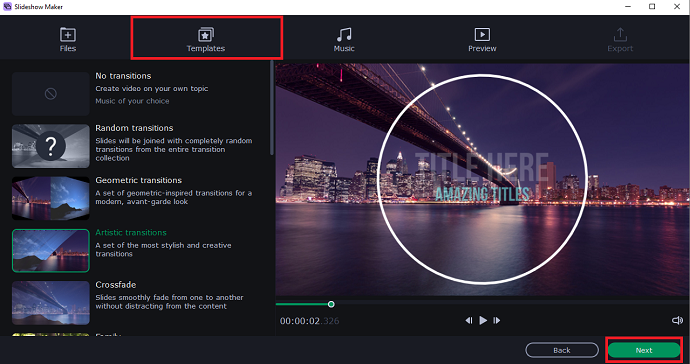
Movavi slideshow offers a few beautiful templates that include predefined transitions, effects, music, and titles. However, if you want to customize everything just select the first option “No transitions” from the list. For this example, I am selecting the “Artistic transitions” template. By the way, you can always preview the template before finalizing it.
Step 6: Add a Music to the Facebook Ad Video
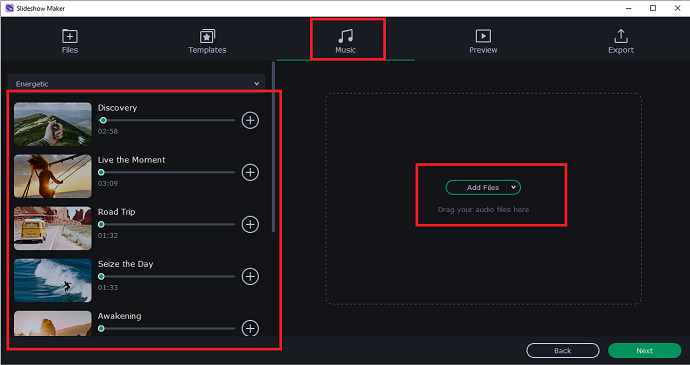
After finalizing the template you have been given the option to choose a music track for your ad video. Either choose from the Movavi library or add audio from your PC.
Step 7: Configure Slideshow Duration, Titles, and More
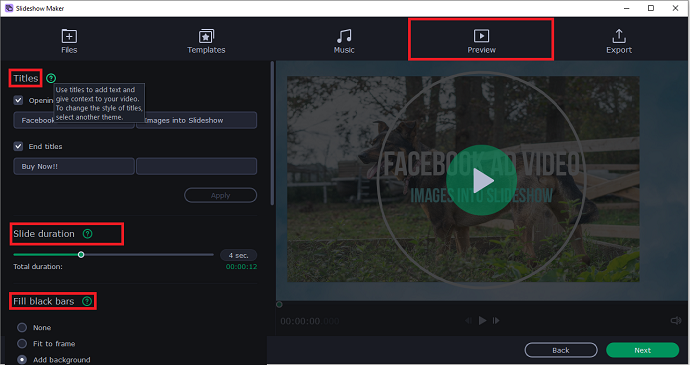
As soon as you move into the preview tab you have a few more options to configure. First, use titles to insert text on your Facebook ad video. Then with the slide duration slider, you can control the length of each slide (Ad photo). Finally, remove black bars (if any occurs due to the transitions). I am going to add a background that replaces the black bar perfectly.
When you are done with the designing just preview your Facebook Ad Video created from images and slideshow concept and hit the next button.
Step 8: Export the Facebook Ad Video
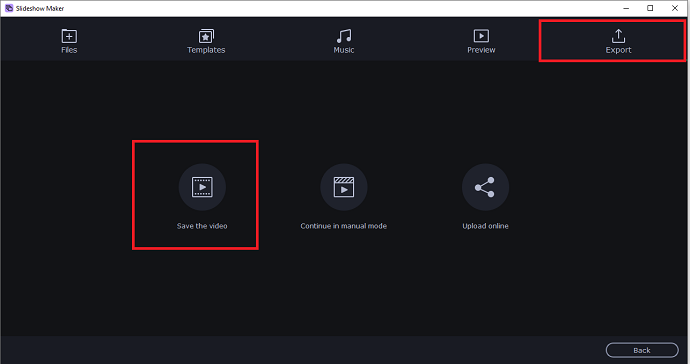
The only thing is left to save the video. However, if you want to edit your ad video further you can use the Movavi video editor. Just tap on “Continue in manual mode” and use advanced editing options like animation, masking, pan and zoom, and whatnot. We have already discussed all these options in the previous method.
For this example, I am simply selecting a “Save the video” option. After that Movavi slideshow maker will open in its full mode. Here to export the video just tap on the export option from the top menu bar and export your video.
So this is how you can create videos for Facebook Ads with images easily.
Movavi Video Suite Pricing & Plans
Don’t worry you don’t have to spend a single dime for the first 14 days on any of the Movavi methods we discussed above.
As I said earlier that Movavi is a complete package of video editing tools. So pricing depends on what you choose.
The complete Movavi video suite would cost you only $34/year whereas if you buy an individual Movavi video editor program (used on the first approach) or Movavi slideshow maker (used on the second approach) then it will cost you $24/year each.
I highly recommend a complete Movavi video suite because it gives you more free video-related tools for just an additional $10.
Movavi Video Suite Pros
Choosing the Movavi video suite method for facebook ad video creation gives you plenty of advantages including:
- The user has the option to export the Facebook ad video in a 1080p HD resolution.
- Includes advanced features which are usually found in professional video editing software.
- Affordable plans
- Compatible with both Windows and Mac operating system
- Video Splitting feature is there (missing from invideo.io tool)
- Chroma key is a special feature that is commonly used in advertisements to replace green screens with a custom background.
- Audio editing features are included too
Movavi Video Suite Cons
- Readymade editable Facebook video ad templates aren’t there.
Method 3: Using Facebook In-House Video Ads Creation Tools
Did you know that Facebook itself offers a way that you can use to create videos for Facebook ads?
Well, Facebook has a tool included in the ad manager which converts images into ad videos. But compared to the Invideo.io & Movavi video suite here transitions and other editing essential features like animations, options to add music, etc are missing. Without transitions and animations, your ad video would not be engaging at all.
So if you just want to create a very basic Facebook ad video with the images then you can try this tool.
The steps are very simple to follow. Facebook gives you plenty of ready-made templates (both vertical and square) for all types of ad formats. You just need to edit them with your image, background, logo, and text and you’re good to go.
So these are the steps for creating a Facebook ad video with Facebook inbuilt ad management tools:
- Log in to the Facebook ad manager
- Under the media section click on “Create video”. This will open up the video creation window.
- Next tap on the upload button to upload all the images.
- Next, you have to select a video template. There are three types of templates: Flexible, Square (1:1), and Vertical (9:16). Choose according to the ad type. (Check guidelines section of this article)
- Next, edit the template. First, replace the Facebook video ad template images with your images. Then if you want you can use these options to design your ad video: Crop, Background, Logo, and Text.
- Also if you want to re-order the images then simply click on the scene and move with the mouse.
- When you are done with the ad designing just preview the video and tap on the “create video” button. This will transfer this video into the Facebook ad.
- Complete remaining steps and finally publish your Ad to make it live.
Tips for Creating Results-Driven Engaging Facebook Videos
Do not open the Facebook Ad Maker tool without having a “storyline” prepared
In the learning stage of Facebook advertising, I used to directly sit in front of the invideo.io tool to create videos for Facebook Ads. But then I got to know the concept of storyline. Now I always prepared a storyline or script for my ad video in advance. This helps me in making my workflow smooth and avoiding any possible blocking point in the production of ad video.
Go big within 3 secs
According to murmurings, human beings now have an attention span of only 8.25 seconds. A goldfish, on the other hand, can focus for 9 seconds.
Yes! We are faster than the goldfish!
This is scientifically accurate; it is strongly linked to our content consumption. Consumers scroll through their social feeds at breakneck speed and without pause.
This means you must find a way to capture and hold your viewer’s attention instantaneously. So this makes it essential to create video ads that go big within a few seconds of the video ad.
You can make a captivating video by asking provocative questions, making grandiose statements, or using eye-catching colors and visuals. You keep the audience’s attention by telling a compelling narrative. Don’t just show off your product or service; instead, captivate your audience.
Edit it right to make it look professional
Using various tactics for creating a more distinctive look and increasing interaction can be used throughout the editing phase. Try tweaking and retouching by using Facebook video ads making tools such as Invideo.io and ensure your ad is perfectly set in.
A lower third (a visual overlaying inserted in the lower portion of the screen) in the intro is used to create a branded look. You can achieve this with an animated clip or by adding your logo and some content to the screen during the introduction.
Consider altering the screen regularly to retain visitors’ attention and enhance engagement. This can be accomplished by zooming in or out, employing different recording angles, or transitioning to a screen with text and graphics.
Organize, strategize, and pull the trigger
A great-looking video doesn’t require a lot of expensive equipment. The most crucial aspect of your video is to be genuine and relatable. You can begin recording with your smartphone, and all that is required for a great video is good sound quality and decent lighting.
However, professional lighting equipment is not required. To light the area, merely use lighting fixtures from your living room or home office. Alternatively, shoot your video in a room with plenty of natural light streaming in through the window frames. Then simply create the ideal script with the right objective. Focus on capturing attention, piquing interest, evoking desire, and concluding with a powerful call to action.
When you’re finished fine-tuning your storyline and script, simply go for it. Remember that cringing at your initial video content is normal. The more you practice them, the more natural the process becomes. It’s just a matter of getting used to it.
Keep it short with a clear message and CTA
First and foremost, you should establish a clear purpose for your video ad. Whether you want to generate leads by suggesting a follow, drive sales by leading to your website, or simply raise brand recognition with a business narrative, understand what you want your video ad to do before you begin. A smart Facebook ad should have a message that immediately introduces your business or brand, informs your viewers about the value you deliver, and enthusiastically summarizes things.
Design with sound off
One of the most irritating annoyances of the internet is noisy, auto-playing audio. It’s no surprise that, as per Facebook, 85 percent of its users choose sound-off. According to studies, millennials and Gen Z viewers prefer films with subtitles, and this tendency is gradually spreading to other viewers.
As a result, while creating video ads, turn off the sound. It doesn’t mean they can’t have sound, but the message should be clear even without it. This is accomplished through Video Ad Making Tools (Example: Invideo) – displaying subtitles, captions, logos, and title cards. People have grown accustomed to scrolling through their feeds and viewing Facebook videos while on the go. Allow them to get the concept of your video even if they are unable to hear it.
Compelling Thumbnail
Video ads in Facebook’s feed must attract potential viewers and persuade them to click and watch them.
How do you encourage them?
With enticing writing and an attractive thumbnail. The quicker, the nicer.
Think Like a Smartphone User
Yes, this is among the most apparent Facebook video ad recommendations.
According to studies, smartphones and tablets account for more than half of all digital video consumption. That is why it makes perfect sense to design video commercials with smartphones in consideration.
Check your Video Ad Specifications
It should come as no surprise that one of the most crucial elements of an effective Facebook video ad is its appearance.
You won’t have the visual appeal you want with your campaign if you don’t use the correct Facebook video format.
Facebook has stringent recommendations for video ad formatting, video ratio between 9:16 and 16:9; 1080p resolution, or the highest resolution video available that fits within file size and ratio limits and an ideal video length from 1 second to 240 minutes, make sure to follow these for perfect ads.
A/B test for optimization
We can’t emphasize this enough: while creating video advertising, make sure to thoroughly A/B test it. This is also true for Facebook ads. Finally, there is no blueprint for innovation, and every audience behaves differently. Do your homework and put your creatives to the test to ensure your video ad performs well.
With all this information, you are ready to change the landscape of Facebook marketing.
Now that you know the basics of Facebook video ads and the benchmarks for designing fantastic ads for your brand, it’s time to get geared up.
Always explore, experiment with your video advertising, optimize them to be viewed without sound, keep them concise, establish an impact within the first milliseconds, and easily boost your business on Facebook.
We hope that your Facebook video advertising yields a lot of positive outcomes for you.
Conclusion: Create Videos For FaceBook Ads
So we have at the ending of a great Facebook ad video tutorial. Today we have discussed 3 methods. Are you still confused? Don’t worry consider the summary below and choose the preferred method accordingly:
Go for the Invideo.io (Recommended) Method:
- When you want to create a Facebook ad video online with minimum possible time.
- When you want to generate an Ad video with readymade editable templates
- When you want to design your ad video with the most popular online video creation tool.
Go for the Movavi Video Suite (Recommended) Method:
- When you have recorded footage and you first want to edit it professionally.
- When you just want to create a slideshow ad video with the saved images
- When you want to create an ad video with PC software rather than an online tool.
- When you don’t have an issue with the absence of editable video ads templates
- When you want to create the best engaging Facebook ad video by using the advanced features including animations, transitions, pan & zoom, chroma-key, slow motion, reversing video, and much more.
- When you also want to improve and edit the voiceover before using it in the Ad video.
Go for the Facebook In-house Ad Management Tool:
- When you are new to Facebook advertising just want to test how video ads work for you.
- When you’re happy with a simple less engaging ad video created with images and includes no animation and transition.
So which method are you gonna use to generate a Facebook ad video? Let us know in the comments.
Whatever method you choose for your ad video is one thing. The second highly important thing is to follow tips while creating an ad video. Otherwise, your ad won’t perform the way you wanted it to perform. So follow the tips and guidelines mentioned in this article and design your Facebook ad video accordingly.
I wish this article, How to Create Videos for Facebook Ads, helps you to generate a Facebook ad video quickly. If you like this article, please share it with your friends. If you want more blogging tips, follow BlogVwant on Facebook, Twitter, and YouTube.
FAQ: Create Videos for Facebook Ads
Which method is the fastest?
Invideo.io
Do I need to learn video editing for Facebook ads videos?
No. To create Facebook ad videos, only basic video editing is required. The methods which I have mentioned in this article are very simple to use. Just follow our article and you would able to generate ad videos easily.
How do I make a video for Facebook Ads?
The process of making a video for Facebook Ads is divided into 4 steps. The first users have to produce ad footage or ad images if they want to make an ad video with the slideshow approach. Next user has to choose a Facebook Ad video maker that can be used to edit the ad footage and for including the necessary effects such as animation, transition, text, and whatnot. After finishing the video part the user can include voiceover or audio in the video ad. Finally, after everything is done the user can export the Facebook ad video and publish it on Facebook.
What is the best video format for Facebook ads?
The most popular video format for Facebook ads is 1:1. However, you can always decide based on the format for which you want to create an ad video. Consider reading the Facebook ad guidelines.
Can I use videos for Facebook ads?
Yes.
What is the maximum Facebook video ad size?
Facebook Feed Ad Video Maximum Size: 4 GB, In-Stream Ad Video Maximum Size: 4 GB, Stories Ad Video Maximum Size: 4 GB. Check the Facebook ad guidelines page to explore the complete video format list.
How long should a video be for a Facebook ad?
1-2 minutes. For better engagement and conversion, the user has to design an ad video that is able to convey the message in a short time. Try to keep your Facebook video ad length within 1 minute and don’t forget to grab the user’s attention in the first 3 seconds.
Can I upload a 4K ad video to Facebook?
Yes.

