Do your website has the best articles? But found out no one is reading them? Want to ask Google Analytics to show off your popular posts lists to anyone who visits your site? And want to get crazy engagement with popular posts lists in WordPress? So as to get more page views, reduce the bounce rate, and keep visitors on your site. Then you need to install and use the MonsterInsights Pro plugin.
With MonsterInsights latest version, you can easily do it with just a few clicks. Recently in November 2020, MonsterInsights has announced its latest features Popular Posts and Contextual Insights in its new version MonsterInsights 7.13. Its Popular Posts feature aids your readers find the best content and articles on your site. And its Contextual Insights aids you to get actionable insights to grow your business.
In this article, we will show you how to add the top 5 posts from the past 30 days to your curated list of Popular Posts using MonsterInsights. This unique and great feature will not only keep your readers glued to your content, but they will also wanna come back for more.
What is MonsterInsights?

MonsterInsights is a #1 Google Analytics plugin that easily connects your WordPress site to your Google Analytics in a few minutes. That too without touching a single line of code. And you can view GA reports right in your WordPress site dashboard. In brief, MonsterInsights makes it easy to track your website’s performance with Google Analytics. That’s why over 2 million professionals and WordPress website owners are now using MonsterInsights.
What is MonsterInsights’ Popular Posts? How it works?
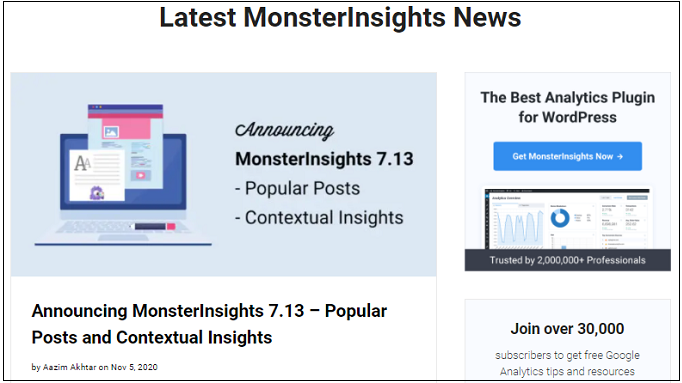
No one is seeing the popular posts on your website? Want to ask Google Analytics to show off your popular posts to anyone who visits your site? So as to increase your page views, reduce the bounce rate, and improve user engagement all at once. Then you can do it using MonsterInsights.
MonsterInsights has announced its latest features Popular Posts and Contextual Insights in its new version MonsterInsights 7.13 recently in November 2020.
With MonsterInsights’ Popular Posts, you can now display your best content like popular posts and even top products anywhere on your WordPress. And it aids your visitors to find your popular posts. And you will surely get crazy engagement. Further, this way also increases your page views and ad clicks.
MonsterInsights provides 3 ways for you to display your popular posts:
- Inline Popular Posts – Display posts within the text of your content.
- Popular Posts Widget – Display up to 10 articles anywhere on your site, like your sidebar or at the end of the post.
- Popular Products – If you have an eCommerce store, then make your popular products visible and increase your revenue.
Why should you include your popular posts from Google Analytics?
You must include your popular posts from Google Analytics if you want Google Analytics to display your popular posts while the visitors and readers visit your site. And you can also view how your website is performing and analyze the details of visitors on your website such as location, gender, age, pages they visit, etc.
But you need the help of MonsterInsights if you want to easily connect your WordPress site with your Google Analytics. And to display your popular posts to the visitors and readers when they visit your site. Further, you can view all the important metrics of your site straight from your WordPress site dashboard.
- Also Read: How To Quickly Export WordPress Analytics With Google Analytics Using MonsterInsights
- How To Set Up Author Tracking On WordPress Site by MonsterInsights
How to Get Crazy Engagement with Popular Posts Lists in WordPress
With MonsterInsights’ new feature Popular Posts, you can display your top content and products anywhere on your WordPress site. It aids you to get crazy engagement and more page views. And with numerous people reading your blog posts, you have a higher chance of getting more ad clicks, social shares, email signups, and ultimately more conversions.
Here you need to set up MonsterInsights’ Custom Addon to automatically add your 5 popular posts from the past 30 days. Then these posts will appear to your visitors when they visit your site.
Next, with MonsterInsights’ Contextual Insights, it is easier than ever to get actionable insights and make the best use of your data to skyrocket your website’s performance.
How to display Popular Posts Lists in Wordpres using MonsterInsights
Note: If you have already installed the MonsterInsights Pro plugin on your WordPress site and connected it to your Google Analytics. Then skip steps 1, 2, and 3. Jump to step4. And if you don’t set up Post Type custom dimension earlier, then you will need to wait up to 24 hours for it to take effect in Google Analytics.
In this section, you can view how to add the top 5 posts from the past 30 days to your curated list of Popular Posts using MonsterInsights’ Custom Dimensions addon. This unique and great feature displays your popular 5 posts to your visitors when they visit your site.
In brief, the following steps are involved here:
1. Subscribe to MonsterInsights Pro plan
2. Install And Activate MonsterInsights Pro plugin on your WordPress site
3. Connect your MonsterInsights to your Google Analytics
4. Install and Activate Custom Dimensions addon. Then Add Custom Dimensions in MonsterInsights
5. Set Up Custom Dimensions in Google Analytics
6. Match Custom Dimensions IDs
7. Specify How Popular Posts are Sorted. And Select Which Popular Posts to Display
8. Add the Top 5 Posts from Google Analytics
Total Time: 5 minutes
Step1: Subscribe to MonsterInsights Pro plan

1. To access MonsterInsights’ new features Popular Posts and Contextual Insights, and Custom Dimensions addon, you need the MonsterInsights Pro plugin.
So, first, subscribe to the MonsterInsights Pro plan.
2. The cost of the MonsterInsights Pro plugin is $199.50/year.
3. But here you don’t think that its price is a little bit high. Because, at this price, MonsterInsights provides not only the Popular Posts, Contextual Insights, and Custom Dimensions features but also other great features like:
Ecommerce Report, Custom Link Attribution, Form Conversions, Author Tracking, Category / Tags Tracking, and more.
4. Further, with a single license, you can access this pro plugin on five of your WordPress sites.
Step2: Install And Activate MonsterInsights Pro plugin on your WordPress site
1. Go to the MonsterInsights website and log in.
2. Click the Downloads tab on the top of the page.
3. Click the Download link beside your MonsterInsights Pro plugin.
4. A zip file is downloaded.
5. Go to your WordPress site Dashboard. And navigate to Plugins >> Add New >> Upload Plugin.
6. Click the Choose File button. And upload the recently downloaded zip file.
7. Click the Install Now button and then on the Activate Plugin.
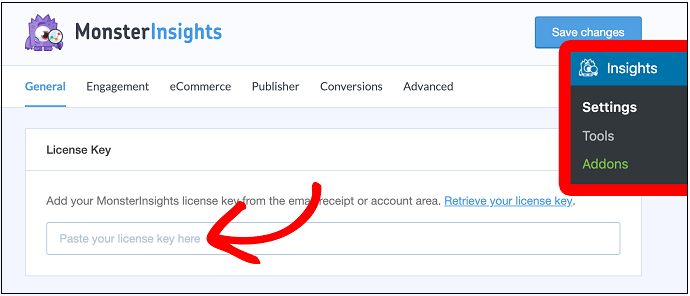
8. Go to your My Account page on the MonsterInsights site and copy your License Key.
9. Get back to your WordPress site dashboard and navigate to Insights >> Settings.
10. Click the General tab. Then enter or paste the copied license key.
11. Click the Verify button.
That’s it! You have now successfully installed and activated the MonsterInsights Pro plugin on your WordPress site.
Step3: Connect your MonsterInsights to your Google Analytics
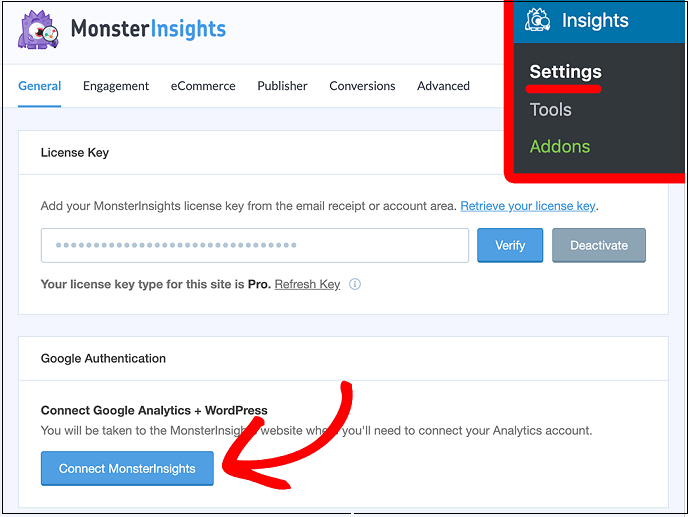
1. On your WordPress site dashboard, navigate to Insights >> Settings.
2. Click the General tab.
3. Click the Connect MonsterInsights button.
4. Select your right Google Account. Then click the Allow button.
5. Select your right website profile and click on I’m not a robot option.
6. Click the Complete Authentication button.
That’s it! You have now successfully set up your Google Analytics on your WordPress site using the MonsterInsights Pro plugin.
Step4: Install and Activate Custom Dimensions addon. Then Add Custom Dimensions in MonsterInsights
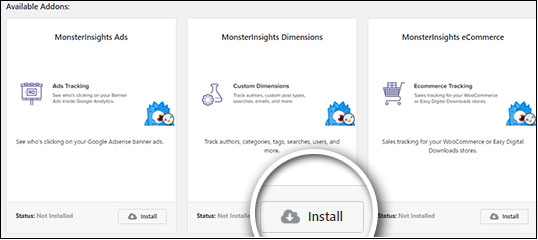
1. On your WordPress site admin dashboard, navigate to Insights >> Addons.
2. Click on the Install button under the MonsterInsights Custom Dimensions addon.
3. Once the installation completes, then the button will change from Install to Activate. Then click the Activate button.
4. Again go to Insights >> Settings. And click on the Conversions tab. Then scroll down to the Custom Dimensions section.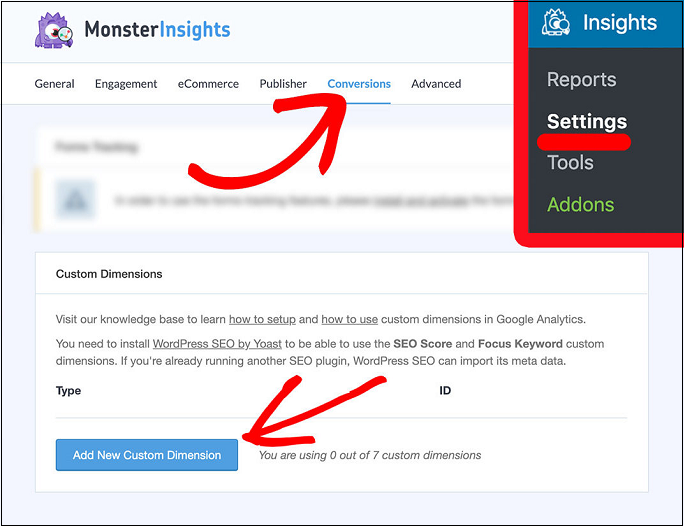
5. You can view many dimensions. Among them select your required dimension Post Type. Then MonsterInsights automatically saves your changes.
That’s it! You have now set up a Custom Dimension, Post Type in your WordPress site. Next, you have to set up Custom Dimensions in your Google Analytics.
Step5: Set Up Custom Dimensions in Google Analytics

1. Log into your Google Analytics account. And select your right WordPress site for which you have to set up custom dimensions.
2. Click the Admin tab in the left panel. Then on the Custom Definitions and Custom Dimensions.
And on the +NEW CUSTOM DIMENSION button. 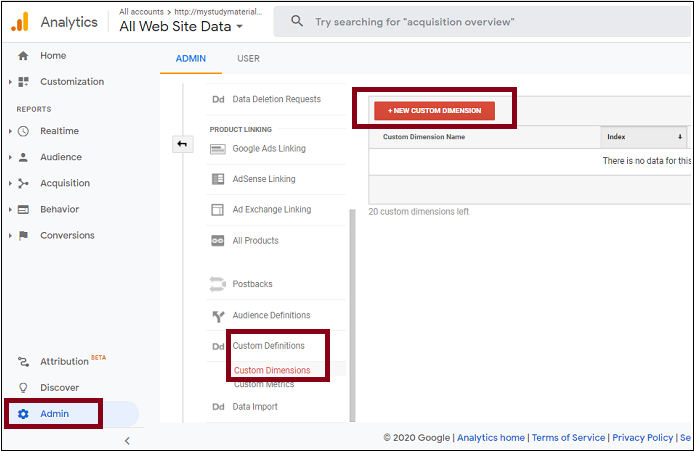
3. Enter the name of your new Custom Dimension based on the dimension type you chose in Step 4. That is Post Type. And click the Create button. And don’t change any other settings.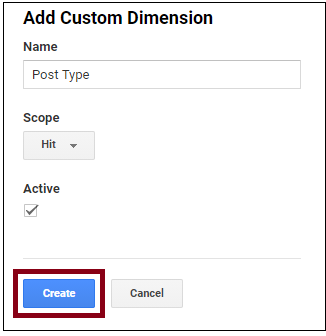
4. Click on the Done button.
Step6: Match Custom Dimensions IDs

Now you need to check that the index number in your Google Analytics corresponds with the Custom Dimension ID in the MonsterInsights settings.
1. First, check the index number of the Post Type in your Google Analytics.
2. Next, go back to your Custom Dimensions settings in your MonsterInsights. And ensure that the ID of the Post Type custom dimension must match with the index number in your Google Analytics.
If not, type in the correct number. And click on Save Changes.
Step7: Specify How Popular Posts are Sorted. And Select Which Popular Posts to Display

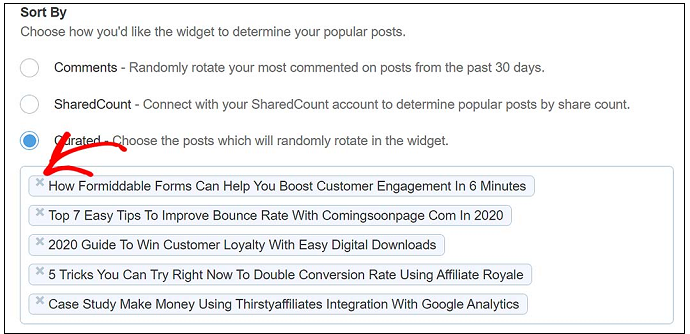
1. Navigate to Insights >> Popular Posts >> Inline Popular Posts >> Sort By.
And click the Curated radio button.
2. Click inside the text area below the Curated radio button.
3. Then a drop-down list will appear.
4. Next, select your post from the drop-down list. Or type in here the title of your post to search. Then select it.
Once you select the post, it automatically adds to the text area. Each selection adds to the list.
Suppose you want to remove a selection, click on the X icon in front of the post title that you want to remove. 
Step8: Add the Top 5 Posts from Google Analytics
1. Navigate to Insights >> Popular Posts >> Inline Popular Posts >> Automated + Curated.
2. Click on the Add Top 5 Posts from Google Analytics toggle button to slide to the On position.
3. A Check configuration button will display below the toggle button.
4. Click on the Check configuration button.
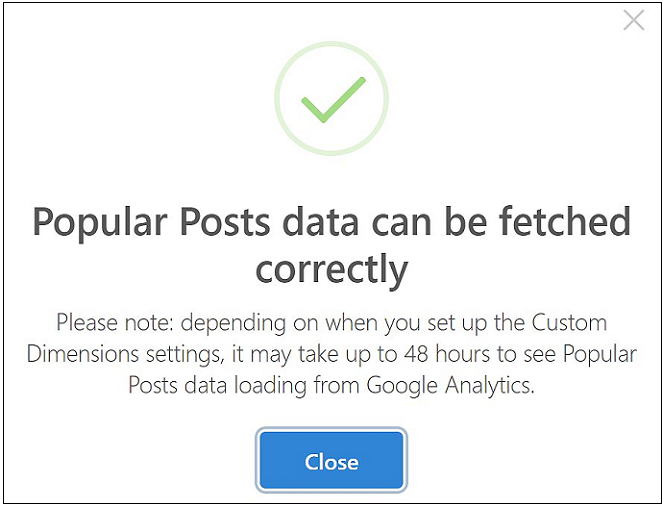
5. If the check configuration is successful, you will see a message like “Popular Posts data can be fetched correctly.
6. Suppose you are missing a setting, such as the required Post Type custom dimension, then MonsterInsights will conveniently guide you on where to go to fix it.
7. And MonsterInsights’ auto-save feature saves all your changes automatically. For your satisfaction, if you want to save, then scroll back up to the top of the page and click the Save Changes button.
8. Now to view the work that you just did, make sure you have inserted your inline Popular Posts somewhere on your site.
9. Then visit that page to view your curated top 5 posts proudly on display. That’s It!
Related: 3 Steps To Track Google Analytics Scroll Depth With MonsterInsights
MonsterInsights Discount
First-time customers will get a 50% discount on all MonsterInsights plans through This MonsterInsights discounted pricing page.
Grow Your Business with MonsterInsights’ Contextual Insights
MonsterInsights is continuously working towards helping its users find important information to grow their business. So it has introduced a new feature Contextual Insights recently in November 2020.
With this, you will get notifications within the plugin. That’s really a great and useful way to instantly know the latest performance of your website. Besides informing you on how your website is performing, it also provides you actionable insights. And aids you make the best use of the data to skyrocket your website’s performance. For example, MonsterInsights will send you a notification regarding most of the people visiting your site from a specific country.
Then using that information, you can translate your website into that region’s language. Find new content topics and build personalized marketing messages for your audience to get more traffic and conversions.
Further, Contextual Insights also aids you to find new ways to track your visitors and get key information that you might be missing out on.
Conclusion
Now with MonsterInsights Popular Posts, you can easily display your popular posts to the visitors and readers who visit your site. And aids you to get crazy engagement, more traffic, more page views, and ultimately more conversions. And reduces the bounce rate. Further with its Contextual insights, you can get the latest notifications about your website performance right within the plugin. And you can also get actionable insights to grow your business.
Finally, you must say thanks to MonsterInsights that not only makes connecting your WordPress site with your Google Analytics easy but also aids you to easily display your popular posts to your visitors and readers when they visit your site.
I strongly believe that this article, How to Get Crazy Engagement with Popular Posts in WordPress, helped you to easily add your top 5 posts from Google Analytics. If you like this article, please share it with your friends. If you want more blogging tips, follow BlogVwant on Facebook, Twitter, and YouTube.
Get Crazy Engagement with Popular Posts Lists in WordPress: FAQs
Can I get crazy engagement with popular posts in WordPress?
Yes. With MonstersInsights’ Popular Posts feature, you can surely get crazy engagement on your WordPress site.
Is MonsterInsights free?
Yes. MonsterInsights Lite is a free version. But it has limited features. And you need to upgrade to its premium versions if you want more features.
Which Google Analytics Plugin for WordPress is the best?
MonsterInsights.
