
Google webmaster tools verification is must for any website to get into Google search results. Google webmaster tool is a free tool provided by Google which helps Google search engine to understand your website and latest information on your website. Webmaster tool is must to improve or to maintain your website SEO.
- Related: What is SEO(Search Engine Optimization)?
- 12 Best On-page SEO Techniques to get No.1 rank in Google
Why Google Webmaster Tools?
It will maintain your website SEO by showing internal or external Links, Keyword analysis, etc., Google webmaster tools or Google search console will not only help you to show your website on the Google search results but also give you many features.
- You can submit your sitemap to Google which helps to inform Google about latest published posts.
- It can help you to test Robots.txt file for the errors.
- You can check your website errors like 404 not found URLs.
- You can change Google crawl rate.
- You will get notified by Google when your website gets blocked due to malware so that you can remove the malware to appear on Google.
- You can check how your website and your posts appear in search results and how they perform.
- You can submit URL to index and remove URLs from indexing.
- You will get notified when Google face any issue while indexing.
- It monitors whether your server is running properly or giving any errors.
When you want to get all above features and more, you must first do Google webmaster tools verification to your website.
Google webmaster tools verification
Video Tutorial:
For the reader’s convenience, we always create a video tutorial. Either you can watch and learn or simply skip the video and continue with the steps mentioned below.
Verification is very simple. Just signup to webmaster tools website. Submit your website URL. You will get a code or meta tag. Paste that tag on your website. Google will verify your website by using the tag.
When you have a WordPress website, many plugins and theme are giving a direct option to verify webmaster tools.
Visit https://www.google.com/webmasters/tools/
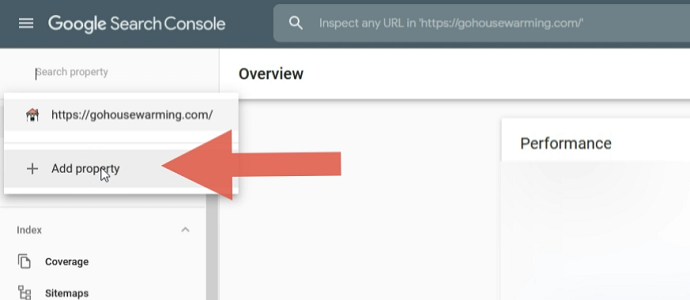
Login using your Gmail. You will see search console home page. Type your website URL and select ADD A PROPERTY.
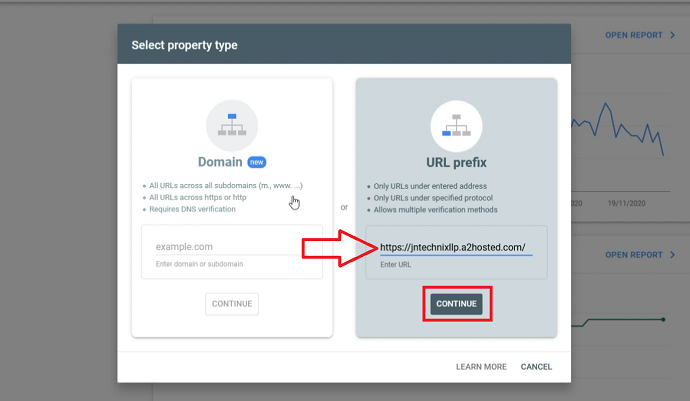
Then enter your website URL. Make sure to add HTTP or HTTPS prefix. If your domain has an SSL feature then use HTTPS as a prefix. After that click on the continue button.
You will see a Verification page. Google webmaster provide 5 ways to verify the website.
It is better to choose meta tag method. Because It is simplest of all. Select HTML tag option.
Copy entire meta tag

Now you have copied the meta tag. You need to paste it into your website header section. You can use any method from the next section to paste the meta tag.
After using one of the methods below to paste the meta tag on your website. Don’t forget to click on the verify button as shown in the below screenshot.

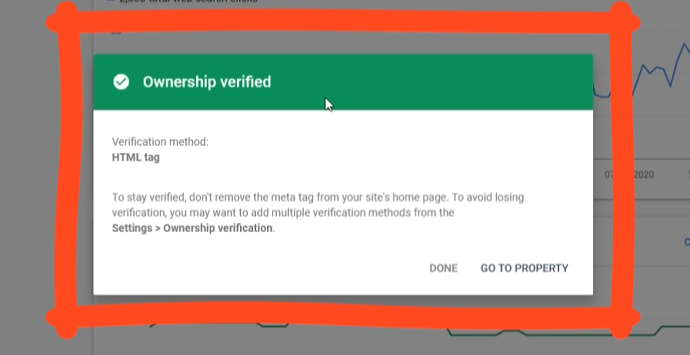
After tapping the verify button, If everything goes right, you will see the “ownership verified” status. If you see any error, then you did some mistake in pasting the meta tag. Repeat the process. And it still doesn’t work, you can go for other verification methods provided by google webmasters.
1.Using Yoast SEO
Yoast SEO is the best free SEO plugin. You must not run your website without this plugin. This plugin will give you many options like creating XML sitemap, SEO for your website posts, pages, and archive pages, indexing, and no indexing options, Editing files like htaccess, robots.txt etc., It will also give you the option to add the meta tags.
Login into your WordPress dashboard. Install and activate the Yost SEO plugin if you did not have.
Go to SEO -> General from the left menu.
Select Webmasters tools option from the tabs. Paste the copied content. Click Save changes.
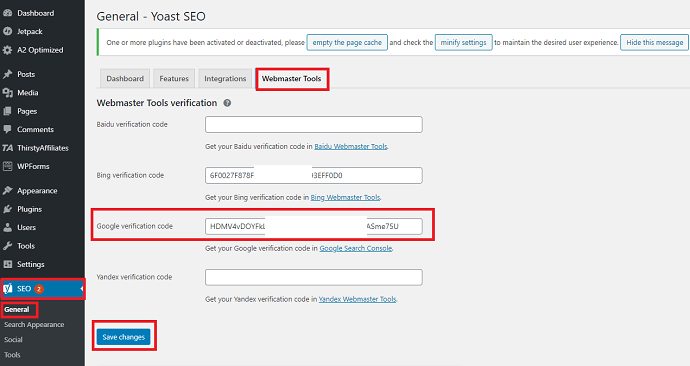
Even if you had pasted entire meta tag, you will see only the required code in the field.
Now go back to the Google webmasters tools page. Click on Verify button at the bottom.
You will see the success message.
You need to repeat the same procedure for non-www version, https www, and https non-www versions also. You will get the same verification code for the remaining versions. You need not copy and paste the code second time. You can directly click on verify button after selecting alternate method.
- Related: What are backlinks in SEO? How to build high-quality backlinks
- What are follow or nofollow links in SEO? Do nofollow links help SEO
2.Use Jetpack
Jetpack is another plugin without which you can not run your website. It gives many features like website statistics, Social share buttons, Image CDN, automatic publishing your posts to social media, many widgets, etc., It will also give you an option to add meta tag.
Login to your WordPress dashboard. Install and activate jetpack plugin if you did not have.
Go to Jetpack -> Settings -> Traffic.
Scroll down the page Click on ACTIVATE at Site Verification option.
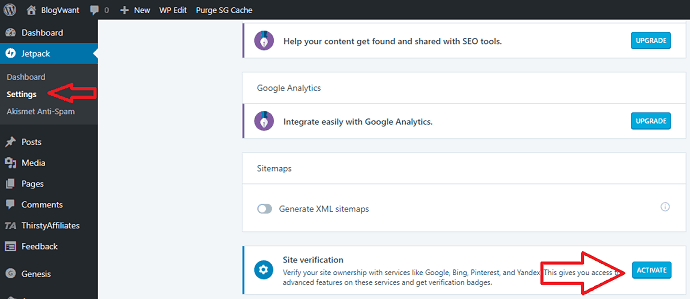
You will see the fields to paste the meta tags.
Paste the meta tag, Save Settings and Verify from Google webmaster tools.
If you are not using the two plugins or WordPress, you can use file upload method. You just need to download the file and upload to your server.
Till now, you have verified your website. You must submit the sitemap of your website to Google webmaster tools. Otherwise, Google might not index your website. You must read How to create XML sitemap and submit to Google webmaster tools.
- Next Topics to Read: 2 Ways to Add website to Bing webmaster tools
- 5 Steps to Create or Setup Google analytics Account and to Add site
I hope this tutorial on Google Webmaster Tools Verification helped you to verify the website with google webmaster. If you like this article, please share it with your friends. If you want more blogging tips, follow BlogVwant on Facebook, Twitter, and YouTube.