
Jetpack Publicize helps you to auto-publish posts to social media. By using the Publicize feature, you can automatically publish your WordPress blog posts to multiple social media accounts. It is must use the function because it saves your lot of time. In this tutorial, I am going to give you step by step procedure to set up the Jetpack Publicize feature.
What is Jetpack Publicize?
If you use WordPress, you must have been using the Jetpack plugin. Jetpack is one of the must-have plugins for WordPress websites. Jetpack is a free plugin that gives a lot of necessary features for your WordPress website. One of the best features is Publicize.
You may know that social media is the best way to give publicity to your website and to your posts. When you publish a new post, it is a must share your post on social media networks. You may have accounts on many social networks like Facebook, Twitter, Google, Linkedin,. You need to spend some time to share the published post on all networks.
If you set up Jetpack publicize feature. It will automatically share your latest post to all social media networks. When you click the Publish button at the post editor in the WordPress dashboard, jetpack will automatically publish your post to all social media networks.
Limitations of Jetpack Publicize
Though it is the best feature, it has some limitations.
- It supports only 6 social media networks, i.e., Facebook, Twitter, Google+, LinkedIn, Path, and Tumbler.
- You can use either your Facebook profile or Facebook page. You can not use both from a single account. Of course, you can use multiple Facebook accounts.
- It can not auto-publish updated posts. It will work only for new posts.
Though it has some limitations, you must use this feature. Because it is free.
How to use Jetpack publicize
Video Tutorial:
When you like to watch a video tutorial and understand the process click below, else you can just continue with the steps mentioned after the video.
Login to your WordPress dashboard. If you don’t have the Jetpack plugin. Install Jetpack.
If you are using the Jetpack plugin first time, Go to Jetpack -> Settings -> General -> Connection Settings. Connect your wordpress.com account with the Jetpack.
Now Go to jetpack -> Settings -> Sharing.
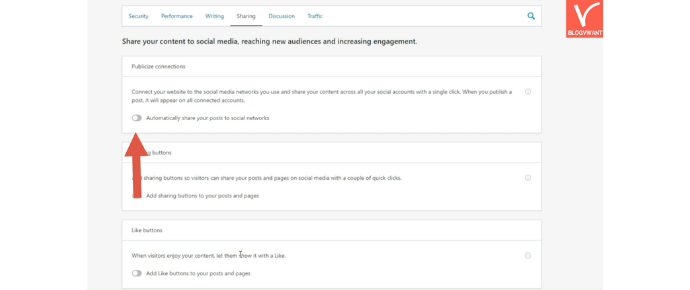
Enable Publicize.
Click on the Down arrow mark.
Click Configure your Publicize Settings. You will see the Sharing settings window shows that in the below screen. Or you can also Go to Settings -> Sharing to see the below screen.
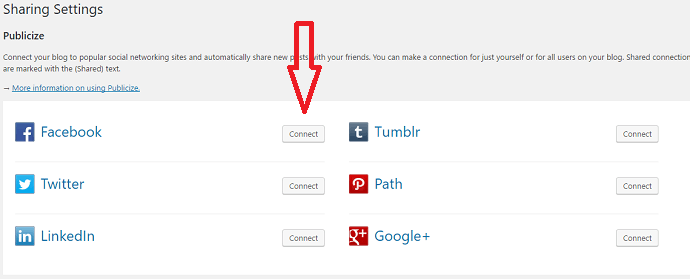
How to Connect Facebook Accounts
Click Connect right to Facebook shows that in the above screenshot. It will display the Facebook login page. Log in with your credentials. If it shows any error, you need to read Easy Fix for Publicize not working issue.
After login into your Facebook account, you will see the below screen which shows your Facebook profile and your pages. You can select either your profile or page. You can not select both from a single profile. Of course, you can add another Facebook profile.
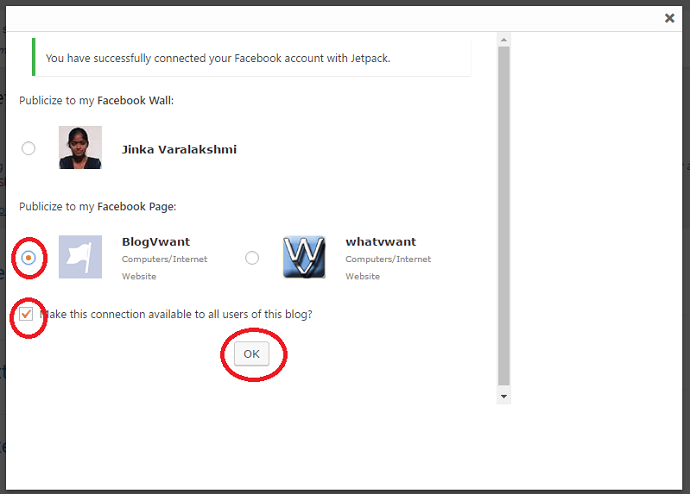
Check Make this connection available to all users of this blog. And click OK.
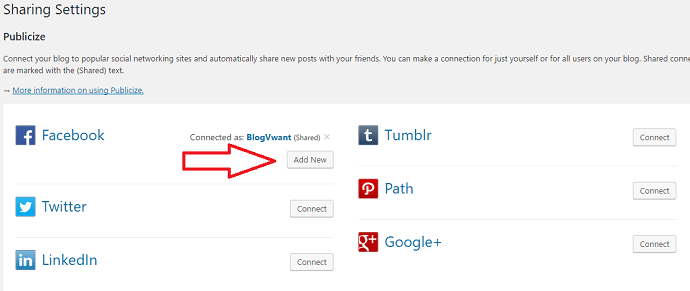
Now you will see your Facebook connection name in the Sharing settings window.
If you want to add another Facebook profile, first open Facebook in a new tab, and log out.
Now come back to Sharing settings and click on the Add New button.
Log in with another profile credentials. Select your Profile and check Make this connection available to all users of this blog. And click OK.
How to Connect Google+ Accounts
Jetpack Publicize can not accept both of your Facebook profile and pages. But it allows Google+ profile and page.
Click Connect right to Google+.
If you have logged in into multiple Google accounts on your computer, it will show all accounts. Select anyone. You will see your profile and pages indicate that in the below screenshot.
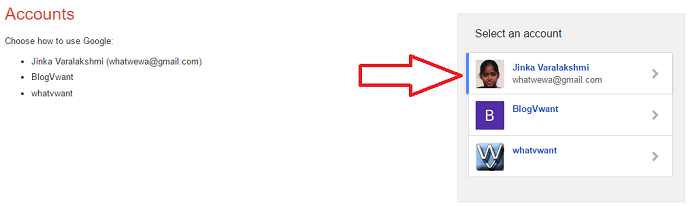
Select your Profile. Click Allow in the next window. Check Make this connection available to all users of this blog. And click OK.
Now you will see your profile connection.
Click Add New. Select your account. This time select your Page. Click Allow. Check Make this connection available to all users of this blog. And click OK.
You can also connect another profile by selecting the Add New button. Repeat the same procedure for all your accounts.
How to Connect Twitter Accounts
You may have one Twitter account for your profile and another account for your website. You can connect both of them. If you want, you can connect Twitter accounts.
Click the Connect option right to Twitter in Sharing settings.
Log in with your credentials in the next window.
Check Make this connection available to all users of this blog. And click OK.
If you want to connect to another profile, open Twitter in a new tab. Log out from that account.
Come back to Sharing settings. Select Add New. Repeat the same procedure.
You can repeat the same process for your Linkedin, Path, and Tumbler accounts also.
I hope this tutorial helped you to set up the jetpack publicize feature. If you like this article, please share it with your friends. If you want more blogging tips, follow BlogVwant on Facebook, Twitter, and YouTube.