
Are you becoming frustrated by wasting your essential time on basic forms tasks? Like data transfer from your website forms to other apps? Well, if that is the case, it’s time to automate your work by enabling form automation. In this article, we are showing you the exact process to automate your website forms with the help of the 2 most popular tools out in the market Zapier and WPForms. At the end of the article, you will be surprised and feel happy to find out that you could save plenty of time that you are wasting normally.
Why Should You Automate your Website Forms?
Adding forms to the website could not take longer rather than figuring out how to use the form data further. In many situations, we are required to transfer the form data to multiple applications to take further action. For example, you may want to save new form entries to Google sheets, or you may want to save attachments and files that come along with every new form entry to google drive or you may want to transfer form entries into your email marketing platform like MailChimp, etc.
The possibilities when you require to transfer form data to other applications or to take action as soon as you receive new leads are endless.
This sounds time-consuming when you have decided to do transfer form data in such types of situations manually. Under these kinds of situations, you must enable an automation system on your website forms. With the form automation, the form entries will automatically be moving to other applications for further processing.
By enabling form automation you can eliminate your focus on such small tasks and save chunks of time which can be utilized in other high priority tasks.
What is WPForms?
WPForms is the major form builder plugin available for WordPress websites. Being a WordPress user, there is no chance that you do not have heard about this plugin yet. Might be chances that you have already been using this plugin to set up forms on your WordPress websites. It can help you to create any type of form including the payment form, donation form, contact form, custom forms, multi-page forms, etc. Apart from building a form, this plugin allows you to automate your forms with the help of “Zapier Addon“. So that you can connect WPForms with other CRMs or applications easily. The WPForms Zapier Addon only available in WPForms paid version.
What is Zapier?
Zapier is the US-based online automation tool founded in 2011 which helps you to connect multiple web applications together without coding to reduce the repetitive tasks and promotes seamless workflow by enabling automatic data transferring between applications.
Without Zapier, you may require a professional web developer to establish a connection between two applications. This would cost you a fortune. But with the Zapier, initially, you don’t have to pay. For beginners, the Zapier 14-day trial period plan is enough. After that, you may require to upgrade your plan.
It has supported more than 3,000 web apps including popular ones such as Google sheets, slacks, WPForms, Gmail, Google Drive, MailChimp, etc. There could be millions of ways where you can use Zapier for. For example, you could automate the task to send a personal message for each new lead coming through your forms.
In simple words, Zapier is the automation tool that works on your behalf and reduces unnecessary manual work.
Fortunately, Zapier has a WPForms integration which could help your website forms to connect with more than 2,000 web apps easily. After forming a connection, you can transfer WPForms data to other applications. For example attachments to Google drive, form entries to an email marketing tool, etc.
Not limited to files and forms entries transfers, you can automate any tasks as soon as you get new form submission. For example, you can use Zapier to enable the connection between WPForms and Gmail for sending a custom greeting message to people who have just hit or completed your form submission.
Note: Zapier only supports 1 trigger for WPForms that is “New form entry” which means every time WPForms receives a new entry, zapier will turn on and initiate the action on your behalf that you have configured.
What are the Benefits of Integrating Zapier and WPForms
As I told you that with the help of WPForms Zapier Addon both tools could be connected. But have you wondered in which situations you can take advantage of connecting WPForms with other applications through Zapier?
Here the automation possibilities are infinite. Some of the examples of situations where you can configure a connection between WPForms and other applications through Zapier are:
- To transfer form entry from WPForm to lead in SalesForce
- To save new form entry as a contact into HubSpot
- To generate an invoice in FreshBooks for a new form lead automatically
- To send an SMS from the Twilio app to new WPForms forms leads
- To save new form entry as a contact into Google Contacts
- To transfer new form entries to the Trello board as a new card
- To instruct Zapier to create a new Asana task as soon as someone complete the form
- To transfer form entry into QuickBooks and as a customer
- To transfer new form entry information to the slack channel and notify team members.
- To transfer WPForms forms attachment and files to Amazon S3, Dropbox, and Google Drive
- To transfer form leads to other email marketing and CRM platforms including ConvertKit, Freshsales, Salesforce, Zoho, Sendy, MailChimp, etc.
- To create a record in AirTable for new form entries
- To create an event in Google Calendar based on the date and time inputted by the user during the time of WPForms form submission
- To transfer form entries into Google Sheets
- To add WPForms form entries into Jira to create a new issue
- To instruct Zapier to upload video on YouTube as we receive new form entries.
- To create a Zendesk ticket for the new form entries generated by WPForms forms
How do Zapier and WPForms integration work?
As soon as you integrate WPForms with Zapier through API, you have to first choose a trigger. The trigger is basically an action or event which initiates the zap. As we had already mentioned in the above section, Zapier only has 1 trigger for WPForms that is “new form entry”. So it is by default set as a trigger. Next, you have to configure an action. Action is basically telling Zapier what to do next. This could be anything from the above possible situations. Now each time your WPForms forms receive a new entry, ZAP will run and transfer the form entry data to other applications on your behalf.
This is just a theoretical explanation, jump to the next section to see how you can establish a connection between Zapier and WPForms practically.
- Related: How to Automate your Workflows with MemberPress and Zapier
- Create Multipage forms in WordPress with WPForms
How to Connect Zapier and WPForms to Automate your Work: Step by Step Guide
In this section, you will see the process to connect Zapier and WPForms practically for enabling the connection between WPForms and other applications:
Total Time: 10 minutes
Step 1: Purchase WPForms plugin
The WPForms Zapier Addon is only available in WPForms Pro and Elite versions. If you haven’t yet purchased the plugin, make sure to purchase it and then install it on your WordPress website.
Step 2: Activate the WPForms Zapier Addon
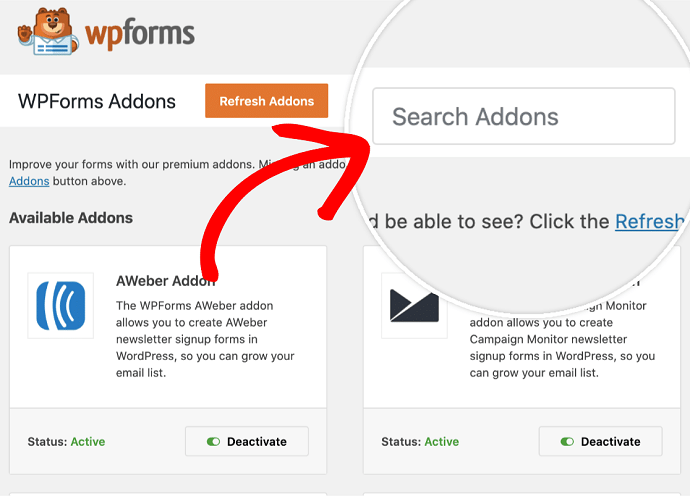
After installing the plugin, navigate to WPForms > Addons and search Zapier addon here. Then install it.
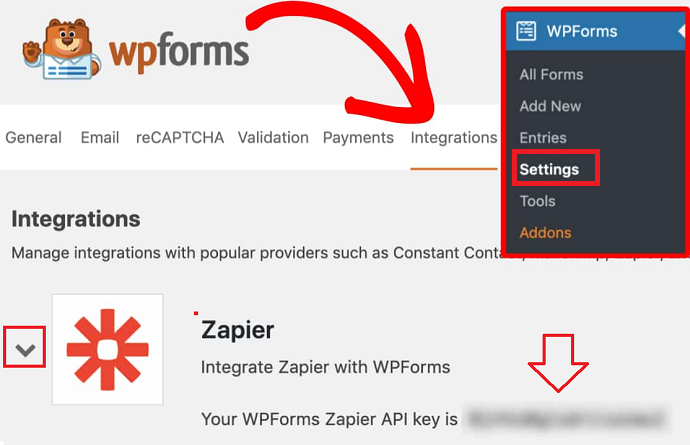
Step 3: Navigate to the Integrations tab

After installing the Addon, simply navigate to WPForms > settings > Integration. In this tab, you must find a Zapier option. Tap on it. The API Key for the Zapier and WPForms integration should be visible. Keep this browser tab open and open up the new tab.
Step 4: Login or Signup to Zapier

It’s time to configure the Zapier settings. But first, make sure to login or create a free account on Zapier. Initially, you will be registered as a Zapier premium user. But after the 14 days trial period ends, you will be required to upgrade your Zapier plan because WPForms integration cannot be found in the free version.
Step 5: Create a Zap
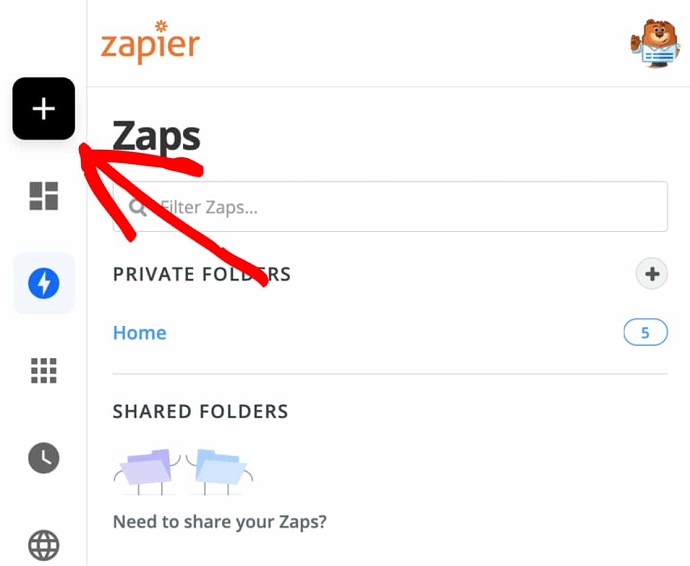
After login into Zapier, you need to create a Zap. Zap is basically defining a task that you want to run between two apps. To create a Zap tap on the black “+” button located at the upper left.
Step 6: Select WPForms App

As soon as you tap on the “+” button it will open a new setup window. Here first give a name to the zap if you want and then search WPForms under the “Choose App & event” box and then select it.
Step 7: Choose a WPForms Trigger Event
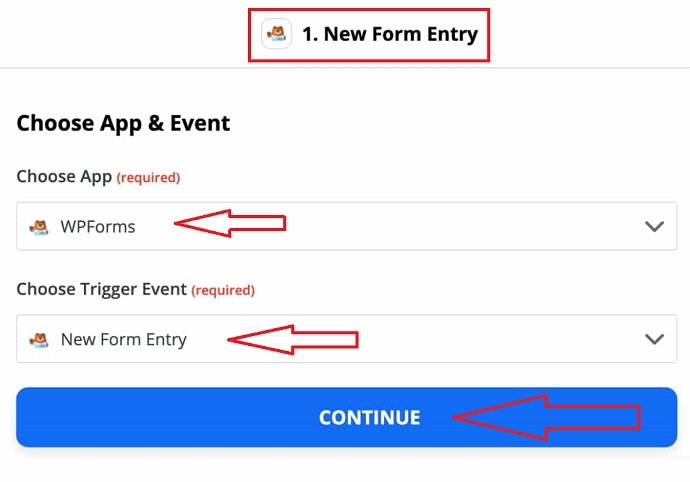
After selecting the WPForms, zapier will show the all available trigger options for the WPForms. As I mentioned earlier, Zapier has only supported 1 trigger – “New form entry” for the WPForms. So select it under the “Choose trigger event” option. And finally hit on the continue button.
Step 8: Initiate a connection between Zapier and WPForms
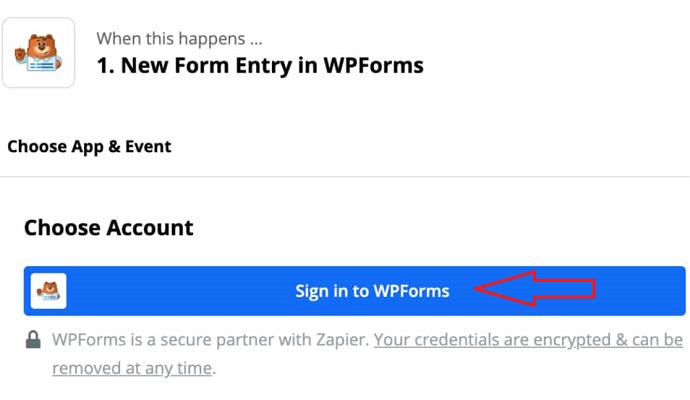
After pressing continue, Zapier will ask you to login into WPForms. Tap on the “Sign in to WPForms button”, now you must remember that the WPForm tab is already being opened in our browser since step 3, so here overlapping will occur and the login process will automatically be completed. You only require to enter the Zapier API key.
Step 9: Enter the Zapier API key
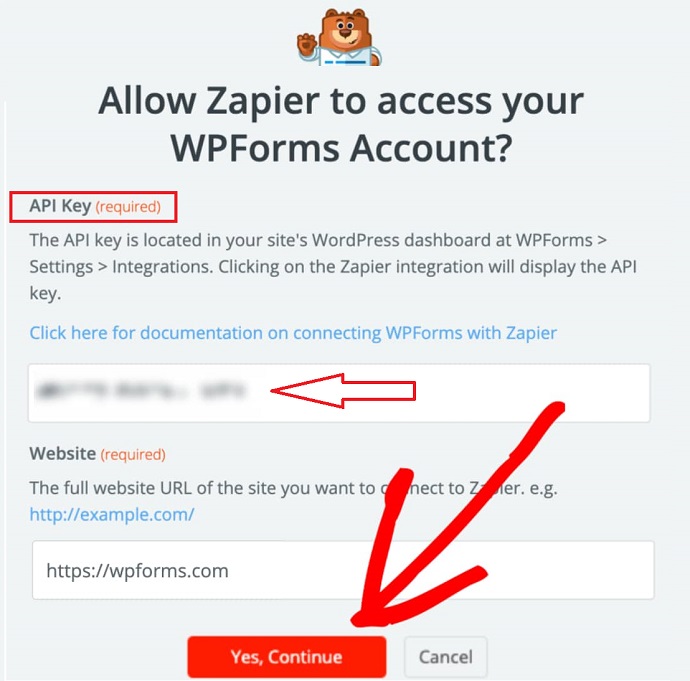
If by mistake, you have closed the WPForms tab which we were keeping open since step 3. No problem. You can find your API key by navigating to WP dashboard > WPForms > Settings > Integrations > Zapier. So copy the API key and paste it here. Also, you need to input your website URL. Make sure to enter a URL in a proper format as shown in the image. After everything is ready, you can tap on the red “yes continue button”. Next zapier will ask you to select an account to use for running a ZAP. Choose WPForms from the dropdown menu, select your site and press continue.
This way the connection between Zapier and WPForms has been established successfully.
Step 10: Select a WPForm form
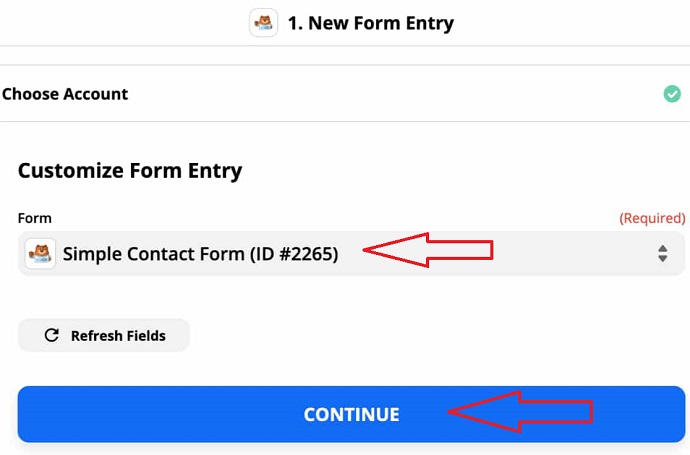
Now Zapier will automatically detect all WPForms forms available on your website. Choose a one for which you want to configure a new form entry trigger and tap on the continue button.
Step 11: Test the Connection
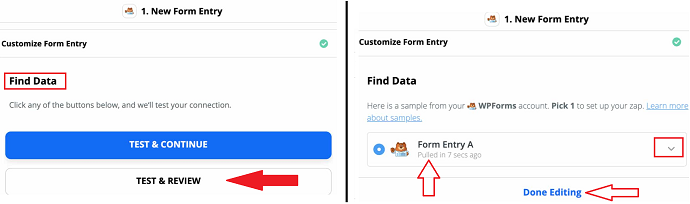
This is the last step in configuring a connection. Zapier allows you to test if the connection you have made between the above-selected form and Zapier is working properly or not. But testing could only be possible if your selected form at least has 1 entry before the connection.
Because while testing, Zapier will pull up the form entries from WPForms to here. If your selected form does not have any entry or form submission yet, make sure to have at least 1 form entry and then only move forward in the testing process.
To start the testing, tap on the “test and review” button instead of the “tap and continue button”. If you are choosing tap and continue, then zapier will automatically complete the testing process and promote you to the next step if things are working properly.
It is better to test and review form entries manually before proceeding. On pressing the “tap and review button”, in a few moments you will see your form entries are populating. Once they appear, tap on the form entry to expand it and check whether Zapier is pulling the correct form entry along with the accurate data or not.
If everything seems fine, finally tap on the done editing button to finish the testing process.
Step 12: Choose App & Event

After testing, Zapier asks you to select an App for which you want to send WPForms forms data. In other words here you need to mention an app name you wanted to connect with WPForms through Zapier. The Zapier has more than 2,000 apps and services that you can connect with. To see a complete list navigate to zapier and WPForms official integration page and find out your preferred one. Or you can refer to the” benefit section” of this article where we had discussed some of the popular integrations along with their possible actions.
When you have decided on the app, simply search it under “choose app & event box” and select it.
In the next step, you need to specify the action to be taken by the app you have defined here. We could not show further, because the further steps would depend on the integration selection.
Final Words:
Have you been following us till the end of this article? If yes, then you should definitely understand the importance as well as the process of enabling form automation in WordPress. You might be facing confusion in deciding which “forms action” should I need to automate. For this simply take a notepad and first jot down the situations where you usually used the form data and transfer it to other apps manually. Once you figured out such manual small tasks and apps, search that application in the Zapier integration list and establish a connection with the help of Zapier.
If you don’t have WPForms installed on your website yet, then what are you waiting for? Switch your forms or create fresh forms on your website with this form builder plugin and reduce the burden of repetitive tasks by enabling the Zapier and WPForms integration.
- Read next: Why WPForms is the best form builder
- How to Collect Paypal Payments on WordPress with WPForms
- How to Connect WordPress website leads and salesforce
I hope that this article, How to Automate your Work with Zapier and WPForms, helps you to integrate WPForms and Zapier together. If you like this article, then do a favor by sharing this article and follow BlogVwant on Youtube, Facebook, and Twitter for more tips.
FAQ:
How many types of applications could be connected to my WPForms forms through Zapier?
The complete list of WPForms and zapier integrations are mentioned here.
What is Zap?
Zap is basically defining a task that you want to run between two apps. Zap includes the trigger and an action.
Does WPForms Zapier Addon is available in a free WPForms version?
No. The Zapier addon is only available in WPForms Pro and Elite versions.
How much money should I need to automate forms with the help of Zapier and WPForms integration?
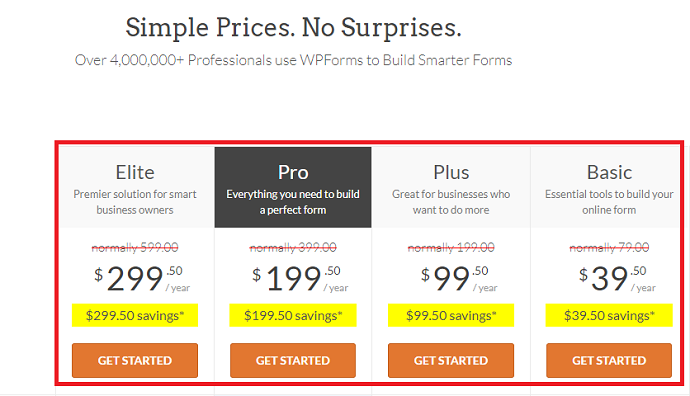
It depends on the WPForms and Zapier plans you would choose. For example when you choose the WPForms pro version, first you have to pay $199.50/year. Then Zapier premium plan started from $239.88/year or $19.99/month. After calculating, the finalized amount would be the final expense you require to enable form automation.
Does Zapier offer a free trial?
Yes. They are offering a 14 day free trial on Zapier professional plan. The new users will automatically be enrolled in this plan as soon as they sign-up.