So do you want to increase your site engagement and conversions? Well, adding a button to WordPress Header could be the best and free solution to achieve this. However, Users only click on your button when its look and design seem attractive. In this article, we would be helping you to Add a Button to WordPress Header. Whether you are a coding person or not, We’ve covered both coding and non-coding methods to implement a button to the WordPress header.
Why Should I Add a Button to WordPress Header?
It is very essential to understand the need of adding a button to the WordPress header before proceeding further. Bloggers and internet marketers opted for various techniques to drive visitors to their important pages including discount offer pages, affiliate product pages, and whatnot. The main goal of using any technique is to encourage visitors to click on your special link and land them on the special page.
Exit popups, popup notifications, newsletters, etc are some of the examples. The technique: Add button to WordPress header is one of them. The main advantage of using this strategy is that you don’t have to pay or purchase any plugin in order to use it. An attractive, as well as a noticeable button, could be easily added to the header of your WordPress website with the help of a simple CSS hack.
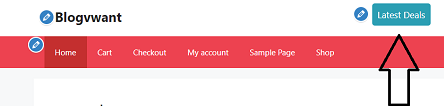
In most cases, the header button will be visible to the top of the navigation menu bar which makes it stand out and catchy. Further, if you make your header sticky, then this will double up the visibility of the button. As soon as you add a button to the WordPress header, you can use a plugin like MonsterInsights to track the clicks the button would receive.
Adding a button to the WordPress header is different from the menu. Don’t be confused! We have already created a separate article to show the process of adding a button in the WordPress menu.
In a nutshell, you must add a button to WordPress header in the following situations:
- When you want to use a free marketing strategy to grab the reader’s attention.
- When you want to redirect users to the affiliate product page as soon as they land on the website
- When you want to encourage users to call you immediately
- When you want to notify users about special deals and coupons with the blinking button.
The possibilities are endless.
Hint: Everyone loves to have a fast and secure website. We suggest Rocket.net, the most secured and fastest managed WordPress hosting service that gives you a Cloudflare Enterprise plan for free. Our readers get a special 50% discount on all Rocket.net plans using the coupon code: VWANT50.
What are the Best Methods to Add a Button to WordPress Header
Video Tutorial:
For the reader’s convenience, we always create a video tutorial. Either you can watch and learn or simply skip the video and continue with the steps mentioned afterward.
Adding a button to the WordPress header could be possible in two ways:
- Manually with the help of CSS and HTML
- OR, with a plugin that helps you to create buttons with a live button builder. Example MaxButtons
Again both methods have their own perks and cons. For example, with the manual CSS method, you have more freedom to customize the button. However, it requires CSS and HTML knowledge for implementing additional effects to the header button.
In the plugin method, the user doesn’t require any prior CSS and HTML knowledge in any kind of way. But still, you have to install an extra plugin to your WordPress site for the sake of installing a button to the header.
Let’s implement both methods…
Method 1: Manual Method to Add Standard Button to WordPress Header
In this method, we are going to use an HTML widget to add a standard button in the header then apply CSS code to style it accordingly. Remember this method requires some coding knowledge in order to customize effectively.
You can use the exact code mentioned below. We have also mentioned the additional CSS code in the next sections to allow users to choose from multiple button effects.
Total Time: 5 minutes
Step 1: Add Custom HTML widget to the Header Widget for adding a Button
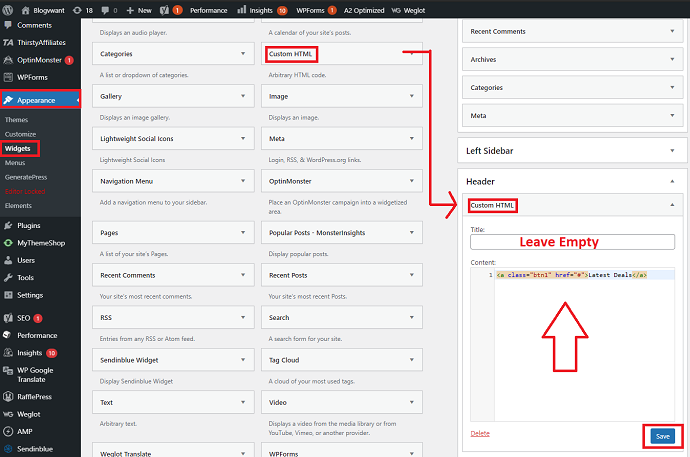
First, we are going to add a button HTML code in the header then style it in the next steps. So, open up the WordPress widgets page by navigating to appearance > widget. Then here you need to drag and drop the custom HTML widget to the header widget. After that insert the below HTML code to the Custom HTML widget you have just added:
<a class=”btn1″ href=”#”>Latest Deals</a>
Now a few things you need to look at it before proceeding further. In the above code, the class name I choose is “btn1” which is unique and will be used as it is when we apply CSS to this button. You can replace it with the other class name if you want. After that, you need to replace “#” with the URL you want to embed to the button. Finally, replace the “Latest deals” with the text you want to use as a label for the header button.
Note: If you want to add more than 1 header button, simply repeat the above code like this:
<a class=”btn1″ href=”#”>Latest Deals</a><a class=”btn2″ href=”#”>Sale Alert</a>
After you are done with adding the HTML button code, tap on the Save button. So this is how you can add button to WordPress Header. Let’s apply CSS styles to the button and make it attractive.
Step 2: Apply CSS styles to the Header button
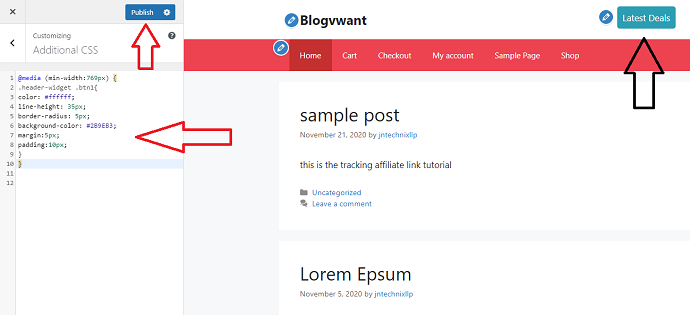
Navigate to Appearance > Customize. Then expand the additional CSS option. Here you need to enter the CSS code for the header button. You can exactly copy our CSS code from below and paste it.
@media (min-width:769px) {
.header-widget .btn1{
color: #ffffff;
line-height: 35px;
border-radius: 5px;
background-color: #2B9EB3;
margin:5px;
padding:10px;
}
}
Remember, replace “.header-widget .btn1” with your button class name if you chose a different class name. Else, you will see the CSS styles have been applied to your header button successfully.
Note: The CSS properties such as color, background-color, margin, padding, border-radius, and line-height are adjustable. Also, this button will only appear on screens that are wider or equal to 769px. Again this is also adjustable.
Method 2: Manual Method to Add Blinking Button to WordPress Header

To add a blinking button to the header, you just require to make a small change in the CSS Code. Follow step 1 as it is mentioned in method 1. Then navigate to Appearance > Customize > Additional CSS. After that paste the below CSS code to add button to WordPress header.
@media (min-width:769px) {
.header-widget .btn1{
color: #ffffff;
line-height: 35px;
border-radius: 5px;
margin:5px;
padding:10px;
-webkit-animation: colorchange 1s infinite alternate
}
}
@-webkit-keyframes colorchange {
0% {
background-color: #2B9EB3;
}
50% {
background-color: #2B9EB3;
}
100% {
background-color: #000000;
}
}
Note: Replace “.header-widget .btn1” with your button class name
Method 3: Manual Method to Add Ghost Button to WordPress Header

Ghost buttons are trending. They are different from standard buttons and much more catchy and noticeable. It has a transparent BG with a border. And when you hover on them, the transparent background fills back in.
The below code converts your normal button into a Ghost Button. We have also added a transition property to make it more interesting.
Again follow step 1 mentioned in the first method, and use this CSS code.
@media (min-width:769px) {
	.btn1 {
display: inline-block;
width: 200px;
padding: 8px;
color: #2B9EB3;
border: 2px solid #2B9EB3;
text-align: center;
outline: none;
text-decoration: none;
transition: background-color 0.2s ease-out,
color 0.2s ease-out;
}
.btn1:hover,
.btn1:active {
background-color: #2B9EB3;
color: #fff;
transition: background-color 0.3s ease-in,
color 0.3s ease-in;
}
}
Note: Replace “.btn1” with your button class name
Method 4: Manual Method to Add Gradient Button to WordPress Header

Who doesn’t love gradients? No one. Well, you can easily add a gradient button with the below CSS code. Follow step 1 of the first method and then paste this CSS Gradient button code:
You can use the “Gradientbuttons.colorian” website to generate attractive gradient button CSS codes easily.
@media (min-width:769px){
.btn1 {background-image: linear-gradient(to right, #e52d27 0%, #b31217 51%, #e52d27 100%)}
.btn1 {
margin: 10px;
padding: 15px 45px;
text-align: center;
text-transform: uppercase;
transition: 0.5s;
background-size: 200% auto;
color: white;
box-shadow: 0 0 20px #eee;
border-radius: 10px;
display: block;
}

.btn1:hover {
background-position: right center; /* change the direction from here */
color: #fff;
text-decoration: none;
}
}
Note: Replace “.btn1” with your button class name
Method 5: Using MaxButtons Plugin to Add Button to WordPress Header
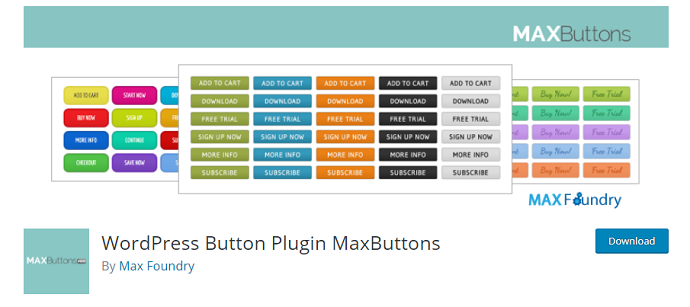
MaxButtons is the trending 5 stars rated button plugin having more than 100,000 active users. The sole purpose of this plugin is to allow users to create a button with the live button editor instead of manual CSS coding. With this tool, you can generate multiple types of buttons including standard buttons, gradient buttons, etc. With the live preview, you can quickly review the changes before onboarding the button to the WordPress header. With the help of the shortcode feature, the user could place buttons anywhere on the WordPress website.
How to Add Button to WordPress Header using MaxButtons Plugin
Step 1: Install MaxButtons Plugin and Activate it
The user has 2 options to install this plugin. Either install it from the WordPress repository or simply download it and upload it.

Step 2: Create a Button to Add to WordPress Header
Navigate to MaxButtons > Add New. Now you are at the MaxButtons buttons builder page. On this page, you will see a lot of CSS properties that you can toggle to generate a button for your WordPress header. Also, you will notice the small movable preview window which helps you to create and preview button changes in real-time.
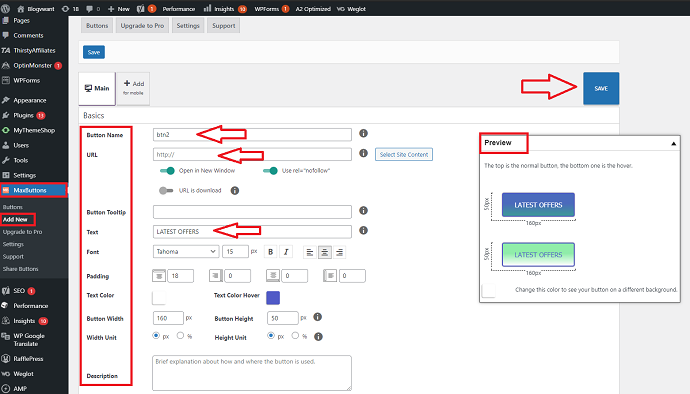
Start with Button name, URL, text, text-color, and toggle each required option. When you are done, simply tap on the Save button to generate a Button shortcode.
Step 3: Copy the button Shortcode
As soon as you save, the MaxButtons plugin will generate a shortcode. Copy it.

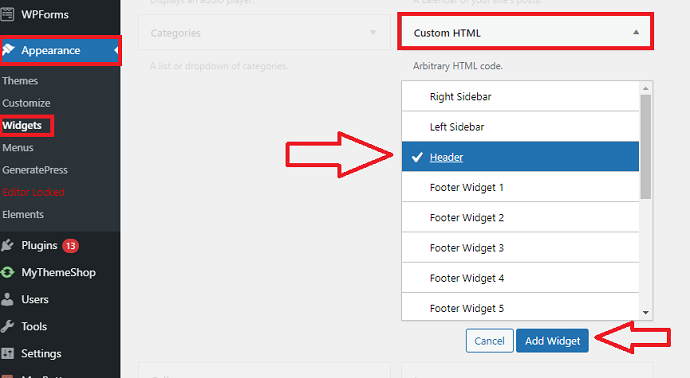
Step 4: Create an HTML button
Now go to Appearance> Widgets. Now here you need to insert an HTML widget into the header widget. Simply tap on the custom HTML widget, select the header option, and tap on the add widget button.
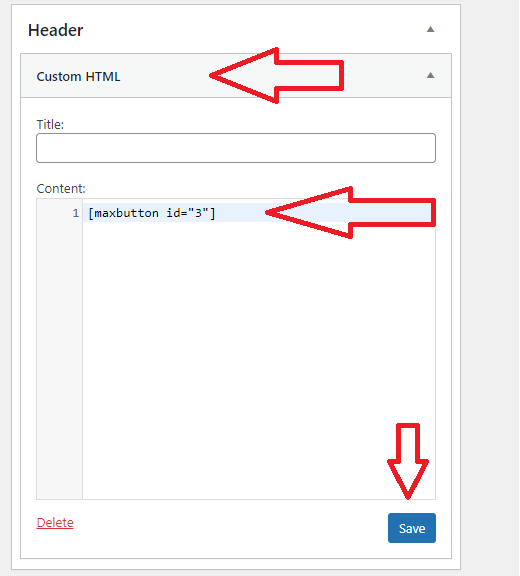
Step 5: Enter a MaxButtons Shortcode
Enter the MaxButtons shortcode you copied earlier and paste it into the Custom HTML widget inside the header widget. And then click on save.
Step 6: Reload the website
Now just refresh your website page, you will see the exact button in a header you have created a few minutes ago. So this is how you can add button to WordPress header with this plugin.

MaxButtons Pros:
- Simple to use
- Live button preview option is available
- Buttons can be added to any location of the website
- Social icons can also be created
- No limit on the number of buttons to be created
- Gradients buttons can be generated
- All Buttons are responsive
MaxButtons Cons:
- A blinking Button cannot be created.
Conclusion
This is it. Now you have seen awesome ways to attach a nice attractive button to your WordPress header. What are you waiting for? Implement this today and don’t forget to track its conversions. Otherwise, adding this button to the website would be useless. We highly recommend using MonsterInsights and Custom event tracking techniques for this purpose.
- Read next: How to Add Back to Top Button in WordPress
- How to add social media follow buttons to WordPress website
I hope this tutorial helped you to add a button to WordPress Header. If you like this article, please share it with your friends. If you want more blogging tips, follow BlogVwant on Facebook, Twitter, and YouTube.
FAQ: Methods to add Button to WordPress Header
Are the above methods working on all websites?
The manual method works on all websites. However, the plugin method only works on WordPress websites.
Should I need to take a backup of my site before proceeding with any of the methods mentioned above?
No. The CSS code would never break or crash your website. No need for backup.
What action should I take if the above methods won’t work on my site?
Tell us about your query in the comment section, we will help you out and guide you to add button to WordPress header correctly.