
Do you want to enable donations on your WordPress website? Well, you just got a great idea. But to convert this idea into reality you must add donate button on WordPress website. For that you need a perfect donation plugin that helps you in fundraising.
In this blog post, we are going to explain the 8 methods (step-by-step) which are unique in their own way. Whether you’re looking to embed PayPal donation form on website or just a single PayPal donation button, we’ve got your back.
Note: We highly advised our readers to go through our first post: List of Best WordPress Donation Plugins. If you do this, you will learn which donation plugin would be suitable for your fundraising needs. Then come back to this post to learn the step-by-step procedure of embedding a donate button on WordPress.
What is Donation Button?
The donation button is the button commonly added by Nonprofit organizations on their websites to receive online donations. The donation button can be published anywhere on the website with the help of donation plugins or with the help of the API code provided by the payment gateway services. The most common donation button is the PayPal donation button.
What are the Best Ways to Add Donate Button on WordPress Website?
Adding a donate button on WordPress could be possible in 2 ways:
- Manually with the help of HTML code – Code Approach
- Using WordPress Donation Plugins (GiveWP plugin is recommended)
Before jumping to the actual methods, let’s discuss both approaches:
Manual OR Code Approach
Well, this method is applicable only when you are interested in a PayPal donate button. By logging into PayPal you can generate an HTML code for the donation button and hook up on to your website. The process is easy, However, you have to face this major downside.
- No extra features: With this approach, you only get a single donate button. Features like reporting, design customization, donation goal, currency switching feature, donor management won’t be available.
- In a nutshell, an individual or Non-profit organization that is serious about online fundraising will be facing a lot of problems in a long run by going with this approach.
Note: Unlike PayPal, other payment gateway service providers won’t give you the readymade generated HTML donate button code. In that case, you only have to rely on the below WordPress donation plugins.
Note: Folks who still want to learn the procedure of adding a PayPal donation button using this manual method can directly jump to Method 8 of this article.
WordPress Donation Plugin Approach:
No coding, Unlimited features, and a 100% effective approach for lifetime online fundraising.
We have invested several days in finding the best donation plugin which not only just easy to use but also free of cost.
We have created a separate post – “Best WordPress Donation Plugin”. This post has included in-depth information about the plugins (methods) which we are going to show in the next section.
Method 1: Using GiveWP WordPress Donation Plugin (Free & Highly Recommended)

Why GiveWP?
- GiveWP is the most picked and trusted wordpress donation plugin of all time. The 4.7+ rating on WordPress, 100,000 active installations, plenty of success stories are the reason behind this.
- When we talk about features security & customer support no other plugin would be able to beat GiveWP.
- GiveWP comes in both free and paid options. Initially, the free plugin is all you need.
- GiveWP plugin should be the first choice when you are looking to add a PayPal or any type of donation button on your fundraising website.
Hint: Learn more about GiveWP features, customer support, pros & cons from our last article.
How to Add Donate Button using GiveWP?
Video Tutorial:
For the reader’s convenience, we always create a video tutorial. Either you can watch and learn or simply skip the video and continue with the steps mentioned afterward.
Note: We are going to experiment with the “GiveWP multi-step donation form template”. In case you choose a “classic” or “legacy” donation form template then a few options related to layout, features, and design might vary, but the overall process will be the same.
Note: The main steps you should follow are numbered 1 to 19. After that, I will be demonstrating the configuration of some extra settings of the GiveWP plugin which are optional.
In this section, we are going to show the step-by-step procedure of adding a donation button using the GiveWP plugin.
Total Time: 10 minutes
Step 1: Download and Install GiveWP WordPress Donation Plugin
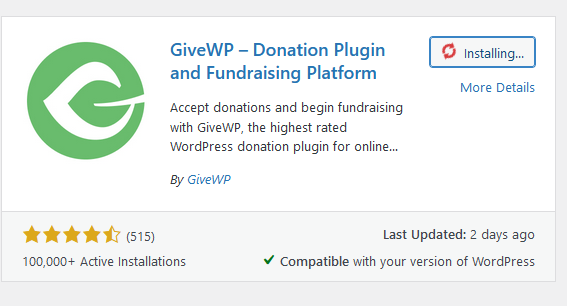
GiveWP is available in both free and paid versions. Although we recommend its paid version however if you are new to donation management then simply try its free version which is accessible from the WordPress plugin repository. Install it and then activate it.
Step 2: Initiate GiveWP Onboarding Wizard
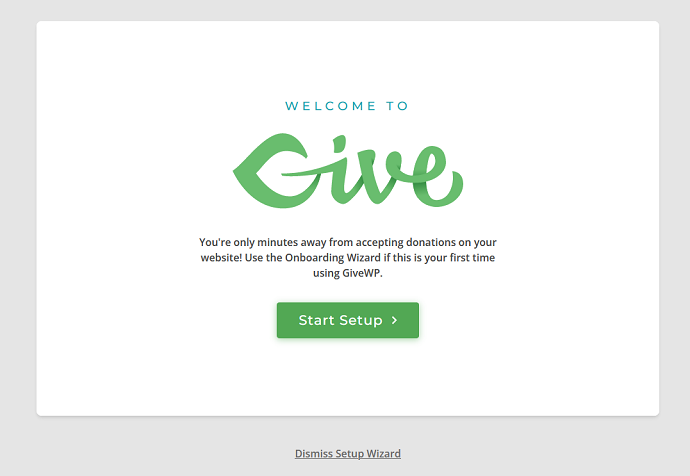
If you install the GiveWP donation plugin for the very first time on your WordPress website then this setup wizard will be open up as soon as you activate the plugin. Yes, you can skip it by tapping the “dismiss setup wizard button” But for this example, let’s configure this plugin with the help of the setup wizard.
Tap on the “Start setup” button to initiate the GiveWP onboarding wizard.
Step 3: Define a Donation Cause

In the first step of this onboarding wizard, you have to define the donation cause and provide information about yourself. I am fundraising for my organization and the cause is saving the environment.
Later tap on the “Accept & continue button” to move to the next step.
Step 4: Specify the Location & Currency from where you are Fundraising
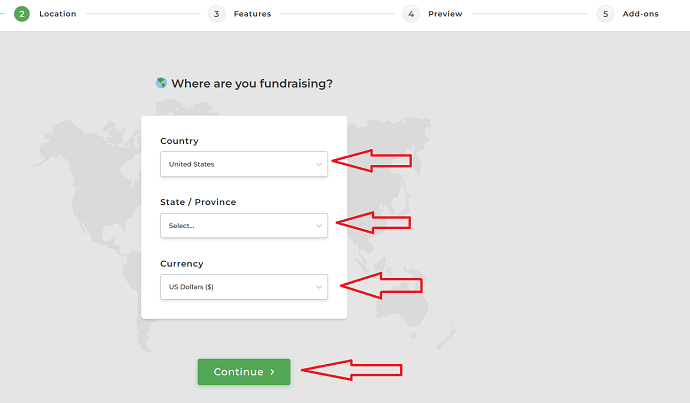
The currency you will have chosen here must be the same as the location of your bank account. For example, if your bank account is USA based then the currency should be set as “US Dollars”.
Step 5: Define your First Fundraising Form
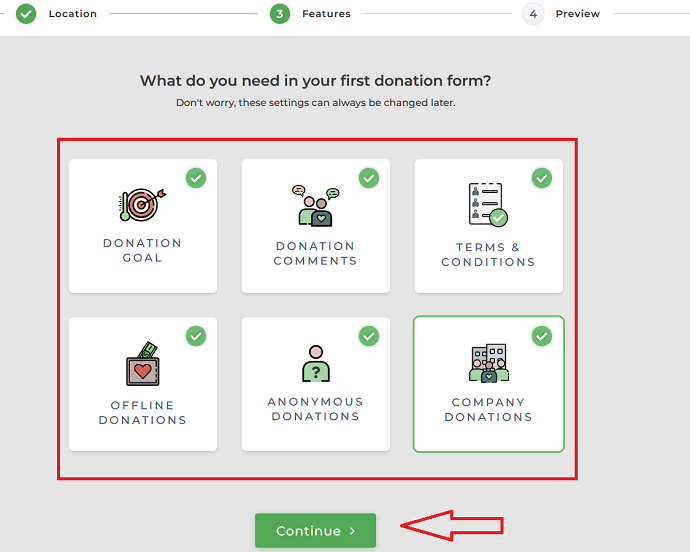
In this step, you have to define what features you want to include in your fundraising form. There are a lot of options mentioned here which can be configured separately later. I need all these features for running successful donation campaigns.
So I am going to select all features and tap on the continue button.
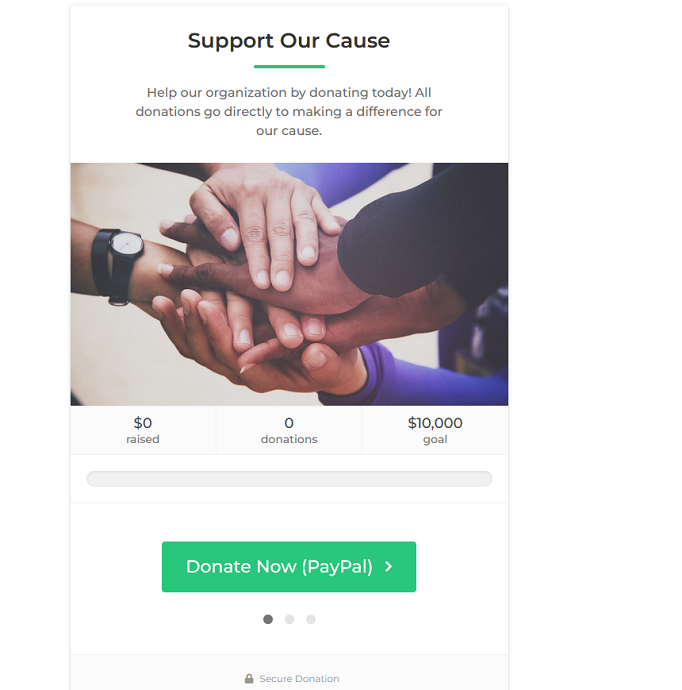
Step 6: Preview the Donation Form and Donation Button
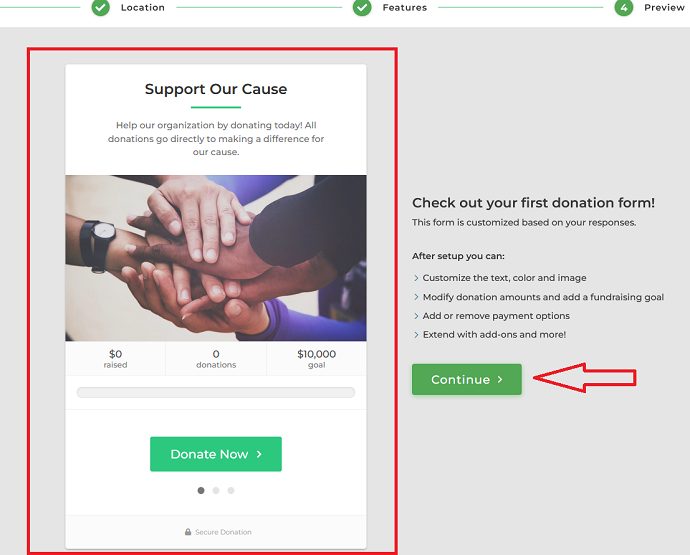
Based on the previous step responses, GiveWP has come up with the readymade multistep donation form. Don’t worry you can customize all options of this donation form later before publishing it on your site. For now, just preview it and tap on the continue button.
Step 7: Configure Add-ons (Optional)
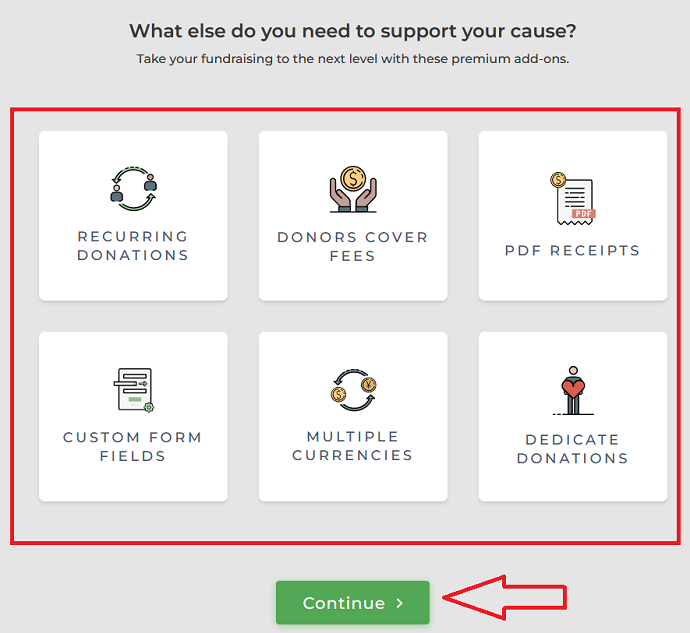
This is an optional step. Basically, GiveWP asks you if you need their paid add-ons for extra features like recurring donations, donor cover fees, etc. These are very essential add-ons which you can purchase individually or all at once.
We have created a separate post “Best WordPress Donation Plugin” where you can learn more about GiveWP add-ons. I highly recommend checking this post because in a long run these add-ons will going to be beneficial for your Non-Profit organization.
For now, if you want to add any of these add-ons then simply select it and tap on the continue button. But for now, I am leaving add-ons.
Step 8: Connect a Payment Gateway
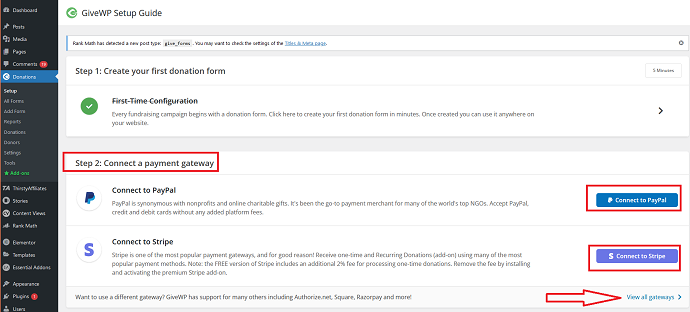
Now you will be back to WordPress. So far you have completed the basic configuration. Now it’s time to move forward.
GiveWP’s free version only has 2 payment gateways: PayPal & Stripe. However, you can add more payment gateways with the help of Add-ons. Tap on the “view all gateways” button to check the complete list of supported payment gateways.
For this example, I am adding a PayPal donate button to my donation form.
Step 9: Edit the Donation Form
In step 6, the GiveWP plugin had generated the donation form. Now if you want you can edit it or start from scratch with a new form.
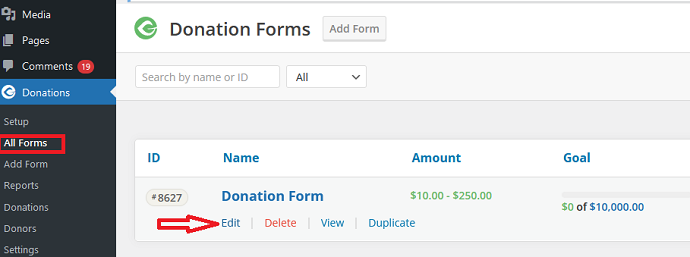
In this step, I am going to edit that form only. For that navigate to Donations > All Forms. On this page, you will see all your donation form created through this plugin.
You can see our first form that was generated in step 6 are also available here. To edit it simply tap on the edit button.
(Also, make sure to open up the donation preview in another tab of the browser. This will help us to preview the changes we will make during customization.)
Step 10: Customize Donation Form Label and Permalink
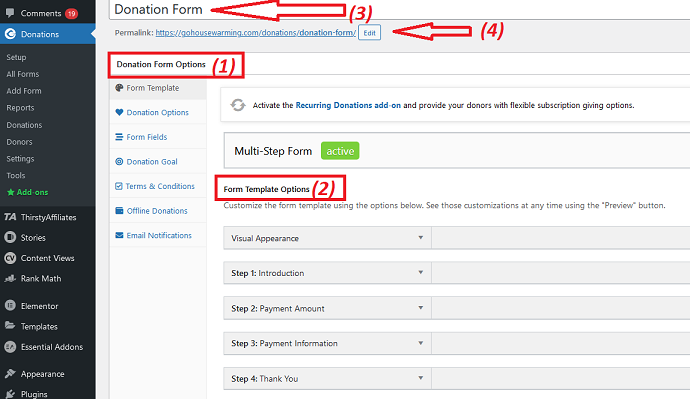
As soon as you tap on the edit button, you will be presented with a donation form editor. This is the main interface you will be interacting with most.
Here on the left few options are visible under “Donation Form Options” (1). Each of them has a separate set of options visible next right to it (2). We will configure all of them step by step.
For now, just rename the donation form label (3) and its permalink (4). By the way, we are using RankMath for optimizing the SEO score.
Step 11: Customize Donation Form Template Options
Form Template options are divided into 5 categories: Visual Appearance, Step 1: Introduction, Step 2: Payment amount, Step 3: Payment Information, Step 4: Thankyou.
Each of these categories has a bunch of options. (For a better visual of these options, watch our video tutorial)
Category 1: Visual Appearance
As soon as you expand this category you will find 3 options:
Primary Color: This is the global color of your donation form and would reflect in different elements such as buttons, line breaks, etc. Its recommend setting this color according to your brand.
Primary Font: To change the default font of your donation form and donation button.
Decimal Amounts: When disabled, the decimals in a donation amount will be rounded
Note: To preview changes, tap on the preview button.
Category 2: Step 1: Introduction
Include Step one: Make sure to enable it.
Headline: Set a headline (form title). This headline appears at the top.
Description: Enter a description. It will appear just below the above headline. Make sure to write a short and crisp description for your donation cause.
Image: Add a donation banner if you want.
Donate Button: Customize the donate button label. If you are accepting donations through PayPal then add a “PayPal” word in it.
Category 3: Step 2: Payment Amount
Let’s customize the second step of the donation form. Here you will find payment related options:
Header Label: Set title for the payment form. Enter something like “Choose Amount”.
Content: Enter description. This text will have appeared just above the donation amount button. Enter something like “How much would you like to donate? As a contributor to (ORGANIZATION NAME), we make sure your donation goes directly to supporting our cause.”
Continue Button: Leave it unchanged. This button is used for forwarding users to the next step.
Category 4: Step 3: Payment Information
This is the step where a donor inserts his information before initiating a donation.
GiveWP has set a default value for these options: Header Label, Headline, Description, Summary Heading.
You can change the default values according to your preference.
Donation Summary option: Make sure to set it as enabled
Summary Location: Choose before or after payment fields
Submit button: For changing the label of “donate button”
Note: Leave settings unchanged if you are confused because GiveWP did a decent job by configuring all options in advance.
Category 5: Step 4: Thank You
This is the step where you can customize the “Thank You” page. Donors will have interacted with this page after they made a donation.
Image: Set an image for the thankyou page
Headline: Give a nice & sweet title/headline
Description: Enter a thank you message that will delight donors
Social Sharing: Make sure to enable this option. This will add a social share button over your thankyou page
Step 12: Configure Donation Options
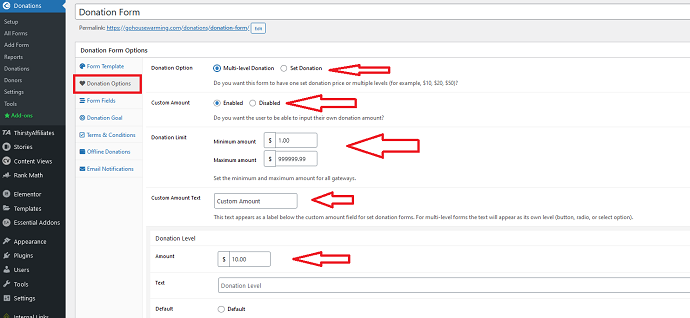
In this tab you have to configure donation amount related options:
Donation Option – Choose between Multilevel or Set donation
Custom Amount: Make sure to enable it.
Donation Limit: Set Maximum & Minimum Limit
Custom Amount Text: Give a label to the custom amount field
Donation Level: Define amount & text for levels. This option only appears when you choose “multilevel” in the donation option”
Note: To preview changes, tap on the preview button.
Step 13: Configure Form Fields
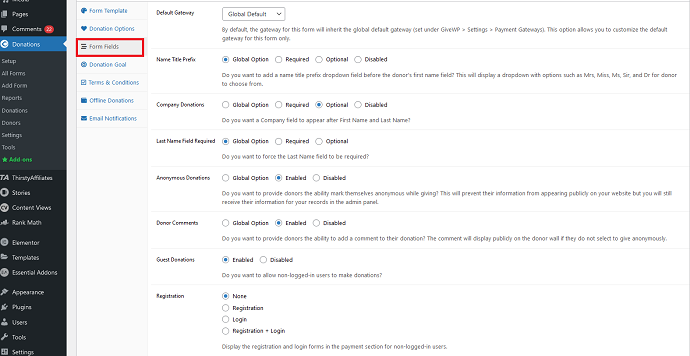
Default Gateway: Change Payment gateway if you want or leave as a “Global default”
Name Title Prefix: For adding a prefix before donor name.
Company donations: For adding a company field
Last name field: For enable/disable last name field
Anonymous Donations: Make sure to enable it because some donors might remain anonymous.
Donor Comments: Allow donors to comment on the donation form page.
Guest Donations: Enabled it. Allows donors to donate without registering themselves.
Registration: To display a registration & login form in the payment section. I recommend setting this as “None” because nobody likes to register them before donations. People simply want to donate, that’s all.
Step 14: Configure Donation Goal
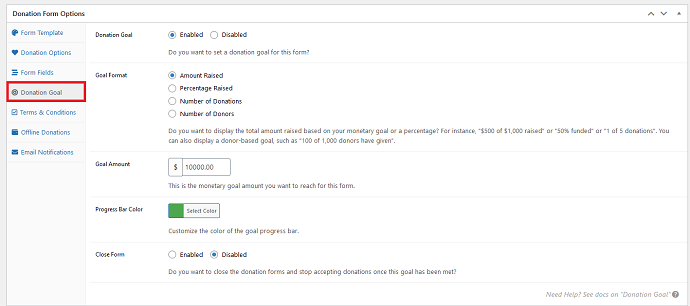
Donation goal plays a vital role in donation management. If you enable a donation goal then it will encourage donors to donate the maximum amount they can.
Donation Goal: Enable it.
Goal Format: 4 different formats are available. Experiment with it by previewing the results.
Goal Amount: Set donation goal amount.
Progress Bar Color: Set according to your brand color.
Close Form: Decide whether you want to accept donations after the goal will meet.
Step 15: Configure Terms & Conditions Options
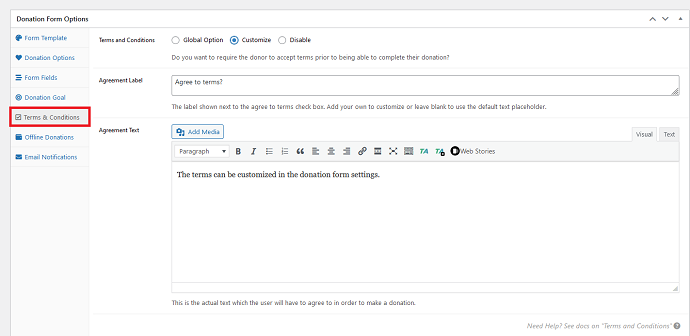
Terms & Conditions are the perfect way to ask for donors’ consent before they initiate a donation. Every Non Profit organization has different policies and it is best to lay everything on the table.
And in this step, you are going to do this exactly.
Terms & Conditions: Set it to customize.
Agreement Label: Set a label for the “Agreement checkbox field”
Agreement Text: Place all terms and conditions details in this text editor.
Step 16: Configure Offline Donations (Optional)
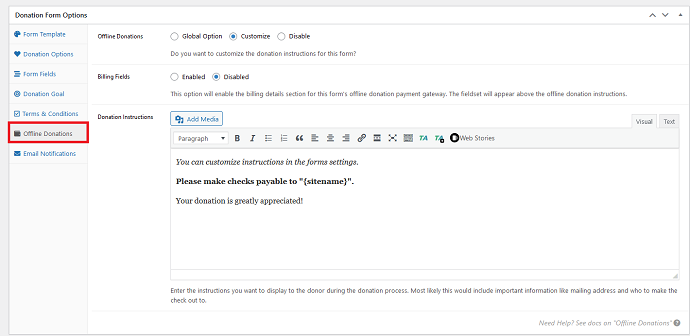
Skip this step if you do not accept offline donations. Just set offline donations to disable and move forward.
Step 17: Configure Email Notifications
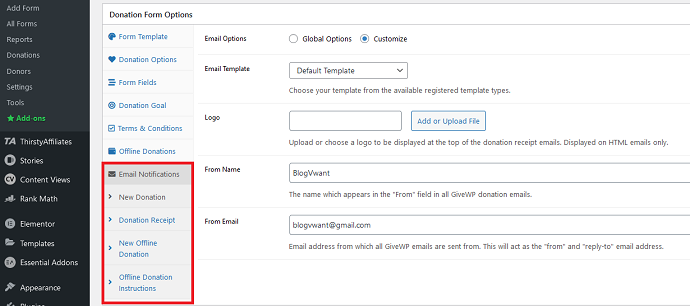
Do you want to receive notification through email when a donation happened? Then this tab is for you.
From this tab, you can customize the email template for new donations, donation receipts (sending to donors), new offline donations, etc.
Although, GiveWP has already set up the default message for all email templates. However, you can customize them easily. Explore each tab and make the necessary changes.
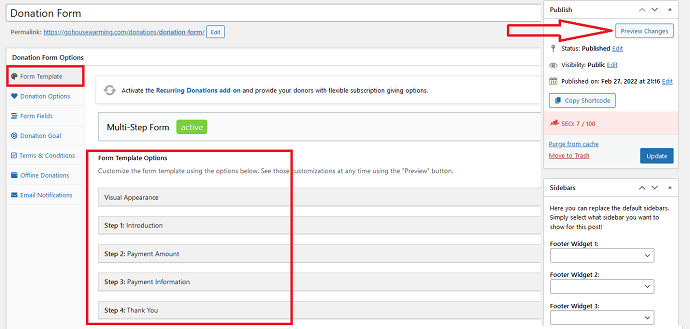
Step 18: Preview the Changes
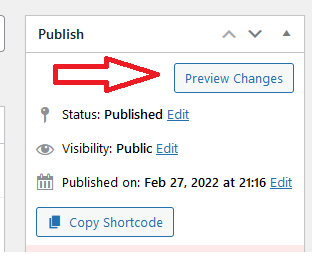
We have configured all form editor options for the “donation form” generated through the onboarding setup wizard. Now it’s time to preview the donation form and donation button.
Just tap on the preview changes button located at the rightmost of the form editor and publish it if you are happy with the changes.
Step 19: Add Donation Button (Form) on WordPress Website

After approving the preview results it’s time to add a donation form on WordPress posts and pages.
The process is very simple. You have to copy the donation button (form) shortcode and place it on WordPress.
Now there can be 2 places where you get the ShortCode. First under the preview button (check the previous step image) or simply navigate to Donation > All Forms. Over this page, you are going to find the shortcode of all donation forms.
Just copy the donation form shortcode and then open up the WordPress post/page in a Gutenberg editor mode where you want to add this donation button (form).
Tap on the “+” option and search shortcode, select it, and enter the copied shortcode. Finally, preview the page to check whether the donation form is working or not.
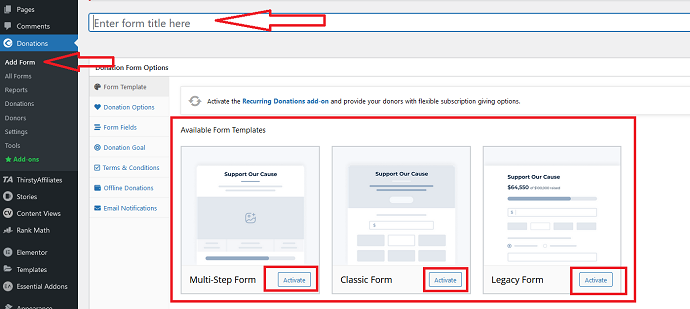
Step 20: Experiment with Different Donation Form Templates (Optional)
From now on we are going to discuss extra settings and configuration of the GiveWP WordPress donation plugin.
To add a new donation button in a different style and format then simply navigate to Donations > Add Form.
Over this page, you will see more templates. Earlier we have used a Multistep template but you can experiment with others. In case you want to experiment with other templates just enter a form title and tap on the activate button located below the template.
Step 21: Checkout Donation Reports (Optional)
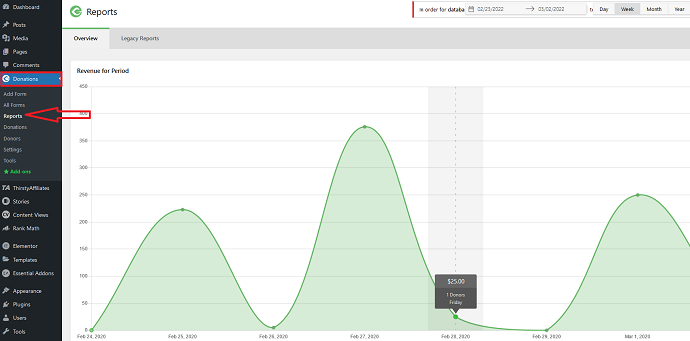
Reports are not a big deal, all reports can be understood easily. To access reports, Just navigate to the Donations > Reports tab.
GiveWP has the ability to show reports in a visually pleasing manner.
Some of the essential reports you can extract as well as export with this donation plugin is:
Revenue by period (Day, week, month, year, etc)
Total Revenue
Average Donation
Total Donors
Total Refunds
Popular Payment Method
Donation Button (Form) performance
Payment Status
Top Donors
More…
Hint: WPGive has a Google Analytics integration add-on that you can use to extract deeper insights and for enabling eCommerce tracking.
Step 22: Configure General Settings (Optional)
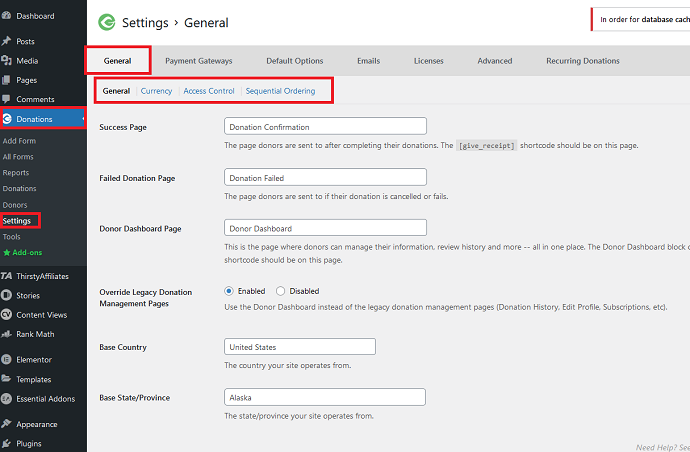
For people who have skipped the onboarding wizard, then no problem. You can configure the settings manually.
Navigate to the Donation > Settings > General.
General Settings has been divided into 4 tabs. We will be configuring the necessary settings only.
A) General Settings > General
Success Page: Choose a custom donation confirmation page if you want. By default, GiveWP generated this page when you install the plugin.
Failed Donation Page: Choose a page where donors will be redirected in a case when donation payment get failed. This page is also generated by the GiveWP plugin.
Donor Dashboard Page: Choose a donor management page.
Base Country: Set the country from where you are fundraising
State: Set the state/province
B) General Settings > Currency
In this tab, you can configure the default donation currency. In a free version, only 1 currency can be configured. If you want to give a feature of multiple currencies to donors then you have to upgrade or install the “Multiple currency” add-on.
Step 23: Configure Donation Payment Gateways Settings (Optional)
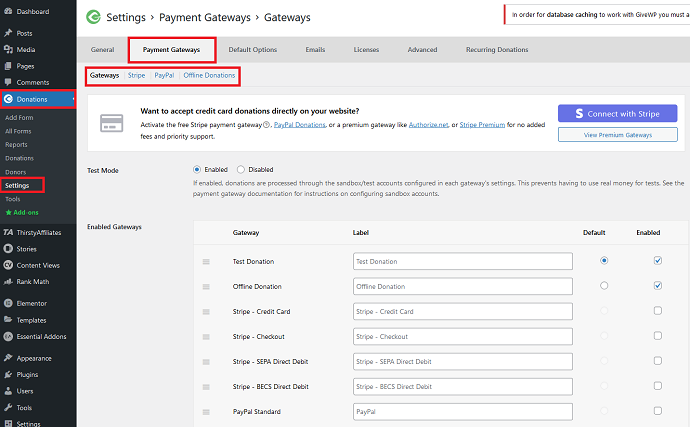
These settings you should not miss at any cost.
Navigate to Donations > Settings > Payment Gateways. Again donation payment settings are divided into 4 tabs:
A) Gateways:
Test Mode: Enable test mode for testing the donation deliverability. Make sure to disable it when you are ready to accept real donations.
Enabled Gateways: Enable/Disable the available Payment gateways. Unlock more payment gateways through add-ons at any time.
B) Stripe:
From this tab, you can connect GiveWP with Stripe. The process is so simple. Just click on the “Connect with Stripe” button and you’re good to go.
C) PayPal:
Connect with PayPal through this tab.
D) Offline Donations:
In this tab, you can define instructions for donors about how they can donate offline. The common mode of offline donations is cheques.
Step 24: Export Donation Data (Optional)
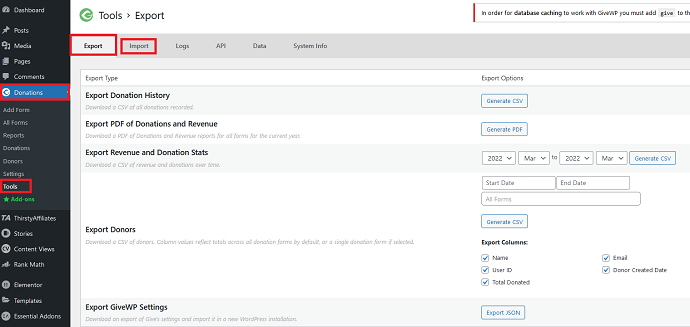
Do you want to export donation history, revenue stats, donors list, etc into CSV or pdf file? Then navigate to Donations > Tools tab.
In case you have migrated to GiveWP from another tool, then you can import the existing donor’s details into this plugin easily through this same tab.
Step 25: Install Add-ons (Optional)
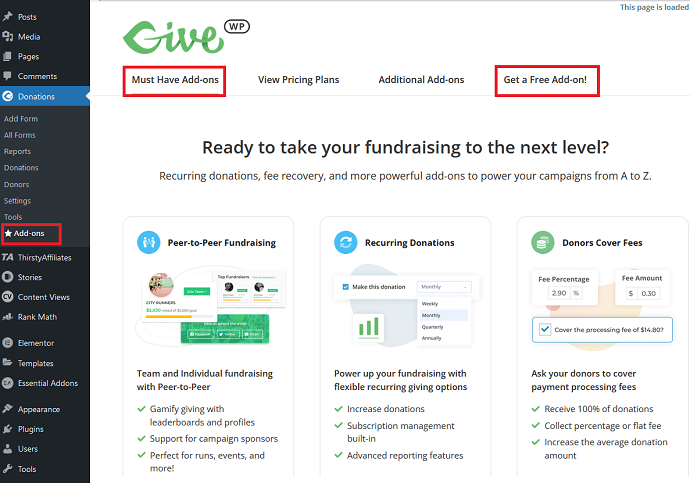
To streamline the donation management experience for a longer run, you should definitely check out the GiveWP add-ons.
Navigate to Donations > Add-ons. The great thing is GiveWP not only offers paid add-ons but also has essential free add-ons that you can install anytime.
Hint: Check out this article where we have discussed GiveWP Addons in detail.
Method 2: Using PayPal Donations WordPress Plugin (Free)
Why PayPal Donations WordPress Plugin?
- PayPal donations WordPress plugin is the fastest way to hook a PayPal donation button on a WordPress website. Gladly, it supports recurring donations too.
Downsides:
- Except for the PayPal donation button, nothing else is here.
- Supported single currency only
How to Add PayPal Donate Button on WordPress using PayPal Donations WP Plugin
Adding a PayPal donate button with the “PayPal donations plugin” hardly takes 5 minutes. Either watch this video tutorial or follow the steps mentioned afterward.
Step 1: Download and Install PayPal Donations Plugin
Navigate to the WordPress plugin repository and search PayPal donations. You might see different PayPal donations but you have to pick the one which is developed by “Tips and Tricks HQ”. Install it and activate it.

Step 2: Configure Plugin Settings
After activating the plugin, from the WordPress dashboard navigate to settings > PayPal donations.
This plugin configuration setting has been divided into 2 tabs: General & Advanced.
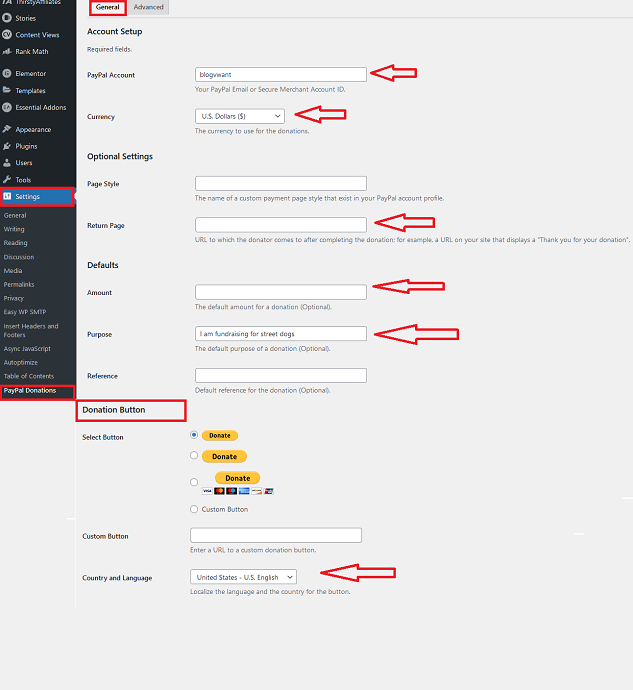
General Tab Settings:
- PayPal Account: Enter your PayPal account email id here. You can also enter a secure merchant account ID.
- Currency: Choose donation currency in which you want to get paid.
- Return Page: Specify the URL of the thankyou or confirmation page where donors will be redirected when they made a donation.
- Amount: Set the default donation amount. Note: Suppose if you set a $5 value here, then donors have to make a $5 donation. It is better to leave this field blank and let donors decide the donation amount.
- Purpose: Define the purpose of your fundraising in a single line
- Select Button: 3 different-sized PayPal donation buttons are available to choose from. Also if you want to use a custom button (image) then simply specify the URL. Note: The custom image should be selected from your WordPress media files.
- Country and Language
Step 3: Add PayPal Button
With this plugin, you can add a PayPal button to the sidebar, footer, posts, and pages. In this step, I am going to show you the procedure for adding a PayPal button to WordPress posts & pages.
If you want to add over a sidebar, then check the above video.
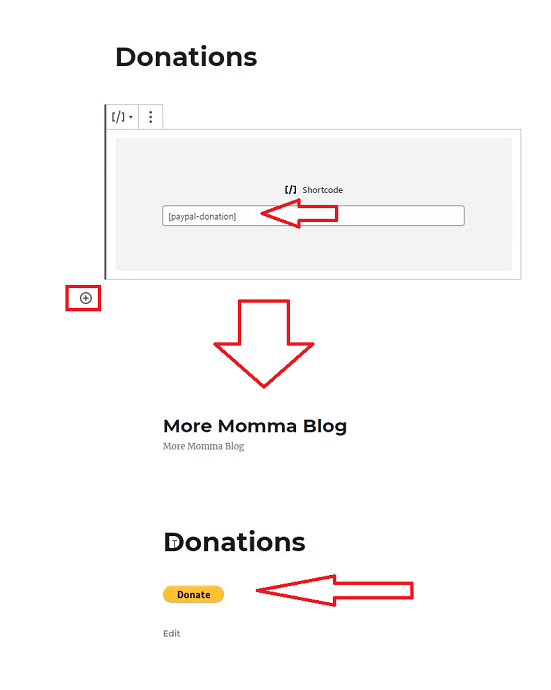
So first thing first opens up the post/page in a Gutenberg editor, tap on the “+” button and enter this shortcode: [paypal-donation].
Finally, preview the post to check whether the PayPal donation button is visible or not.
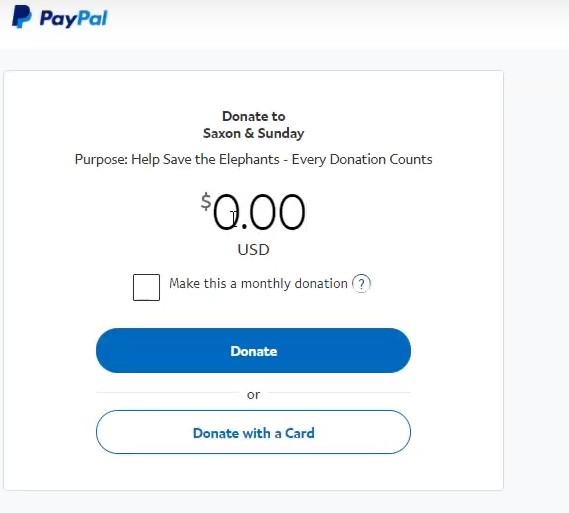
When donors tap on the donate button, they will be redirected to the PayPal donation form like this:
- Related: How to Collect PayPal Payments on your WordPress Site
- 6 Best Payment Gateways For International Transactions
Method 3: Using Charitable (Free) WordPress Plugin

Why Charitable?
- Charitable should be only preferred when Non Profit organizations are looking for a free fundraising plugin.
Downsides
- Compared to GiveWP you will face a lot of troubles with charitable in the long run because it lacks these must-have features:
- Lack of WooCommerce features
- Lack of essential donor management features such as donor profile, donor history, etc.
- No spam protection compared to GiveWP.
- SMS donations won’t be found
- Google analytics integration is missing
How to Add Donate Button on WordPress using Charitable – Donation Plugin
Step 1: Install & Activate the Charitable WordPress Plugin
From WordPress dashboard, Navigate to Plugins > Add New and search Charitable. Install it and activate the plugin.
Step 2: Configure Charitable Plugin Settings
The settings of this fundraising plugin have been divided into 5 tabs. We will configure each of them.
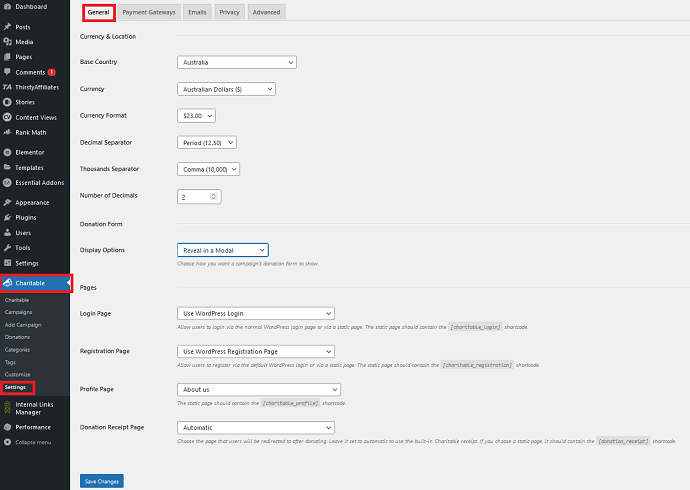
General Settings: Charitable > Settings > General
- Base Country: Set country from where you are fundraising
- Currency: Set default currency
- Currency format: Set currency format
- Display options: Configure the appearance of the donation form (Show on a separate page, Same Page, or via Model Popup)
- Login, Registration, Profile Pages: Configure these pages according to your preference.
- Donation Receipt Page: Configure Thankyou page
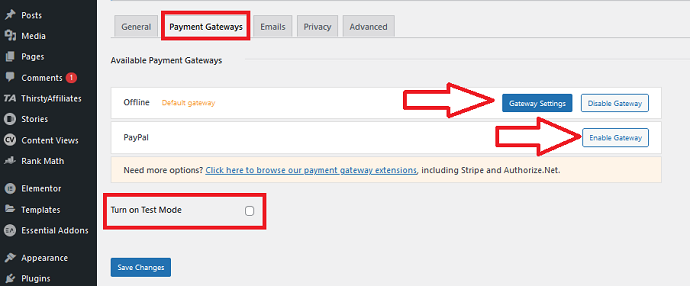
Payment Gateways Settings: Charitable > Settings > Payment Gateways
Inside the free version of Charitable, only 2 Payment Gateways are available: Offline & PayPal. And on this tab, you can configure both.
To enable offline gateway just tap on the “Enable Gateway”. Then click on “Gateway Settings”. Here 2 options are there: Gateway Label (This label will be shown over a donation form) and Instructions (Enter detailed instructions about how donors could make an offline donation). Example bank transfer instructions.
To enable PayPal gateway, the process is a little bit tricky. We recommend you to go through this Charitable documentation about PayPal.
Turn on the test mode if you want to test the deliverability of donations.
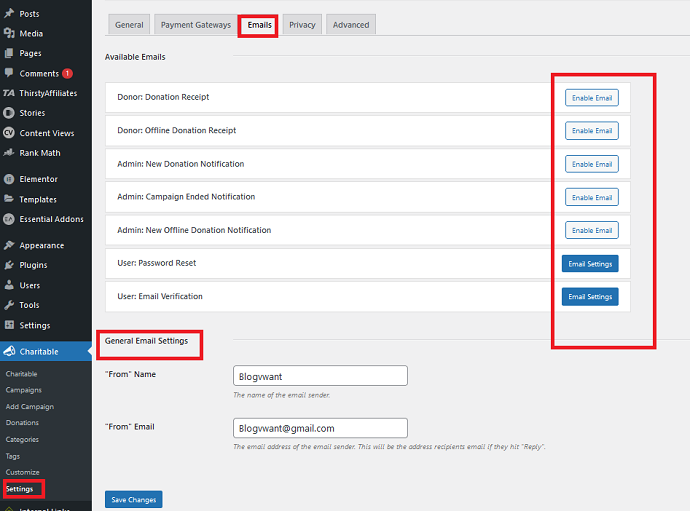
Emails Settings: Charitable > Settings > Emails
This tab is totally dedicated to Email notifications for both Donor and Admin. Along with notifications you can also edit the email template.
To enable any type of email just tap on the “enable email” button and then click on “email settings” for configuring settings like email subject line, email headline, email body, and whatnot.
Privacy Settings: Charitable > Settings > Privacy
Charitable stores personal data as a backup and from this tab you can configure the retention period of that data.
Advanced Settings: Charitable > Settings > Advanced
Only 1 option is available here: Reset data.
Step 3: Create a donation campaign with Charitable
To receive donations, you have to create a donation campaign.
For this navigate to Charitable > Add Campaign.
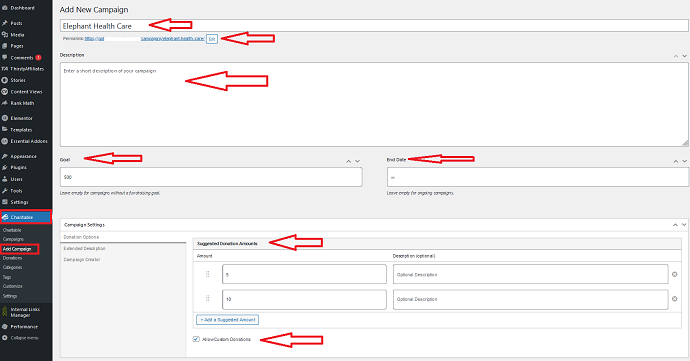
- Enter Campaign Title: Enter the headline for donation cause
- Description: Enter a complete description of this fundraising campaign
- Goal: Define the donation goal amount. You can also leave it as a blank.
- End Date: Leave it blank and your donation campaign will run forever.
- Campaign Categories: Choose a category for this campaign.
- Suggested Donation Amounts: Define a few donation amounts from which donors can make the selection.
- Allow custom Donations: Check this option.
- Feature Image: Add a featured image for the donation campaign
Note: Charitable Categories & tags work exactly like WordPress categories & tags.
Note: Charitable generated a permalink (URL) for the donation campaign based on its title which is 100% editable.
Hint: To preview what the donation campaign looks like simply tap on the preview button situated at the top right.
Note: In case you feel difficulty in the implementation of step watch this video:
Step 4: Customize the Look of the Donation Campaign
Charitable don’t have donation form templates. It is a campaign-based plugin and to customize the look and feel of campaign pages, you have to depend on the WordPress customizer.
In the last step, we have previewed the donation campaign. On the preview page, you will find the “Customize” button at the top. Tap on it to open up the WordPress customizer.
On a WordPress customizer page, tap on the Charitable. Under the Charitable tab, you can configure these settings:
- Design Options
- Donation Form
- User Privacy
- Terms & Conditions
Play around with these settings and finally publish the campaign.

Step 5: Display Multiple Donation Campaigns
When you multiple donation campaigns, you can always display them all together on a WordPress post & pages with this shortcode: [campaigns].

Step 6: Choose Donation Form with Donate Button over Campaign
Sometimes donation form works better than a campaign. In case you want to add a simple donation form then instructions are mentioned on this post of Charitable.
Method 4: Using WP Simple Pay (Free) Plugin
WP Simple Pay: Go through the tutorial of this plugin when you want to add a stripe donate button only on your WordPress site.
How to add Stripe Donate Button in WordPress using WP Simple Pay plugin
Step 1: Install and Activate the WP Simple Pay Plugin
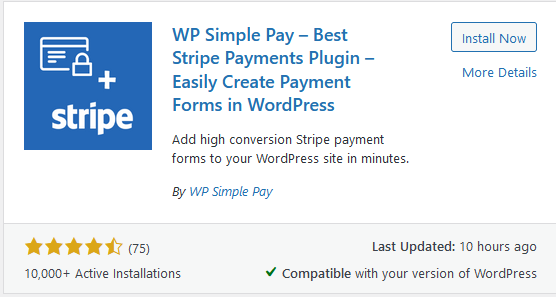
Search WP simple pay under WordPress plugin repository and install the plugin as shown in the image.
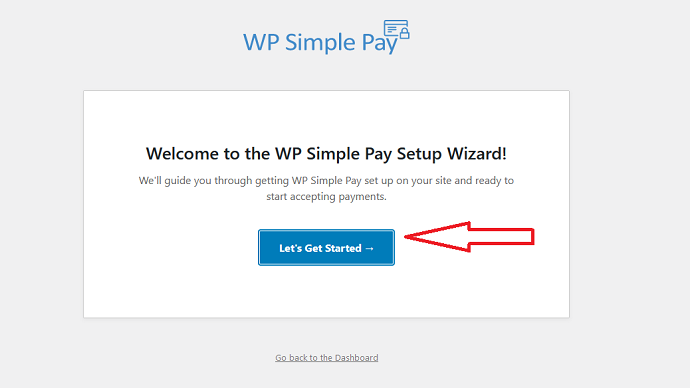
Step 2: Run the WP Simple Pay Setup Wizard
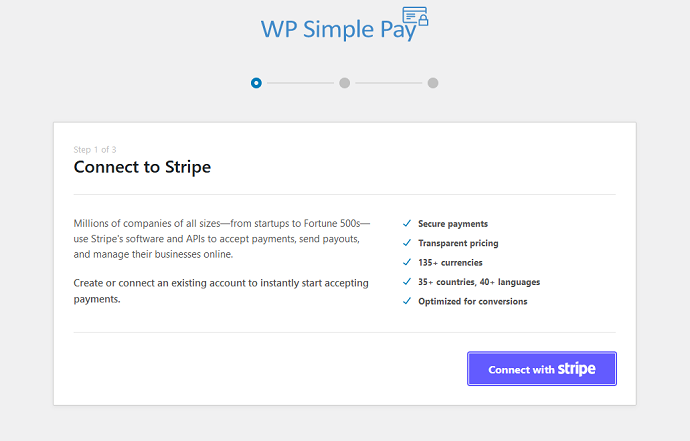
As soon as you activated the plugin, the setup wizard will appear on your screen. To run the setup wizard tap on the “Let’s started button”:
The first step in a setup wizard would be of Stripe connection. To connect the plugin with the Stripe simply tap on the “Connect with Stripe button”. After that, you will be redirected to Stripe.com where you have to enter login credentials for completing the Stripe connection procedure.
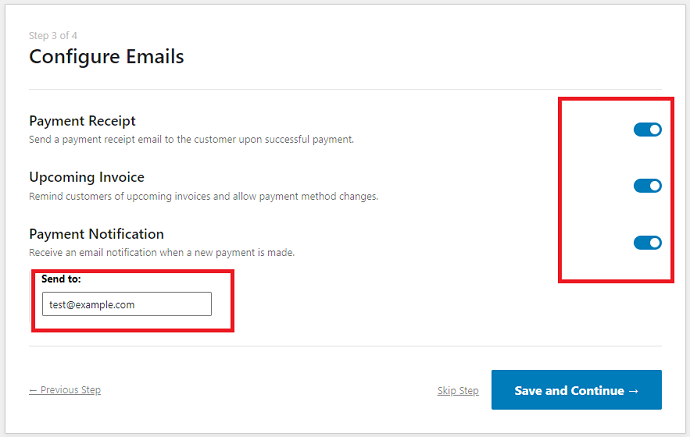
Next, you have to configure email-related settings. Simply use a toggle button and turn on/off the different types of email notifications.
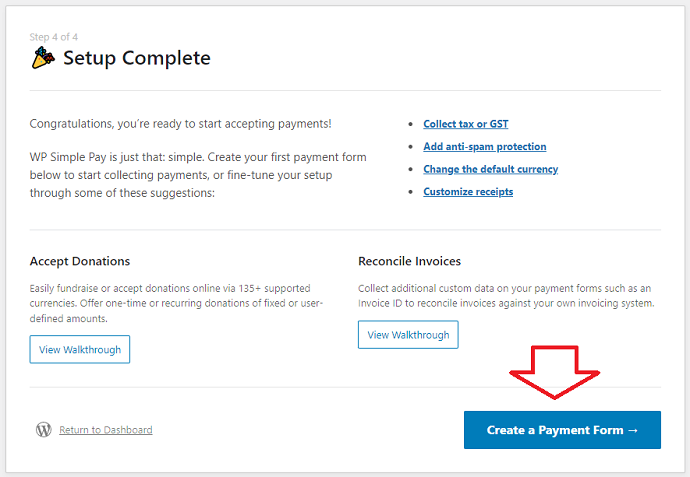
If you have completed all the steps successfully then you will see this screen. Finally, the only thing that is left is to create a donation form and add a donation button on WordPress. Simply tap on the “create a Payment form” button to move ahead.
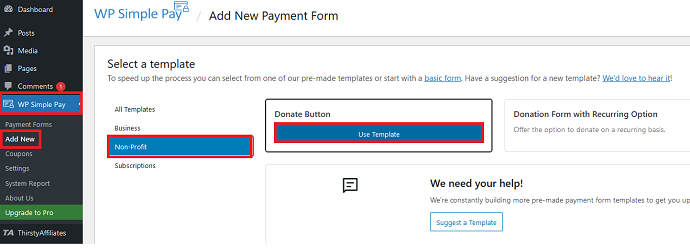
Step 3: Pick up the Donate Button Template
As soon as you tapped the “create a payment form button” in a previous step you will be redirected to the WP simple pay “Add new” page. Here first you have to choose a donation form template.
In the free version, you only have a single donate button template. However, if you require a recurring functionality in your donation form then you have to purchase the license of this plugin.
For this tutorial, I am going with a simple “Donation button template”.
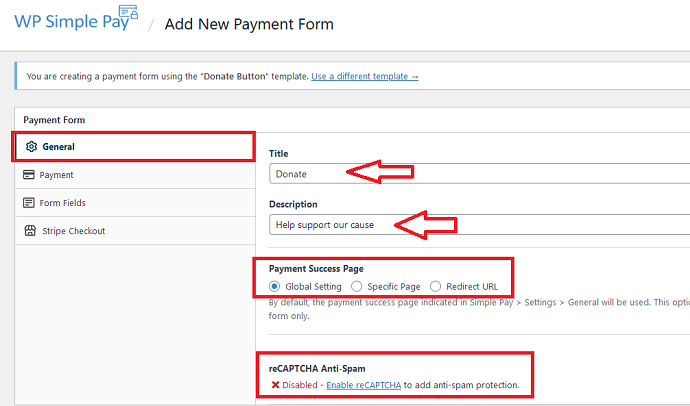
Step 4: Configure Donate Button Template Options
General Options:
- Title: Add a heading for the donation cause.
- Description: Give a detailed description of your donation.
- Payment Success Page: Specify a URL where donors would be redirected as soon as they complete a donation.
- Enable reCaptcha: To secure donation form with Google reCaptcha form protection technique.
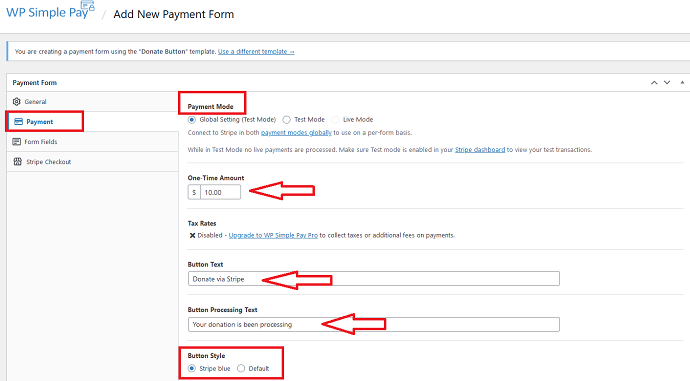
Payment Options:
- Payment Mode: Choose live mode here when you’re ready to accept donations.
- One-time Amount: Leave it blank if you want donors to choose their custom donation amount.
- Button Text: Enter a label for the donation button
- Button Processing Text: Enter a text which will appear during the payment processing.
- Button Style: Choose a style for donate button
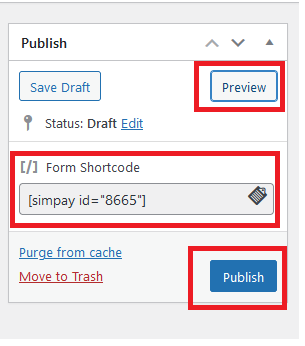
Step 5: Preview & Add a Stripe Donate Button to WordPress
After done with the configuration, simply preview it from the top right preview button.
To add a donate button on WordPress, copy the shortcode and paste it into the WordPress post/page through Gutenberg editor.

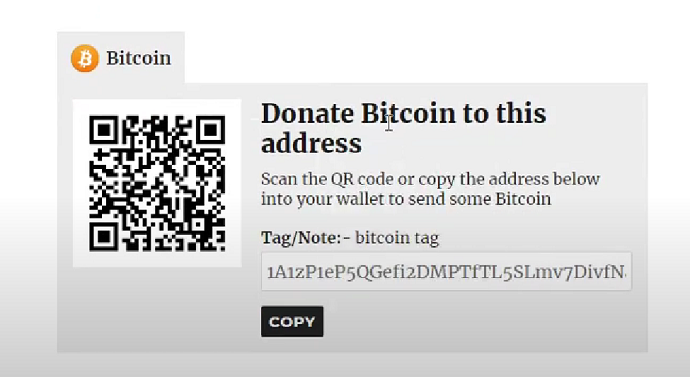
Method 5: Using Cryptocurrency Donation Box WordPress Plugin (Free)
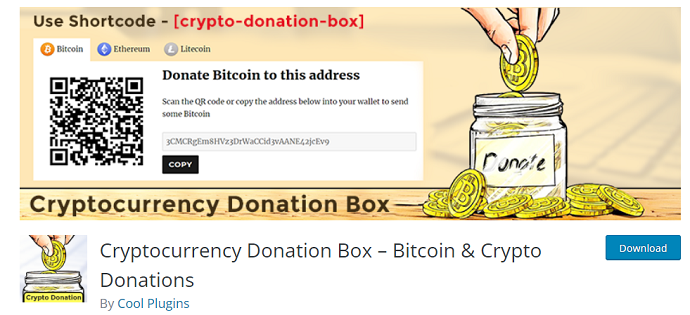
[crypto-donation-box] method is only applicable in a situation where Nonprofit organizations or individuals looking to collect donations in cryptocurrency.
How to Add Crypto Donate Button on WordPress
Step 1: Install & Activate the Cryptocurrency Donation Box Plugin
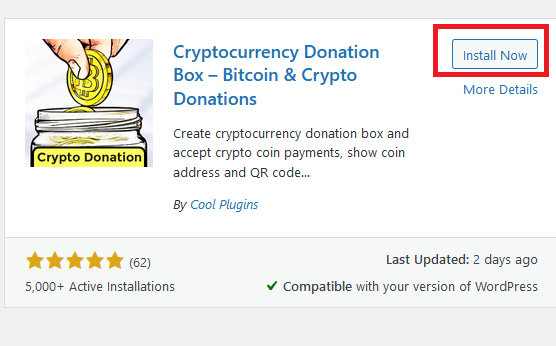
Move ahead to the WordPress plugin repository page and search “cryptocurrency donation”. You will see plenty of plugins but you have to install the plugin developed by the “Cool Plugins” team. (See image)
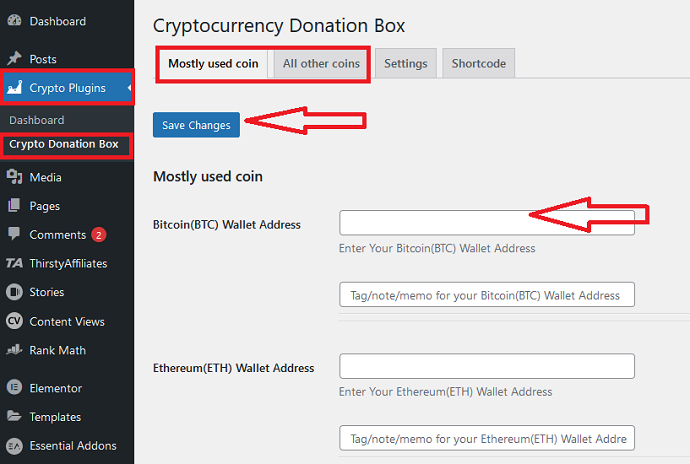
Step 2: Establish a connection between plugin and a Coin wallet
Navigate to Crypto Plugins > Crypto Donation Box.
This plugin supports all popular cryptocurrencies. First, search your preferred coin under the “Mostly used coin” tab. In case you haven’t found it then explores the “all other coins” tab.
When you find the coin, simply enter the wallet address and tap on the save changes button.
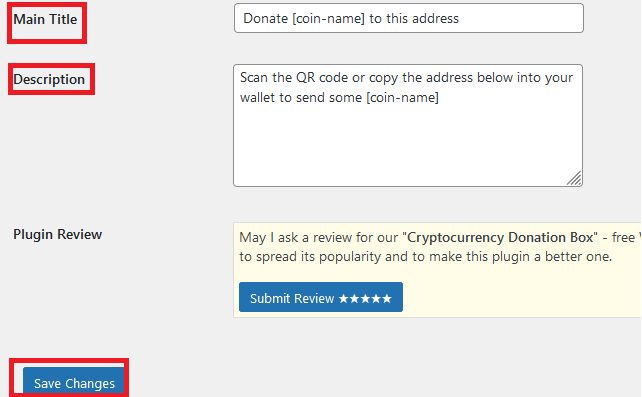
Step 3: Enter Donation Button Title & Description
Head over to the settings tab. Here you have to insert donate button title and the description. By default, this plugin has filled up these text boxes for you. Finally, save changes.
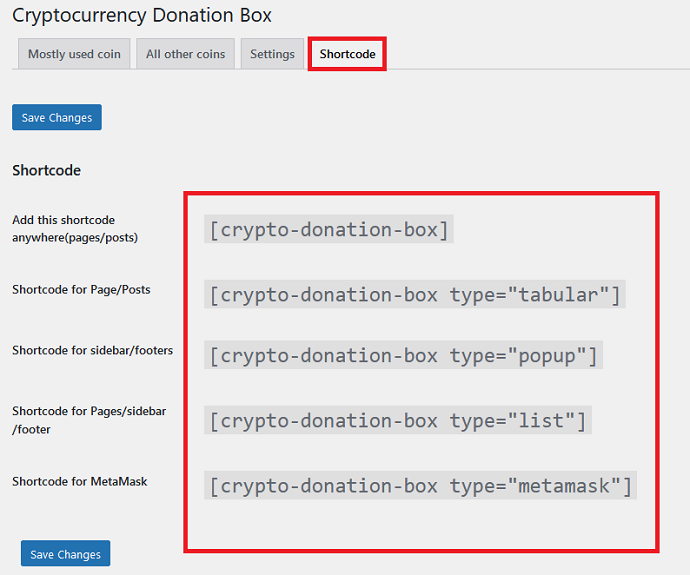
Step 4: Add a Crypto Donate Button on WordPress
Navigate to the Shortcode tab. Here you will see the different types of shortcodes applicable for different scenarios. Copy the shortcode and paste it into the WordPress post/page.
The cryptocurrency donate button will look like this:
Watch the above tutorial in a video format:
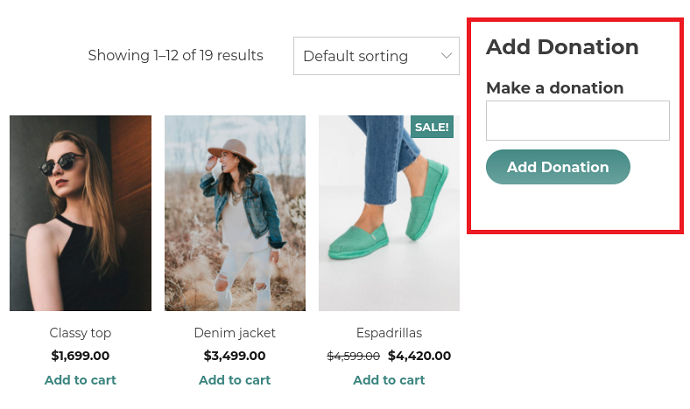
Method 6: Using YITH Donations for WooCommerce (Paid) Donation Plugin
YITH Donation plugin is recommended in a case where you just want to add a donation button on the WooCommerce product pages.
How to Add a WooCommerce Donate Button on WordPress using the YITH WooCommerce Donation plugin
Step 1: Download, Install & Activate the YITH Donations License
Since this is not a free plugin, you have to purchase it through YITH official website. Navigate to the YITH official website, purchase the plugin and upload it on your WordPress website.
To manually install the plugin on WordPress, navigate to Plugins > add new and tap on the upload plugin button.
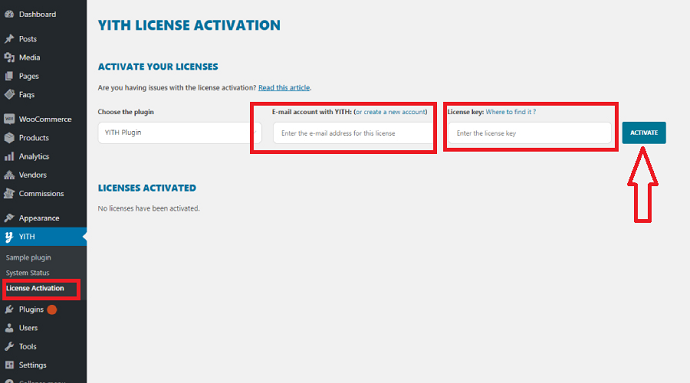
After that, you have to activate the plugin by the License code. You get the license code from the YITH official account by logging into your account.
Navigate to YITH > License Activation. Enter the copied license code and activate the plugin.
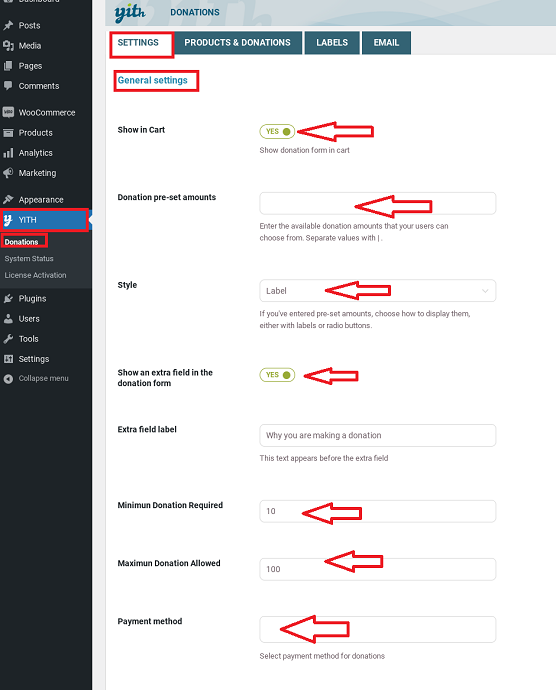
Step 2: Configure General Settings
The first step after licensing your product is to configure a few important settings. Don’t worry it’s not rocket science.
From WordPress dashboard, Navigate to YITH > Donations > Settings and then configure these options:
- Show in Cart: Toggle this switch to on/off the appearance of donate button over the Cart page.
- Donation pre-set amounts: Leave it blank if you allow custom donations.
- Show an extra field in the donation form: Switch it on to insert an extra text-based form field along with a donation button.
- Extra field label: Give a label to the above field
- Minimum donation required: Define the minimum donation allowed
- Maximum donation required: Define the maximum donation allowed
Step 3: Enable Donation on WooCommerce Products
Navigate to Donations > Products & Donations tab.
If you came here for the first time, then you will see nothing here. However when you add products then this tab will look like this:
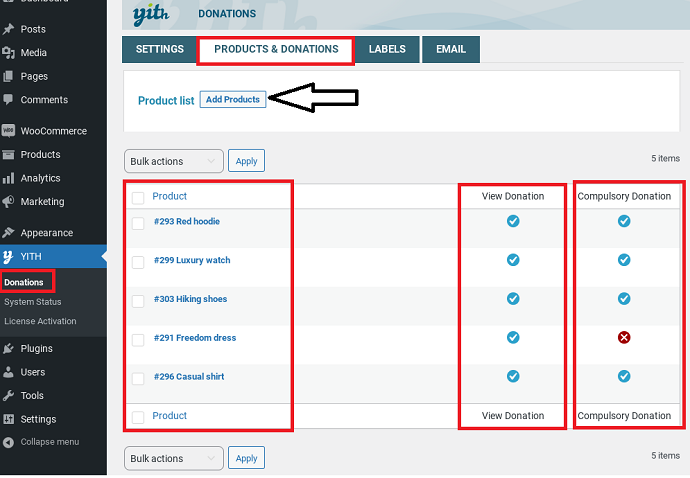
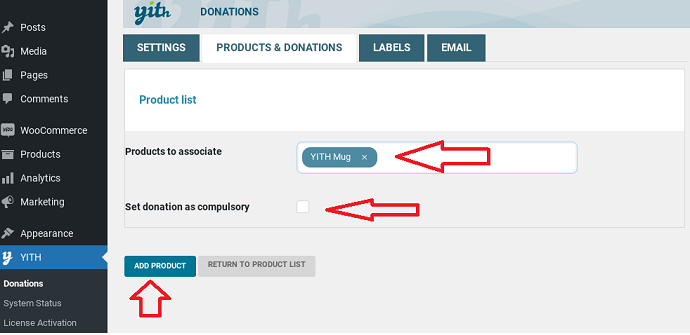
Tap on the “add products” button shown in the above image to add more WooCommerce products for donation. Enter the product name that you want to add and check/uncheck the compulsory donation option according to your preference.
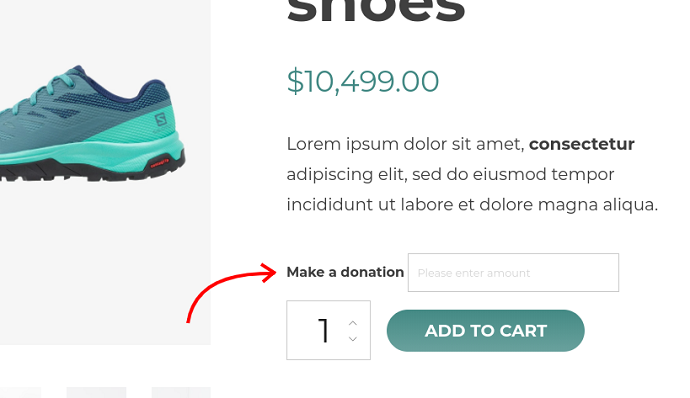
The donation button on the WooCommerce product page would be shown like this:
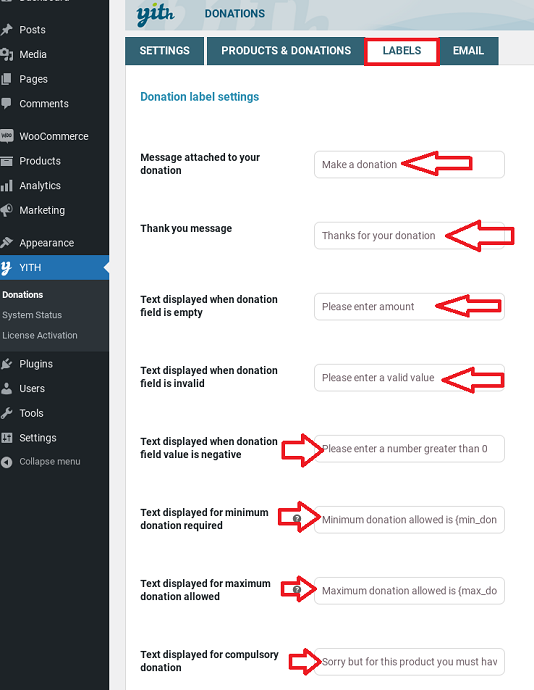
Step 4: Customize the Labels Tab
This tab is mainly for configuring text labels for different scenarios. By default, the values are set but you can change them always.
Step 5: Add a Donation form to the Sidebar
Apart from the “donate cart button”, you can show the donation form inside the sidebar of your website with the help of the “YITH donations for WooCommerce” widget. This widget has been created by the plugin upon installation. Locate this widget by navigating to Appearance > Widget tab.
Learn more about YITH Donation for WooCommerce plugin configuration from here.
Method 7: Using WPForms (Paid) Donation cum Form Builder Plugin
WPForms – Prefer this approach when you are already using its free version on your website. Just upgrade it and enjoy the fundraising features.
How to Add Donate Button on WordPress Site with WPForms Plugin
Don’t worry the process of donation form (button) is exactly the same as you create different forms with this plugin.
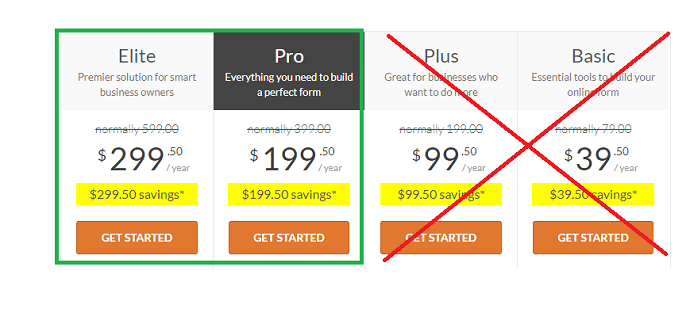
Step 1: Purchase WPForms Donation Form Builder Plugin
People who are already using the free version of the WPForms plugin require to upgrade it by license code. For the license code, you have to subscribe to any of the given WPForms paid plans.
Note: The donation button support is available only in the “Pro & Elite” version of WPForms. So you have to make a selection between them.
As soon as you made the payment you will have access to the license code. Copy it.
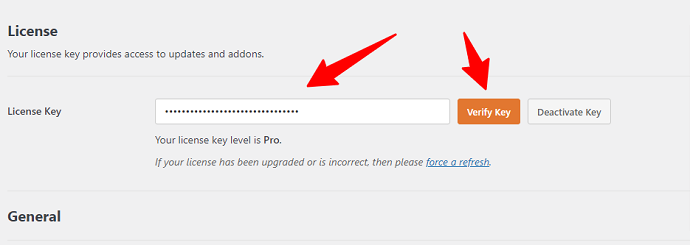
Step 2: Paste the License Code & Activate the Plugin
From WordPress dashboard navigate to WPForms > Settings. Here paste the license code you get in the previous step and tap on the “verify key button” to verify it.
Step 3: Setup your First Donation Button (Form) with WPForms
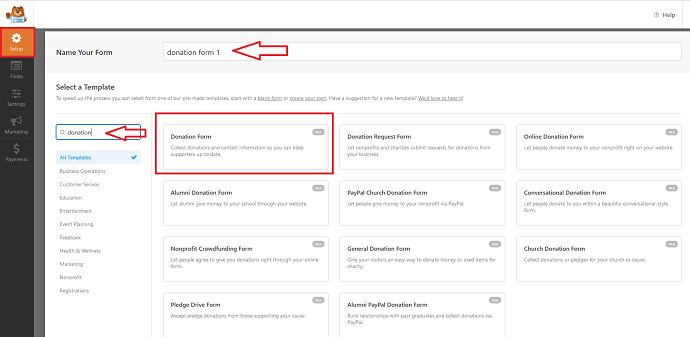
After activation, head over to WordPress > WPForms > Add New. Now you are into the WPForms form editor.
Here first input a name (label) for your donation form. Then search for donation form templates. WPForms is offering different types of donation form templates. Pick one according to your need.
For this example, I am going with the first template which is the simplest among all.
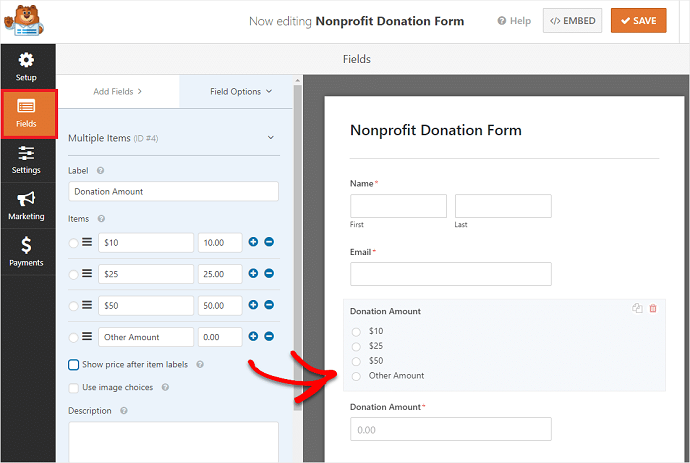
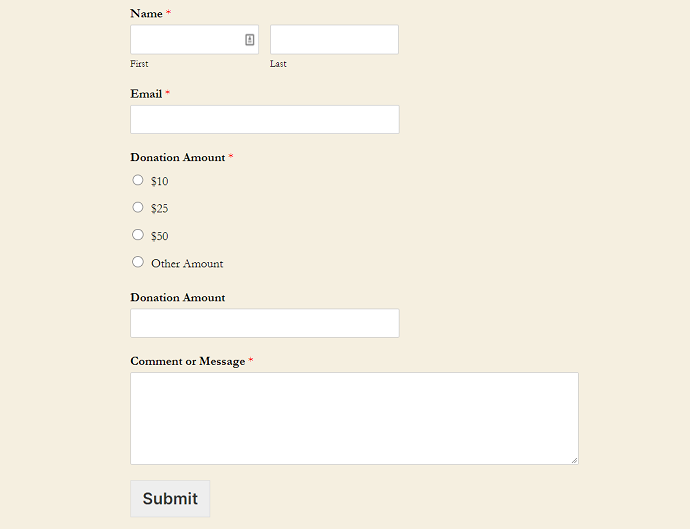
Step 4: Customizing the Fundraising Form Template
By default, the donation form template comes up with a few form fields. The template I chose has these fields:
- Name
- Donation Amount
- Comment or Message
Now you may proceed at this point, Or you can explore extra available fields and add up to your form at any time.
To add new fields, tap on the fields button. For this example, I am going to put up the “Multiple item” form fields just above the donation amount field. This field is going to use for providing donors with multiple donation amount options.
Don’t forget to rename the values of the field you added manually.
Finally, save your donation form.
Step 5: Enable Payments Gateways on Donation Forms
Your donation form would be useless if you published it without integrating it with Payment Gateways.
WPForms can allow you to establish a connection with popular payment gateways through their add-ons. In other words, you have to activate the Payment services add-on before using it.
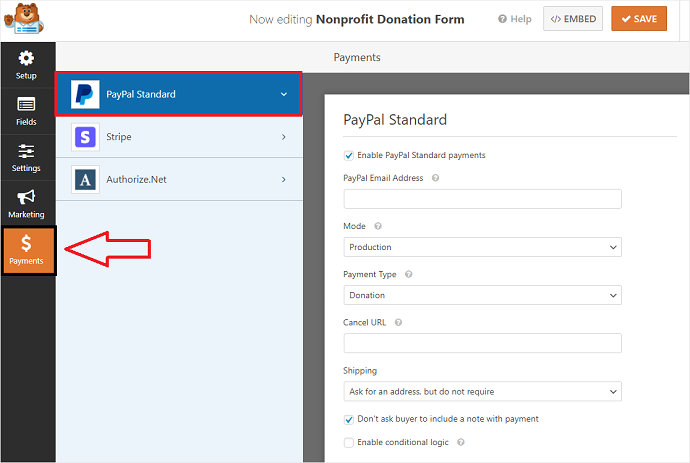
Activating the Payment gateways is an extremely easy process. Go back to the WordPress dashboard and navigate to WPForms > Addons.
- If you want to add a PayPal donate button, then activate the PayPal add-on.
- Else Authorize.net add-on or Stripe add-on
After that go back to the form editor and tap on the Payments tab. Configure the PayPal add-on and you’re good to go.
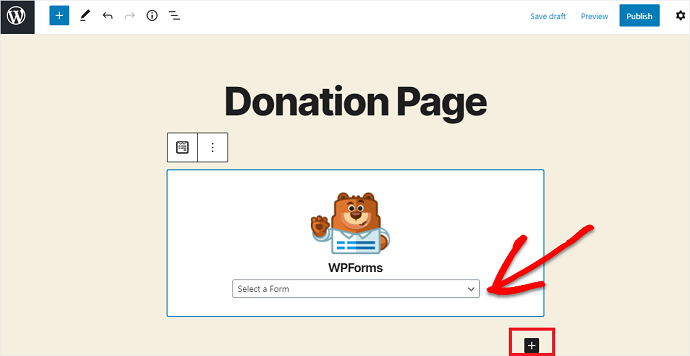
Step 6: Display a Donation Button on WordPress
WPForms charity forms can be published on blog posts, pages, and sidebar widgets.
Just open up the Gutenberg editor, tap on the “+” icon and search for WPForms block. Then it will ask you to select the form which you want to show on this particular page. Select the donation form you have just created and publish the post.
Method 8: Using Manual HTML Code Approach
How to Add (PayPal) Donate Button on WordPress Without Donation Plugins
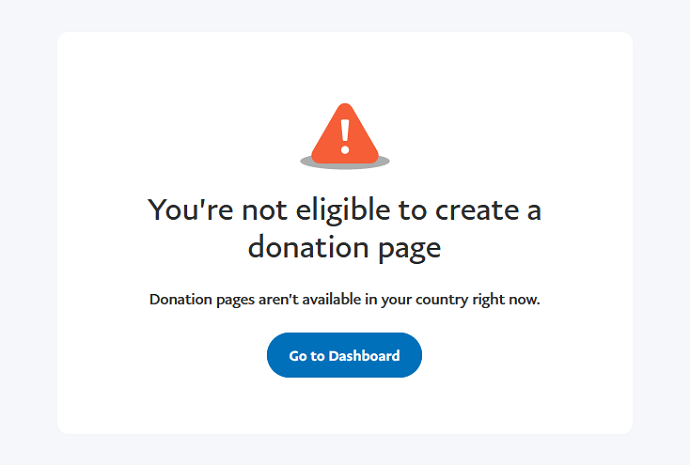
Note: The HTML code method will not work in all countries. We are located in “India” and PayPal donate button is not available in our country at the moment.
Click here to check whether PayPal donate button (API) is available in your country or not.
For countries where PayPal allows donate button through their API can visit WPBeginner.com where step by step tutorial is available. Else choose a donation plugin like GiveWP and configure the PayPal button now!
Conclusion: Add Donate Button to WordPress
So this is it. You have seen 8 awesome methods for adding a fundraising button on WordPress.
Which one are you gonna use? Still confused? Well, why don’t you try GiveWP free donation plugin first?
Rather than choosing a plugin that offers only a donate button, Choose a professional donation management plugin like GiveWP which gives you a tremendous amount of features that will be beneficial for your Non Profit organization in a long run.
If you need more information for any of the plugins listed in this article, then please visit our last article about the Best WordPress Donation Plugins
And the comment section is always open to sort out any issues…
- Next Read: 5 Free Ways to Add A Button to WordPress Header
- 3 Free Ways to Add a Button to WordPress Menu
- 4 Methods to Add social media follow buttons to WordPress website
I hope this tutorial helped you to add a donation button to the WordPress website. If you like this article, please share it with your friends. If you want more blogging tips, follow BlogVwant on Facebook, Twitter, and YouTube.
FAQ: Add Donate Button on WordPress Website
Which is the fastest method for adding a PayPal donate button?
Method 2.
Can you accept donations on WordPress?
With the help of WordPress donation plugins like GiveWP, you can easily accept the donation on the WordPress website. The alternative to WordPress donation plugins is to use a non-plugin approach which is time-consuming and comparatively hard.
How can I add a donate button to my website?
The procedure of adding a donate button is straightforward. For a WordPress website, first, you have to make a choice on the donation plugin. After installing the plugin the basic steps you have to follow is: Configure the plugin settings, design a donation form, establish a PayPal connection and finally embed the donation button on WordPress post, pages, and a sidebar.
Can I add multiple donation plugins at the same time?
Yes. But that doesn’t make sense at all.
How to increase donations in a quick time?
The GiveWP plugin has amazing in-house free marketing tools that you can use to enhance the number of donors quickly. Some of the tools you should have a look at are: Peer-to-Peer fundraising campaigns, donor walls, donors’ gifts, social buttons, and whatnot.
By installing a donation plugin, would my website speed suffer?
No.
Which donation plugin has more features?
GiveWP. Check out complete details of GiveWP and other plugins from our best wordpress donation plugin blog post.