So do you want to setup Authorize.net Payment forms & accept credit card payments on your site? Then you need to Create Payment Forms for Authorize.net. But do you hate involving in manual coding trouble? If so, then continue reading this article.
Because…
In this article, we are going to show you the step-by-step procedure for establishing a connection between a website & Authorize.net. Yes, we will create a payment form too.
What is Authorize.net? Why Should you Setup Authorize.net Payment Forms on your website?
Authorize.net is one of the oldest and most popular international payment gateways that have been offering payment processing services since 1996.
40,000+ merchants have associated with Authorize.net and due to this, transactions of more than $149 billion have been processed every year. Some of the most popular Authorize.net clients are Magento, Shopify, Moolah, Shopify, eBay, SurveyMonkey, etc.
If you’re operating your business from any of these countries (USA, Canada, UK, Europe, or Australia) then you should have definitely plugged Authorize.net international payment gateway on your site.
Alongside international payment facility to merchants, it is also offering the benefit of multiple payment methods to the customers from which customers can link their credit card and process the payment from any device.
Some of the most popular payment methods associated with Authorize.net are Discover, VISA, MasterCard, American Express, PayPal, ApplePay, eCheck, JCB.
The great thing is Authorize.net is providing the powerful API which non-WordPress-based websites can use to create a payment form and accept payments.
Let’s create an Authorize.net Payment Form…
What are the Best Ways to Create Payment Forms for Authorize.net on a Website
The best way for creating an Authorize.net payment form on a website mainly depends on the website type itself. In case a website is developed on a CMS like WordPress then the best approach is to use WordPress plugins.
However, for Non-CMS based websites, the only option left is by editing the website code and setting up an Authorize.net payment form with the help of Authorize.net API.
In a nutshell, the best approach for integrating Authorize.net payment forms on websites are:
- Using Manual Coding Method (Difficult)
- Using Plugin (Example: WPForms) – Recommended & Easy Method
Note: Before implementing the coding method, don’t forget to go through its limitation mentioned in the next section.
Create Authorize.net Payment Forms Using Manual Coding Method
This method is suitable only for Non-CMS based websites. With the help of the Authorize.net API, you could able to set up an Authorize.net enabled payment form on a website but you might have to face these limitations:
1.) High Developer Charges
To set up a payment form through Authorize.net API, you require a professional web developer. In case, you got no one on your team then be ready to bear this expense.
Although you don’t have to hire a full-time web developer, a freelance web developer available on freelance sites like Fiverr.com sound perfect in this situation.
A well-skilled web developer is a must here and they will charge somewhere from $20 to $200. But there is one more problem, in case you successfully build up the Authorize.net payment form but in the future, if something wrong happens to the form then you have to hire a freelancer again.
So in a nutshell, the expense associated with this non-plugin method will be higher.
2.) Time Consuming
From implementing to debugging the payment forms, you can expect a long setup time. Mainly it depends on the skill of the developer you hired for this job. Further, if you haven’t sourced the web developer yet, then include sourcing time too in your payment form creation process.
Hint: With the WPForms plugin method you can set up an Authorize.net payment form and start collecting payments in hardly 10 minutes without hiring a web developer.
3.) Problem in Payment Gateways Expansion
In case you want to hook up more payment gateways on your website, then you have to again hire a web developer and interfere with the website code.
Hint: With the WPForms plugin approach, you just have to install a plugin a single time and then you are free to add unlimited payment gateways to your website anytime you want.
Hint: The detailed step-by-step procedure of integrating Authorize.net with WPForms Plugin is waiting for you in the next section.
4.) The Procedure Might be Risky
The biggest reason people prefer plugins rather than interfering with website code is site breakage.
I suggest without any proper knowledge of web development, do not try to mess with the website code otherwise, your website might be crashed. And believe me, it would be a blunder to repair a crashed website. Takes huge time.
How do I add Authorize.net to my Website with Manual Coding Approach?
Although this method is completely out of scope, still I would like to give you an overview of the steps.
In case you want to explore these steps in detail, then please find the links of important resources at the end of this section.
These additional resources would help you to set up an Authorize.net payment form with the coding approach in a much better way.
The main steps you have to follow while implementing this method are:
- Set up a sandbox account in Authorize.net and get the credentials (API login ID and key)
- Get access to Authorize.net API by importing PHP SDK
- Setup an Authorize.net payment form for collecting user credit card information
- Configure API credentials and finally hit the request for payment processing
- Store the payment data in the database which is returned by the Authrorize.net API.
Explore these resources for more information about the coding approach:
- Authorize.Net Payment Gateway Integration using PHP – By phpbot.com
- Connect My Website to the Authorize.Net Payment Gateway – By Authorize.net
- Accept.js – Javascript API procedure – By Authorize.net
- Accept hosted – Authorize.net API
Create Authorize.net Payment Forms using WPForms WordPress Plugin (Recommended Method)
WPForms plugin is truly a gem for WordPress website owners. Although you must get the purpose of this plugin by its name, let me tell you that this is one of the oldest drag and drop form builder plugins active in the market.
With this, you can design all types of forms and embed them into your site without any prior coding knowledge.
This plugin comes in both free and paid versions. But the feature of Authorize.net integration is only be found in its “elite” version which is paid.
In case you are going with this method, then congrats you won’t face any limitations as you probably face in the manual coding approach.
Now let’s talk about the actual process…
What is WPForms Authorize.net Add-on
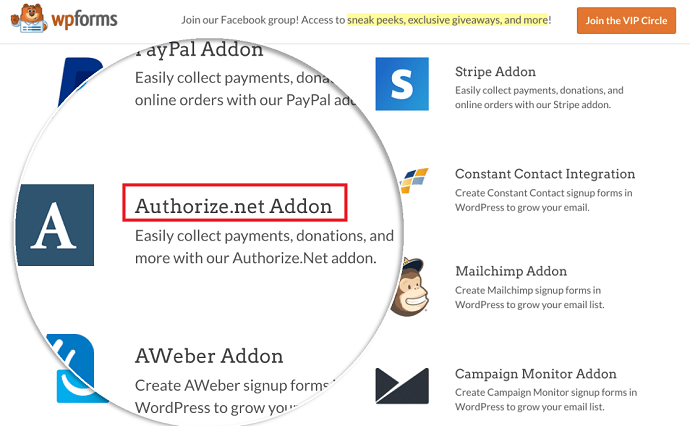
Installing a WPForms plugin only is not sufficient. Because the plugin only allows you setup payment forms. The real magic comes up when you install the “WPForms Authorize.net Add-on” and enable the Authorize.net integration on your forms.
Don’t worry, you do not have to pay the additional amount for this add-on. Just install the WPForms elite version plugin and you are good to go.
And after that, you would be able to collect donations, payments for sales, and whatnot through the Authorize.net payment gateway.
WPForms actually added an Authorize.net enabled credit card field in the form which users can use to make secure payments without exiting the site.
One more important thing, this add-on would enable both one-time & recurring based payments on your site.
How do I Create an Authorize.net Payment Form on WordPress Website Using WPForms?
In this section, I am going to introduce you to the process of the Authorize.net payment form creation process with the help of the WPForms WordPress plugin.
Total Time: 10 minutes
Step 1: Purchase, Download, and Install WPForms Plugin (Elite Version)

WPForms plugin is available in 4 plans. But the Authorize.net integration is only available in the “Elite version” so purchase it and get back to the WordPress dashboard. Upload the downloaded plugin, install it, and finally activate it.
Note: To activate the plugin, you will require a license code that can be accessed by logging into the WPForms account. Paste the license code by navigating to the WPForms settings page.
Step 2: Activate the Authorize.net Add-on (Integration)
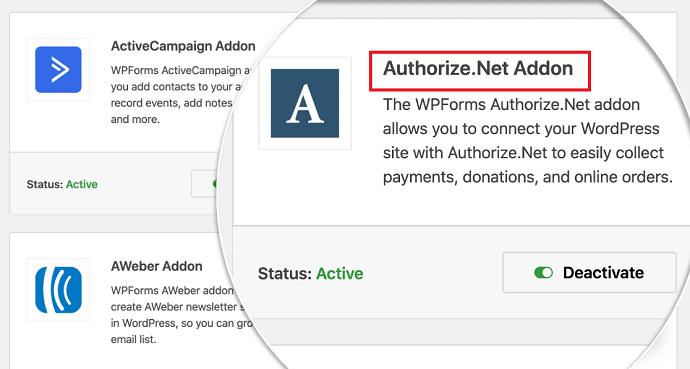
From the WordPress dashboard, navigate to WPForms > Addons.
Search Authorize.net in the available add-ons. Install it and activate it.
Step 3: Define the Default Payment Currency

Before rolling into the form creation process, first set the default currency in which you are going to accept payment through Authorize.net international payment gateway.
For this, Navigate to WPForms > Settings > Payments tab.
Under the payment tab, select the currency from the currency dropdown field.
Step 4: Get Access to the Authorize.net API Key (Credentials)
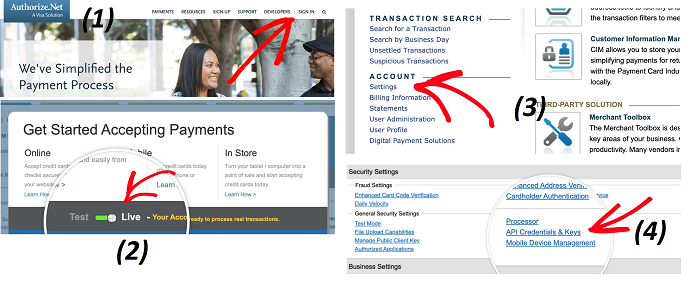
To establish a connection between your WordPress site and Authorize.net, you will need credentials.
Simply jump to the Authorize.net official website. Signup for a free account and log in.
The first thing you have to do after logging in is to switch on live mode. (See image)
Next, open up the settings from the top right corner under the accounts tab. Under general settings, tap on the API Credentials & Keys.
Copied down the Authorize.net key and go back to WordPress. (Do not close the Authorize.net API Credentials & Keys Page yet)
Step 5: Paste the Authorize.net API key into WPForms & Establish a Connection
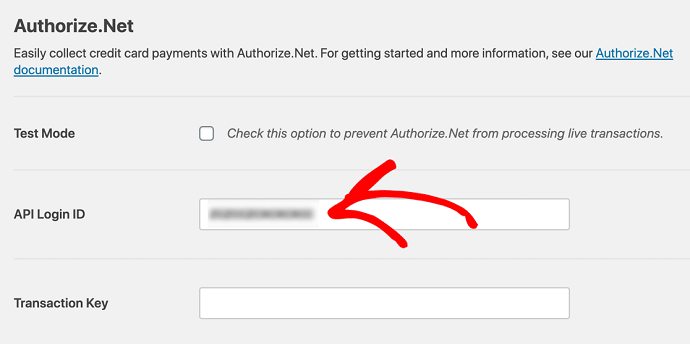
Again navigate to the WPForms > Settings > Payments tab. Here paste the copied API key into the “API Login ID” field and save the changes.
Step 6: Get Access to the Authorize.net Transaction Key
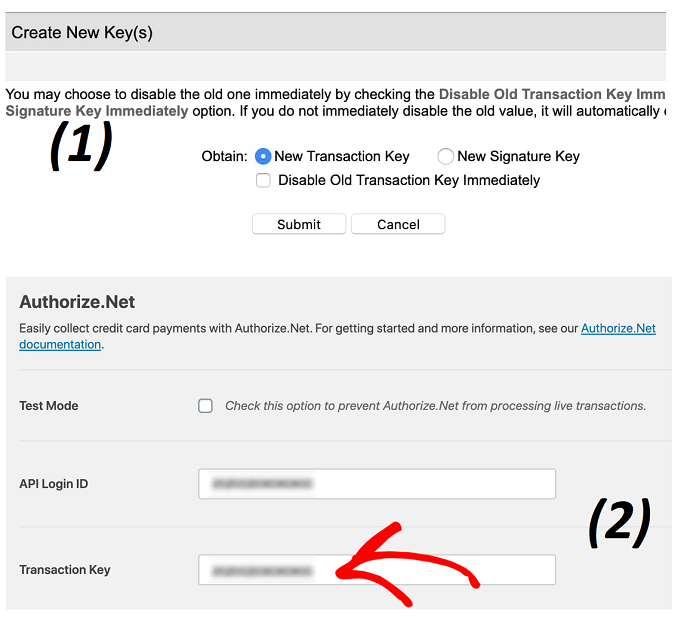
Similar to the API key, now we have to generate the transaction key. For that go back to the Authorize.net API Credentials & Keys Page. Click on obtain button, select the new transaction key, and hit the submit button.
As soon as you tap on the submit button, Authorize.net will send up a pin on your email for verification. Paste the verification pin and tap on the verify pin button.
In a matter of a few seconds, you will see your working transaction key.
Copy the transaction key and paste it into the “transaction key” field under the WPForms Payments tab.
Save the settings.
So congrats your site has been connected with Authorize.net. Now it’s time to set up a payment form.
Step 7: Create an Authorize.net Payment Form
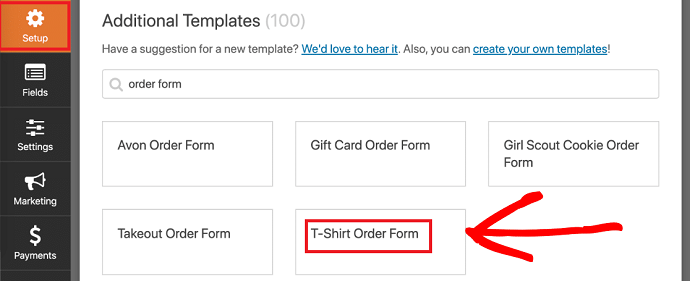
The first thing you have to do is to open up the form editor and choose a form template. From WordPress dashboard, navigate to WPForms > Add New.
Now you’re inside the setup tab of the form editor.
WPForms has 100+ form templates and you can attach the Authorize.net credit card field to any template.
For this example, I am selecting the “T-Shirt Order Form Template”.
Step 8: Attach Authorize.net Credit Card Payment Field
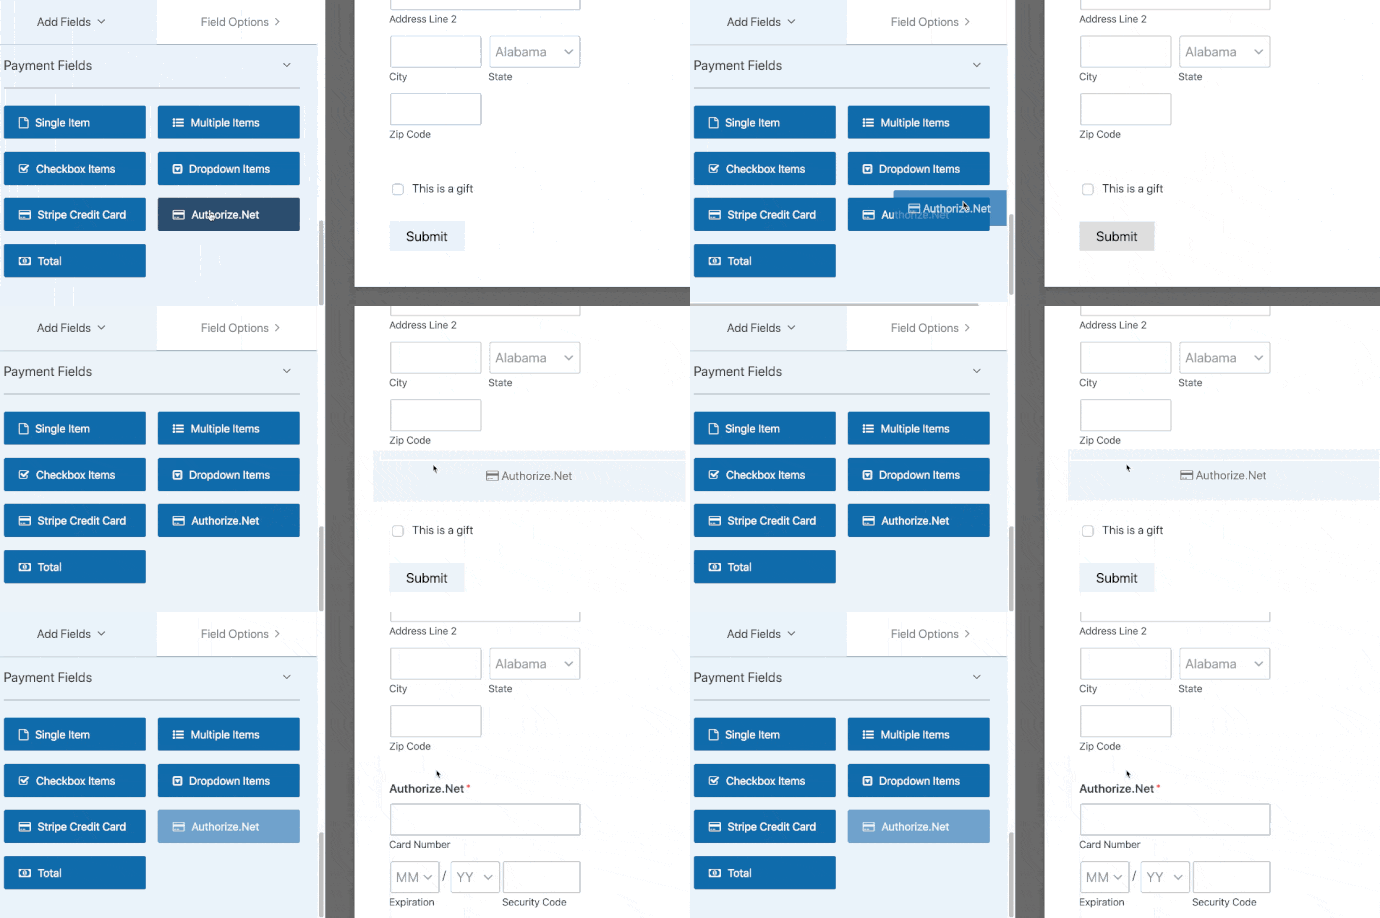
As soon as you tap on the template, the form builder with predefined fields will be open up.
To accept payments through Authorize.net, navigate to the “Fields tab” from the left.
Under the available payment fields, drag the Authorize.net payment field, and drop on onto the form (right).
To customize other existing fields, select them one by one and customize accordingly.
Step 9: Enable the Authorize.net Payment Processing on the Form
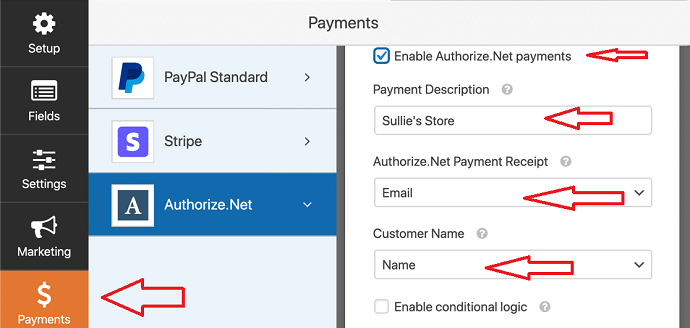
So once you are done with the customization part, navigate to the “Payments” tab from the left within the form editor and enable the Authorize.net payments by making a checkmark on the “Enable Authorize.net payments” field.
Then configure these additional fields:
Payment description: Enter a text which would appear as a user credit card statement.
Authorize.net Payment receipt: Select email here if you want to send the payment receipt to your customers upon successful payment.
Customer Name: Select name here.
Save the settings.
This is it. The Authorize.net payment form creation process has been finished and is ready to accept payments.
The final step remaining is…
Step 10: Embed Authorize.net Payment Form on Website
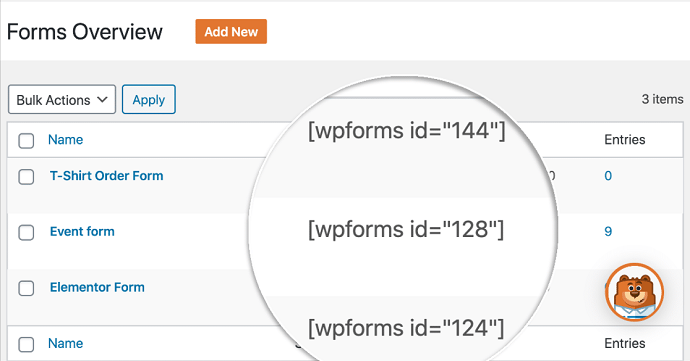
Well, keep in mind that you don’t have to edit a single line of code for this step.
It is a very simple process to display WPForms payment forms on a WordPress website.
There are multiple ways for embedding a WPForms form on WordPress. However, we are going to show you the easiest one.
From WordPress dashboard, Navigate to WPForms > All Forms page.
Here you will see all your created forms with their shortcode. Copy the shortcode of the Authorize.net payment form you just created.
Then head over to the WordPress post/page where you would like to embed this form and open up it in a Gutenberg editor mode.
Tap on the “+” button, search shortcode, and paste the copied shortcode. Finally, publish the page.
Estimated Cost: 299.50 USD
Supply:
- WPForms Plugin
- WordPress Website
Tools:
- WPForms Plugin
- WordPress Website
Materials: WPForms Plugin WordPress Website
Conclusion: Payment Forms for Authorize.net
So what are you thinking about? If you are a WordPress site owner then why are you wasting time? Just install the WPForms plugin and enable the Authorize.net connection in hardly 10 minutes.
Sadly, Non-WordPress users don’t have another option except the manual coding method. For you guys, I suggest Upwork.com and Fiverr.com for sourcing a freelance web developer at minimal rates.
For further queries, the comment window is always open.
- Next Read: 5 Reasons Why WPForms Is The Best Form Builder
- Best WordPress Survey Plugins
- How To Collect PayPal Payments on Your WordPress Site using WPForms
I hope that this article, How To Create Payment Forms For Authorize.net, helps you to set up an Authorize.net payment form on your site. If you like this article, then do a favor by sharing this article and follow BlogVwant on YouTube, Facebook, and Twitter for more tips.
FAQ: Payment Forms for Authorize.net
Can I use Authorize.net with WordPress?
Absolutely yes. To use Authorize.net with WordPress one can take the help of form builder plugins. The best form builder plugin for this purpose is WPForms.
How to Integrate Authorize.net with the Website?
To integrate Authorize.net with the website, the authorize.net API is all you need. To embed the API key there can be 2 possible methods. Check our article, we have discussed both methods.
Can I accept eCommerce payments with WPForms Authorize.net Add-on?
Yes.
Is WPForms secure?
Yes.
Does WPForms make my website slow?
No.
