
Have you recently discovered a “Remove Unused CSS” error while analyzing your site in Google PageSpeed Insights? Well, don’t worry today we will talk in detail about this topic and try to help in fixing this error. After fixing this error, you must see an improvement in website performance.
Hint: Everyone loves to have a fast and secure website. We suggest Rocket.net, the most secured and fastest managed WordPress hosting service that gives you a Cloudflare Enterprise plan for free.
What is the “Remove Unused CSS” Error in Google PageSpeed Insights?
With the “Remove Unused CSS” error, the Google PageSpeed testing tool basically tells you that a website page has some CSS styles/code which is not essential or do not play a role in webpage rendering or loading. Hence suggesting removing unused CSS from the webpage to release the burden of the network server. The Google PageSpeed only reports those CSS styles that have at least 2 KB of unused CSS code at the “above the fold content” rendering section of a webpage.
Well, if you are a Non-WordPress user, there is little chance that your webpage reports the unused CSS code.
However, if you are a WordPress user, Unused CSS generally find in plugins, page builders, or third-party themes. The developers usually write a CSS-style code for all modules available inside them. Even if you disable such elements, the CSS code for them is still loaded. Because the developers write code by keeping all the user’s choices in mind, not just individual.
Let me explain by a simple example, suppose you are using a Page builder which included multiple visual elements like slider, grids, etc. As an individual, you might not need a slider so you have an option to disable it. But the CSS code for that slider is still there and loads every time regardless a webpage needs it or not.
Why Should You Take Immediate Action to Fix “Remove Unused CSS Error”
Removing unused code from a webpage is very important. There are a lot of reasons that justify this. Let’s have a look at each one of them:
To Improve Core Web Vitals Metrics of the Page
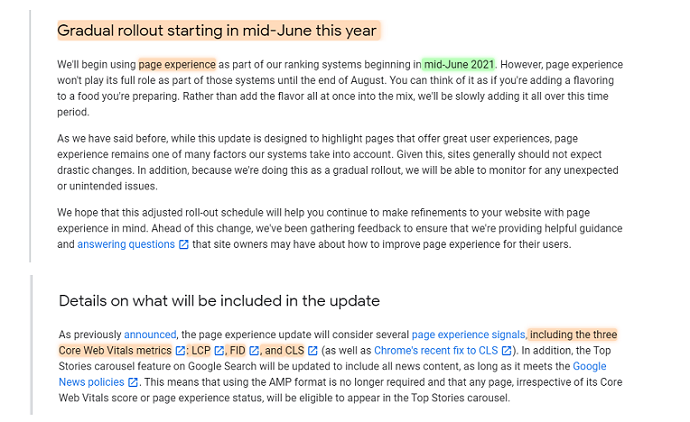
Do you know what the core web vitals is? Well, core web vitals are the metrics (LCP, FID & CLS) that Google considers to determine the user experience of the website. Starting June 2021, Google made a big change in its ranking algorithm and considers core web vital reports and other page experience reports as a ranking signal.
Basically, the extra unused CSS code impacts the LCP and FID metrics, or in simple words unused or extra CSS code increases the page rendering time which directly impacts the loading of the Largest (LCP) and first (FIP) element of a webpage. Apart from the Unused CSS, there are tons of factors that could also affect the core web vitals. So to scored better LCP and FID you should eliminate all unused CSS from the webpage.
- Must Read: How to Improve Core Web Vitals
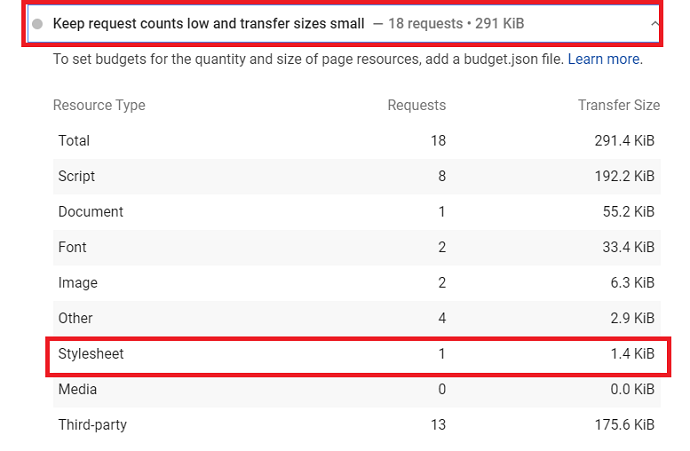
To Keep the Requests Count Low and Transfer Sizes Small
Do you know that CSS styles are stored on a server separately from the HTML file of a page? Well, whenever a page is requested by the user the browser needs to download and parse all the external stylesheet to render the page on a user device screen. So to load numerous stylesheets, the browser has to make several requests from a network to load all the stylesheets. Further the larger the transfer size, the more time it takes. Ultimately all this leads to an increase in page rendering time and bad page experience.
So if you find the stylesheets requests count larger than 1 or 2 in the Google PageSpeed tool then you should make sure that all the CSS styles of a webpage are available under one file and also the size of the CSS files should be small as possible. Unused CSS code ultimately increases the size of the CSS file which leads to higher transfer sizes and requires more time to render.
To Eliminate Render Blocking Resources and Improve TBT time
Do you find any CSS styles in a Google PageSpeed tool under the eliminate render-blocking resources section? That means a webpage has CSS styles that are blocking the rendering process and increase the TBT time.
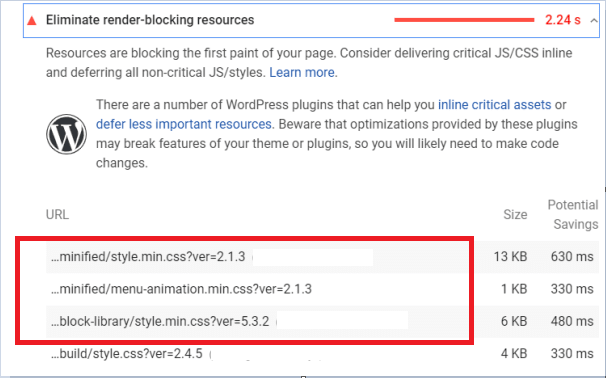
Apart from the LCP, other important metrics such as TBT (Total blocking time) also affected by the Unused CSS. These metrics hold an overall 25% of the total speed insights score. However, CSS might not be a single culprit, other elements like JavaScripts can also affect the blocking time. Larger CSS styles increase the parsing time and due to this the rendering of a web page blocks. The only solution to deal with the CSS that blocks the rendering is to defer or remove the non-critical (unused) CSS code. We will discuss about this solution in the later section of this article.
How to Identify Webpages that have Unused CSS Styles?
Now before approaching towards solutions, the first step is always to find the affected CSS file. It is very important to find the CSS file of a webpage that has unused CSS code.
The Unused CSS can be hidden anywhere in a webpage. It is impossible to find without site performance and audits tools. Well, there are free tools provided by Google itself which help you to identify the affected CSS files.
But first, we have to figure out the web pages that might have Unused CSS styles.
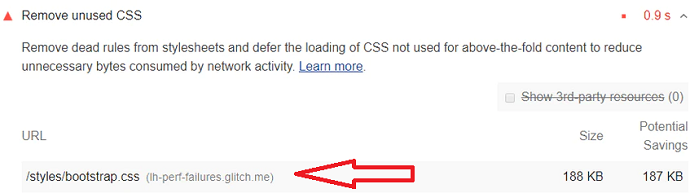
The Simplest Method is Google PageSpeed Insights Tool:
In this, you just need to enter a URL of a webpage and if there is an unused CSS code that exists on your web page then the link of that CSS style will be displayed under the “Remove Unused CSS” section.
However, there is one huge disadvantage of this method that you have to test all your website URLs manually to find the impacted ones.
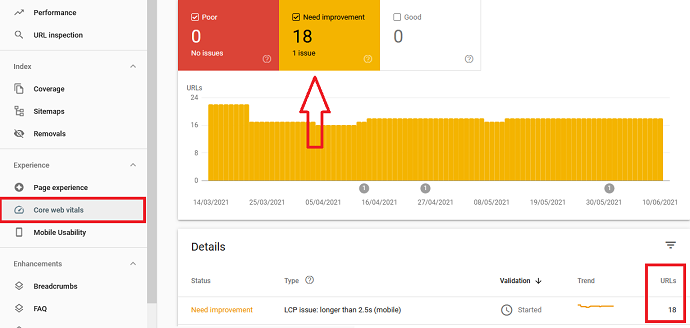
The alternative of this method is to use Google search console core web vitals report. Recently Google made a change in the search console. Now the user can able to find all those web pages that need improvements within the search console.
So you have to do one thing, just navigate to Google Search Console > Page Experience > Core Web Vitals. Here you will find all those pages which report bad LCP or FID time in a single place. So at this point, you have figured out all the affected web pages of your site which might have Unused CSS. Now simply go to the Google Page Speed tool and run each affected URL that you discovered from the Google Search console. If there is any Unused CSS code exists, you can see the URLs of those CSS styles under the “Remove Unused CSS” section.
What are the Solutions to Fix “Remove Unused CSS” Error?
Video Tutorial:
For the reader’s convenience, we always create a video tutorial. Either you can watch and learn or simply skip the video and continue with the steps mentioned afterward.
Note: If you don’t have time for going through the whole article, just quickly navigate to the WP-Rocket plugin section and quickly remove the Unused CSS from your WordPress site automatically.
Now before proceeding, let’s see the solution suggested by the Google PageSpeed tool for removing Unused CSS errors:
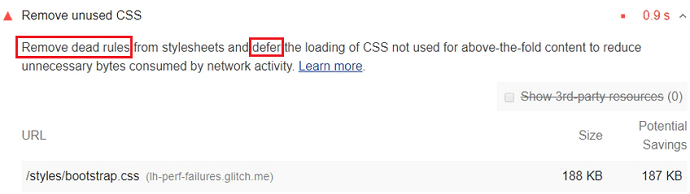
As you can see in the image above, Google Page Speed Insights basically mention 2 solutions to fix this. The first one is as usual removing all unused CSS code from a webpage and the second one is to defer the non-critical or unused CSS. By deferring the CSS, we are instructing the browser to load the Unused or Non-critical CSS after the page will finish loading. This way, the unused CSS will never block the rendering of the page and hence there would be no impact on the LCP and FID metrics.
In a nutshell, The solution to remove the unused CSS from a webpage depends on how you would like to do it. There can be 2 possible approaches: Remove the Unused CSS or Defer the Non-Critical/Unused CSS
Now you may be wondering which method should I proceed with?
We will discuss both methods briefly in the upcoming sections of this article and help you to determine the best approach for you.
Solution 1: Remove the Unused CSS
Removing CSS manually (without plugin) is not easy as you think. And the success ratio without damaging the site design is also less. That’s why most people choose to go with the defer method.
But guess what, if you remove the Unused CSS with the help of a plugin then there are fewer to nil chances of failure.
The process of removing Unused CSS depends on how you would like to do it. Both manual way and plugin way are available. The simplest way is to let the plugin in action and allows it to done a job for you. Also, the chances of mistakes would be less when you choose a plugin approach over a manual approach.
Note: If you’re in a hurry, just skip the whole article, navigate to the WP-Rocket Plugin section, and remove the unnecessary CSS from your website in a single click.
The Manual Approach to Deal with Unused CSS (Not Recommended)
Note: Only go with the Manual method when you have a web developer in your team or if you have enough knowledge about CSS, website source code, etc. And also, make sure to take a backup of your website before proceeding with this method.
It is extremely time-consuming to eliminate Unused CSS from all web pages one by one especially when you create your site on any CMS like WordPress.
When we talk about removing the non-used CSS manually, generally there are 2 steps you need to follow: The first step is to Extracting the Unused CSS code and the second will be removing them.
Now, this may sound very simple to you, but there are few limitations of removing CSS manually. It is very important to aware of these limitations before implementing this solution.
Limitations of Removing Unused CSS with a Manual Method:
#Limitation 1: Time Consuming
When you perform the first step that is extracting the Unused CSS with the help of Google chrome dev tools, you might find out that multiple CSS files are associated with a webpage that has Unused CSS code. This especially happens when you hosted your site on WordPress and uses third-party themes and plugins on your site. So you have to go through each CSS file to collect all necessary or Used CSS code and stored them separately.
Now, this may even take more longer when you have tons of pages on your website that are affected by the Unused CSS.
#Limitation 2: Hardly to Remove Unused CSS Injecting Through Javascripts
Well, most of the tools used for extracting the unused CSS available in the market are only able to detect the Unused CSS that is occurred beforehand on a webpage. Lighthouse is one of them.
But what about the Unused CSS that is injecting in real-time or dynamically? There are many cases where you will find the CSS styles appears on a webpage by the external javascript. For example, a slider div section which occurs on a webpage when a user hits the button. All the Unused CSS associated with this slider will remain undetected because of its dynamic characteristic.
It’s almost impossible to find unused CSS that is hidden and associated with the execution of Javascript. And you will never know whether the CSS selector is unused unless all the Javascripts are loaded on a webpage.
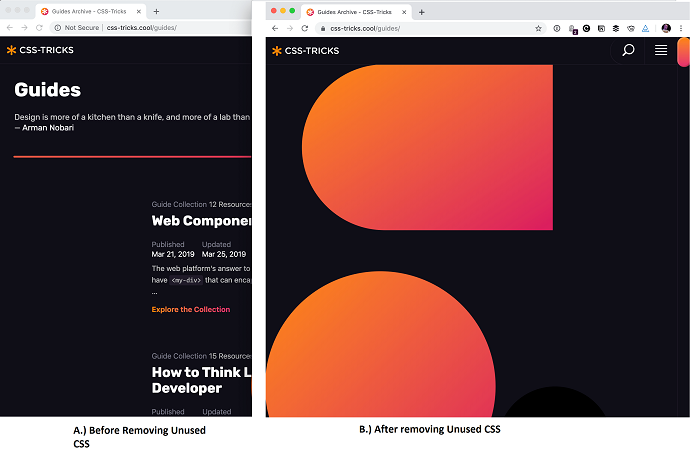
In the above image, you will see how badly the website design affected by removing the unused CSS code and pasting the new CSS code extracted from the PurifyCSS tool. This happened because this tool doesn’t count the styles injected by the javascript as “used”. So, it removed it. The same will happen if you use Google Lighthouse or chrome dev tools for extracting the Unused CSS.
#Limitation 3: Hardly to determine if the CSS selector is 100% Unused or Not
By following the above limitation, several factors we need to keep in mind while ensuring that a CSS selector is 100% unused or not.
Apart from the javascript, there are some CSS selectors which supposed to load based on a device screen or media queries. So you have to find their usage manually by boot up the page on different screen resolutions or according to the media queries rules you have set on your site.
Besides that most web developers use the code splitting technique to split the large CSS code into multiple files based on different elements and link to the respective pages. This is mainly done to keep the amount of Unused CSS as low as possible. However, it is very hard to determine which elements are associated with which pages. For example, suppose a “Page A” has reported some unused CSS rules in a typography.css and you removed it. But there are high chances that other pages of your website might have been using that code. As a result, the design or styles of other web pages have gone broken.
In a nutshell, to ensure that a CSS selector of a webpage is 100% unused, you have to check every webpage, all Javascripts, all possible states, all possible media queries combination, etc.
And even though you will succeed in this, you will soon realize how time-consuming this process is going to be when you have a lot of pages affected by the Unused CSS.
#Limitation 4: The Probability of Mistakes and Failure is More
99% of the time users make their website design broken by removing the important CSS selectors of which they aren’t 100% sure of their usage.
Apart from this the following errors you may face after removing the Unused CSS code with a manual method:
- Conflicts with Page builders
- Conflicts with the plugin’s functions
- Conflicts in the position of elements
- Disappeared fonts, i.e 404 error
- Blurry design elements
- Disappeared elements. Example Slider
#Limitation 5: Testing Never Ends
So even though you manage to remove all the Unused CSS of an individual webpage, the process is still not finished. You have to go through every page of your site and verify everything is fine or not. If your website styles are written based on a code splitting technique, then this verification process should not be skipped at any cost.
So, at this point, you have clearly understood why I said earlier that dealing with Unused CSS manually is not simple as its sounds. That’s why if you are a WordPress user, then the recommended approach should always be a plugin method.
But still, if you are interested in the manual method, follow the given steps below:
Fix 1: How to Remove Unused CSS Manually
Step 1: Extracting the Unused CSS Code of a Webpage
Have you made the list of the affected pages which reported an Unused CSS error? If not then please follow the “How to Identify Webpages that have Unused CSS Styles?” section of this article.
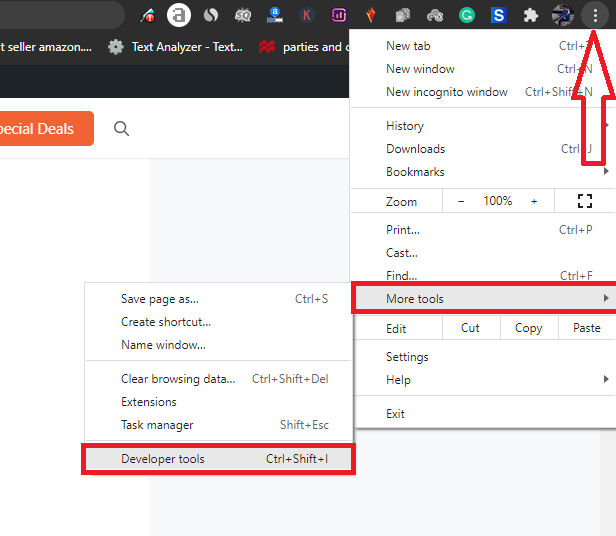
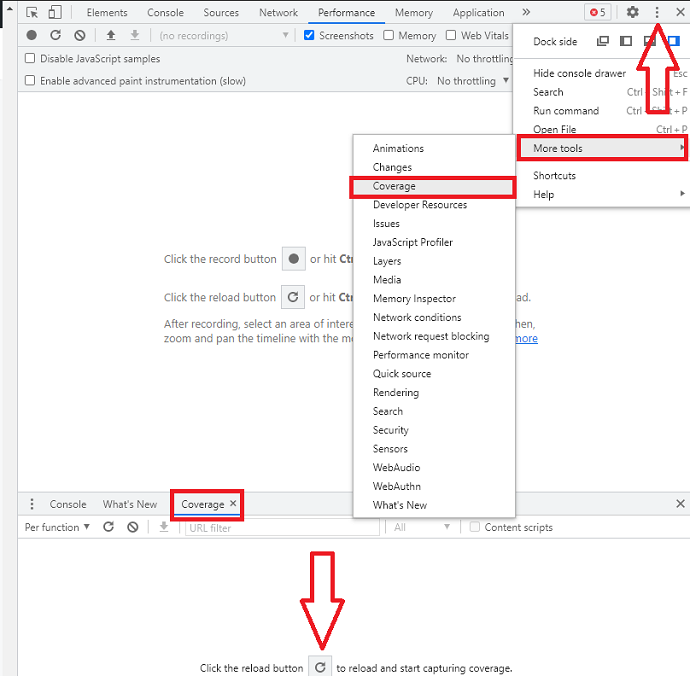
After that open up the affected web page in Google Chrome. Then from the right top of the browser, you will see 3 dots icon. Click on it and then navigate to the More tools > Developer tools section.
Now the chrome dev tools window will open. Again click on the three dots icon placed at the top right and navigate to the more tools > coverage.
This will open up the coverage tab just below the main window. After that, tap on the reload button situated in the middle of the coverage window. This will reload the page for finding the Unused CSS.
As soon as you tap the reload button, the chrome dev tools start analyzing your page for detecting Unused CSS and Javascript. All the CSS URLs with Unused percentage are shown in the coverage tab itself. In the coverage tab > Unused Bytes tab, you can see the percentage of Unused CSS.
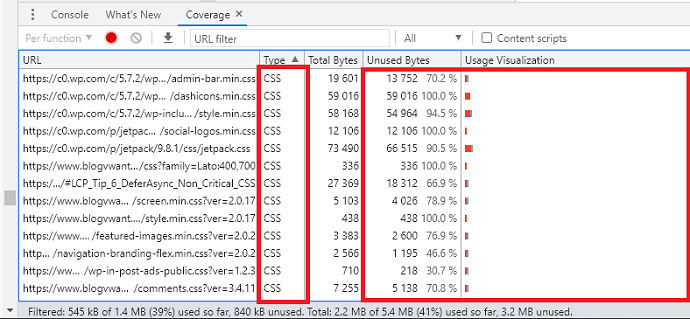
Now there are chances that an Unused CSS of a webpage may have stored in multiple files. If that’s the case you have to open all those CSS files and eliminate the unused CSS code manually. I am showing the demo for 1 CSS file reported under the coverage tab.
So in the above image, you have seen the percentage of Unused CSS associated with each CSS file.
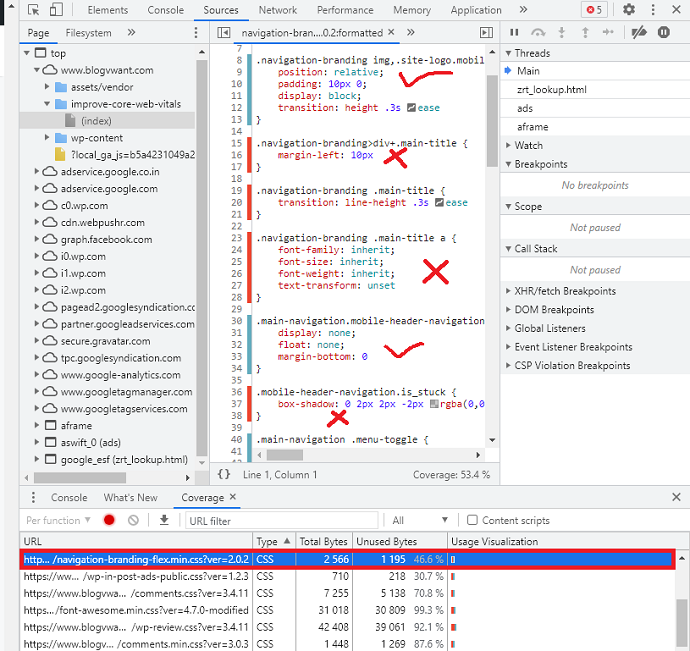
Tap on any CSS file which reports more than 0% Unused CSS in the Unused Bytes tab. As soon you tap on it, the CSS code for that file will be visible in the above window. Now open up the notepad and copy all the code labeled by the blue stripe and ignore the rest. The code marked by the red line is the Unused CSS code present in the particular CSS file. And we don’t need it. So avoid that code and only copied the blue one.
Step 2: Paste the New CSS (Used) code
So at this point, you have extracted the Used code and eliminate the Unused code of a particular CSS file of a webpage. Now it’s time to paste this new code to that same CSS file. But for this, we have to locate that CSS file in our website files.
To find the location of the CSS file, simply hover on the CSS file name shown at the top of the chrome developers window. It will display the whole file directory.
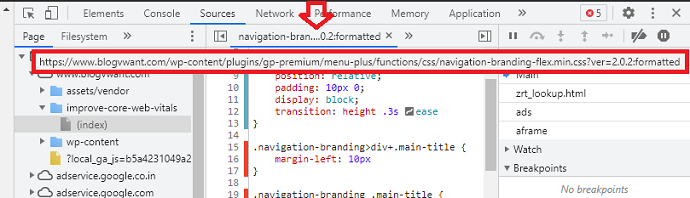
When you get the file directory of the CSS file, simply navigate to your website files either through cPanel or FTP. Open up the public HTML folder and navigate to the CSS file location. Open it, remove the existing code and then paste the new code (blue line marked) and save the file.
Make sure to remove Unused CSS code from all CSS styles linked to a particular webpage. I only showed a process of only 1 stylesheet.
Note: Before making any changes to the original CSS file make sure to download it to your PC as a backup.
So this is how you can remove the Unused CSS from a webpage manually.
The Plugin Approach for Removing Unused CSS (Recommended)
Ok, so you have failed in the manual method. Or if you are worried about your website design and do not want to implement the manual method then the only solution is left to use a WP-Rocket – World best performance plugin for WordPress.
Recently WP-Rocket introduced a “Remove Unused CSS” module for their customer’s demands. These are the following benefits you will get when you choose this approach over the manual approach:
- No need to extracting Unused CSS code manually
- Automatically deletion of Unused CSS present in all pages of a website
- Option to include selected CSS files and selectors that you want to keep as used.
- Manual Option to clear Used CSS stored in a WP-Rocket database and generate a new one. This option is useful when you make new changes in stylesheets.
- The WP-Rocket automatically regenerates the newly used CSS after every 30 days.
- Used CSS for mobile devices can be generated separately.
Fix 2: How to fix “Remove Unused CSS” with the WP-Rocket Plugin
In this, we will show you the step by step procedure to remove the unused CSS with the WP-Rocket plugin:
Total Time: 5 minutes
Step 1: Purchase and Install a WP-Rocket Plugin

WP-Rocket plugin is a paid plugin. It’s a complete site optimization solution and will help you eliminate almost every error of the Google PageSpeed and improve your site’s performance in minutes. The WP-Rocket pricing depends on the number of sites. You can choose according to your need. After purchasing, make sure to download and activate the plugin on your WordPress site.
Step 2: Enable the Remove Unused CSS Module
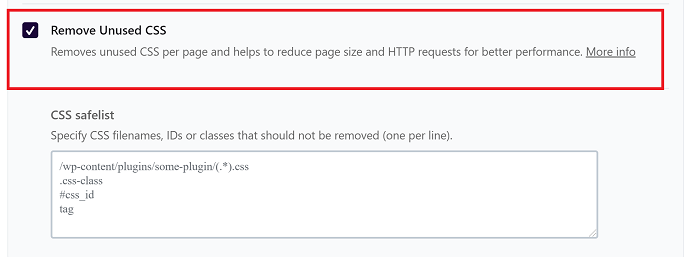
From the left WordPress sidebar, navigate to the WP-Rocket > Settings > File optimization. In this tab, you will find the Remove Unused CSS option. Just enable it and you are good to go. Under this option, the CSS Safelist option is also available to specify any CSS file or selector you don’t want to remove. So use it according to your preference or keep it blank.
Step 3: Test the Results using Google PageSpeed Tool
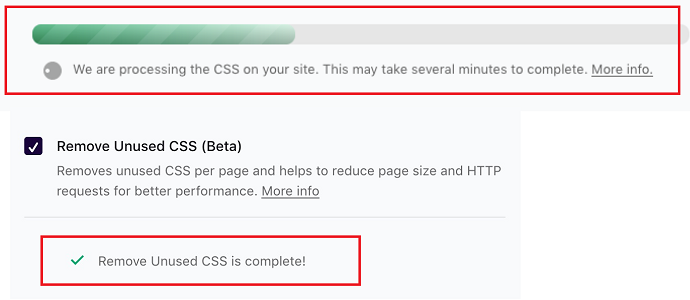
WP-Rocket takes time to finish the CSS removing process. Usually, it depends on the size of the CSS applied on the whole site. The process may take up to 30 minutes or shorter. Finally, when a process will complete, you will see the confirmation message displayed right under the WP-Rocket “Removed Unused CSS” module. At this point, you can check the results in the Google PageSpeed tool.
Note: After utilizing the benefits of the WP-Rocket “Remove Unused CSS” module it is recommended to enable the Optimize CSS delivery. This option helps you defer your site’s Non-critical CSS and make your website even more faster. The process to defer the CSS with WP-Rocket is mentioned in this section of this article.
Solution 2: Defer the Unused and Non-Critical CSS
Deferring CSS is the perfect option to deal with Unused CSS. We have mentioned 2 fixes in this section:
The first fix is the manual way of deferring the CSS. Implement this method when you get failed or face problems while removing Unused CSS manually.
The second fix for WP-Rocket plugin users and should be implemented together with the WP-Rocket “Remove Unused CSS” method we shown in the above section.
Fix 1: How to Remove Unused CSS with the Manual Defer Technique
Now you should only implement this method when you failed in the manual method of Removing Unused CSS. As I said earlier that the success ratio is less in the removing CSS approach as compared to the deferring technique.
Basically, in the defer CSS approach, we actually don’t remove the Unused CSS Code. Instead, we defer the Non-critical CSS code so it will load after the page finish rendering.
Non-critical CSS code is the code that doesn’t play any role in the rendering of the “above the fold content” of a webpage. So there is no harm to delay the execution of this CSS code.
Even Google also recommends the defer approach as a preferred option in its removing unused CSS guide to deal with Unused CSS. So you can 100% trust this method.
So the deferring process requires 3 simple steps:
- Generate the critical CSS code
- Inline the Critical CSS Code
- Defer the Non Critical CSS code
Note: Even though you defer the non-critical CSS of a webpage, there is still a chance that the “remove Unused CSS error” is shown under the PageSpeed reports. Because in reality, we don’t remove the code. However, you don’t have to take tension anymore because we already delay the execution of the Non-critical CSS code. So there would be no impact on the LCP, FID core web vital metrics, and hence on the loading speed of the page.
Note: If you do not want to involve in the manual process, simply jump to the WP-Rocket plugin method which automatically defers as well as removes the Unused CSS manually.
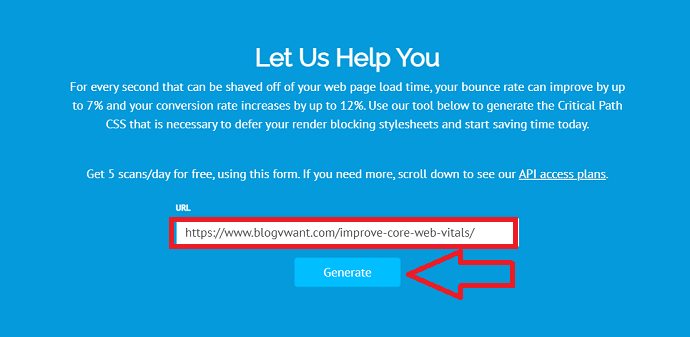
Step 1: Generate the Non Critical CSS code
Copy the URL of the page where you have found the Unused CSS and open up the critical path CSS generator website. This tool gives you 5 searches per day, so you don’t have to pay anything just enter the URL of a web page and hit the generate button. After few seconds, you will able to see your critical CSS code. Copy it.
Note: Critical CSS can also be extracted with the help of chrome developers’ tools. But it is a very time-consuming process, because a webpage CSS may have critical CSS code stored in multiple CSS files and you have to extract the Critical CSS code by going through each CSS file. That’s why we have used the critical CSS generator tool. The procedure to extract critical CSS code with developers’ tools is explained in this Google developers guide.
Step 2: Inline the Critical CSS code
Now it’s time to paste the critical CSS code we have extracted from the above step. Open up the HTML source code of your webpage and then create a <style></style> tag before the first line inside the <head> region of the page. Then paste the copied critical CSS code between the <style></style> tag. The syntax of the style tag is:
<style type="text/css">
//paste the crtical CSS code here
</style>
Then save the file.
Step 3: Defer the Non-critical CSS code
Now the work is not finished yet. At this point, we have inline the critical CSS code. Now it’s time to defer the rest non-critical CSS code (which also includes Unused CSS code).
First, analyze your web page in the Google PageSpeed tool and collect all the CSS style URLs mentioned under the “Remove Unused CSS” and “Eliminate Render Blocking Resources” sections. These CSS styles need to be deferred.
The process is simple, you just need to enter few lines of code in the footer section of the page. Follow this pattern to load non-critical CSS code asynchronously.
<link rel="preload" href="styles.css" as="style" onload="this.onload=null;this.rel='stylesheet'">
<noscript><link rel="stylesheet" href="styles.css"></noscript>
Note: Replace the CSS path in the href attribute accordingly.
The above code is only for 1 stylesheet of a webpage. If you find multiple CSS files URLs under the “Remove Unused CSS” and “Eliminate Render Blocking Resources” section then you have to repeat the code and link to all CSS files of a webpage.
The complete explanation of the above code is mentioned in this Google dev guide.
After deferring the CSS, the Unused CSS code will not interfere in page loading and hence the webpage performance won’t be affected.
Fix 2: How to defer the Unused and Non-Critical CSS with WP-Rocket Plugin (Recommended)
Note: This method should be implemented just after the process of removing unused CSS with the WP-Rocket plugin. If you skip the previous step, make sure to complete it first from the previous WP Rocket of this article.
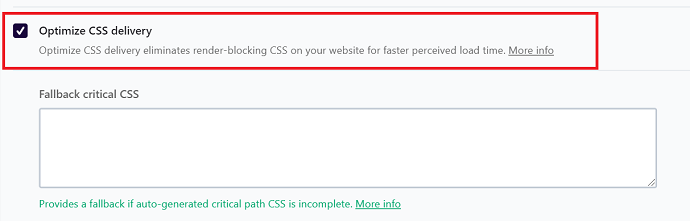
So with the WP-Rocket plugin, you can defer the non-critical CSS in just a single click. This will also help you to eliminate the CSS which blocks the rendering of the page.
Just navigate to the WP-Rocket > Settings > File optimization tab and enable the “optimize CSS delivery” option and you are done.
Conclusion
So today we have covered a lot about Unused CSS. We have talked about the reasons for eliminating it, the solutions to deal with it, and much more. The final method to be chosen for removing Unused CSS is the main confusion you may still have in your mind.
Based on the people’s opinions roaming on the internet about Unused CSS, we have found that the manual process of removing Unused CSS is extremely time-consuming and comparably less successful than the plugin approach. Because in manual approach, it is very difficult to detect Unused CSS that is injecting through javascript or dynamically. This is the main reason of failure here.
But still, if you want to deal with Unused CSS without a plugin we suggest go with a manual CSS defer method. It will not break your site design at least. Instead, it improves the site performance. But again this is a time-consuming process.
WP-Rocket is still the most preferable option for those who care for their site and don’t want to waste the crucial time in dealing with site audit tasks. With the WP-Rocket plugin, you have more control of both current Unused CSS and future Unused CSS of your website. And it not just removes the Unused CSS but also gives your site an extra performance boost by automatically deferring the Non-Critical CSS code.
So in a nutshell, when you remove as well as defer the unnecessary CSS code the following errors will be gone from a Google PageSpeed tool: “Remove the Unused CSS” and “Eliminate the render-blocking resources”
I strongly believe that this article, How to Fix “Remove Unused CSS”, helps you to eliminate the Remove Unused CSS error shown in the Google PageSpeed Insights tool. If you like this article, please share it with your friends. If you want more blogging tips, follow BlogVwant on Facebook, Twitter, and YouTube.
FAQ: How to Fix “Remove Unused CSS”
After removing the Unused CSS with the WP-Rocket plugin, will the error of Unused CSS go from Google PageSpeed Insights?
Yes. But make sure to enable both modules in the WP-Rocket plugin: Remove the Unused CSS and Optimize CSS delivery.
Should I need to create a backup of my website?
With the manual methods, it is compulsory. However, with the WP-Rocket plugin, the chances of crashes are very less. But still, you can create it for the exceptions.
How much WP-Rocket costs?
$49 for 1 website annually.
Does WP-Rocket take care of all future Unused CSS errors?
Yes, WP-Rocket constantly monitors your site and will remove all unused CSS from new pages of your site automatically.
Is there any other free plugin available that removes the Unused CSS?
Yes, you can use the Asset clean-up plugin but the configuration is difficult and most features are available in the pro version. Further, you have to install another site optimization along with it because you will not find extra features including lazy loading, caching, prefetching, etc as compared to WP-Rocket.
What is the difference between removing and deferring the Unused CSS code?
Removing CSS means you deleting the Unused CSS code from your website which may cause a problem in the design. The deferring process works differently. In this, we defer the Non-used CSS code and instruct the browser to load this code after the page is rendered completely.