
Have you been wondering about what core web vitals are and How they would impact the website? Do you want to know how you can improve core web vitals reports of your site? Well, you have landed in the perfect place. In this article, we will be clearing all queries related to Core Web Vitals and lastly, we will show you a practical approach to optimize the core web vitals of your WordPress website.
This is going to be the most comprehensive and easy-to-understand guide on core web vitals you ever saw on the internet. I highly recommend you to bookmark this post because it will always help you to improve core web vitals metrics (CLS, FID, LCP) errors of your website.
To save time, you can skip the whole article and directly jump to the conclusion where we have suggested 2 solutions to improve all core web vital metrics.
What are Core Web Vitals?
In simple words, Core Web Vitals are the set of metrics Google has been using to measure the user experience of the website. As of June 2021, Google is going to consider core web vitals along with other page experience factors as a ranking signal.
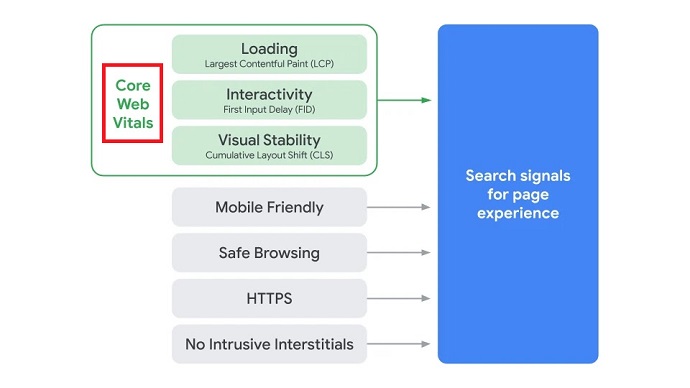
Although there are several metrics or factors are available which determine the overall page experience of the web page, but under Core Web Vitals, you will find these three main metrics:
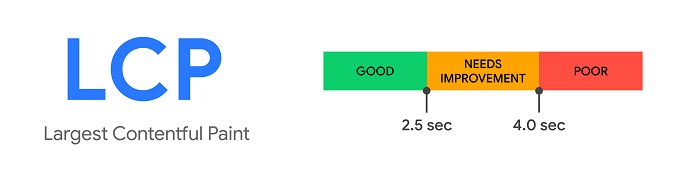
Largest Contentful Paint (LCP):
This core web vital measures the time a web page takes to load or render its main content (largest element) on the device viewport or screen. A web page should aim to load the main content within 2.5 seconds in order to score a good LCP.
Consider this example given by Google to understand the concept of LCP:
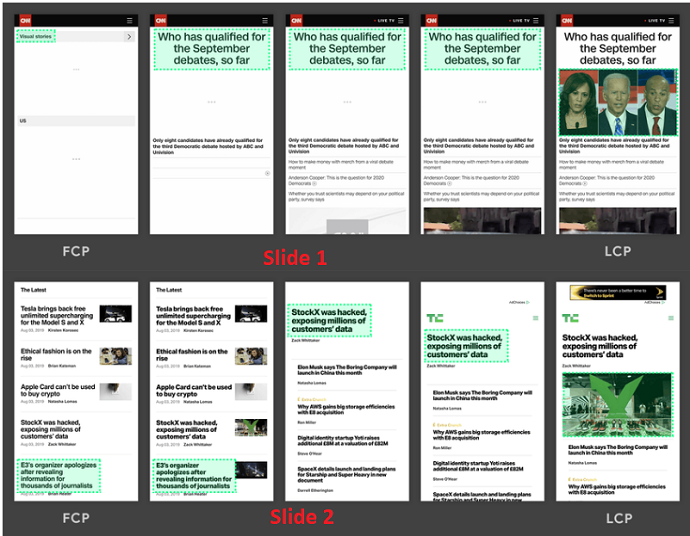
In the above example, two slides are there, basically, this is how a Google Page Speed or browser loads your website page when requested. In both slides, you would notice that the largest content has been changing continuously as the content is loading.
In slide 1 the new content has been adding to the DOM according to the server speed and this will also change the largest content. For example, first, the largest element on the web page is the top heading but as soon as the image loads the tag of the largest content would be given to the image, and hence that image is considered as the largest element of this webpage.
The time a web page took to load its largest element is defined as your LCP score.
In slide 2, Google trying to show that page scrolling or moment in the page layout also changes the largest element accordingly. With this regards, you must have optimized your whole web page in order to get a good LCP score
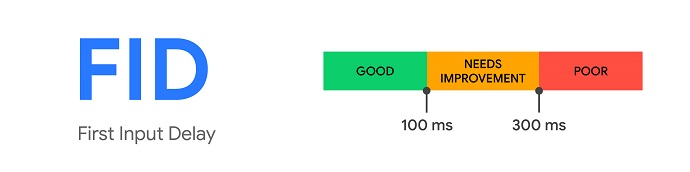
First Input Delay (FID):
This is the second core web vital which measures the time a web page takes to paint the first image or text on the device viewport or in other words the time when users are allowed to interact with your web page. According to Google, a web page should become interactive in less than 100 milliseconds to get a good FID score.
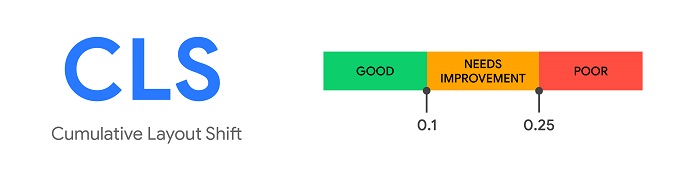
Cumulative Layout Shift (CLS):
CLS measures web page stability or in other words, it measures how much elements of a web page move or shift as the page loads. A web page should maintain or score less than 0.1 CLS to provide a good user experience. Each time a layout shift occurs without user interaction would be counted under CLS.
Some of the bad CLS examples are: when you reading something on the website and suddenly you lost your place or the web page scrolls automatically, when you click on a link but ended up on another link etc. Such type of shift in page layout leads to a bad user experience and hence impacts badly on the CLS score.
In the below example, Google demonstrated how the bad layout or elements unwanted moments affect the layout and hence page and user experience
To find out what causes a bad CLS score and how to improve the CLS score, keep reading. We will discuss this shortly.
Apart from these Core Web Vitals, you should also consider improving other web vitals like:
- First Contentful Paint (FCP): which measures how much time a web page takes to start rendering the first content on the viewport or device screen.
- Time to Interactive (TTI): which measures how long a web page takes to become fully interactive.
- Total Blocking Time (TBT): which measures the time difference between FCP and TTI.
Why Should You Improve Core Web Vitals?
After going through the above section, you should understand the meaning and concept of Core Web Vitals. But have you ever wondered, why measuring the Core web vitals is important for your site? How does the low or good core web vitals score have impacted your site?
The main reasons to improve core web vitals are:
For Better User Experience:
Imagine a user comes on your site and due to the slow loading speed of your web page, he goes away without actually reading a single line of your content. The whole point of making a website or content became meaningless. But as soon as you take action to measure and improve the core web vitals of your web page, users will start spending time on your website and also take action on your site. By improving the page experience you not only delight the users but also boosting your conversions.
For Better Search Engine Rankings:
Your site may have the best content in the world for a particular query or you might have been successful in creating hundreds of backlinks for your website, but still, the Page experience or user experience contributes much more than any ranking factor in the search engine rankings.
Page experience algorithm consists of a lot of factors like website speed, website responsiveness, loading speed, bounce rate, safe browsing, mobile-friendliness, etc. Core web vitals metrics are going to be a part of them, so as a website owner you should take care of all Page experience factors.
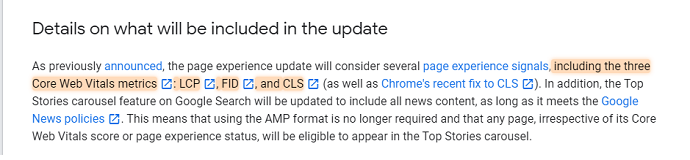
To Get Eligible for Google Top Stories
Well, there is good news for media and news-related websites, Google has been stated that they are going to consider Page experience or in other words, core web vital metrics to determine the eligibility of website content to appear in a top stories snippet in mobile searches. They will no more consider AMP as an eligible ranking factor for Google Top stories. So from now onwards, news website publishers should be focusing on improving the core web vitals of a website rather than involving in a mess of AMP.
To Figure Out the Problems Affecting Webpage Loading, Interactivity, and Stability
Well, the main goal of Google behind the development of Core web vitals is to let publishers know about their website page condition in terms of loading, interaction, and stability aspects. With the help of core web vitals metrics, website owners will debug the ongoing technical problems that are affecting these 3 factors and take necessary steps to improve the page experience of their websites.
With the help of these core web vital metrics, you can identify the problems that impact the user experience of your site and take necessary actions.
Infact, Google already confirmed that they are going to consider core web vitals reports and other page experience reports from this upcoming June as a ranking factor.
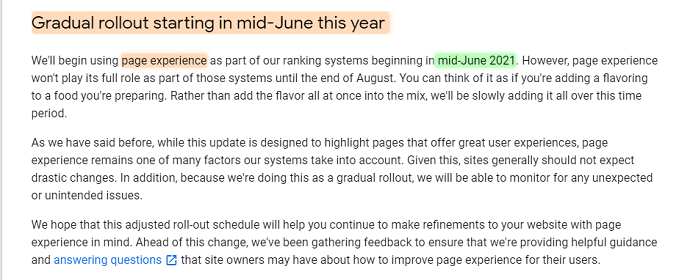
Update: As per the latest update, Google has declared that the Page experience update will complete by the end of August 2021. So users still have time to work upon improving the core web vitals of the website.

How Core Web Vitals Affect Google Algorithms
Part of Page Experience Ranking Signals:
As I mentioned in the above section, that Core Web Vitals is going to be part of Page experience ranking signals which already included other signals Mobile-friendliness, Safe browsing, etc. Somehow if you manage to improve other page experience factors but still Core web vitals matrices hold a larger percentage. So if your webpage LCP, FID, and CLS metrics scored poor, the page experience ranking algorithm affects and hence website ranking.
Extra Ranking Weightage:
Sometimes multiple websites have published 80-100% similar content for a particular search query. For example, suppose a user searches for “Opposite word Synonym” in Google, Now almost every website under the search result has the same content. In such cases, Google gives extra ranking weightage to sites whose page experience algorithm signals (including core web vitals metrics) scored better.
The Bounce Rate of a Webpage will Affect
As per the John Mueller Google Chrome Dev Summit Sessions, When a page experience is good, Users are 24% less likely to bounce back before the first content is painted. As a result, the bounce rate reduces, and search ranking improves. The LCP and FID metrics indicate to Google how fast a web page loads or in other words the overall user experience with a page. If your page loads faster, the user tends to spend more time on a web page and less likely to bounce back. Google algorithm will consider this signal as a positive factor and hence give your website a hike in a search ranking position.
What are the best ways to Improve Core Web Vitals?
The process of improving core web vitals is basically divided into 2 parts: Measuring and Improving.
In this section first, we introduce you to the 2 best measuring tools from which you can discover any issues and errors that are impacting the core web vitals of your webpage then we will go in deep to analyze how you can improve LCP Score, FID Score, and CLS score by giving solution to every possible error.
Methods to Measuring Core Web Vitals
The ultimate goal of yours’s by measuring the core web vitals is to identify the cause and opportunity to resolve the core web vital errors .
According to our research, we have found that these are the best ways to measuring core web vitals:
- Using Google Dev Tools
- Using MonsterInsights Plugin Speed Reports (Recommended and Easiest)
Note: In the next section, you will see the practical steps to measuring Core Web Vitals with the help of the MonsterInsights plugin.
Using Google Dev Tools
There are tons of tools available in the market for this task. Even Google has its own set of dev tools for measuring core web vitals including Page Speed Insights, Chrome UX report, Search Console, Chrome Dev Tools, Lighthouse, and Web Vitals Extension.
The major advantage a user gets while measuring Core Web Vitals with any of the Google Dev tools is that they don’t have to pay anything for that. However, the main problem with these tools is that they are best for web developers not for users who don’t have knowledge of how the back end of your website works.
The solutions or the suggestions recommended by Google Dev tools to improve the core web vitals are complicated. WordPress users may face problems while implementing suggestions provided by the Google Dev Tools.
Also, users have to insert all URLs of the website to gather audit reports which are very time-consuming. This can be a lot easier with the case of the MonsterInsights plugin.
In a nutshell, Google Dev tools are best for measuring the site speed performance or core web vital report of the website but the solutions recommended by them are hard to implement.
Let me show you with the help of an example:
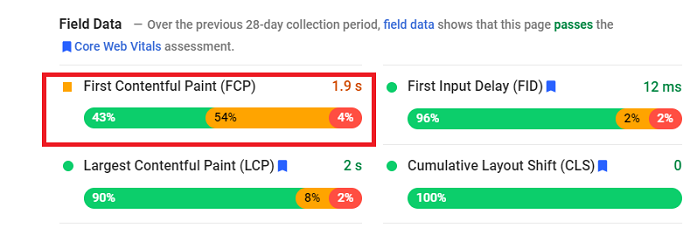
Suppose I wanted to check my Core Web Vital report with the Google PageSpeed Insights tool, so I ran an audit on a webpage and it shows 54% FCP (First Contentful Paint). To improve the score of this web vital report, the Google PageSpeed tool suggests different solutions. You can find them under their opportunity section.
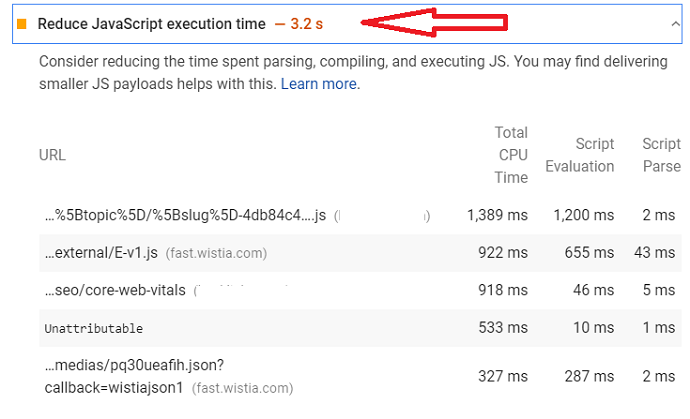
The solutions suggested by this tool are hard to implement. For example, you can see in the 2nd screenshot that one of the solutions this tool suggested is “Reduce JavaScript execution time”. And under that, it mentioned all unnecessary scripts that cause the problem at page speed and increasing the FCP (web vital) time.
But how would you implement this suggestion? If you tap on the “learn more” button, Google recommends a few solutions which are again best for Non-WordPress users or web developers.
For WordPress users, we highly recommend the next method to measure core web vitals.
Using MonsterInsights Speed Reports
MonsterInsights is the WordPress Analytics Plugin basically used for extracting a different kind of reports in a much easier way than you have normally seen in Google Analytics. With this plugin, you can extract reports like Pageviews, website speed reports, Bounce rate, Traffic source, Top Posts/Pages, etc. Further, this plugin is also used for implementing different types of tracking on your site without coding.
Well when we talk about core web vitals, MonsterInsights recently released a new feature called Site Speed Report which not only measures but also helps you to improve core web vitals report of your site.
The main advantage of MonsterInsights Speed reports that it automatically audits your website pages regularly, offers a goal for each metric, and gives you complete details on how you can improve core web vitals as well as the performance of your website.
The suggestions recommended by the MonsterInsights Speed Reports are clear and easy to implement, unlike Google Dev tools.
Let’s see the live demo to enable MonsterInsights Speed Reports on your WordPress website and improve core web vitals.
How to Measure and Improve Core Web Vitals with MonsterInsights Speed Report
In this section, you will learn how you can audit and improve core web vitals issues with the help of the MonsterInsights Speed Report.
Total Time: 5 minutes
Step 1: Purchase MonsterInsights Pro Plugin and Install on your Website
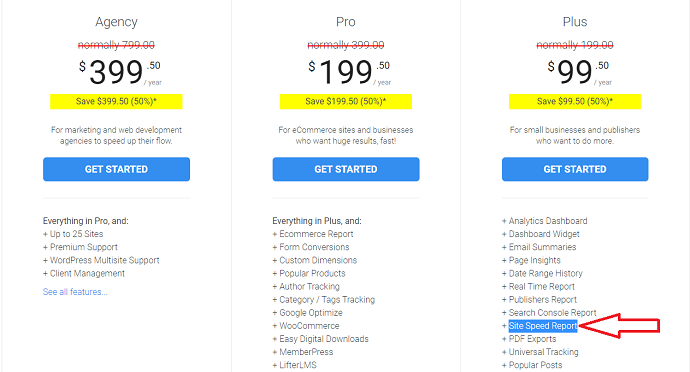
Although MonsterInsights is also available in a free version but for the Site Speed Report feature, you will require its paid plugin. There are 3 plans available: Plus, Pro & Agency. Choose accordingly. After making the payment, download the plugin then upload and install it to your WordPress website.
Step 2: Navigate to Site Speed Report
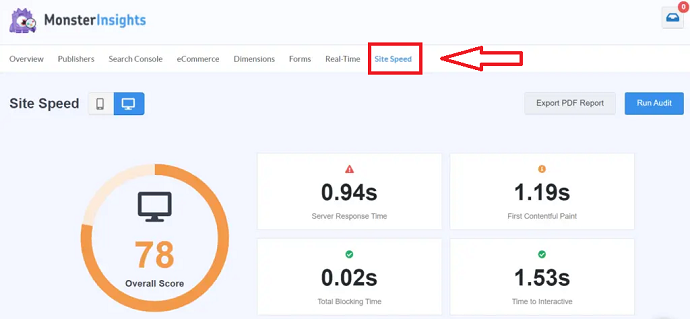
After the plugin activation, from the WordPress dashboard navigate to Insights > Site Speed. Here you will see your overall website performance report which also covers Core web vital reports. You can also export this report in PDF format.
Step 3: Improve Core Web Vitals and Other Performance Issues
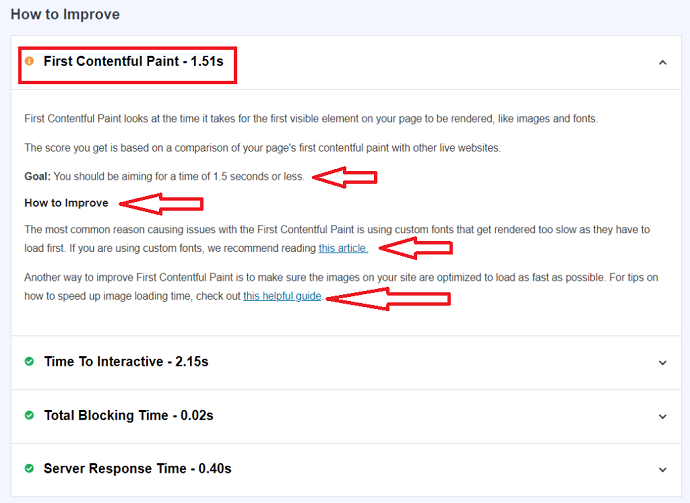
On the same page, you will see the suggestions recommended by the MonsterInsights speed report to improve website performance. Also, MonsterInsights offers you a goal for each metric which you should aim for while resolving the issues.
For example, As you can see in the screenshot, the Site Speed Reports detected an issue in the First Contentful Paint web vital metrics and under that, the easy to implement instructions are also mentioned.
Methods to Fix CLS Issue: More than 0.25
Video Tutorial: How to Fix CLS Issues – More than 0.25 (Core Web Vitals Series – Part 1)
For the reader’s convenience, we always create a video tutorial. Either you can watch and learn or simply skip the video and continue with the steps mentioned afterward.
Has your webpage scored more than 0.1 or 0.25? Well if the CLS score exceeds 0.25 then you should implement a necessary solution. Although, there could be lots of reasons for the high CLS score, but we are trying to give you the solution for every possible reason.
I hope at this point you have figured out the reason for bad CLS by measured out your web page core web vital with any of the methods explained in the core web vital measuring section. Now let’s check out the solutions or methods to fix the CLS Issues.
The list of top reasons that affect the webpage CLS score are:
- Missing Image dimensions
- Adding or loading of elements dynamically above the fold
- Web Fonts
- Ad widget unexpected moment
- Unreserved Embeds dimensions
- Bad Animations
CLS Issue 1: Missing Image Dimensions
Are you facing this error “Image elements do not have explicit width and height” when measuring the core web vitals of your web page in Google Page Speed?
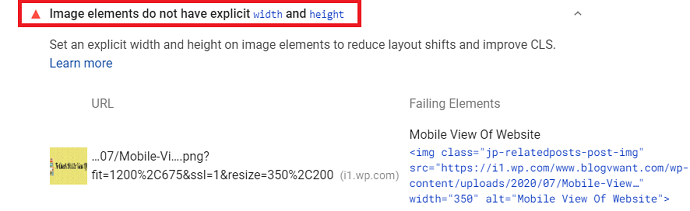
This is happening because some of the images/videos used on your website are missing the size attribute and their size is usually controlled by the CSS code dynamically. When there is no width and height is defined explicitly, the browser could not able reserve the space for such elements. At the moment such images or videos load, the other elements of a web page like HTML text or CSS shift upwards or downwards, leading to a bad page experience and impacting the CLS score.
CLS Fix 1: How to Add Missing Image and Video Dimensions Manually
Well if you are a non WordPress user or you know about web development then this method would be best suited for you. With the Google Page Speed core web vital report, you can able to find the image name that does not have the width and height mentioned.
After finding the name of such images and videos, you need to edit the HTML code of the web page. And then add the missing pixel dimensions to the image height and width like this:
<img src=”image_name.png” width=”500″ height=”500″ alt=”myimage”>
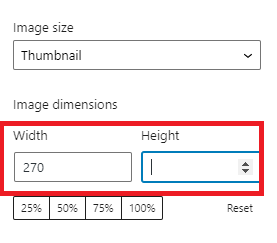
Well if you are a WordPress user and want to add missing dimensions manually simply open up the post/page in an edit mode and tap on the image and from the right enter the missing height or width.
CLS Fix 2: How to Add Missing Image and Videos Dimensions Automatically
Well, for those who are lazy or don’t want to waste their time on fixing the missing dimension of the images one by one, then a plugin like WP-Rocket could be the best approach for them. It will save a huge time and further prevents all the future CLS shift issues related to missing image dimensions.
Basically, WP-Rocket is the world’s best site performance optimization plugin for WordPress. They have tons of features like caching, file optimization, CDN, lazy loading, compression support, etc. Even major bloggers recommend this plugin as their first choice when we talk about the site optimization
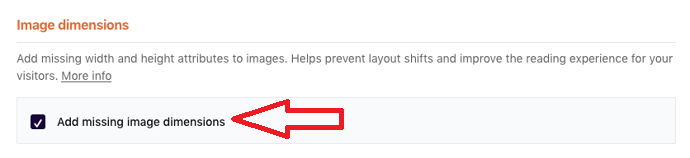
By installing this plugin, your site won’t be facing any issue related to missing image dimensions because WP-Rocket.net will take care of this automatically. It will add missing height and width attributes as soon as your website page starts loading.
You just need to enable the “Add missing image dimensions” module located under the Media tab and you are good to go.
CLS Issue 2: Adding or loading of elements dynamically above the fold
Google has clearly mentioned in their CLS optimization guide, that a webpage should avoid any elements that would load unexpectedly above the fold or in other words above the existed content.
This is mostly seen in a website where a publisher adds some kind of banner, pop-up, or sticky bar in the header or uses ads on a website. Such types of elements are appearing dynamically and hence causing a shift to the position of the below elements.
How to Fix this CLS issue: Adding or Loading of Elements Dynamically above the Fold
Well, the only way to fix this issue is to either load such dynamic elements below the fold or you must have defined or reserved a space for those elements (if you still want them to appear at the top of the content).
With the core web vitals measuring tools, you can identify the element or scripts which cause a shift in the CLS. However, the process of removing or shifting such elements below the fold (or existed content) is varied and depends on the element itself.
Non-Plugin Approach:
If you used any plugin to add banners or popup, then consider change its settings or remove the plugin itself. Else you may need to edit the website code to change the position of that element in order to shift that problematic element below the fold. This can be a tricker and if you are a beginner in web development, you should take the help of a web developer to resolve this task, otherwise, you could end up breaking your site. Sites like Fiverr could hook you up with cheap web development services starting from just $5.
Plugin Approach
Luckily if you are a WordPress user and you prefer plugins over manual optimization, then WP-Rocket could resolve this problem. With this site optimization plugin, you cannot move the dynamic content below the fold.
However, you can control or delay the appearance of such dynamic injected content.
With the WP-Rocket Delay Javascript Execution feature, you can delay all those scripts that are injected dynamically above the fold until user interaction. By doing this the CLS of your webpage won’t be impacted, because as per the Google Core Web Vitals guidelines, only those layout shifts are counted which occurs before the user interaction.
The process to delay all those dynamic content scripts that appearing above the fold and causing the CLS are as follows:
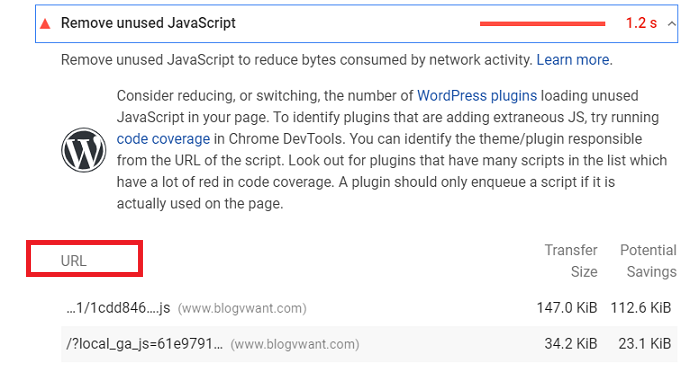
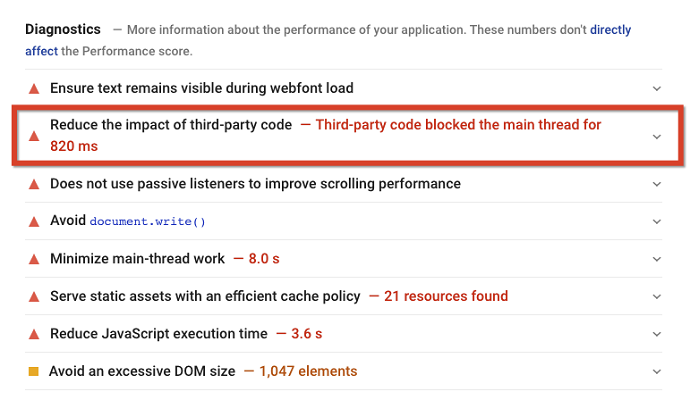
First, you have to gather all those problematic scripts from the Google Page Speed that are currently appearing above the fold. Well, check these sections of Google Page Speed for finding such scripts:
- Reduce JavaScript Execution time
- Reduce the impact of 3rd party code
- Remove Unused JavaScript
On my website, these scripts causing the problem and impacting the CLS score of my website.
Then simply (purchase and) install the WP-Rocket plugin on your website. Navigate to the Delay JS execution module and enable it. Then insert the URLs of all those scripts which has been injecting dynamically and save settings. (Check Google Page Speed)
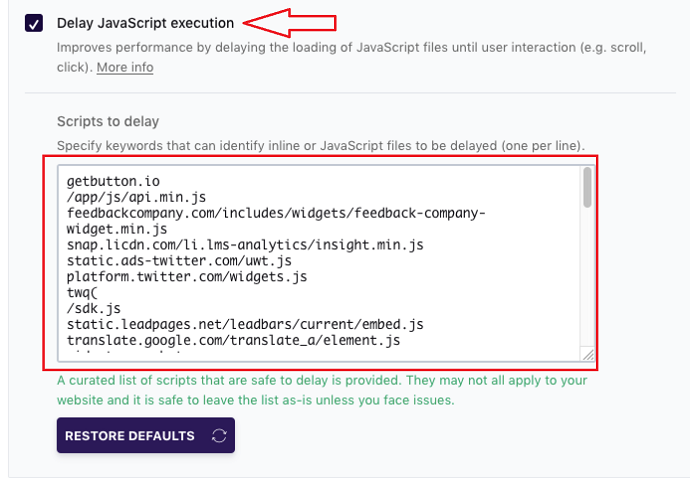
Now all those scripts you have put above will be delayed and only execute when there is a user interaction occur on the page.
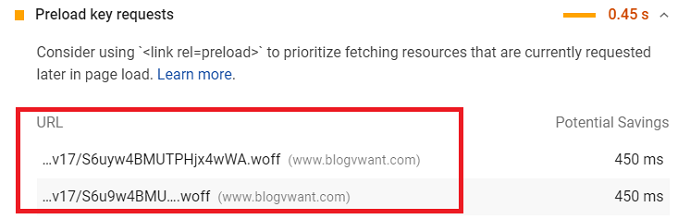
CLS Issue 3: Web Fonts
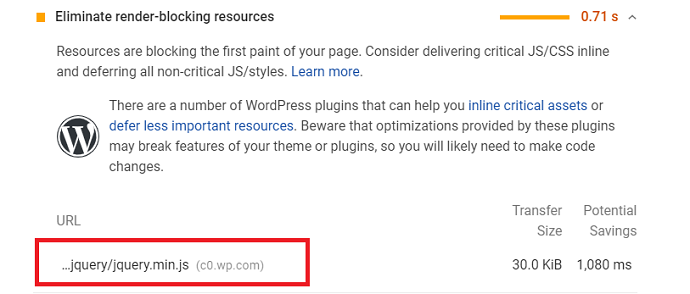
Well, if your site is using fonts hosted from another site for example Google Fonts, then this might be impacting the CLS score of your site and also increasing the blocking time of the page (see image).

Let me explain to you in simple words:
Suppose your website theme uses fonts that are hosted on a third-party server, then whenever someone opens your website page the browser takes time to download that font from the server. The time required will depend on the speed of your font hosting server.
During this time, all those elements that using that hosted font will be hidden (FOIT), and the browser shows a fallback font or unstyled text which is defined in the CSS file (FOUT)
FOIT: Flash of invisible text
FOUT: Flash of unstyled text
As soon as the hosted fonts are downloaded, the browser will replace these fallback fonts with them and it may cause CLS shift because of the font size difference.
By applying the rel=preload attribute, you can force the browsers to download such fonts as a priority, or in other words, browsers will download such resources in the early phase of the page lifecycle.
Even Google Page Speed suggests you apply preload on all those high-priority resources that should be served as soon as possible.
CLS Fix 1: How to Fix the issue of Online Hosted Fonts Manually
Well, if you like the manual coding approach then this solution is for you. Suppose the fonts are hosted from Google fonts servers, then you will find the link of the google fonts stored in the header.php file of your website.
I would suggest you to take a backup of the website before making any changes to the header.php file
If you are a WordPress user, you can find the header.php file by navigating to the Appearance > Theme editor > Header.php.
You will probably see the Google font’s script in the header.php file similar to this:
<link href="https://fonts.googleapis.com/css?family=Roboto" rel="stylesheet">Now we just need to add a rel=preload attribute and link back to the CSS file. After that it looks like this:
<link href="https://fonts.googleapis.com/css?family=Roboto" rel="preload" as="style" onload="this.rel='stylesheet'">Note: This hack might not work if you are using page builders. In that case, you first need to disable google fonts which are enabled by default and then apply the rel=preload.
CLS Fix 2: How to Fix the issue of Online Hosted Fonts Automatically
Well, those who don’t want to involve in a manual coding mess, can take the help of a plugin like WP-Rocket. As I already discussed this site optimization plugin in the above section, you will be glad to know that WP-Rocket.net also helps you to resolve font-related errors.
Whether you want to optimize Google-hosted fonts or self domain hosted fonts WP-Rocket got you covered.
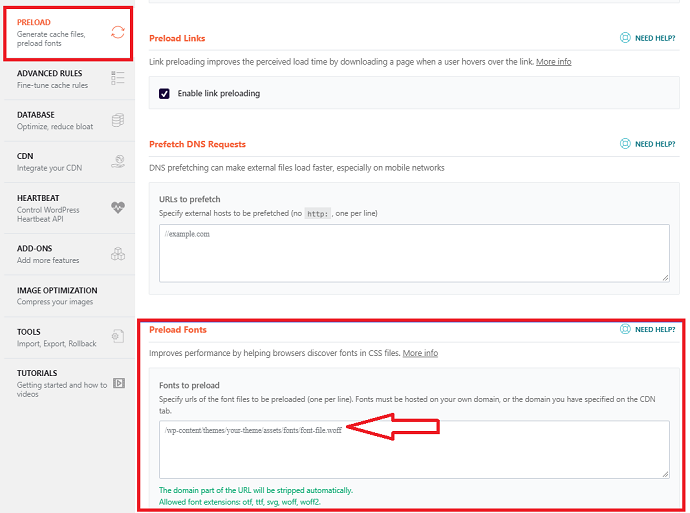
When you want to optimize self-hosted fonts and improve the core web vital score of your site, you can take the help of the WP-Rocket preload module. The steps to enable preloading on self-hosted fonts with WP-Rocket is very easy:
First simply copy the link of the fonts shown in the Google Page Speed Core web vital report, then paste it into the “fonts to preload” section. You will find this section under the Preload tab.
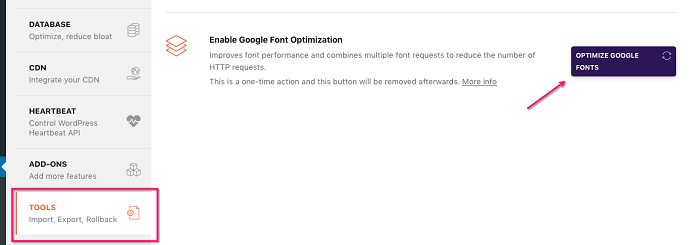
When you want to optimize Google fonts simply, install this plugin on your website and navigate to the Tools tab and then enable the Google font optimization module.
CLS Issue 4: Ad Widget Unexpected Moment
Are you using Ads on your website? Then you may feel bad by knowing the fact that ads are one of the major elements that cause a bad shift in the website layout.
In today’s world of advertising, almost every ad network using dynamic ads, and due to this, we could not define a fixed space for ads. The size of ads served totally depends on the ad network.
Due to this, you cannot specify a fixed size for the ad widget on our website.
Since ads are hosted on other server’s we cannot control the ads text, graphics, etc directly, and hence there is no chance to eliminate the complete effect of ads on the CLS, however, we can reduce or minimize it with the help of these tips mentioned below:
How to Fix this CLS Issue: Ad Widget Unexpected Moment
- Reserved as much space as you could for the ads on your website. You can get information about the maximum ad size (dimension) from the ad network website itself. Or you can also use the historical ad data to determine the most served ad size.
- Define fallback images to replace the ad widget area when ads don’t appear on the website. This way the area where ads are supposed to appear won’t collapse and the layout will not affect.
- Make sure that your website ads loads upon user scroll within 0.5 seconds, because as per the Google core web vital guidelines, the layout shift occurs by the user input such as tap, touch, click, etc within 0.5 seconds are negligible or in other words, it would not affect the CLS score of the website.
Now you may wonder…how would I load my website ads within 0.5 seconds?
The answer is simple: use the fastest hosting like Rocket.net, do not use slideshows, optimize images, optimize javascript, optimize main thread, etc.
Note: Whatever ad network you are using for serving ads, the website speed will suffer for sure. If you are using shared hosting, consider upgrading your hosting provider to a hosting provider which has built-in CDN like Rocket.net
Even if we are using Rocket.net hosting on this site with the running ads, have you experience any issue with loading speed? I am sure, you did not. This is the power of Rocket.net hosting.
- The best alternative approach in place of upgrading web hosting is to use a plugin like WP-Rocket. As we already discussed in the CLS issue 2 section that WP-Rocket helps in delaying all those scripts until user interaction which is injecting dynamically above the fold. Gladly Google ads script is one of them. WP-Rocket automatically delays the execution of the Google ads script. No manual actions are needed. Apart from this if your website running ads served through other ads networks then you can manually insert links of those scripts under the “Scripts to delay” box available inside WP-Rocket.
The other great advantage of this WP-Rocket plugin approach, that you don’t have to manually reserve a space for the ads to protect the CLS score, because all ads script would be executed after user interaction and hence they wouldn’t be counted under a layout shift.
CLS Issue 5: Unreserved Embeds Dimensions
Have you often using YouTube videos, Maps, social media posts, or other third-party elements on your website? Then, you have definitely aware of the embeds feature available in the WordPress editor.
Well, most of the embeds will be load on the website in the following forms including iFrames, inline HTML Code, or JS tag with HTML fallback.
The problem with Embeds that the browser doesn’t know what embeds is supposed to contain until they are requesting from the server. It could be a YouTube video, GPS Maps, Facebook Post, Instagram Story, and whatnot.
Due to this, a browser can’t reserve an exact size for embeds. And this leads to a shift in Layout and hence impacted the CLS core web vital of your website.
Let’s understand with the example given by Google:
Unlike Ads, We have full control over the type of embeds added to the website and that’s why we could able to determine the dimensions of the embeds and reserve the space for them.
When we have this information, we can easily adjust or style the height of the placeholder accordingly. With this approach, you can eliminate the unnecessary layout shifts causing by embeddable widgets.
How to Fix this CLS issue: Unreserved Embeds Dimensions
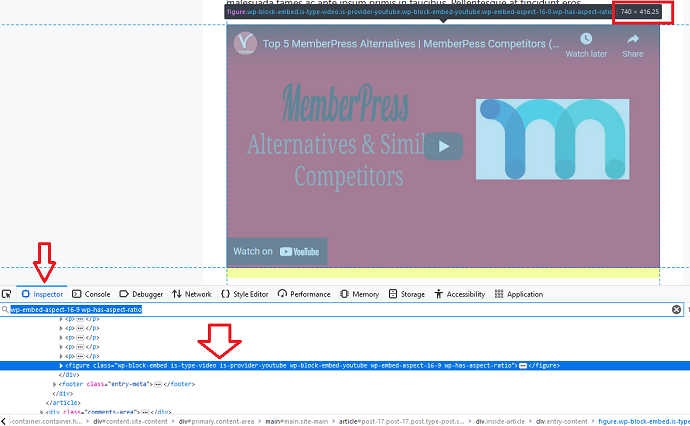
To define or reserve the required space of the Embeds we want on our website, first, we have to actually add or load them into our website. For demo purposes, I am going to embed a YouTube video through the WordPress Gutenberg editor.
Simply open up any post where you want to embed a YouTube video and tap on the add block (+) button and choose YouTube/Embed. After that insert the URL of the video which you want to embed.
Then preview the page, now we have to determine the final height of this YouTube embed.
For this right-click on the browser and choose Inspect. I am using Mozilla, but it could also be done on Google Chrome. On the inspect window you need to search the “Embed” word, Or simply hover on the HTML code until the YouTube Embed frame or container is highlighted. Note down the height dimensions of the YouTube embed block.
In our case the maximum height a YouTube embed will require to load perfectly is 416.25 pixels.
Now with the help of CSS, you can reserve the correct height for the embed box. To apply a CSS style to the embed block of our website, either edit the CSS stylesheet file of your website or insert the CSS code in the “Additional CSS” box. Navigate to Appearance > Customize then you will find this Additional CSS tab.
Before adding a CSS code to the embed box, first, we need to find its class name. The process is the same. Open the inspect window, hover on the embed iFrame to get the class name. Once you find the CSS class name for the Embed wrapper/block, enter the below CSS code.
The CSS code to define the fixed height for the embed block is mentioned below:
.wp-block-embed__wrapper{
	height:416.25px;
}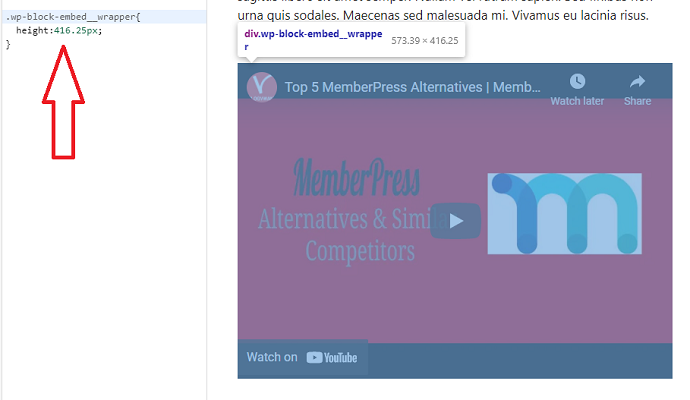
Note: Replace the class name of the Embed box. This might be different on your website. Also, change the height dimension according to the type of Embed you want to reserve the space for on your website.
After this procedure whenever the embeds load on your website, the container or the embed block of your website will be resized to the fit size automatically according to the dimensions of the embedded content. As a result, the layout or the CLS score of your website won’t be impacted.
CLS Issue 6: Bad Animations
Animation isn’t bad. The way you present on your website might be bad. If the animations appeared in a way that shifts the content unexpectedly then both user experience and CLS score would be impacted. Google doesn’t like that, they clearly mentioned in their CLS optimization guide that animations should be move naturally from one position to the next on the page.
Note that there might be a layout shift because of user interaction with such animated elements. In those cases, you don’t have to worry. They wouldn’t be counted in a bad CLS score.

How to Fix this CLS Issue: Bad Animations
The hack is simple, you just need to use the CSS transform property for animating elements. With the transform property, the layout won’t be shifted at any cost. Avoid moving or animating elements with changing height and width properties.
Tips to Fix LCP issue: Longer than 4s
Video Tutorial: How to Fix LCP Issues: Longer than 4 Seconds (Core Web Vital Series – Part 2)
For the reader’s convenience, we always create a video tutorial. Either you can watch and learn or simply skip the video and continue with the steps mentioned afterward.
Has your webpage reported LCP over 4s? Well, it’s time to optimize or improve this core web vital.
In this section, first I will introduce you to the major causes behind high LCP scores then give you the tips or necessary actions that you can take to improve the LCP score of your website.
The main causes behind the bad LCP (Largest Contentful Paint) are:
Slow Server Response Time
Slow server response time or low TTFB is by far the most common reason for a low LCP score. Whenever someone opens your webpage, the browser will request the content from the server. If your hosting server makes any delay in processing content, then it would automatically impact the content rendering time on the screen viewport. Hence it leads to high LCP time.
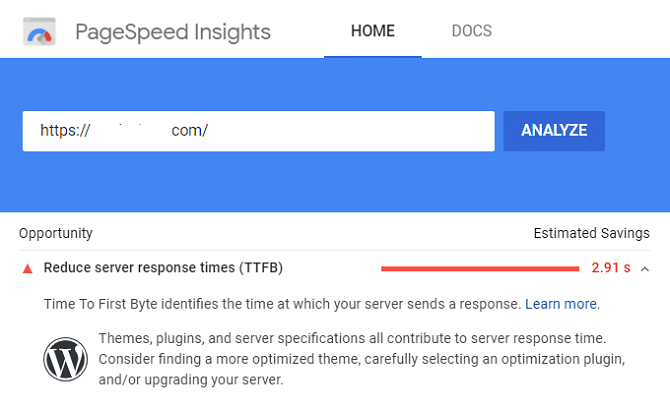
There are tons of ways to optimize server response time, however, the primary solution that gives a huge improvement is to upgrade the hosting server.
Using a powerful yet affordable hosting server like Rocket.net not only improves the server response time but also makes a positive impact on all core web vitals of your website.
But still, if you are not ready to upgrade your hosting server, there are some secondary solutions available that we will discuss in the next LCP optimization section.
Render Blocking Scripts (CSS and Javascript)
Have you ever seen this render-blocking error in Google Page Speed?
Well, all those CSS scripts, Javascripts mentioned under this section are causing this error and affecting the LCP score of your website.
Basically, during the HTML parsing time when the browser encounters any external scripts which take time to fetch from the third-party servers, it will block the HTML parsing and causing the delay in the content rendering time, and hence increases the LCP loading time.
We cannot eliminate such scripts fully, however with the techniques like minifying and deferring we can reduce the impact. We will disclose the exact procedure in the next section.
Slow Resource/Assets Loading Time
Well, if your web page is dealing with render-blocking scripts then it will already slow down the other things like assets loading time. Apart from this if images, videos are supposed to render above the fold, then undoubtedly it will affect the LCP score of your website.
Videos or high-resolution images take too much time to render if your web server is not powerful. Well, there are some methods we will discuss in the next section that you can take and ensure such assets will load as soon as possible.
Client-Side Rendering
If your website content is supposed to render on the client browser directly then it may affect the LCP score. Client-side rendering normally includes tons of javascript which takes a lot of time to download and execute. The user may have to wait to see or interact with the content of the website. Optimization techniques like server-side rendering, minimize critical JS, etc could reduce the impact and hence improves the LCP core web vital of your site.
So these are the main causes that decline your LCP score. Let’s see the solutions to deal with them. We will try to explain each LCP optimization technique suggested by Google in the simplest and actionable way.
LCP Tip 1: Upgrade or Optimize the Server – Primary Solution
Responsible for: improving server response time and asset loading time – LCP causes.
Well as I already mentioned that server speed directly affects the LCP score of your website. By installing or upgrading to the powerful hosting server, the browser could able to receive or process the content from the server faster and hence render it quickly on the user screen.
By improving the server response time up to 90% of LCP issues will be gone. Even Google Page Speed claims that all requests would depend on the server.
To eliminate the “Reduce initial server response time” error no method will work except upgrade to the powerful server.

By upgrading from shared web hosting to managed or dedicated server hosting like Rocket.net could boost the TTFB or server response time up to 233%.
We have been happily using Rocket.net managed web hosting (started from just $30/month) on our website for a long time and our server response time had never disappointed us so far.
LCP Tip 2: Enable Caching
Responsible for: improving server response time and asset loading time – LCP causes.
Powerful web hosting is an important factor for good server response time, but that doesn’t mean other factors are useless like Caching.
Are you facing a “Serve static assets with an efficient cache policy” LCP error in Google Page Speed? Then it’s time to leverage the advantage of Caching.
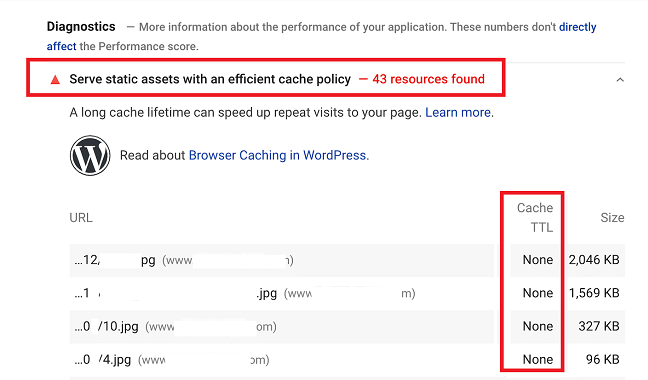
Web Caching is nothing but storing the website files temporarily rather than requesting them again and again from the server. This will make a huge impact on the server response time and reduce the burden of the server.
But the question is how to enable caching on a website?
Well, the safest and recommended method to enable caching is either using web hosting like Rocket.net which by default turns on the page caching on your website, or use a Caching plugin like WP-Rocket
The WP-Rocket plugin will also help you in further optimizations, not just caching so it is a major plugin every WordPress website should have.
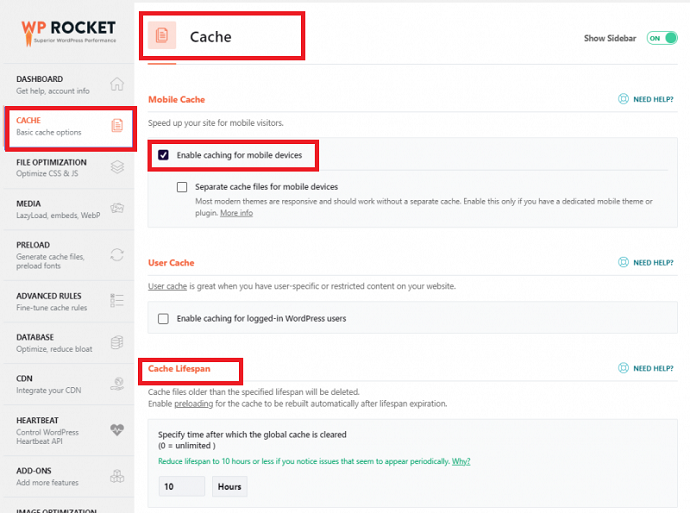
The process to enable caching with WP-Rocket is simple as it sounds. Just install a plugin, navigate to the Cache section and turn on the feature. Even you can control the lifespan of Cache with this plugin.
LCP Tip 3: Enable CDN Support
Responsible for: improving server response time and asset loading time – LCP causes.
Another popular strategy to increase server response time is to enable a CDN service on your website. Basically, CDN is the content delivery network that helps to reduce or shorten the time between user requests and server responses. Due to this, the website LCP and FID scores will improve.
There are chances that your hosting server is located elsewhere than the reader’s location. Due to this, the server takes more time than normal to sent images, videos, CSS files, etc. To solve this problem, CDN services were born and after enabling CDN on your site, your readers receive content from nearby servers rather than your globally situated server.
How to Enable CDN?
Nowadays most hosting services like Rocket.net included CDN support in their package. The main advantage of this that you can be free from manual CDN configuration. Else you have to configure it manually.
For users who don’t want to upgrade their hosting, simply use the WP-Rocket for CDN service. Apart from caching features, this plugin also has its own dedicated CDN service which can be configured easily.
In a nutshell, for non-WordPress users, built-in CDN web hosting would be the perfect approach to enable CDN. And for WordPress users, WP-Rocket is the preferred approach because its other site optimization features are essential and help improve the core web vital of the site.
LCP Tip 4: Enable rel=Preconnect on Third-Party Connections
Responsible for: improving server response time – LCP Cause
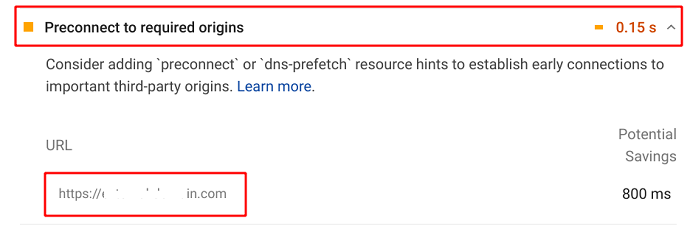
Are you facing a “Preconnect to required origins” LCP error in Google Page Speed? Well, it’s time to tackle or solve this issue.
Well, if you have read about preload in the CLS section of this article, then you will understand the concept of Preconnect easily. Preconnect is somewhat similar to preload.
Basically, there were times when we used resources on our website stored on third-party servers. The best example is Twitter posts, Instagram posts, etc.
No wonder how powerful the server of these third parties, but still it takes time to load or fetch on your site. Hence it will impact the LCP score of your website.
By adding the preconnect attribute to such third-party scripts, you can command a browser to load and establish the connection with them as soon as possible or on a priority basis.
How to Enable rel=preconnect on Third-Party Connections?
This can be implemented by HTTP link headers.
For those who want to do it manually, simply add rel=connect to all those third-party URLs that you have added to your website page. After applying rel=preconnect, your links would look similar to this:
<link rel="preconnect" href="https://test.com" />According to the Google LCP Guide, you can also add a dns-prefetch to third-party links to solve this issue. Because some browsers don’t support preconnect natively.
<link rel="preconnect" href="https://test.com" />
<link rel="dns-prefetch" href="https://test.com" />
Remember all those above third-party links will be added under the <head> section of the page.
For WordPress users: if you have a WP-Rocket plugin installed on your website, you don’t have to make any changes to your website code.
WP-Rocket supports “dns-prefetch” rather than “preconnect” to built connections faster with the third-party domains. Well don’t be worried, preconnect and dns-prefetch is almost the same. Even dns-prefetch is supported by the maximum number of browsers than preconnect. So it is completely safe to use rather than preconnect.
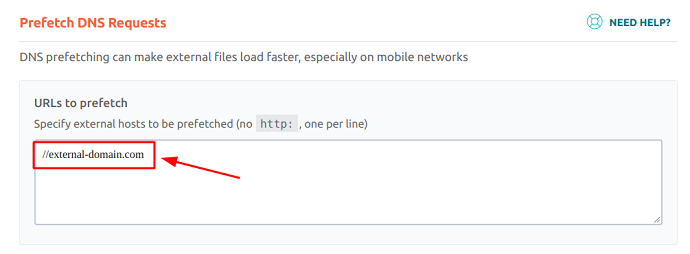
To enable dns-prefetch with the help of the WP-Rocket plugin simply navigate to preload tab and add external domains URL under the prefetch DNS requests tab like this:
Note: Avoid adding HTTP or HTTPS protocol before the domain name, just use the forward slashes. And make sure to have one domain per line.
LCP Tip 5: Minify the CSS
Responsible for the render-blocking scripts LCP error – Improve Core Web Vitals (LCP)
As I already told you about the impact of render-blocking resources (CSS & JS) on the LCP in the above section, now it’s time for the solution. Let’s deal with the CSS first.
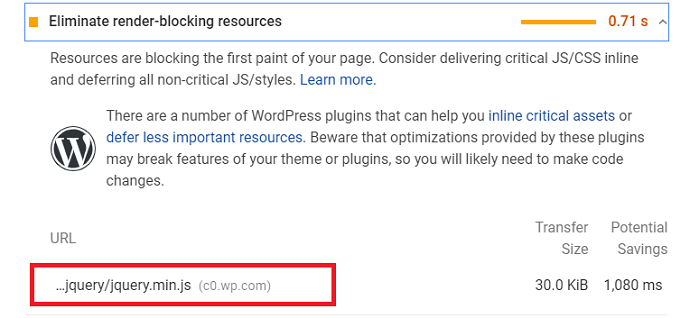
If the Google Page Speed report shows CSS files URLs under the “Eliminate render-blocking resources error” then it’s time to take immediate action.
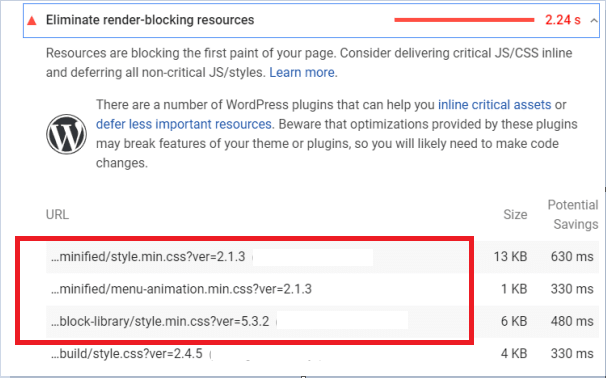
Well, minify or minification is the process of removing unwanted or say extra characters from the CSS code including indent, space, line breaks, comments, etc. This leads to a decrease in the CSS file size and hence faster loading times. When a page renders its large contentful content quickly, the LCP score will automatically improve.
How to Minify the CSS?
Well, there are a lot of ways to minify the CSS code. Now you have to decide whether you want to do it manually or allow a plugin like WP-Rocket to do it for yourself.
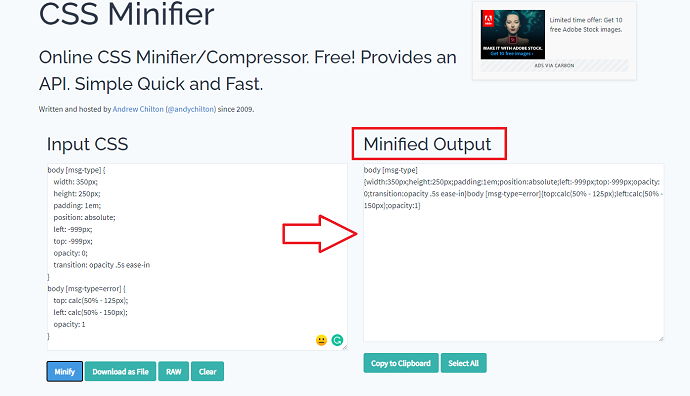
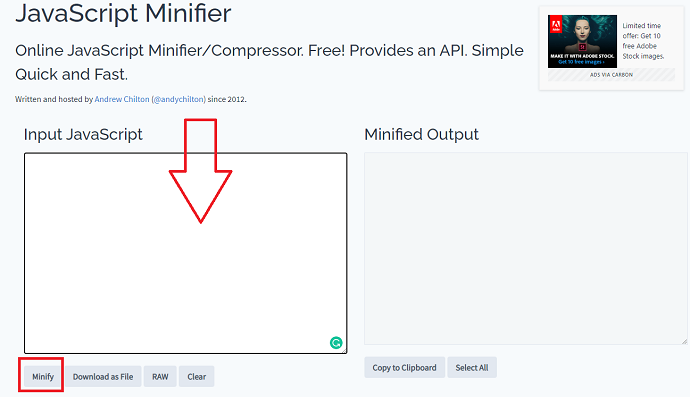
If you want to minify the CSS code manually for all your web pages, use any online CSS-minification website like cssminifier.com. But remember with this approach you have to manually minify the CSS code for each web page (if you use different CSS for every page) and upload the minified version. This can be a very time-consuming process.
By considering the above approach in mind, simply open up the cssminifier.com insert your original CSS code on the left input box, and then click on the Minify button. After minification is done, you will see the minified CSS code on the right which you can download also.
WP-Rocket also has a minification feature that automatically minified the CSS of all web pages. Consider this plugin approach for a hassle-free CSS minification process.
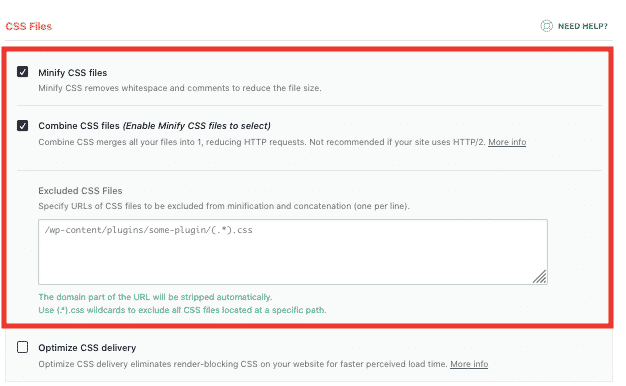
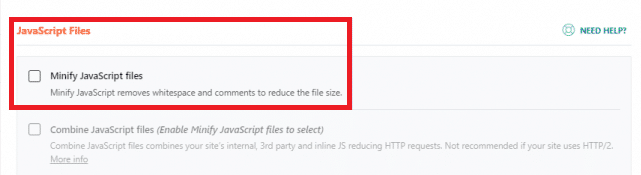
To enable CSS minification with the WP-Rocket plugin, just install the plugin and navigate to the file optimization tab. Here enable the Minify CSS file option and you are good to go. And remember, WP-Rocket also gives you the option to exclude some web pages from the CSS minification. Use this feature when required.
LCP Tip 6: Defer/Async Non Critical CSS
Responsible for the render-blocking scripts LCP error – Improve Core Web Vitals (LCP)
Is Google Page Speed suggesting you defer any CSS stylesheet of your website?
Well if yes, then it’s time to defer all non-critical CSS of the website. Deferring non-critical CSS means commanding browsers to load all the non-critical CSS of the page after the page will fully load. This way none of the CSS files would able to block the HTML parsing process and the browser will able to render the content (including larger content) faster.
The perfect example of non-critical CSS is the font CSS style. There will be no issue in deferring such type of non-critical CSS if they block or make a delay in the rendering of the content.
How to Defer Non-Critical CSS?
The manual process to defer non-critical CSS is a bit difficult. First, you have to identify or extract the Non-critical or unused CSS. Use the Google Page speed tool to identify such CSS scripts and then take help from a critical path CSS generator to generate the Non-critical CSS code. After that save all the non-critical CSS code into a new .css file then with the help of the “preload” and “onload” attributes you can link to that new CSS file to load them asynchronously.
Note: All Critical CSS generators could only extract the critical CSS from the web page. So ignore the Critical CSS and consider the rest of CSS as a non-critical CSS.
Note: After extracting and defer the non-critical CSS, don’t forget to inline the remaining Critical CSS. The process to inline the critical CSS is mentioned in the next LCP tip.
Suppose if the normal CSS loading syntax is like this:
<link type="text/css" rel="stylesheet" href="stylesheet.css" />Then after deferring it, the syntax would change to this:
<link type="text/css" rel="preload" href="stylesheet.css" as="style" onload="this.rel='stylesheet'">In the above code, we have used the “preload” and “onload” attributes to instruct the browser to process the non-critical CSS later. The above-deferred code for creating a connection with a non-critical new CSS file should be placed in the footer section of the page. A full explanation of the above code is mentioned in this Google dev guide.
Note: Make sure to load such CSS files into the <head> tag
If you don’t like the above Asynchronous approach of deferring non-critical CSS recommended by Google, you can simply ignore it and add defer attribute to all the CSS files like this:
<script defer src="/example-css-script"></script>Again for WordPress users, the best approach is to use a plugin like WP-Rocket. Previously we saw a process to minify the CSS. Now let’s defer the non-critical CSS with the same plugin.
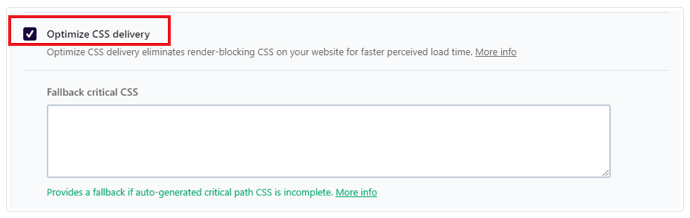
After installing the plugin navigate to the WP-Rocket > Settings > File Optimization. Here just checkmark on the “Optimize CSS delivery” option and then the WP-Rocket plugin will extract all the non-critical CSS files from your website and defer or load them asynchronously.
LCP Tip 7: Inline Critical CSS
Responsible for the render-blocking scripts LCP error – Improve Core Web Vitals (LCP)
Are you facing the “Avoid chaining critical requests” error in Google Page Speed?
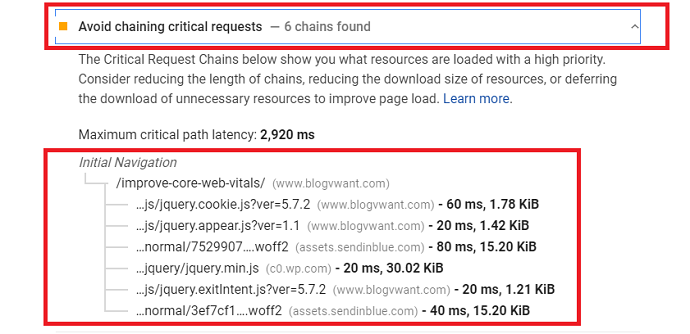
Well, it’s time to fix it. Basically, Google Page Speed is trying to say that all those resources (CSS, JS, Assets) mentioned under this box are critical and should be load on priority. If any delay or blockage happens, the content rendering process and hence LCP (core web vital) of the web page would be affected.
In this section, we are focusing only on Critical CSS which needs to be loaded at a rapid fast speed. In the above section, we had deferred the non-critical CSS of the page, but here we need to do the exact opposite.
Inlining the Critical CSS means loading the above-the-fold resources on a priority basis. Let’s take a look at the below example to understand the difference between Inline Critical CSS and Defer Non-Critical CSS:
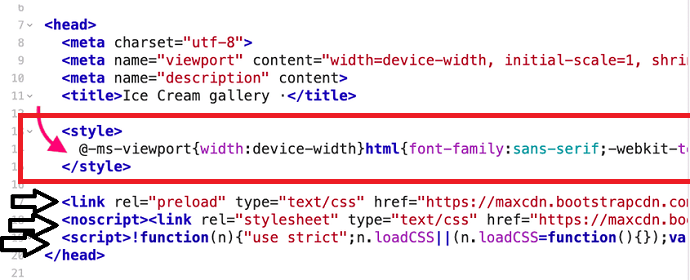
In the above example, we have inline the critical CSS (pointing with the red arrow) in the HTML header between the <style> tags. And just below that, we had deferred the non-critical CSS (pointing with the black arrow) using the preload and loadCSS(); function.
How to Inline Critical CSS?
The manual process is almost similar to defer the CSS. First, we have to identify the CSS files which need to be inlined or load on a priority basis. This can be done with the help of the Google Page Speed tool. Then extract the critical CSS using the critical path CSS generator then inline it between the <style> tags and placed it into the <head> section of the page.
The syntax for inline critical CSS is:
<head>
	<style> /* put all critical CSS here and remove the comment */ </style>
</head>
After inline the critical CSS code, don’t forget to defer the remaining non-critical CSS code of the webpage. Follow the LCP tip 6 for this task.
When we talk about the plugin approach, again WP-Rocket got you covered. The process is the same as we saw in the defer CSS section. You just need to enable the “Optimize the CSS delivery”. That’s all. After that, all the critical CSS will be inline and all the non-critical CSS will be deferred.
- Read Next: 5 Best Places to Learn HTML and CSS
LCP Tip 8: Minify JavaScript
Responsible for the render-blocking scripts and Client-side rendering LCP Error – Improve Core Web Vitals (LCP)
Is Google Page Speed asking you to minify some of the JavaScript on your website?
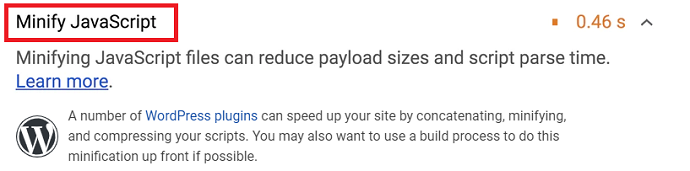
Javascript minification is similar to CSS minification. Here we are using javascript minification techniques to compress or remove unwanted characters from the Javascripts, so they can render flawlessly.
How to Minify Javascript?
Well, the procedure depends on the user’s situation. I am sharing with you 3 easy ways to perform this task:
Minify Javascript for Non-WordPress users:
For Non-WordPress websites, javascript minification can be done manually. First, you have to gather/download all those Javascripts which require minification. Well, these can be easily collected from the Google Page Speed tool. After that, you can use any online JavaScript minification tool to minify the Javascript and then replace the minified code in the original Javascript files.
Minify JavaScript for WordPress users (Without Plugin):
Before going further with this method, make sure to take a backup of your WordPress website. After that navigate to Appearance > Theme Editor. Now open up the functions.php file and then paste the below code at the bottom.
Remember the code below is responsible for minifying HTML, CSS, and JavaScript on your website.
class WP_HTML_Compression
{
// Settings
protected $compress_css = true;
protected $compress_js = true;
protected $info_comment = true;
protected $remove_comments = true;

// Variables
protected $html;
public function __construct($html)
{
if (!empty($html))
{
$this->parseHTML($html);
}
}
public function __toString()
{
return $this->html;
}
protected function bottomComment($raw, $compressed)
{
$raw = strlen($raw);
$compressed = strlen($compressed);

$savings = ($raw-$compressed) / $raw * 100;

$savings = round($savings, 2);

return '<!--HTML compressed, size saved '.$savings.'%. From '.$raw.' bytes, now '.$compressed.' bytes-->';
}
protected function minifyHTML($html)
{
$pattern = '/<(?<script>script).*?<\/script\s*>|<(?<style>style).*?<\/style\s*>|<!(?<comment>--).*?-->|<(?<tag>[\/\w.:-]*)(?:".*?"|\'.*?\'|[^\'">]+)*>|(?<text>((<[^!\/\w.:-])?[^<]*)+)|/si';
preg_match_all($pattern, $html, $matches, PREG_SET_ORDER);
$overriding = false;
$raw_tag = false;
// Variable reused for output
$html = '';
foreach ($matches as $token)
{
$tag = (isset($token['tag'])) ? strtolower($token['tag']) : null;

$content = $token[0];

if (is_null($tag))
{
if ( !empty($token['script']) )
{
$strip = $this->compress_js;
}
else if ( !empty($token['style']) )
{
$strip = $this->compress_css;
}
else if ($content == '<!--wp-html-compression no compression-->')
{
$overriding = !$overriding;

// Don't print the comment
continue;
}
else if ($this->remove_comments)
{
if (!$overriding && $raw_tag != 'textarea')
{
// Remove any HTML comments, except MSIE conditional comments
$content = preg_replace('/<!--(?!\s*(?:\[if [^\]]+]|<!|>))(?:(?!-->).)*-->/s', '', $content);
}
}
}
else
{
if ($tag == 'pre' || $tag == 'textarea')
{
$raw_tag = $tag;
}
else if ($tag == '/pre' || $tag == '/textarea')
{
$raw_tag = false;
}
else
{
if ($raw_tag || $overriding)
{
$strip = false;
}
else
{
$strip = true;

// Remove any empty attributes, except:
// action, alt, content, src
$content = preg_replace('/(\s+)(\w++(?<!\baction|\balt|\bcontent|\bsrc)="")/', '$1', $content);

// Remove any space before the end of self-closing XHTML tags
// JavaScript excluded
$content = str_replace(' />', '/>', $content);
}
}
}

if ($strip)
{
$content = $this->removeWhiteSpace($content);
}

$html .= $content;
}

return $html;
}

public function parseHTML($html)
{
$this->html = $this->minifyHTML($html);

if ($this->info_comment)
{
$this->html .= "\n" . $this->bottomComment($html, $this->html);
}
}

protected function removeWhiteSpace($str)
{
$str = str_replace("\t", ' ', $str);
$str = str_replace("\n", '', $str);
$str = str_replace("\r", '', $str);

while (stristr($str, ' '))
{
$str = str_replace(' ', ' ', $str);
}

return $str;
}
}

function wp_html_compression_finish($html)
{
return new WP_HTML_Compression($html);
}

function smi_html_css_js_minify()
{
ob_start('wp_html_compression_finish');
}
add_action('get_header', 'smi_html_css_js_minify');
Minify JavaScript for WordPress users (Plugin Method):
Well, if you have a WP-Rocket installed on your WP website, then the Javascript minification process could be done in seconds. You don’t have to take any backup because, with the WP-Rocket plugin, the chances of website crashes are next to nill.
The Javascript minification option is available inside the File optimization tab of the WP-Rocket plugin. Just turn on the feature and you’re done.
LCP Tip 9: Defer and Remove Unused JavaScript’s
Responsible for the render-blocking scripts and Client-side rendering LCP Error – Improve Core Web Vitals (LCP)
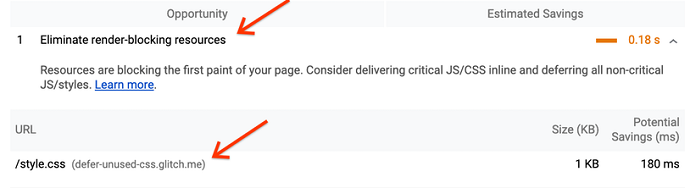
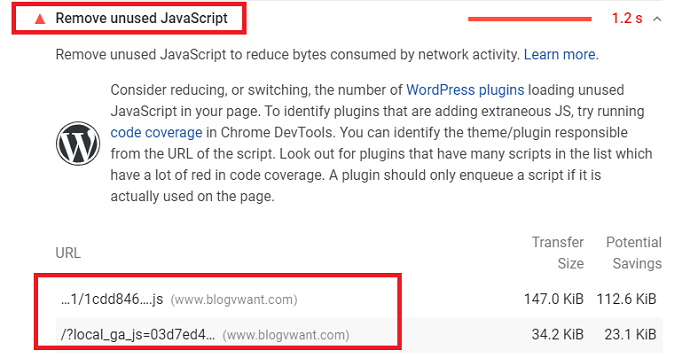
Have you encountered “Remove unused Javascript error” or found any Javascript URLs under the “eliminate render-blocking resources” section of the Google Page Speed tool?
Well, deferring Javascript is similar to the deferring CSS we have already seen in the previous section. All those non-critical Javascripts which create a problem or block the HTML parsing and affecting the LCP score of the webpage should be deferred or load after the HTML parsing is done or the content will be fully rendered.
Another potential hack to speed up the HTML parsing and eliminate the render-blocking resources is to remove all those Javascripts which cannot be incorporated in the above-the-fold content or those which are completely unnecessary or useless.
By attempting these techniques, the unnecessary Javascripts which previously blocked the rendering time is no more get into the HTML parsing process.
How to Defer Javascripts?
The methods to deferring and removing unused JS are completely different. Let’s first see the deferring process.
In the Non-Plugin method, Similar to the CSS deferring, here again, first, you have to gather all those Javascripts of a webpage that need to be load after the HTML parsing. Take the help of the Google Page Speed tool to collect the URLs of those javascript. Then simply add a defer attribute to them.
For example:
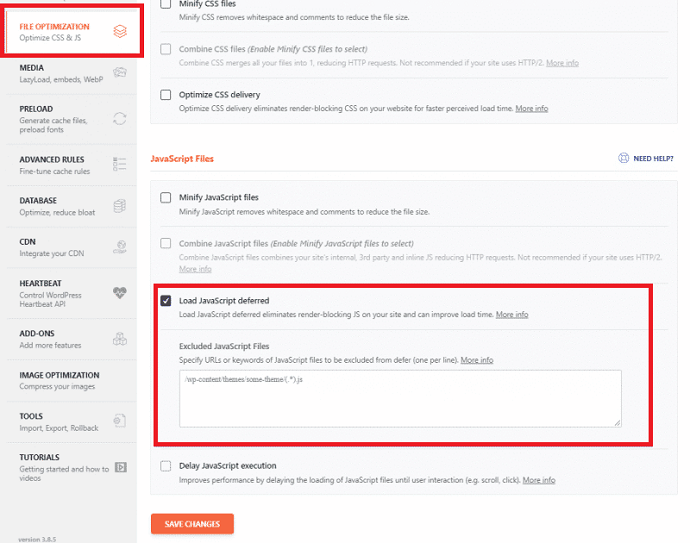
<script defer src="/put-your-javascript-here"></script>For those who are interesting in the Plugin Approach, WP-Rocket again here works for you. Just install the plugin and navigate to the file optimization tab and then switch on the “Load Javascript deferred” module.
That’s it. WP-Rocket will automatically detect and defer all those JavaScript’s which need to be deferred. You don’t have to put in input javascript one by one.
However, Just below the defer option, WP-Rocket also gives you the option to exclude any Javascript files in case you want.
How to Remove Unused Javascripts?
Before moving ahead towards the actual method, there are some points you should be aware of regarding removing javascript.
Well, as per research it is not always a safer choice to remove all unused Javascripts mentioned in the Google Page Speed core web vital report. For example, you may find that the Google Page Speed tool suggesting you remove Google Analytics’ unused javascript. But if you remove this unused Javascript, then GA will not able to track the visitors of your site. Avoid removing such types of javascript at any cost.
So how would you deal with Unused Javascripts safely?
The best alternative for removing unused javascript is to delay them and stop the execution until user interaction (scroll, click, tap, etc). This way such Javascripts won’t appear in the Google Page Speed tool. Also, they won’t make any blockage in the content rendering process.
So in other words, the LCP score of the webpage won’t be affected.
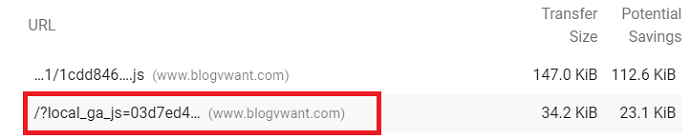
To delay unused Javascripts the best option is to use the WP-Rocket plugin. They have added a feature of delaying javascript execution just below the defer option (see image below). You just require to input all those unused javascript that you want to delay.
LCP Tip 10: Optimize Images
Responsible for the Slow resource/assets loading time LCP error – Improve Core Web Vitals (LCP)
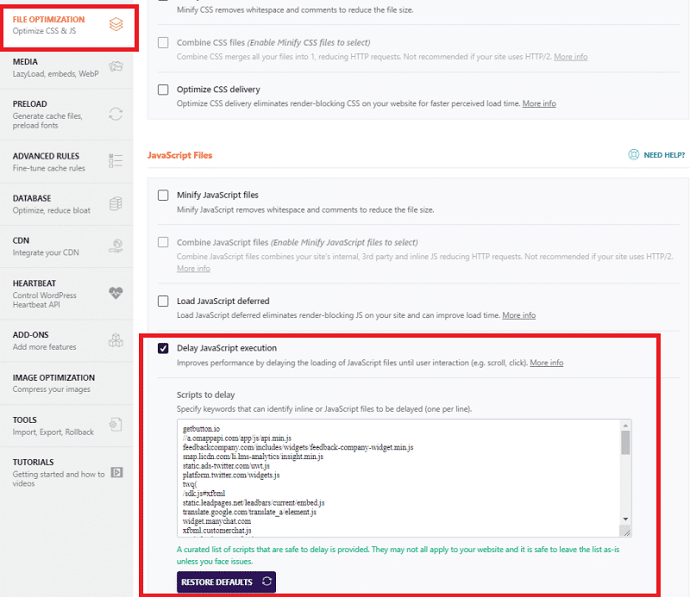
Have you encountered any of your website images under the following errors of the Google PageSpeed tool while examining the core web vital of your webpage?
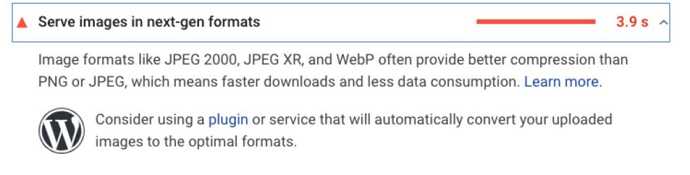
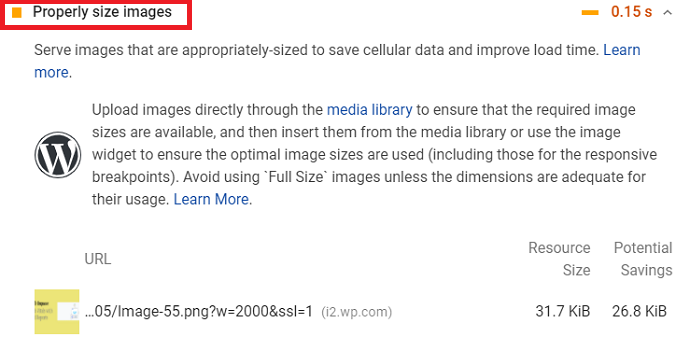
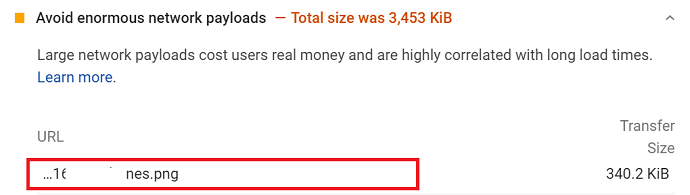
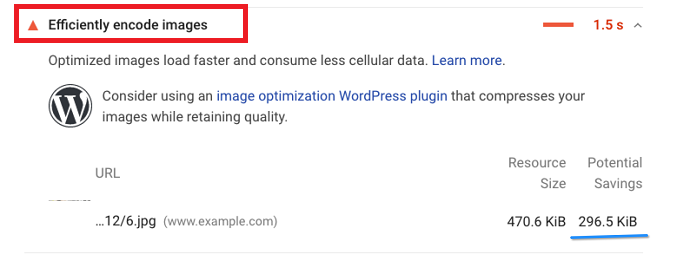
As images are commonly found as the largest in most web pages, it is very important to optimize them otherwise you have to deal with the above errors show in Google PageSpeed.
Some of the essential tips to optimize the images in order to gain a good LCP score are:
Compress Images
Reducing the image file size by compressing it (without losing quality) is the perfect way to increase the loading time. Now there are tons of free plugins available on WordPress to do this task automatically. For example ShortPixel.
Serve images into new generation formats
The Google PageSpeed error “Serve images in the next-gen format” can be easily removed if you convert your normal png/jpeg images into the next generation formats like WEBP, JPEG 2000, and JPEG XR. In WordPress, most of the image optimization plugins like ShortPixel will automatically convert your images into optimized formats before serving to the users. However, you can also convert images into WEBP format with any of the online WEBP converters manually and upload them to your website.
Avoid using images above-the-fold
Unless you are using a powerful hosting server like Rocket.net on your website, avoid placing any images above the fold. Non-optimized or uncompressed images that are supposed to load above the fold will directly impact the loading time and hence LCP of your website.
Serve images through CDN
I already discuss the importance of enabling a CDN service on the website in the above section of this article. Your site should serve images with CDN to decrease the resource loading time. If you have a WP-Rocket plugin then you should not be worried of finding a relevant CDN service. WP-Rocket has its own CDN service. However, you can also go for a hosting service like Rocket.net if you want to avoid manual CDN configuration
Serve Responsive Images
It is the World of Mobile devices, the percentage of people are browsing the internet on mobile phones is much higher than on desktop. That’s why a website should aim for a better LCP score for mobile devices. By placing responsive or smaller images for mobile devices, the page loading speed and LCP won’t be affected.
In WordPress, if you are using page builders like Elementor then you have the option to specify the image dimensions both for mobile and desktop devices separately. Or if you aren’t sure about the recommended size to be set, then leave it on the image optimizer plugin like Shortpixel. It will automatically scale down the image according to the device dimension.
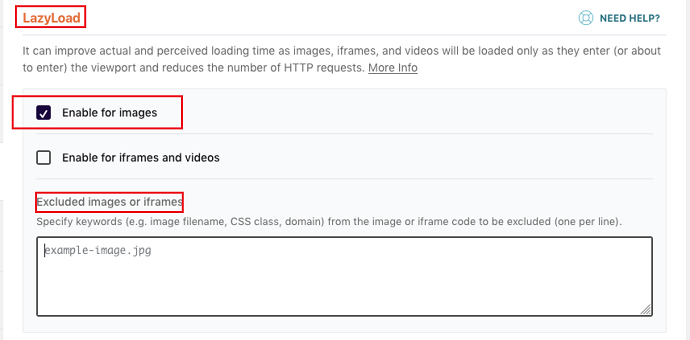
Enable Lazy Loading on Images
Lazy loading is one of the most popular techniques to increase the loading time of the web page. Basically, it is the technique of deferring the loading of resources until the point at which it is requested by the user. The plus point is that you can enable lazy loading on all images of your website. To enable lazy loading on images either add plenty of javascript or use a plugin like WP-Rocket which enables lazy loading on your whole website in a single click.
Pro Tip: Avoid lazy load images that are supposed to load above the fold, otherwise it impact the opposite and worsen the LCP score of your website. Well, WP-Rocket gives you the option to disable lazy load on the specific posts, pages, and images. You can exclude all such images to protect the LCP score of your website.
Avoid Image Sliders
Yes, Sliders are interactive and sometimes very useful to present the content. But they are very heavily coded and give a huge load to the server. Unless you have a powerful web hosting like Rocket.net you should totally these image sliders. Instead, use native HTML to serve images that won’t affect the LCP and loading speed of your website.
LCP Tip 11: Enabling a Preloading on all Critical Assets
Responsible for the Slow resource/assets loading time LCP error – Improve Core Web Vitals (LCP)
We had already talked about preloading on various sections of this article, there is no need to explain it further. By adding a preload attribute on essential assets (above-the-fold-content) you can force the browser to load them as soon as possible.
You may be wondering on which assets should I enable the preloading?
Well, preloading can be enabled on various types of web page assets like images, videos, CSS, Javascripts, and fonts.
How to Enable a Preloading on all Critical Assets?
Well, both plugin and non-plugin approaches are available to address this issue.
But first thing first you have to gather the URLs of all those critical assets which should be preload. You can use a Google PageSpeed tool to identify such URLs which affecting the LCP score of your page. Just navigate to the “Preload key requests” section.
Now if you want to enable a preloading on all affected assets manually, simply add a preload attribute to them like this:
<link rel="preload" as="script" href="script.js" />
<link rel="preload" as="style" href="style.css" />
<link rel="preload" as="image" href="img.png" />
<link rel="preload" as="video" href="vid.webm" type="video/webm" />
<link rel="preload" href="font.woff2" as="font" type="font/woff2" crossorigin />
Now for plugin users, you can use WP-Rocket to enable preloading CSS, JS, Fonts easily. However, to preload LCP images, first, you have to check with your image optimization plugin for this feature availability. Or you can use a free WP plugin like Perfmatters.
To learn how to preload CSS, Fonts, Javascripts with the WP-Rocket plugin navigate to the above sections of this article where we have talked about this topic in detail.
LCP Tip 12: Turn on the Text Compression
Responsible for the Slow resource/assets loading time LCP error – Improve Core Web Vitals (LCP)
Have you encountered the “Enable text compression” suggestion while examining the core web vital with the Google PageSpeed tool?
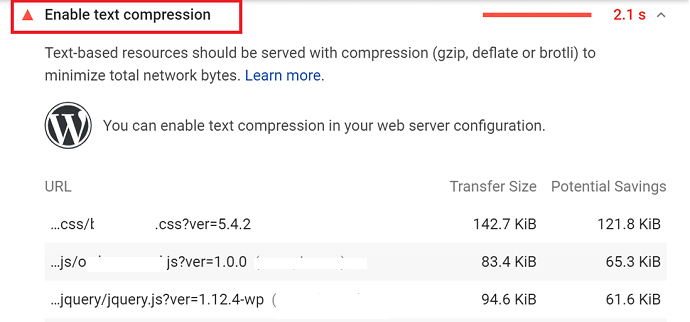
Well, then you should immediate action to enable text compression on your website. Larger uncompressed webpages full of HTML, CSS, scripts are highly impacting the file transfer speed between server and browser. Due to this delay, the LCP loading time will automatically be affected.
Just like image compression, you should compress your text-based files. To compress text files, 2 Major compression algorithms are available: GZIP and Brotli. As per the Google LCP guide, GZIP algorithm is supported by the majority of browsers but Brotli will give you better compression ratios.

How to Enable Text Compression?
To implement GZIP text compression on your website, both manual and plugin methods are available.
In the manual method, you need to add few lines of code in the website configuration file which can be accessed from cPanel. The process is a bit complicated. We already created a separate article where we have covered this manual method to enable gzip compression.
However, if you have a WP-Rocket plugin and your website is running on the Apache server then you don’t have to worried about manual configuration. The GZIP compression could be enabled upon the plugin installation automatically.
To implement a Brotli text compression (highly recommend over GZIP) first check with your hosting server if they support Brotli compression by default. If they do, ask them to enable the Brotli compression. If they don’t consider upgrading your hosting server to Rocket.net which has inbuilt support for Brotli compression.
With Rocket.net hosting you don’t have to install or configure the additional plugin on your website to enable the text (Brotli) compression.
Tips to Fix FID Issue: Longer than 100 MS
Video Tutorial:
For the reader’s convenience, we always create a video tutorial. Either you can watch and learn or simply skip the video and continue with the steps mentioned afterward.
Has your webpage reported FID over 100 MS? Well, then it’s time to take necessary actions and improve core web vital metrics.
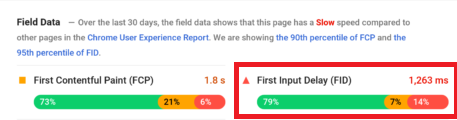
Let’s first talk about the main causes behind the high FID score then we will discuss the tips to FID issues:
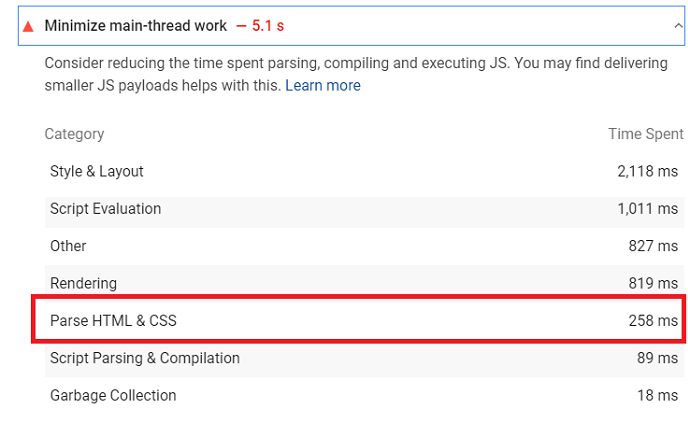
As per the Google FID guide, the main cause behind the bad FID score is heavy javascript execution. Initially, if your main thread is busy, or in other words, if the browser is busy executing heavy JS then the FID score would be badly impacted. As you know that FID is all about the time between the user’s first interaction and the browser response’s to that interaction, so if a browser is busy dealing with executing javascript lies under the main thread, it won’t be able to respond to that user interaction immediately and hence the FID score suffers.
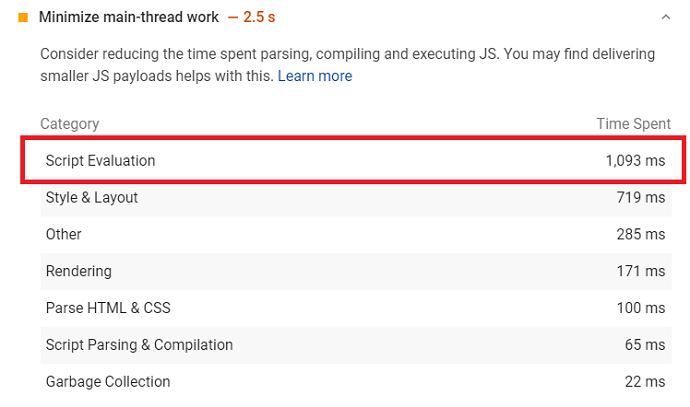
In the above image, you can see that how much time (2.5s) a browser is taking to execute the main thread of a web page. The main culprit here is the “script evaluation” which needs 1,093 ms to execute fully. Only after executing these javascript, the browser will able to respond to the user interactions.
Let’s see how to improve or fix the FID issues. Some of the FID solutions are similar to the LCP fixes which we have already covered in detail in the LCP section, so now we just give you the overview of FID tips.
FID Tip 1: Reduce Javascript Execution Time
The ultimate solution to deal with heavy javascript which blocks rendering or execution of other necessary elements of a web page is to defer or delay their execution until user interaction. By deferring all such javascript browser have enough time to respond to user interactions quickly. This way the FID score of the webpage will improve in no time.
To defer javascript that affecting the FID score, first, you have to find or collect them. Navigate to the core web vital report generated through the Google PageSpeed tool. Here you need to look under these sections for problematic Javascripts:

Then to defer them simply apply a defer attribute like this:
<script defer src="/put-your-javascript-here"></script>Or you can also use the WP-Rocket “Load JavaScript deferred module” that would automatically defer all those Javascripts which impacting the main thread of your webpage.
Some other tips to speed up the JavaScript execution to improve the FID core web vital are:
Minify the Javascript
To improve core web vitals metrics like LCP, FID minification strategy plays a very important role. It reduces or eliminates the unwanted characters from the javascript code so that Javascript will execute quickly.
We already explained the javascript minification process in this section of this article. After minifying the javascript of your website, these Google PageSpeed FID errors will be resolved:
Remove Unused JavaScript
Some of the JavaScripts aren’t played any role in rendering the page, they just increase the Javascript execution time and affect the FID score of your site. So it is better to remove or delay them until user interaction.
We have talked in detail about how to delay unused javascript to improve core web vitals metrics of our site in this section of this article. Read carefully and delay all those problematic JavaScripts that appearing in the “Remove unused JavaScript” section of Google PageSpeed Report.
FID Tip 2: Reduce or Minimize the Main Thread Work by Defer the CSS
Apart from JavaScript, other elements like CSS badly impact or increase the main thread’s workload, which automatically delays the user interaction time and hence FID time.
The solution is simple, you have to defer the Non-critical CSS of a webpage. When you do this, the workload of the main thread reduces and the browser has fewer things to execute, and hence the browser will be able to respond to the user interactions much faster.
To learn how to defer Non-critical CSS, navigate to this section of this article. Also after deferring the non-critical CSS don’t forget to inline the remaining critical CSS. The process to inline the critical CSS is mentioned in this section of this article.
Another important tip to reduce the main thread work and improve the FID time is by minifying the CSS code.
FID Tip 3: Reduce or Minify the Main Thread Work by Break up Long (JavaScripts) Tasks
The longer or heavy the tasks are, the longer it takes to execute and hence the longer it takes to allow users to interact with the page. The main thread keeps busy and hence FID score is brutally affected if the tasks require longer than 50 MS to execute.
The only solution for this issue is to break down or split the longer JavaScript into multiple smaller JavaScripts so that they can easily execute within 50 MS.
Consider these 2 Google JavaScript Code splitting guides to learn more about this topic: Measuring Long JavaScripts Tasks and Split JavaScripts
FID Tip 4: Compress Text Files
At this point, we have seen that FID is affected due to the heavy workload of the main thread. When the page size is big, the browser will require more time to load it from the server compared to compressed pages.
Similar to LCP, non-compressed pages impact or delay the FID of the page.
To improve the FID core web vital metric, you should enable text compression in your website. We have already covered the text compression process in this section of this article.
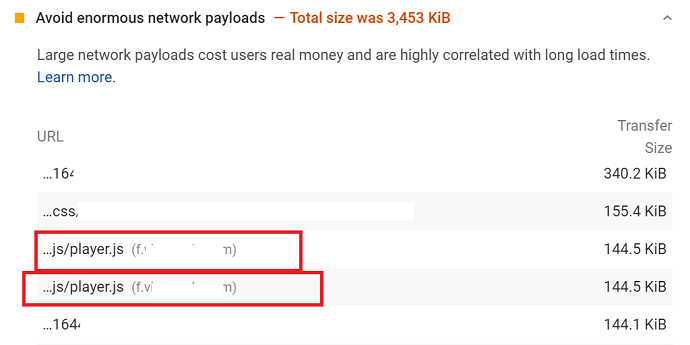
FID Tip 5: Low Requests Count and Low Transfer Size
Here Requests refer to the resources (files) and transfer size is the size of these resources.
Another possible culprit that affects the FID grade is the high resource counts made from the browser. The larger the request counts is the more time the main thread requires to execute it. When the main thread is busy both page loading speed and FID time will suffer.
So a webpage should keep the HTTP requests count low and render fully with a minimum number of resources. Also, the size of the resources (files) matters. Bigger or uncompressed files require more time to render. The effect on page loading speed depends on what type of resource is being requested.
There are many optimizations that you can make on your website code to keep the HTTP requests counts low and transfer size small. Some of them are:
- By enabling CSS minification
- By combining CSS
- By deferring CSS
- By deferring or delaying Javascripts
- By enabling JS minification
- By combining Javascripts
- By optimizing fonts
- By enabling Lazy Load
- By enabling text compression
- By enabling browser caching
- By optimizing images
- By keeping the DOM size low
- By using GIFs instead of videos
- By avoiding multiple page redirects
- By removing unwanted third party plugins or scripts
- By combining images using CSS sprites
Note: Plugin like WP-Rocket has the option to enable (1-10) optimizations mentioned in the above list. Else, you have to rely on a manual coding approach to enable those optimizations on your website.
Other FID Tips
- Use browser caching: which loads the content and executes javascript much faster.
- Optimize fonts so that it doesn’t cause the invisible text or blank screen during the page load
- Optimize images to load faster
- Appoint web worker to execute javascript in the background and free the main thread.
Conclusion: How to Improve Core Web Vitals with Speed Reports
After going through this “improve core web vitals” guide thoroughly you must be wondering or overwhelmed by the number of tasks to achieve a good score in each metric. Don’t worry, don’t get scared just remember 2 things:
First, Over 90% of the Google PageSpeed core web vital errors will be solved by upgrading to a robust web hosting like Rocket.net. The majority of Core web vitals metrics score affected by the speed of the server. If your website server is powerful then automatically the LCP content and FID content will load in no time.
Second, the webserver alone is not enough. Yes, Rocket.net will enable the CDN, File compression, Caching, Image optimization, etc on your site automatically. But still, at least one site optimization every WordPress website should have. When we talk about the site optimization plugin, 9 out of 10 bloggers would recommend the WP-Rocket. Undoubtedly WP-Rocket is the best in the industry. This plugin provides you additional site optimization that you never find in any hosting server including CSS optimization, Javascript optimization, Third-party scripts optimizations, lazy loading, Preloading, etc.
In a nutshell, a combination of the speedy web server and robust site optimization plugin will resolve almost every cause that affects the core web vital metrics of a website.
So in short, if you want to save your precious time from solving core web vitals errors manually, just upgrade your web host to Rocket.net and plug a WP-Rocket plugin on your site.
We highly recommend that you should start considering your website performance as a serious thing from today. As you can see, Google will be considering Page Experience as a ranking factor very soon. This is the perfect time to audit your website and make sure there will be no issues in Core web vitals reports. For WordPress users, the MonsterInsights Speed Reports feature is the perfect and quick solution to audit as well as resolving page experience issues.
Better “Page Experience” leads to Better “Search Engine Ranking”
- Read Next: How to Fix “Remove unused CSS” error
- How to improve website speed by enabling GZIP compression
- EWWW-Image Optimizer Review
- How to Install Google Analytics Global Site Tag on a WordPress website
I strongly believe that this article, How to Improve Core Web Vitals, helped you to improve the page experience of your website. If you like this article, please share it with your friends. If you want more blogging tips, follow BlogVwant on Facebook, Twitter, and YouTube.
FAQ: Improve Core Web Vitals with Speed Reports
How much does the Rocket.net web hosting cost?
Rocket.net has both Monthly and Annual managed/dedicated hosting plans started from just $30/month. The plans are divided into 4 categories: Starter, Pro, Business, and Agency. All plans offer a 99.99% Uptime guarantee and features like Inbuilt CDN, WAF, Free SSL, Staging site, Inbuilt Brotli compression, etc.
How much does the WP-Rocket Site optimization plugin cost?
$49 for 1 website yearly.
Does MonsterInsights work on Non-WordPress websites?
No.
Does MonsterInsights offer a free trial?
No.
After Improving Core Web Vitals, Would my website rank on the first page of Google?
Well, Page experience is not only a ranking factor. Google has more than 200 ranking factors. However, you must see an improvement in your website ranking after optimizing the page experience as well as the Core Web Vitals of your site.