
Want to connect Stripe with your payment form in your WordPress site. Do you wish to collect payments directly within your forms? And do you want to permit your users to choose and submit one-time payments or recurring/subscription payments, without ever leaving your WordPress site? That too easily, fastly, effectively, and safely.
Then WPForms’ Stripe Addon is the best option for you. With this, you can collect either one-time payments or even recurring/subscription payments directly and easily within your forms. And your users can choose and submit those forms, without ever leaving your site.
Go through this article to learn how to connect the WPForms’ Stripe Addon to your WordPress site. And you can also learn what are the enable options of Stripe Addon that make your forms either to accept one-time payments or recurring/subscription payments.
What is WPForms?
- WPForms is the World’s best contact form plugin for WordPress.
- With this, you can build any forms in less than 5 minutes but not in hours. This happens because it provides standard ready-made forms to you. Further, all fields in them are drag & drop type. So, with little modifications, you can build your own form in just seconds. And you no need to build any form from scratch.
- The following are the most popular forms, you can build by using WPForms:
- Contact Forms.
- Payment Forms.
- Survey Forms.
- Newsletter Forms.
- Registration Forms.
- And more.
Besides above, it provides the most popular forms in the form of addons like:
- Stripe.
- Mailchimp.
- Constant Contact.
- GetResponse.
- Drip.
- And more.
What is Stripe?
- Stripe is an efficient and fastest online payment service that permits people to accept and send money over the internet.
- And its popularity is growing in the eCommerce world.
- And it is a popular tool for small and large size businesses.
Related: Top 6 PayPal alternatives that save your transaction fees
6 Best Payment gateways for international transactions
What is WPForms’ Stripe Addon?
WPForms’ Stripe add-on permits you to connect your WordPress site with Stripe to easily and fastly collect:
- payments (one-time payments and recurring/subscription payments),
- donations, and
- online orders.
- You Might Like: How To Create An Order form in WordPress With or Without Payment Option
- 5 Best Contact Form Plugins for WordPress
How To Connect Stripe with Your Payment Form in just 2 Minutes
The following steps are involved to connect Stripe with Your Payment Form.
- Purchase WPForms Pro plan or higher.
- Install and Activate Stripe Addon.
- Connect Stripe to your WordPress site.
- Add Stripe to your Forms.
| Prerequisite: You need to install WPForms on your WordPress site. If you have already installed, then you can continue the following steps to connect Stripe to your forms. Else install WPForms and then continue. |
1. Purchase WPForms PRO plan or higher
- To access the Stripe Addon, you need to purchase the WPForms PRO plan or higher.
- Its price is $199.50 per annum.
- At this price, your site not only can access the Stripe Addon but also can enjoy all the features and addons of WPForms like:
- Mailchimp Addon.
- Constant Contact Integration.
- Aweber Addon.
- GetResponse Addon.
- Zapier Addon.
- And a lot more.
- No other contact form except WPForms provides all of its addons and features at this low price.
- Further, you can use this pro license on your sites up to 5.
- Now, let’s have a glance at the WPForms Pricing and Plans.

2. Install and Activate Stripe Addon
Step1: Go to WordPress site and log in.
Step2: Next, on your WordPress admin panel, select WPForms.
Step3: Next, click on the Addons link. Then the WPForms Addons screen will open.
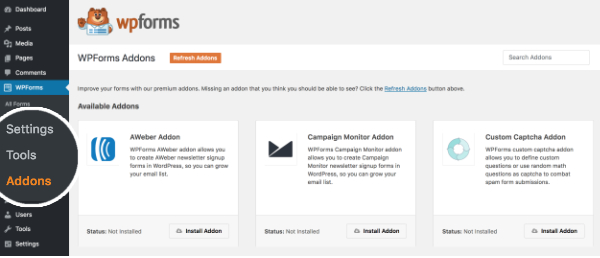
Step4: Suppose, if you don’t view any addons. Then immediately click on the Refresh Addons button. Then it will fix the issue.

Step5: Next, to find the Stripe Addon, type the word Stripe on the ‘Search Addons’ field visible on the top right corner of the Addons page.

Step6: Next, Stripe Addon displays on the screen. Then click on the Install Addon button located just below the Stripe Addon.
Step7: Next, Stripe Addon will install and activate on your WordPress site.
Once, Stripe Addon is installed and activated. Then you can view the Active beside the Status. Here, you can view Status just below the Stripe Addon.
That’s it! You have now installed and activated Stripe Addon on your WordPress site using WPForms.
Read It: 3 Steps to Reduce & Track Form Abandonment in Your WordPress Site
3. Connect Stripe to your WordPress site
Now you have installed and activated Stripe Addon on your WordPress site using WPForms. Next what to do? The next step is you need to connect your Stripe account to your WPForms on your WordPress site. Go through the below steps to perform this task.
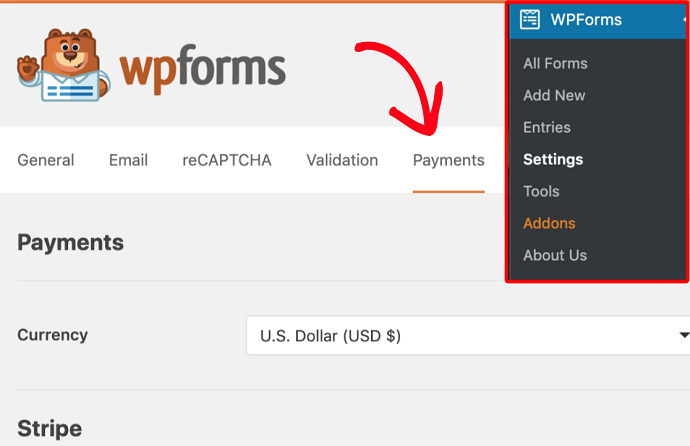
Step1: Go to your WordPress site admin panel. And navigate to WPForms >> Settings in the left menu of your WordPress site dashboard.
Step2: Next, click on the Payments tab.
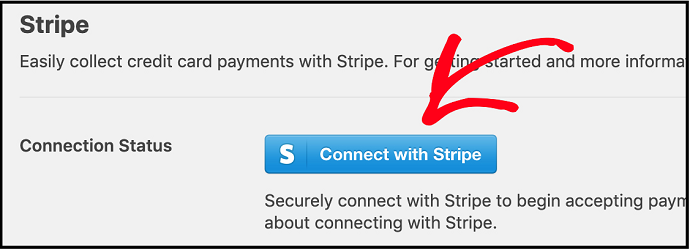
Step3: Now if you would like to adjust the currency, then select your desired option from the Currency dropdown list.
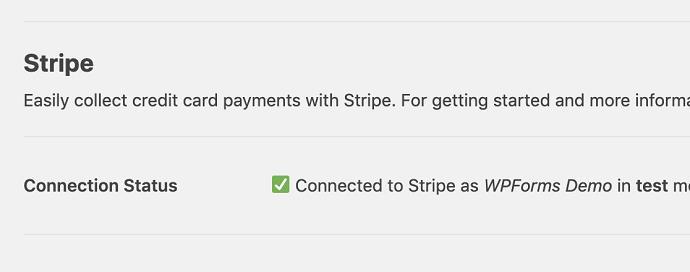
Step4: Next, scroll down the page to view the Stripe section. Then, you can view a field labeled as Connection Status. Here, next to this field, you can view a blue button Connect with Stripe. Then, click this blue button.
Step5: Next, you will be urged to authorize the connection between your forms and Stripe. The exact content you view on this page will alter based on whether your Stripe account is already activated.
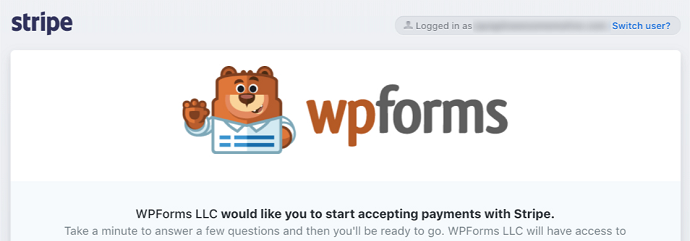
Step6: When you agree to these requirements, then you will be redirected back to your WordPress site’s admin area. Then a green checkmark appears beside the Connection Status field. This indicates that Stripe is connected to your WordPress site.
4. Add Stripe Payments to your Forms
You have now connected your Stripe and WPForms to your WordPress site. What is the next step? The next step is you need to add the Stripe payments to your forms.
But to add Stripe payments, you have to perform the following tasks:
- First, you need to create an order form.
- Next, you need to enable Stripe Payment for that form.
- Next, you need to know what are the enable options included in Stripe Addon Settings.
4.1 Create an order form
- Remember that you will need a minimum of two form fields for Stripe Payment to work. Those two required fields are:
- An item field (Single Item, Multiple Items, Checkbox Items, or Dropdown Items), and
- A Stripe Credit Card field.
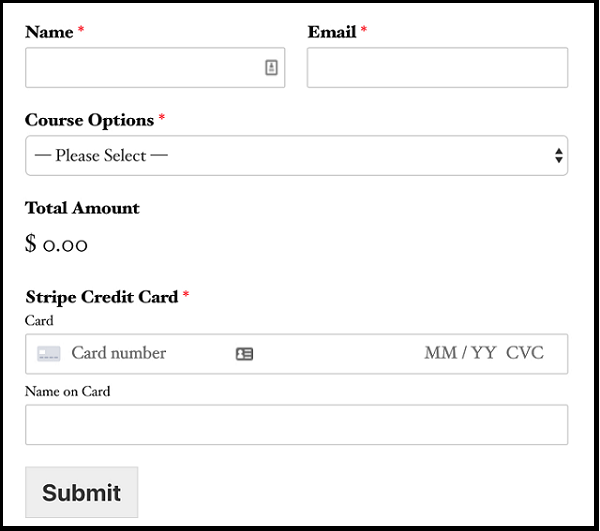
- Now, create a simple order form that includes:
- Name,
- Email,
- Dropdown Items,
- Total, and
- A Stripe Credit Card field.
Recommended: How to Set Up WordPress Email Logs
4.2 Enable Stripe Payments for the Created form (called One-Time Payment Form)
- You have now created a simple order form. Next, you have to enable Stripe Payments for this form.
- To enable Stripe Payment, you need to navigate to Payments >> Stripe.
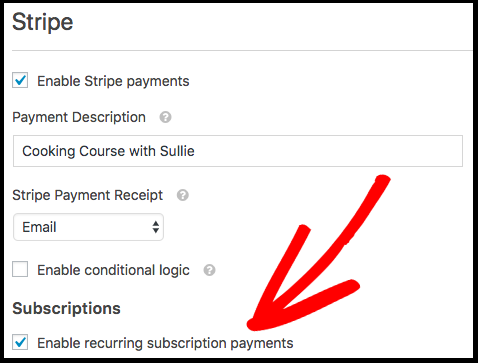
- Now on the Stripe panel, check the box labeled Enable Stripe payments.
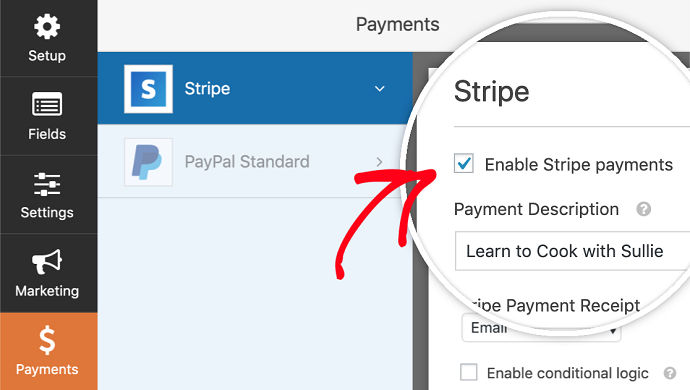
- Once you have checked the checkbox of Enable Stripe payments, next, you need to add a short Payment Description, which will display on the user’s credit card statement.
- Next, you can choose an Email field under Stripe Payment Receipt from the form where Stripe can send a receipt.

Now you have created a simple order form and Enabled Stripe payments to it. This type of form is called a one-time payment subscription form. Likewise, you can also create recurring subscription payment forms as explained in the next step.
4.3 What are the enable options included in Stripe Addon Settings?
You can view the three enable options in Stripe Addon settings. Those are.
- Enable Stripe payments (For one-time payments).
- Enable conditional logic (For recurring payments with a condition).
- Enable recurring subscription payments (For recurring / subscription payments).
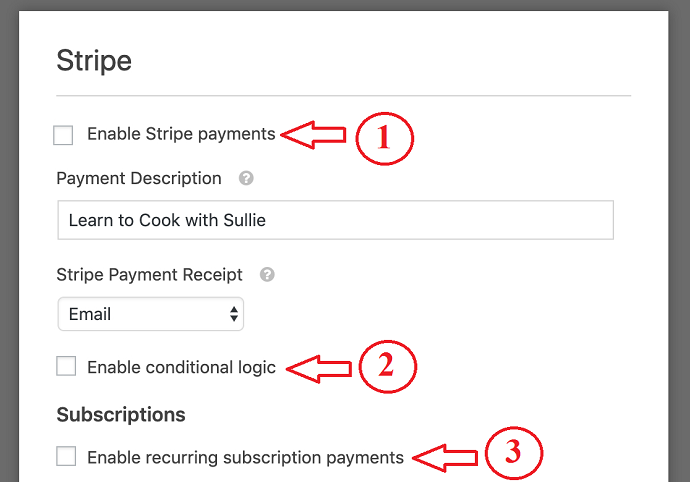
- You can click on the checkbox of Enable Stripe payments for one-time payment forms. This form is already you have seen in the above discussion.
- You can now see the two remaining Stripe payment options.
4.4 Enable Recurring / Subscription Payments
Previously you have created a simple order form. For that form, you have clicked on the checkbox of Enable stripe payments. Now click on the checkbox of Enable recurring subscription payments.
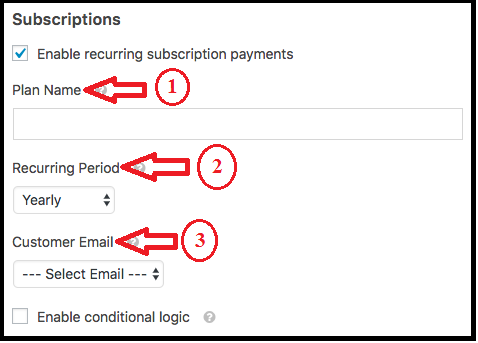
Once you click on the checkbox of Enable recurring subscription payments. Then additional settings will appear like:
- Plan Name:
- This is a title for the subscription, so here you can describe the title such as “Donation to X”. And this will appear within the Stripe transaction.
- Recurring Period:
- Here, you need to choose how often the recurring payments should occur:
- Daily,
- Weekly,
- Monthly,
- Quarterly,
- Semi-Yearly, or
- Yearly.
- Here, you need to choose how often the recurring payments should occur:
- Customer Email:
- Within this dropdown, choose an Email field from your form where the customer can be contacted. This is needed to create a subscription for a customer in Stripe.
4.5 Enable conditional logic
- By using Stripe Addon settings, you can also use conditional logic.
- Previously, you have created a simple order form.
- For that, you have enabled:
- One-Time Payment Option.
- And Recurring Payment Option.
- Now you can also put conditional logic for the created simple order form by clicking the checkbox of Enable conditional logic.
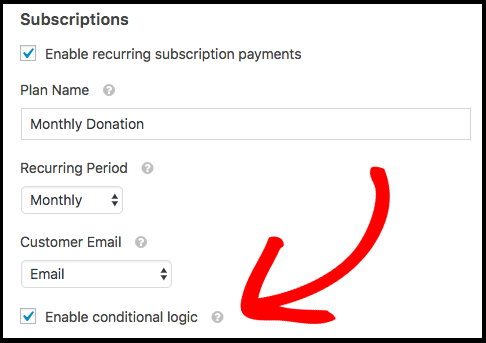
- Once you have checked the checkbox of Enable conditional logic. Then it will display additional fields to set up conditional rules.
- For example, here we will set up a conditional rule that states:
- Process payment as recurring if Donation Type is Monthly.
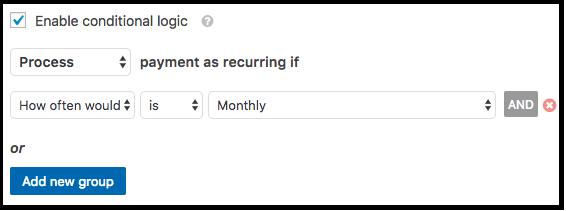
- So, with the conditional logic, you can allow your users to choose either one-time payments or recurring/subscription payments.
- This is an eminent feature that is required for any of your forms.
Conclusion
Now you can definitely realize that WPForms’ Stripe Addon on your WordPress site permits you to collect payments directly within your forms. Further, you can allow your users to choose and submit one-time payments or recurring/subscription payments, without ever leaving your WordPress site.
Finally, you can say, it is not only flexible to you to collect payments directly within your forms, but also flexible for your users to choose and submit one-time payments or recurring/subscription payments, without ever leaving your site.
Last but not least, you can say that when the two great forms WPForms and Stripe are combined on your WordPress site, then you can directly and easily collect payments straight within your forms.
- Read Next: How to Set Up WordPress SMTP Using Amazon SES
- 6 Best Google Analytics Plugins for WordPress
I ensure that this article aid you to connect WPForms’ Stripe Addon easily to your WordPress site. And you can also know how to include one-time payments and recurring/subscription payments in your forms. If so, do a favor by sharing this article and follow BlogVwant on Facebook and Twitter for more tips.
WPForms’ Stripe Addon FAQs
-
Is WPForms partnered with Stripe?
Yes. And as a Stripe partner, WPForms employs Stripe’s best practices to ensure your payments are consistently safe and secure.
-
Why isn’t the Connect with Stripe button working for me?
Stripe strictly allows only owners or administrators to connect a Stripe account to WordPress. So, you need to check your Stripe User role to ensure that it meets these requirements.
-
How do I test Stripe payments in my forms?
The fine way to test out your forms is you need to submit an entry and follow the same steps as your user.
To perform this task, you have to set up Stripe’s Test Mode, before adding your form to a live page. This permits you to test transactions before accepting actual payments.