
Do you host your website at DreamHost? And do you want to optimize, accelerate, and protect your website all-time at no cost or low cost? Then you need to enable and use Cloudflare on DreamHost panel.
Hint: Here is the super tip to get a Cloudflare Enterprise plan for free? Just try Rocket.net, the most secured and fastest managed WordPress hosting service that gives you a Cloudflare Enterprise plan for free.
- Related: Rocket.net detailed review
Do you want to know how to enable and use Cloudflare for your domain in DreamHost panel at no cost or low cost?
Then go through this article to learn how to enable and use Cloudflare in your DreamHost panel to optimize and secure your website at no cost or low cost. Further, you can learn the differences between the Cloudflare subscriptions inside the DreamHost panel and on the Cloudflare website.
What is Cloudflare?
Cloudflare is a service that acts like a proxy server between your visitors and DreamHost’s servers, caching content, effectively optimizing your website, improving website performance, and protecting your site.
In short, Cloudflare protects and accelerates your website.
And it offers free global CDN, free SSL support, iPv6 compatibility, front-end web-content optimization, Lazy Loading, Polish, Mirage, and more that are more beneficial for your site performance and speed.
Because of reasons, many hosting companies like DreamHost partnered with Cloudflare to give the Cloudflare’s benefits to its hosting customers.
Do I need to use Cloudflare?
Cloudflare free version or premium is beneficial for every website.
Suppose you want to optimize your website all-time at no cost or low cost, then Cloudflare is the ultimate choice for you.
And whenever visitors request cached content from your website, they connect and download the content from the closest Cloudflare server instead of connecting directly to the DreamHost servers. This reduces the amount of time it takes for pages to load.
Further, Cloudflare offers free features that are most useful for your websites like global CDN, front-end web-content optimization, SSL support, iPv6 support, Site analytics (24-hour delay), and more.
And also offers premium features like Polish, Mirage, Lazy Loading, 10 URL rules, Site analytics (1-hour delay), and more.
- You Might Like: DreamHost Review: Is DreamHost a Good Web Host?
- 3 Steps to Create A WordPress Website with Dreamhost
How To Enable And Use Cloudflare On Dreamhost
DreamHost (Special discounted link) is one of the most recommended hosting companies for WordPress users, officially recommended by WordPress.org. It optimizes all its servers, especially for WordPress. And it is one and only hosting company that guarantees 100% Uptime. And provides you everything for you to start and skyrocket your business at no time and low cost from domain registration, website building, reliable hosting to email services, and security.
Such a great hosting company DreamHost partnered with Cloudflare to accelerate and protect your site all-time at no cost or low cost.
Now, let’s go through the following to learn how to enable and to use Cloudflare inside your DreamHost panel to accelerate and protect your site. And what are the differences between the Cloudflare subscriptions inside the DreamHost panel and on the Cloudflare website?
However, remember that some features can be configured directly in your DreamHost Panel like Polish, Mirage, Lazy Loading, and Clear Cache. While others like enable free SSL and temporary suspend Cloudfare’s Caching or enable Development mode can be managed at Cloudflare.
1. How To Enable Cloudflare On DreamHost
Step1: Ensure that all URLs in your WordPress site must point to www version before activating Cloudflare in your DreamHost panel. That is, suppose you are running a WordPress site, many hard-coded URLs may point to the non-www version of your domain. But to activate Cloudflare, all URLs in your WordPress database should point to the www version.
For example, https://www.example.com.
Suppose you didn’t update all the URLs, you will view an infinite redirect loop error.
Step2: You must have subscribed to any DreamHost hosting plan in order to use Cloudflare services. And your domain must be hosted at DreamHost.
Suppose your domain is on DreamPress, you must contact DreamHost Contact Support inorder to enable Cloudflare services and plans.
Step3: Go to DreamHost panel webpage and sign in.
Step4: On the left side of your DreamHost panel webpage, click on Domains, and then on Manage Domains. Then the Manage Domains page opens.
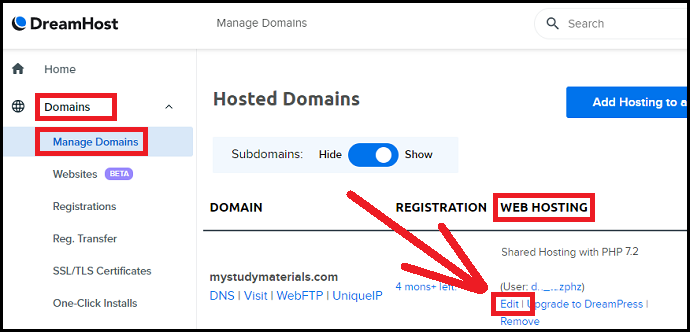
Step5: Click on the Edit button to the right of your domain, under the WEB HOSTING column.
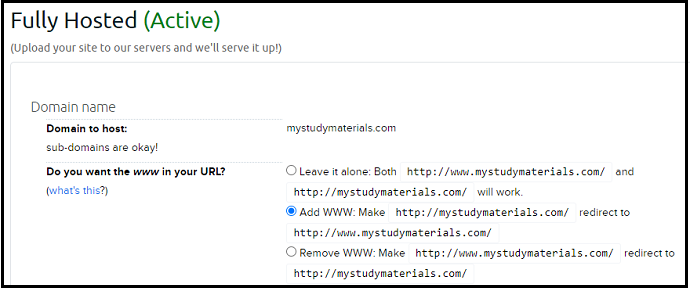
Step6: Suppose you are using Cloudflare without a subdomain, then select ‘Add WWW’ for the question ‘Do you want www in your URL?’ under Domain name section.
Step7: Scroll down to view the “Cloudflare Services”.

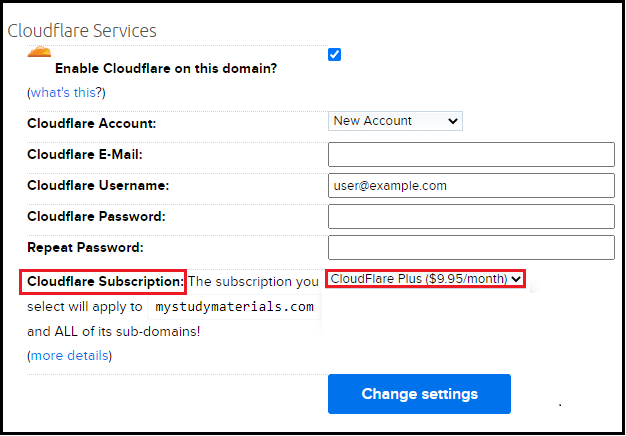
Step8: Click on “Enable Cloudflare on this domain?” checkbox.
Step9: Now you need to set up a Cloudflare account.
- New To Cloudflare:
- Suppose you don’t have Cloudflare account, select New Account in the Cloudflare Account field.
- Enter a valid email address like user@example.com in the Cloudflare Username field.
- Enter your desired password in the Cloudflare Password field. And type in the same password in the Repeat Password field.
- Already Have Cloudflare Account:
- Suppose you already have a Cloudflare account, select the Existing Account in the Cloudflare Account field.
- Type in your Cloudflare’s email address and Password in the respective fields.
- Already Set up A Cloudflare Account:
- Suppose you have already set up a Cloudflare account on your DreamHost panel earlier, then simply select the Existing Account and then the Email address that you would like to use.
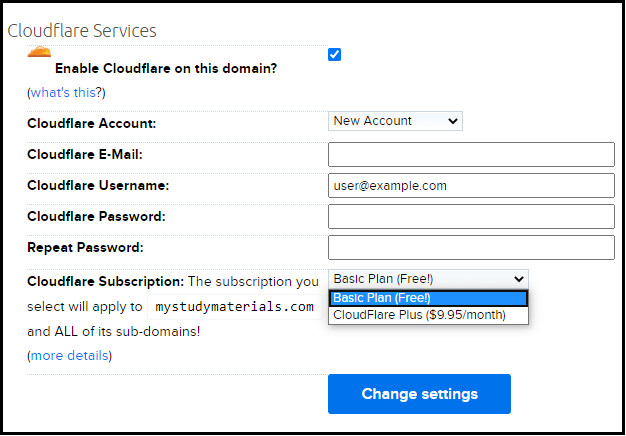
Step10: After you have set up your Cloudflare account, select Cloudflare Subscription like Basic Plan (Free) or Cloudflare Plus ($9.95/month) that will apply to your domain and all of its subdomains.
- Basic Plan (Free)
- Suppose you want to enable Cloudflare basic features like Global CDN, Free SSL support, Site Protection, and more at no cost, on your domain/domains, and all of its subdomains select Basic Plan (Free).
- Cloudflare Plus ($9.95/month):
- Suppose you want to use Cloudfare’s premium features like Polish, Mirage, Lazy Loading, and more, then you can subscribe to Cloudflare Plus ($9.95/month) plan inside in your DreamHost panel.
- Here, if you subscribe Cloudflare Plus plan inside DreamHost panel, then Cloudflare’s subscription fee will be directly billed by DreamHost per month.
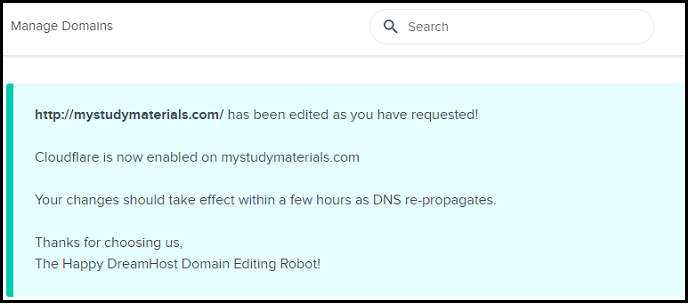
Step11: After you subscribe to Cloudflare Free or Cloudflare Plus plan, click on the Change settings button. Then a success message appears like “Cloudflare is enabled on your domain”. And within 5 to 10 minutes the domain will update to use Cloudfare at DreamHost. However, the DNS changes to your domain will take a few hours to fully propagate online in order to allow Cloudflare to work.
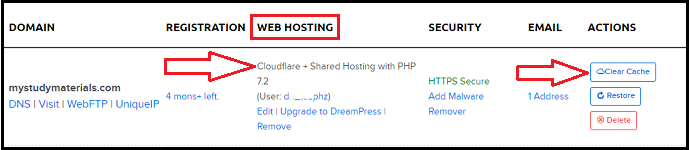
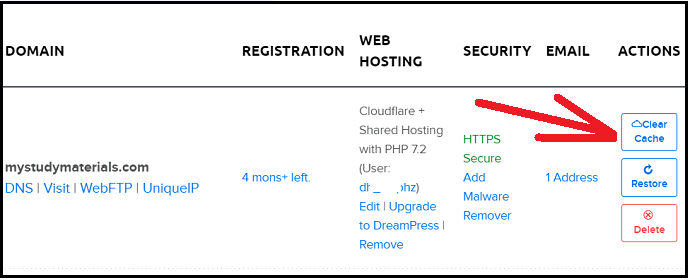
Step12: Once Cloudflare is enabled, you can view Cloudflare listed along with the PHP version under the WEB HOSTING column on the Manage Domains page. Also, you can view the Clear Cache option to the right of your domain under the ACTIONS column.
That’s It! You have now enabled Cloudflare on your domain hosted at DreamHost using DreamHost panel.
1.1 How to Disable Cloudflare on DreamHost
To disable Cloudflare, repeat the previous steps and unselect the “Enable Cloudflare on this domain?” checkbox. And click on the Change settings button.
Consider This: How to Easily Install Any Type of DreamHost SSL Certificate on Your Website
2. How To Use Cloudflare Technologies On DreamHost To Automatically Optimize Website’s Images, Remove Metadata, Compress and Convert Large JPEG Images Without Changing The Images, Manage The Loading Of Images, Enable or Disable Lazy Loading…
In this section, you can view how to use Cloudflare Technologies on your DreamHost Panel like Polish, Mirage, Lazy Loading, and more.
Total Time: 1 minute
Step1: Subscribe To Cloudflare Plus plan
1. You need to subscribe to Cloudflare Plus to use Cloudflare technologies for your domain on your DreamHost panel like Polish, Mirage, and Lazy Loading.
2. To subscribe, go to the Manage Domains page on your DreamHost panel. And click on the Edit button to the right of your domain, under the WEB HOSTING column.
3. Scroll down the page to Cloudflare Services.
Then ensure that you have:
Selected the “Enable Cloudflare on this domain?” checkbox,
And selected the Cloudflare Plus ($9.95/month) in the Cloudfare Subscription field.
4. Suppose, you have not enabled Cloudflare services earlier. Now, enable Cloudflare services on your domain and subscribe Cloudflare Plus plan.
Step2: Enable Cloudflare Polish To Automatically Optimize Images On Your Site
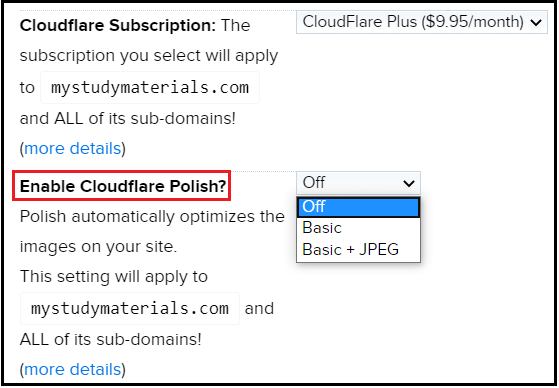
1. Once, you have selected Cloudflare Plus ($9.95/month) in the Cloudfare Subscription field, then immediately you can view the Cloudflare Technologies like Polish, Mirage, and Lazy Loading options, under Cloudflare Services section, inside your DreamHost panel.
2. As a first, click on the Enable Cloudflare Polish? dropdown menu. Then you can view three settings under this. Those are:
Off, Basic, and Basic + JPEG.
3. Here, when you can enable Polish, Cloudflare automatically optimizes the images on your website. Now select any of three settings under it.
Off: Select this mode to disable Polish for your domain.
Basic: This mode is known as “lossless mode”, removes all unnecessary data like metadata and image headers without touching the image data. And does not change how the image looks and usually reduces an image by approximately 21% according to Cloudflare.
Basic + JPG: This mode is known as “Lossy Mode”, removes all the unnecessary data similar to Basic mode. Further, it also compresses and converts large JPEG images. And according to Cloudflare tests, an average file reduction is 48%.
Here, the compression does change the image. However, for most images, the changes are invisible to the average visitor.
4. Finally, remember to fully purge your Cloudflare Cache when you enabling Polish.
Step3: Enable Cloudflare Mirage To Automatically Manage The Loading Of Images
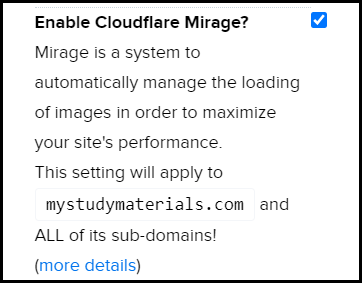
1. Now click on the “Enable Cloudflare Mirage?” checkbox to enable Mirage on your domain.
2. When you enable Mirage, it automatically manages the loading of images in order to maximize your website’s performance.
3. Mirage will work with the following image file extensions:
.jpeg
.png,
.gif
.img
Step4: Enable Lazy Loading To Delay Loading Of Images Until Absolutely Necessary
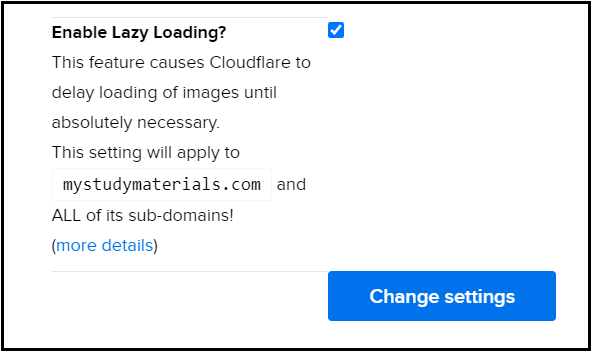
1. Next, click on “Enable Lazy Loading?” checkbox, to enable Lazy Loading.
2. When you enable Lazy Loading, it delays the loading of an image that is not needed on the page immediately.
That is, an image, not visible to the user immediately when the page loads, but visible when the user scrolls down to the image. Suppose the user never scrolls, then the image that is not visible to the user never gets loaded.
3. After you subscribe to the Cloudflare Plus plan and enable Cloudflare Polish, Cloufare Mirage, and Lazy Loading, click on the Change settings button.
Then Cloudflare technologies are enabled on your domain.
Recommended: DreamHost Vs Bluehost: Comparison between Two Big Titans in Hosting Industry
3. How to clear your Cloudflare cache
Step1: Go to Manage Domains page on your DreamHost panel.
Step2: To the right of your domain, you can view the Clear Cache button under the ACTIONS column.
Step3: Simply click that Clear Cache button to clear the entire cache on your domain.
4. DreamHost subscriptions vs. Cloudflare subscriptions
Since Cloudflare is a trusted DreamHost partner, Cloudflare subscriptions inside the DreamHost panel have the same benefits as Cloudflare subscriptions on the Cloudflare website.
Now let’s compare the Cloudflare subscription plans inside the DreamHost panel and Cloudflare subscription plans on the Cloudflare website.
4.1 Cloudflare’s “Free” plan vs. DreamHost’s “Basic (free)” plan
There is no difference in terms of features between the two.
4.2 Cloudflare’s “Pro” plan vs. DreamHost’s “Plus” plan
- Cloudflare’s Pro plan on Cloudflare website:
- Its cost is $20/month.
- It offers a few extra features like Web Application Firewall and 20 PageRules.
- Cloudflare’s Plus plan inside DreamHost panel:
- Its cost is just $9.59/month.
- It doesn’t have a Web Application Firewall but has 10 Page Rules.
- However, all shared, VPS, and DreamPress accounts do include the Web Application Firewall (WAF) installed on the Linux webserver.
5. Cloudflare Free Plan and Cloudflare Plus Plan Features
5.1 Cloudflare Free Plan Features:
- Global CDN:
- Cloudflare’s first feature is it’s global Content Delivery Network (CDN) that optimizes your site, improves website load times, and provides protection against malicious traffic like botnets and internet attacks.
- Boost Your SEO:
- As it improves your site speed, this, in turn, improves your search engine ranking and eCommerce conversion rates.
- Free Universal SSL:
- It supports free SSL connections to all of its customers. Currently, more than 2 million sites are using its free SSL connection.
- This in turn aids to make your website more secure and improves your SEO too.
- Rocket Loader and Auto Minify:
- Cloudflare’s features Rocket Loader and Auto Minify do front-end web content optimization.
- IPv6 Support:
- Cloudflare offers free IPv6 support to all domains without needing any additional configuration or hardware.
- Site Analytics (24-hour delay):
- You can view the metrics of your site in the Cloudflare dashboard.
5.2 Cloudflare Plus Plan Features:
- Polish:
- Automatically optimizes the images on your website
- Mirage:
- Automatically manages the loading of images in order to maximize your website’s performance
- Lazy Loading:
- Delays the loading of an image that is not needed on the page immediately.
- That is, an image, not visible to the user immediately when the page loads, but visible when the user scrolls down to the image. Suppose the user never scrolls, then the image that is not visible to the user never gets loaded.
- 10 URL Rules
- Site Analytics (1-hour delay)
Final Thoughts On How To Use Cloudflare on DreamHost
Now you can know how to enable and use Cloudflare in your Dreamhost panel to automatically optimize, accelerate, and protect your website at no cost or low cost. And you can know how reliable it is to subscribe Cloudflare Plus plan directly inside your DreamHost panel rather on the Cloudflare website. Also, you have seen the Cloudflare’s free features and premium features. So based on your need, you can now decide whether to use Cloudflare basic free or Cloudflare Plus.
Now you must say thanks to DreamHost for offering Cloudflare Plus plan at a low price of just $9.95 per month. Because the actual Cloudflare Pro cost on the Cloudflare website is $20 per month.
Finally, remember that some features can be configured directly in your DreamHost Panel like Polish, Mirage, Lazy Loading, and Clear Cache. While others like enable free SSL and temporarily suspending Cloudfare’s Caching or enable Development mode can be managed at Cloudflare.
If you want to use the Cloudflare plan for free, we suggest you try Rocket.net which is the best-managed WordPress hosting service.
- Read Next: Dreamhost Vs SiteGround: The Hosting Race between the Two Biggest Hosting Companies. Who will Win?
- Dreamhost Vs HostGator: Which is Best?
I confirm that this article, How To Use Cloudflare on DreamHost, is dedicated to DreamHost users to learn how to enable and use Cloudflare in their DreamHost panel to optimize, accelerate, and protect their websites at no cost or low cost. If you really liked this article, do a favor by sharing this article and follow BlogVwant on Facebook and Twitter for more tips.
How To Use Cloudflare on DreamHost: FAQs
How Cloudflare subscriptions work?
Suppose you subscribe to Cloudflare free or plus plan for your domain/domains, then this subscription will apply to all of its subdomains.
However, you need to enable Cloudflare on each subdomain.
That is, a single subscription covers both your primary domain like example.com and any of its subdomains like blog.example.com.
And you can enable Cloudflare for an unlimited number of subdomains.
Further, you don’t need to add ‘www’ to your subdomain.
For example, if your subdomain is blog.example.com, you can simply activate Cloudflare for blog.example.com.
How is Cloudflare Plus subscription billed?
Suppose you subscribe Cloudflare Plus plan inside DreamHost panel, then Cloudflare’s subscription fee will be directly billed by DreamHost per month.
How much does Cloudflare cost?
The basic Cloudflare plan is free to use. And you can enable it on your domain/domains through DreamHost panel.
Suppose you subscribe Cloudflare Plus plan inside DreamHost panel, its cost is $9.95/month.
While you subscribe Cloudflare Pro plan on the Cloudflare website, its cost is $20/month.
Is Cloudflare really free?
Yes. Cloudflare offers a basic plan free for all its customers. And provides basic free features like global CDN, front-end web-content optimization, SSL support, iPv6 support, Site analytics (24-hour delay), and more.
The ability to integrate Dreamhost hosted websites with Cloudflare was removed from the Dreamhost control panel a few years ago (I asked DH’s support about it and they said this was at Cloudflare’s request).
I believe that it’s still possible to link Dreamhost hosted sites with Cloudflare, but it has certainly been made more difficult than your instructions describe. The DNS will need to be handled by Cloudflare and there needs to be special consideration for MX records/ email integration.
Could you please update your guide to help with the current situation?