Are you new to Constant Contact? Or do you want to know how to use Constant Contact? That is from the starting account set up to the end checking the status of your emails sent to your website or blog visitors.
Then, this article is the right one for you. Just go through it. Then you can know how to use Constant Contact to set up your account, upload your contacts, grow your contact lists, send emails, and verify the status of emails. And you can too learn about improvements needed to grow your lists.
What is Constant Contact?
Constant Contact (60 Days Free Trial) is a leading expert in email marketing for over 20 years. And it is an ideal one for small businesses. And it has the following excellent features.
- It is easy to use.
- It makes Drag and Drop Editing easy.
- It greets new subscribers with a timely welcome email.
- It automatically resends emails to non-openers.
- It offers everything that you need to turn leads into contacts into loyal customers.
- You can track your email marketing results in real-time. And you can improve them in no time.
- It provides Subject Line A/B Testing too.
- And more.
Constant Contact Pricing & Plans
It has two plans to buy. The price depends on your list size.
- The email plan starts at $20/Month.
- Email Plus plans start from $$45/Month.
Constant Contact Discount
Time to time they run promotional offers. You need to check our Constant Contact discount coupon page for the latest offers.
- You Might Like: What Is Constant Contact? Features, Pricing, And Review
- 5 Best Contact Form Plugins for WordPress
How to Use Constant Contact and Get the Most Out of Its Tools
Video Tutorial:
For the reader’s convenience, we always create a video tutorial. Either you can watch and learn or simply skip the video and continue with the steps mentioned below.
Just go through the following 5 steps. Then you can get complete knowledge on how to use Constant Contact. And you can know how to use all of the Constant Contact tools.
- Setup Your Account.
- Upload Your Contacts.
- Grow Your Lists.
- Create and Send an Email.
- View Reports.
1. Setup Your Account
To set up your account in Constant Contact, you need to verify an email address. Then you can set up your account settings.
1.1 Verify an Email Address
- First, you need to verify your account email address. Then you can use Constant Contact to send emails.
- Once verification is completed. Then you can start receiving emails from Constant Contact regarding:
- your account,
- billing information,
- password reset emails,
- and more.
- Further, you need to verify the additional email addresses which are used as From Addresses for your outgoing Constant Contact emails.
- Similarly, do for Reply-to email addresses.
- Here, the verification of all From and Reply-to email addresses ensures that you are the owner of the addresses.
- Now use the following methods to verify the email addresses.
Two Ways to Verify an Email Adress
- Using My Settings Option.
- Verifying Within an Email.
1.1.1 Using My Settings Option:
- Open the Constant Contact webpage. And login.
- Next, on the upper right side of this page, click on the profile name.
- Next, on the My Settings.
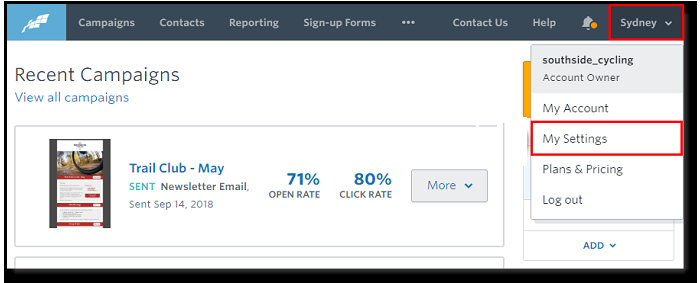
Next click on the Verify Address.
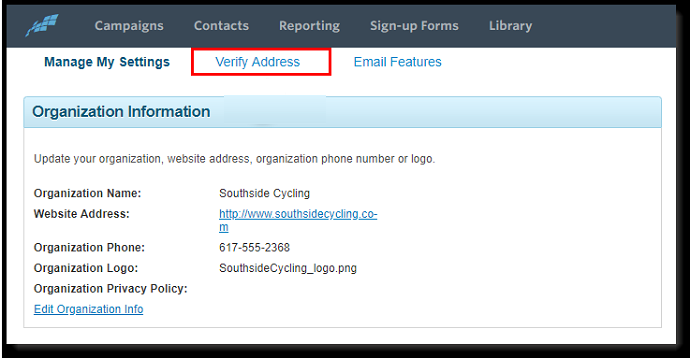
Then you can see the ‘Email Addresses to Verify‘ section.
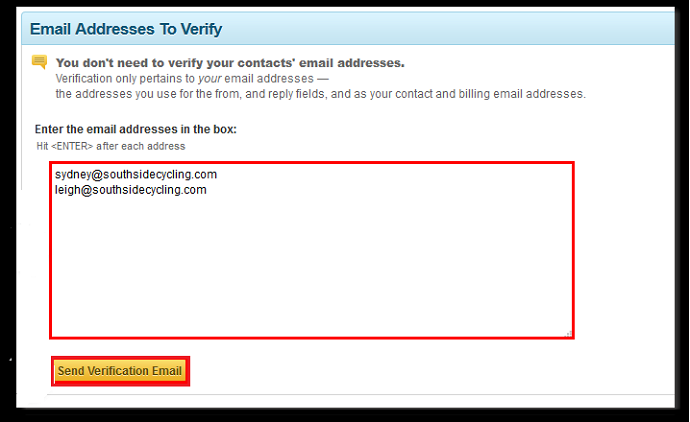
- Now, in the provided box, enter email addresses that are to be verified.
- Next, click on the button Send Verification Email.
- Next, Constant Contact Team sends Verify Your Email Address to each email address.
- You can now open each email. And click on the Verify this email button.
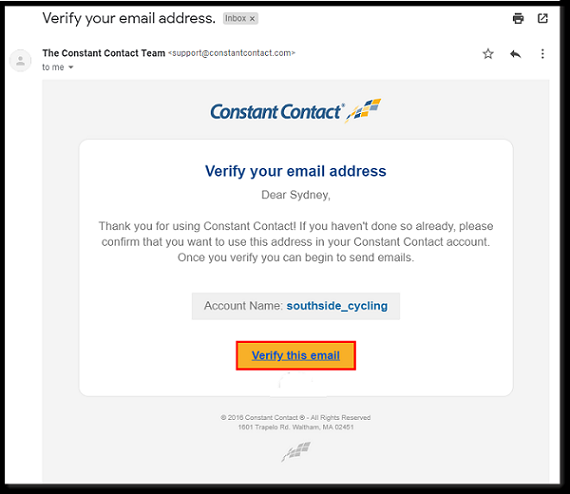
- That’s it! Now all your email addresses are verified.
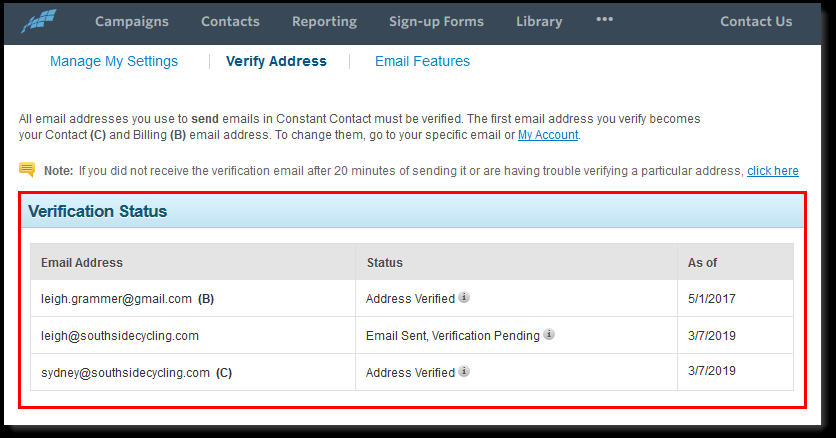
- If you want to view the verification status of the email addresses. Then you have to go to the Verification Status section.
- There you can view all the verified and pending emails.
1.1.2 Verifying Within an Email:
- You can too verify an additional email address within it.
- Within your email draft, just click on the Continue button.

- Next, click Add Another in any one of the following sections:
- From Address.
- Reply-to Address.
- Send Me Early Results.
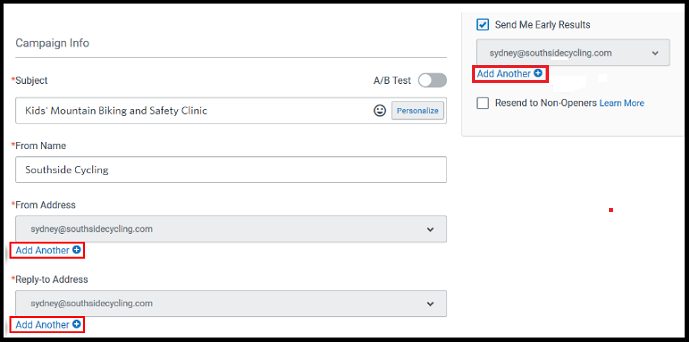
Next, type in the email address you want to verify.
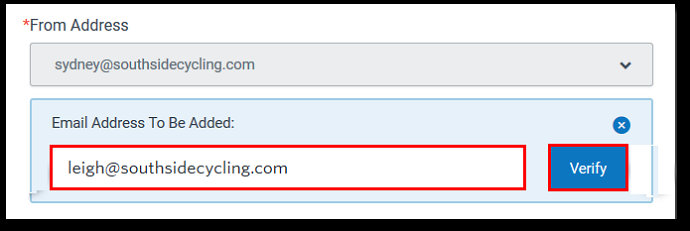
- Next, click on the Verify button.
- Next, you can receive ‘Verify your email address‘ email from the Constant Contact Team.
- Next, open the email. And click on Verify Email.
- That’s it! Now the additional email address is checked.
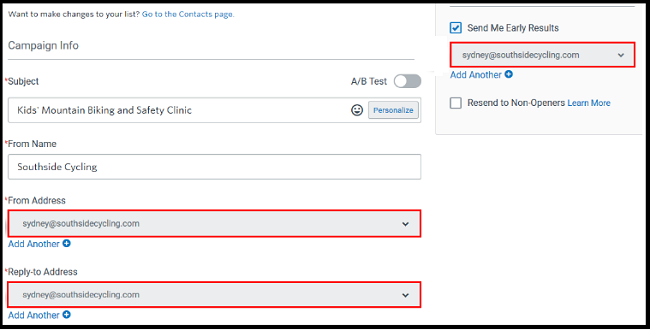
- Once it is checked. You can select it in any of the drop-downs.
1.2 Set Up Your Account Settings
You can set up your account settings by editing:
- Default Settings.
- Email Footer Options.
1.2.1 Editing Default Settings:
- On the top right corner, click the profile name. And select My Settings.
- Next, you can view the Manage My Settings tab. On this tab, there are several sections you can edit and modify.
- Those sections are:
- Organization Information.
- Signature Information.
- Email Message Settings.
- Contact Settings.
- Organization Address.
- Time Zone.
Organization Information:
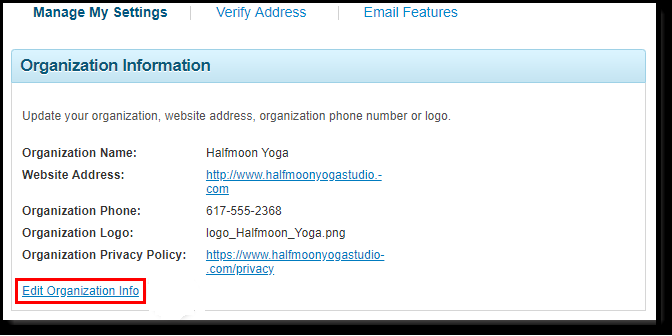
Click on the Edit Organization info link. And provide information about your organization like:
- Organization Name.
- Website Address.
- Organization Phone.
- Organization Logo.
- Organization Privacy Policy.
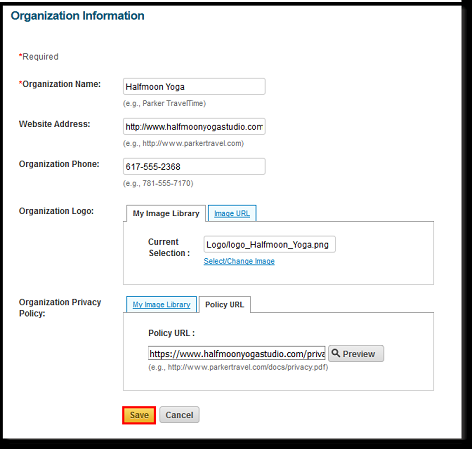
- Next, click on the Save button.
- That’s it! Your organization details are saved now.
- Just like above, edit and modify the remaining sections.
1.2.2 Editing Email Footer Options:
The email footer is a small print that appears at the bottom of the email. The footer consists of sender information like:
- Name of your organization.
- Unsubscribe information.
- Physical address.
To add all of the above details, click on the Email Features tab. Then you can see the Footer Options section.
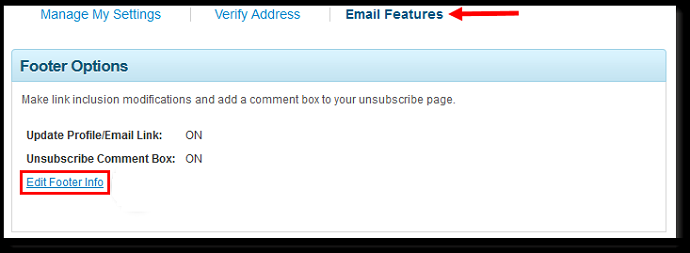
- You can now see the two options:
- Update Profile/Email Link: This is ON by default.
- Unsubscribe Comment Box: You can turn on this option.
- Next, click on Edit Footer Info. And provide details.
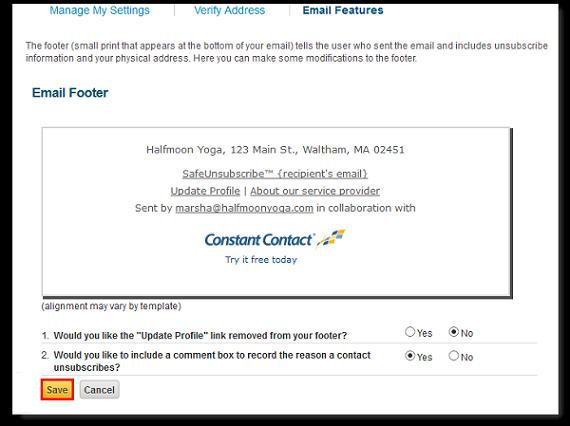
- Next, click on the Save button.
- That’s it! Your footer options are now saved.
Recommended: 5 Best Email Marketing service providers & Newsletter Companies
2. Upload Your Contacts
After verifying your email addresses and your account set up. Next, you have to add contacts to your Constant Contact account. Let’s follow the below topics to accomplish this task:
- Methods for Adding Contacts to an Account.
- Bulk Upload of Unsubscribed Contacts.
2.1 Methods for Adding Contacts to an Account
You can add contacts to your Constant Contact by using the following ways:
- You can upload a file of contacts in the form of CSV, XLS, XLSX, and more.
- You can manually type or paste each contact.
- You can use the Integration tab to export your contacts from the following integrations:
- Microsoft Office 365.
- MINDBODY.
- Quickbooks.
- Salesforce.
- You can export your contacts from your email accounts too. Just like from:
- AOL.
- Comcast Webmail or SmartZone.
- Entourage.
- Gmail.
- Microsoft Outlook (2010, 2013, and 2016).
- Microsoft Outlook (All other versions).
- Yahoo.
- And more.
- You can export contacts from your previous email marketing provider like:
- AWeber.
- GoDaddy.
- iContact.
- MailChimp.
- VerticalResponse.
- You can export your contacts from your eCommerce providers like:
- BigCommerce.
- Shopify.
- You can too export your contacts from Eventbrite.
2.2 Bulk Upload of Unsubscribed Contacts
You can too upload the list of unsubscribed contacts via:
- from a previous email provider.
- or a file in the form of XLS, XLSX, CSV, and TXT.
Now let’s see the demonstration on how to add unsubscribed email addresses to your Constant Contact lists.
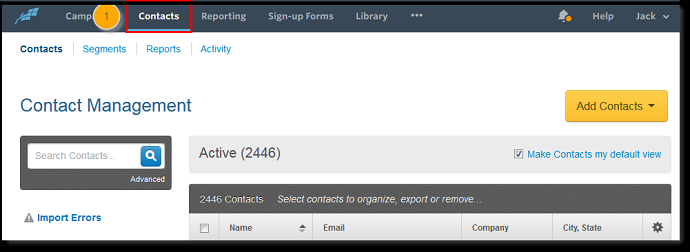
- Click on the Contacts tab.
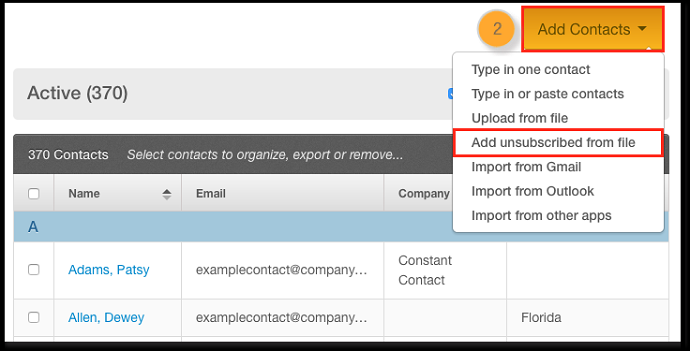
2. Next, click on the Add Contacts button. And then on the ‘Add unsubscribed from file’.
3. Next, click on the Choose File button. And browse to find the file on your computer.
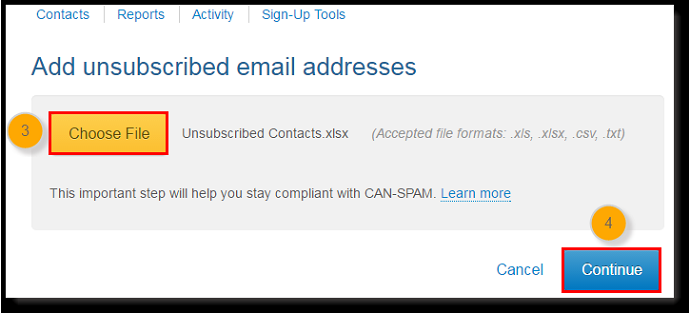
4. Next, click on the Continue button.
5. Next, map the columns that Constant Contact has to match the columns your file has.
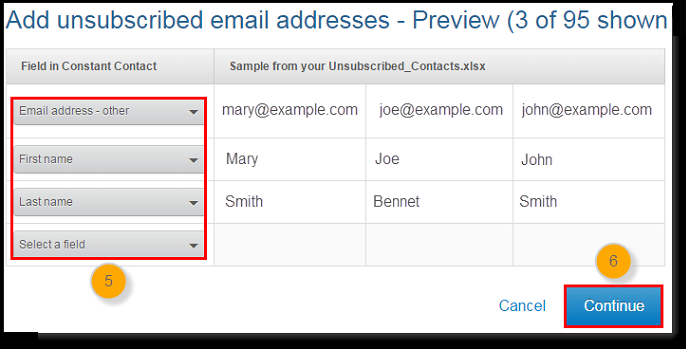
6. Next, click on the Continue button.
7. Next, there is an optional option. That is, Add a tag. If you want, you can add a tag.
8. Next, click on the Import button.
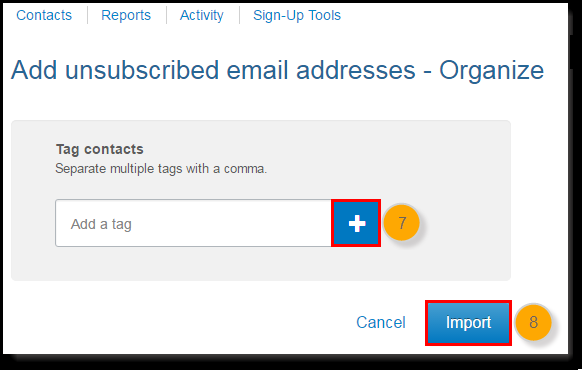
Remember that once you add your unsubscribed contacts. Then you won’t be able to email them. They will need to re-subscribe to your list in order to get your emails again.
3. Grow Your Lists
Next, you have to concentrate on how to grow your lists. Constant Contact provides numerous ways to grow your lists. Let’s follow the below topics to accomplish the present task:
- How to collect email addresses using Constant Contact?
- How to add Constant Contact Join My List App to your Facebook webpage?
- How to customize the Join My List Sign-Up Form Content on a Facebook Business Page?
3.1 How to collect email addresses using Constant Contact?
Constant Contact provides all possible ways to collect emails. Those are listed below.
- Collect Sign-ups Through a Website or Blog
If you have a website or blog, then you can collect email lists by providing:- Inline Sign-up Form.
- Pop-up Sign-up Form.
- Lead Generation Landing Page
- If you don’t have a website or blog. Then you can create a simple landing page just for collecting new sign-ups.
- Next, you can share the link in your emails, in a blog post, or in posts on social media.
- Constant Contact Forms for WordPress Plugin
- If you are a WordPress user, then you can install the Constant Contact Forms for WordPress Plugin. Of course, you can also use any other lead capture plugins like Optinmonster.
- Next, create and customize the sign-up form.
- And start collecting contacts from the visitors of your WordPress site or blog.
- Collect Sign-ups Through Social Media
- You can even collect contacts via social media like Facebook and Instagram.
- For this, you need to add Join My List App to your Facebook Business page.
- Collect Sign-ups from a Physical Location
- If you are face-to-face with your customers, clients, and supporters. Then you can collect the emails via Constant Contact ListBuilder App.
- You can install this app on any Android or iOS device.
3.2 How to add Constant Contact Join My List App to your Facebook webpage?
- In your Constant Contact account, click on the Sign-up Forms tab.
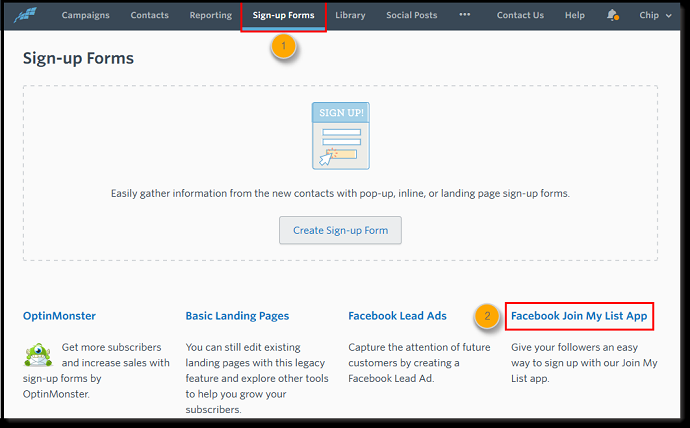
2. Next click on Facebook Join My List App.
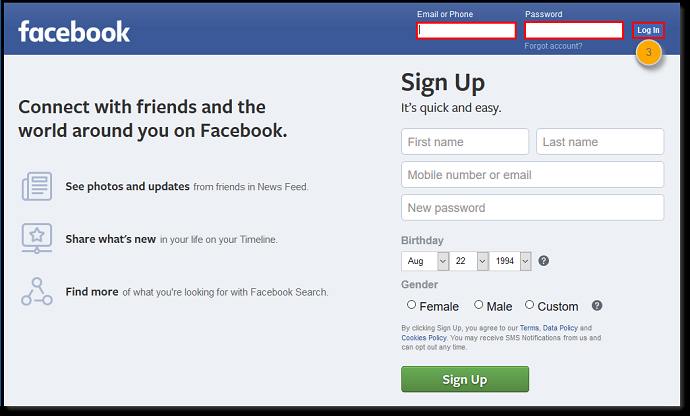
3. Next login to your Facebook account.
4. Next, click on Add App.
5. Next, select the business page you want to add the app to. And click on the Add Page Tab.
6. Next, click on Go To Facebook button.
7. Next, select the business page that you added the app to.
8. Next, click on the Join My List.
9. Next, click on the Continue button.
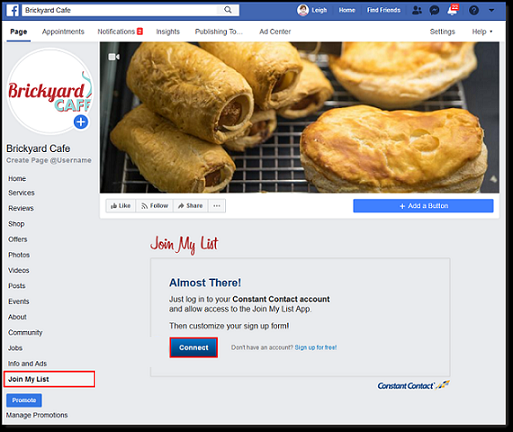
That’s it! You have now connected your Facebook and your Constant Contact.
3.3 How to customize the Join My List Sign-Up Form Content on a Facebook Business Page?
- On your Facebook business page, click on the Join My List tab.
- Next, click on the Customize button.
- Next, choose the Default list.
- Next, click on the Upload Image button. And browse your logo on your computer. And add it.
- Next, click on Page2.
- Next, customize the Thank You message.
- Next, click on the Save Changes button.
Read It: How to Set Up WordPress Email Logs
4. Create and Send an Email
After making all efforts to grow your contact lists. Next, you have to concentrate on sending attractive and mobile-responsive emails. To accomplish this task, let’s follow below topics:
- How to create a mobile-responsive email with all your organization details using Constant Contact?
- How to Schedule and Send an Email using Constant Contact?
4.1 How to create a mobile-responsive email with all your organization details using Constant Contact?
- In your Constant Contact account, click on the Campaigns tab.
- Next, click on the Create button.
- Next, select the Email, from the list.
- Next, click on the Standard tab.
- Next, select any template that suits your business. And edit it. Here all templates are mobile responsive.
- Next, click on the pencil icon to give a name to your email.

- Next, customize your layout using the Build, Images, and Design tabs. It includes:
- Add your logo and colors to your email.
- Add your desired text and images.
- Create a clear call-to-action using text links, buttons, or clickable image links.
- Add social sharing buttons.
- Next, update the content in your header and footer.
- That’s it! You have now finished adding your content to your email.
- If you want to view and check the given details. Then send an email to yourself.
4.2 How to Schedule and Send an Email using Constant Contact?
- Once you’ve finished branding your email. Next, you can send emails to your contacts.
- Here, you can choose to send emails immediately. Or schedule them to go out at a future date and time, in advance.
- Now let’s see the below procedure to accomplish the above task.
- In your Constant Contact account page, click on the Campaigns tab.
- Next, type a keyword into the search bar. And hit the Enter key.
- Next, find the name of the email, you want to send.
- Once you have identified your desired email. Just click the More button beside it. Next on Schedule.
- Next click on the Email Lists option. Or Segments option.
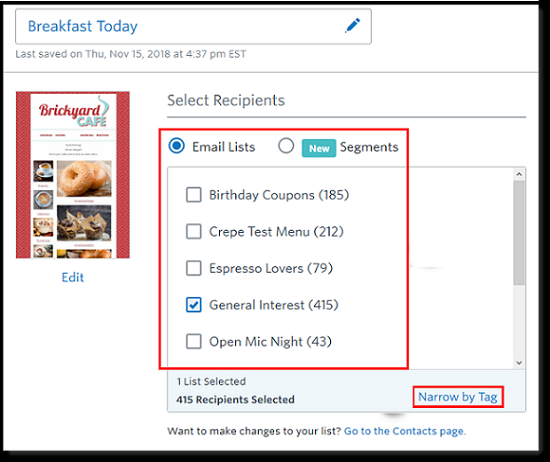
- (Optional) If you have segmented your contact lists with tags. Then click Narrow by Tag.
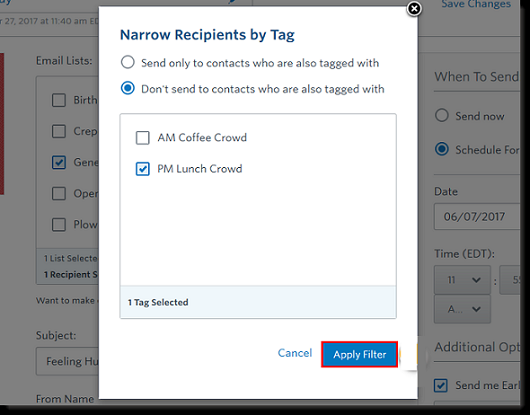
- (Optional) Choose the tags you want to send to or exclude. Then click Apply Filter.
- Next, you have to fill the Subject line and From Name.
- Next, select the From Address and ‘Reply-to Address‘.
- If you want, you can edit and modify the physical address.
- Next, decide which one you need:
- Send Now. Or
- Schedule for later.
- Next click on the Send Now option. Or on the Schedule for later option.
That’s it! You have now finished sending emails to your contact lists.
5. View Reports
Once you have sent emails to your desired contacts or campaigns. Next, you have to concentrate on reports that indicate:
- Whether customers have opened your emails or not.
- If they opened, how many are the click-rates?
- Whether your email reached them. Or bounced.
- And more.
To accomplish the above task, just follow the below topics.
- How to see Overview Reports of your sent emails using Constant Contact?
- How to see Deeper Reports of your sent emails using Constant Contact?
- How to Improve Reports using Constant Contact?
5.1 How to see Overview Reports of your sent emails using Constant Contact?
In your Constant Contact account, click on the Reporting tab.
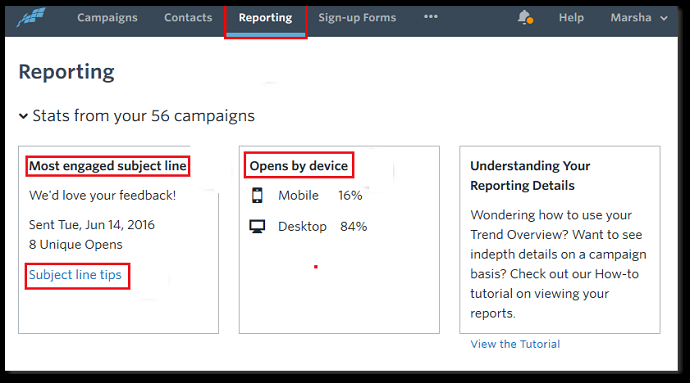
Now you can see overview reports like:
- Most engaged subject line.
- Subject line tips.
- Click this to learn tips to improve your subject line and email open rates
- ‘Opens by device‘.
- Here you can see how your sent email is opened?
- That is by using a mobile or computer.
Next, if you want to view stats for a specific email. Then search it by campaign name or a term within the campaign name. Then you can view:
- Open Rate.
- Click-Through Rate.
- Bounce Rate.
- Unsubscribe rate.
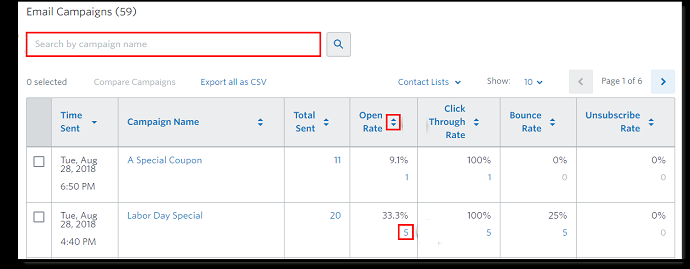
You can too use the checkboxes to select up to 5 emails. And compare their results with a graphical report.

5.2 How to see Deeper Reports of your sent emails using Constant Contact?
Just click on a hyperlinked number, then you’ll get to see all of your email stats.
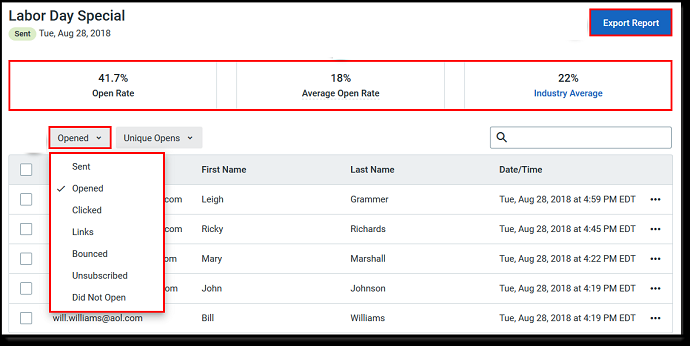
Here, click on the Export Report button. Then the report of emails is downloaded. Then you can save it as an Excel or CSV file on your computer.
The following are the deeper reports for emails you can view.
- Sent:
- This option shows lists of contacts that you have emailed.
- Opened:
- This option shows lists of contacts that are opened your email.
- Clicked:
- This option shows lists of contacts who clicked links in your email. And which links they clicked.
- Links:
- With this option, you can view how many unique clicks each link in your email received.
- You can too view links that were most popular.
- Bounced:
- With this option, you can view how many emails are bounced.
- When you get a bounce message back from an email address. You not only record it but also categorize the reason given for the bounce.
- Take a look and either rescue or remove email addresses that are in trouble.
- Unsubscribed:
- With this option, you can see who opted-out of your emails and why.
- Did Not Open:
- Click this option to find the contacts who weren’t curious enough to open your email.
- You can save them into a new list so that you can send coupons or targeted content to win back their interest.
5.3 How to Improve Reports using Constant Contact?
Just follow the below points to improve reports of your contacts.
- Open Rates:
- If your email is being received but isn’t being read, try the following tips for improving your open rates.
- Send emails at peak daytime hours.
- Segment Your Contact Lists.
- Personalize Your Subject Line.
- Make the Benefits Obvious (Just like Coupon codes).
- Use A/B Test for Your Subject Line.
- Reward Your Most Active Subscribers.
- If your email is being received but isn’t being read, try the following tips for improving your open rates.
- Click Rates:
- Simply opening your email isn’t enough. Help attract your subscribers to take action and improve your click-through rates with these tips.
- Keep Your Email Short.
- Use Only One Call-to-Action.
- Put the Purpose in the Subject Line.
- Personalize Your Email for Each Reader.
- Simply opening your email isn’t enough. Help attract your subscribers to take action and improve your click-through rates with these tips.
- Spam:
- Use industry best practices to reduce spam reports. And keep your email inbox-worthy.
- Deliverability:
- Follow the below tips to improve your deliverability and help your email land in the inbox.
- Make sure you’re not using phrases that trigger spam filters in your subject line.
- Ask your contacts to add you to their “safe sender” list.
- Make sure security programs have you on their “white list“.
- Follow the below tips to improve your deliverability and help your email land in the inbox.
Conclusion:
Now you have gained the complete knowledge on how to use Constant Contact. Now you can use all of its tools easily and fastly to grow your contact lists. And you can increase your sales and business within a short span.
At last, you must say thanks to Constant Contact, which made email marketing easy. And it provides everything to grow your lists. And it provides numerous ways to attract audiences to your site or blog.
And many marketing experts suggest that Constant Contact is the ideal choice for small businesses. So you can give first preference to Constant Contact to grow your business for the next step.
- Read Next: HostPapa Review: Best Linux Web Hosting Service for Your Small Business
- How to Set Up WordPress SMTP Using Amazon SES
I can surely believe that this article definitely aids you to get complete knowledge on how to use Constant Contact. If so, do a favor by sharing this article and follow BlogVwant on Facebook, Twitter, and YouTube for more tips.
Constant Contact FAQs:
-
What is the best email marketing service for small businesses?
Constant Contact.
-
Is there a free version of Constant Contact?
No. Free version is not available. But you can use it free for 60 Days without submitting your card details.
-
What can Constant Contact do?
Its an ideal tool for all your email marketing. It provides everything to attract audiences over the web. And it aids you to grow your contact lists. And you can see the reports of your sent emails too.
-
How much does it cost for Constant Contact?
It has two plans. Price varies depends on your list size. Email plan starts from $20/month and Email plus starts from $45/month.
