
Do you want to keep records of all emails that are sent out from your WordPress website? And do you want to track every email that sent out from your WordPress site?
Then to accomplish these tasks, you need to set up Email Logs on your WordPress site using the WP Mail SMTP plugin.
So, just go through this article to know how to set up and view WordPress email logs on your WordPress site using the WP Mail SMTP plugin.
Why Should I Turn Email Logs On?
Once you turn on the Email Logs, then your WordPress database stores each detail of all emails that are sent out on your WordPress site. So, you can view any detail about a particular email like:
- Status of the email. ie., you can know whether it is sent successfully.
- Date and Sent Time.
- Which visitors or team members received which type of emails.
- When a visitor fills out a form on your site, then form notifications send you email alerts.
- Subject Line.
- And a lot more.
What is WP Mail SMTP?
WP Mail SMTP is the most powerful and user-friendly SMTP plugin that fixes WordPress email delivery and ensures your emails reach the inbox.
Normally, it fixes email delivery problems by reconfiguring your WordPress website to use proper SMTP mail providers like Sedinblue, Amazon SES, and more when sending emails.
Further, it makes easy to enable and view Email logs on your WordPress site.
This plugin is available in free and Pro versions.
First time customers will get the $50 discount on all WP Mail SMTP plans through This WP Mail SMTP discounted pricing page.
- Related: Why My WordPress not sending Email? Quick Solution
- How to Set up WordPress SMTP using Amazon SES
Can WordPress send emails?
- Yes.
- Normally, WordPress uses the PHP Mail function to send emails that are generated by WordPress or any contact form plugin like WPForms.
- But, most WordPress hosting servers are not configured to use the PHP Mail function.
- That’s why you can’t receive emails on your WordPress website.
So, most WordPress website experts recommend to install and use the WP Mail SMTP plugin on your WordPress site to resolve the above issue.
- You Might Like: Why My WordPress Not Sending Email? Quick Solution
- Forgot WordPress Admin Email? 3 Ways to Get WordPress Admin Email
3 Steps to Set Up WordPress Email Logs
Video Tutorial:
For the reader’s convenience, we always create video tutorial. Either you can watch and learn or simply skip the video and continue with the steps mentioned afterward.
Just go through the below steps, to set up WordPress Email Logs on your WordPress site.
- Install the WP Mail SMTP Plugin.
- Enable WordPress Email Logs.
- View WordPress Email Logs.
Step1: Install the WP Mail SMTP Plugin
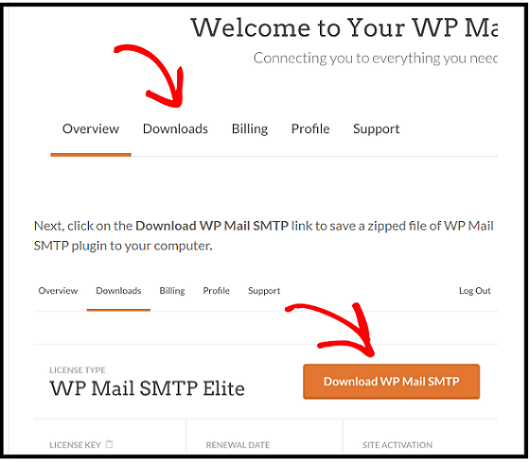
- First, open the WP Mail SMTP Login Account page. And login there.
- Once you logged in, next click on the Downloads tab.
- Then on the Download WP Mail SMTP button.
- Now, a zip folder of the WP Mail SMTP plugin is downloaded.
- Some times, the normal folder is downloaded instead of a zip folder. Then you have to zip that folder.
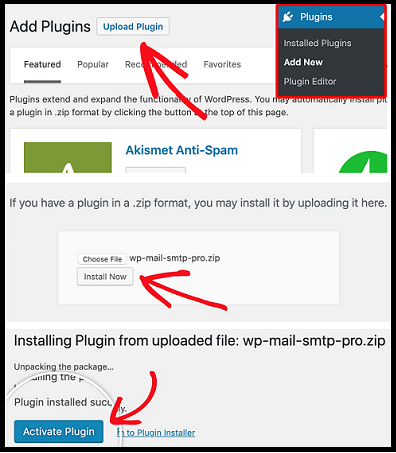
- Next, go to the admin dashboard on your WordPress website.
- Next, navigate to Plugins > Add New. And on the next screen, click on the Upload Plugin button.
- Now click the Choose File button. And select the recently downloaded WP Mail SMTP zip file and upload it.
- Next, click the Install Now button. Then WP Mail SMTP plugin is installed on your WordPress site.
- Once the plugin is installed, then click on the Activate Plugin button.
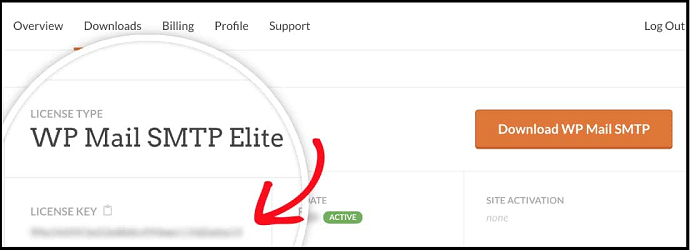
- Next, go back to your WP Mail SMTP account page. And click the tab Downloads.
- Now, on this Downloads page, you can view the LICENSE KEY.
- Next, copy your license key.
- Now move back to your WordPress website admin area.
- Next, navigate to WP Mail SMTP >> Settings.
- Next, click on the tab General.
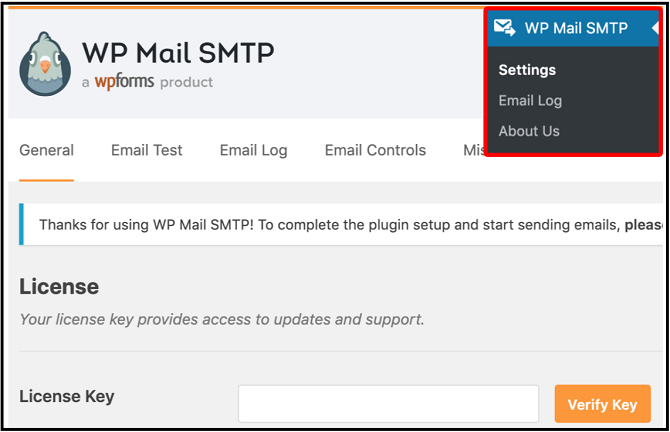
- Now on this page, you can view the License Key field.
- Then, in this field, paste the recently copied license key.
- Next, click the Verify button.
- Then you can see an alert message indicating that your site is now receiving the automatic updates.
- Next, click on the OK button which is appearing below this message.
- Next, you can see your license level, just below your License Key field.

That’s it! You have just now installed and activated the WP Mail SMTP on your WordPress site.
Step2: Enable WordPress Email Logs
- Now go to the admin dashboard on your WordPress site.
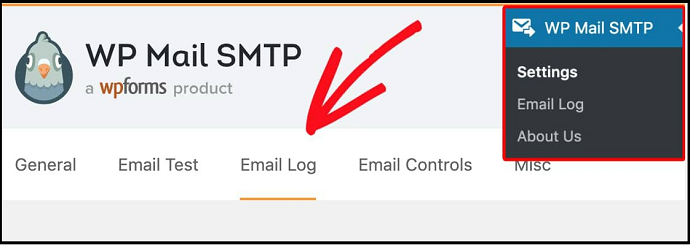
- Next, move to WP Mail SMTP >> Settings.
- Next, click on the tab Email Log.
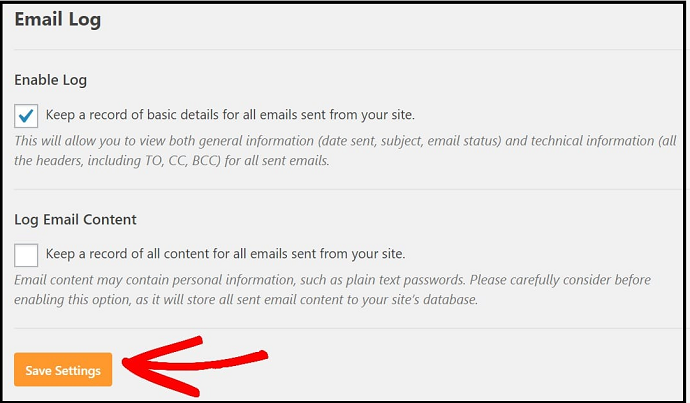
- On the Email Log page, you can see the Enable Log option.
- If you enable this Enable Log option, then the details of each WordPress email are recorded. The details include:
- Email Status (You can know the email is sent successfully).
- Date and Time Sent.
- Subject Line.
- Recipient Email Address(es) (including CC and BCC).
- From Email.
- Number of Attachments (In case you have set up your forms to accept multiple attachments).
- Mailer Options Used.
- Additional Technical Details (like content-type, MIME, and more).
- Next, enable this Enable Log option.
- Once you select this option, then another option Log Email Content is displayed.
- But don’t select or enable that option.
- Suppose you select that option, then all your email content is stored as plain text (not encrypted) in your WordPress site’s database.
- Next, click the button Save Settings.
That’s it! You have now enabled the Email Logs on your WordPress site.
Read It: 8 Best WordPress Email Subscription Plugins To Collect Leads
Step3: View WordPress Email Logs
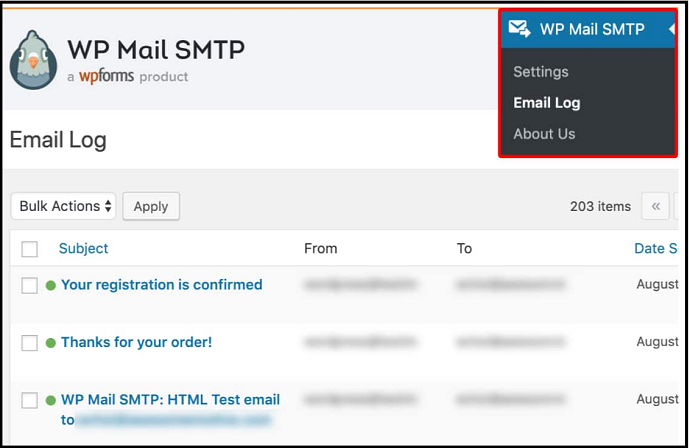
- Now, to view your WordPress site’s Email Logs, go to your WordPress admin dashboard.
- And click on the WP Mail SMTP option.
- Next, click on the Email Log on the left side of your WordPress admin menu.
- Then all new emails are displayed at the top of the list.
- If you want to view a particular email, then just click on the subject of that email.
Excellent Job! You have just now officially enabled and viewed Email logs on your WordPress site.
Conclusion
You can now definitely realize that the WP Mail SMTP plugin made easy to view all your WordPress site’s email logs straight on your WordPress admin dashboard. Further, all the details of each mail that are sent out from your site are recorded in your site’s database. So that you can view every detail about each mail like staus, date, sent time, recipients (CC and BCC), From Email, and more.
At last, you must say thanks to the WP Mail SMTP plugin for making easy to enable and view Email Logs on your WordPress site.
- Read Next: 5 Best Email Marketing service providers & Newsletter Companies
- 6 Best Free Live Chat Plugins for WordPress Website
I hope that this article is guided you to set up Email Logs on your WordPress site. If so, do a favor by sharing this article and follow BlogVwant on Facebook, Twitter, and YouTube for more tips.