This tutorial will give you step by step guide to Transfer WordPress Site From Bluehost shared hosting To SiteGround Shared Hosting. Of course, you can use this procedure to transfer WordPress site from any server to any other servers. Because Procedure to transfer WordPress website is almost the same for every hosting service.
Earlier we have explained WordPress migration process from Siteground Cloud hosting to HostGator Cloud hosting. Now I am moving my website from Bluehost shared hosting to Siteground WordPress shared hosting.
Why I am moving to Siteground?
No doubt Bluehost(60% Discounted Link) is the best hosting company. Their shared hosting plans support unlimited bandwidth and traffic.
Siteground shared hosting plans price is almost same as Bluehost pricing. But it does not support unlimited traffic. Siteground gives more speed and security to your website. It’s GoGeek plan supports up to 1 Lakh page views per month.
I am shifting my site from Bluehost to Siteground because of two reasons.
1)To save renewal charges. My one-year shared hosting plan was expired, so I need to pay the high charge.
2)My website has low traffic which is acceptable by Siteground. So I can get more speed and quality hosting for the less price(comparing to renewal charges) than Bluehost.
I suggest you go with at least Siteground GrowBig plan to get better features. If you have the good traffic or expect good traffic in the near feature, you better stick with Bluehost or you can also consider iPage(75% Discounted Link) to save money. If you are ready to pay the good amount for the better hosting, you can go with Siteground Cloud Hosting plans.
- Related: Siteground Cloud Hosting Review
I need to mention that, Siteground supports one free WordPress transfer. If you want, you can use that service to transfer your website. If you don’t have the free service then you need to do manually. Let us see how I have transferred my WordPress website from Bluehost to Siteground.
How to Transfer WordPress Site
Step1: Remove Unnecessary File, Plugins, and Themes
When you want to Transfer WordPress site, you need to download all your website files and databases. Before going to download the files and databases, it is recommended to remove the unnecessary files, plugins, and themes to reduce the file size. You can remove the themes from File Manager.
Login into Bluehost cPanel, Go to Public_html -> Wp-Content -> Themes. Delete the unused themes. If you want, you can install them later from the WordPress dashboard.
If you had the cache and log folders, just remove them from Wp-Content folder.
You can deactivate and delete the unnecessary plugins from the WordPress dashboard. You need to remove the cache plugin like a W3total cache. Because you don’t have to use it on Siteground servers. Because Siteground has the SuperCacher plugin.
You need to install and activate wp-optimize and clean the database. It will remove unnecessary data from your database. After cleaning the database, uninstall the plugin.
Step2: Download Files and Databases
I suggest you the best method to migrate WordPress website. That is by using the Duplicator plugin. It is a free plugin which works great.
Login into your WordPress dashboard.
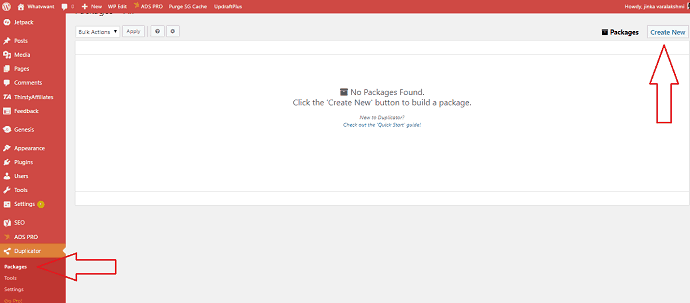
Just install and activate Duplicator plugin.
Go to Duplicator -> Packages from the left menu. Click Create New at top right to create the new package.
Select Next option in the next screen.
Wait for some time until it scans your site.
If you see Good in all fields, you can continue with the migration process. If you see any notice, click on that, you will see the information. I got the notice to remove the cache folder.
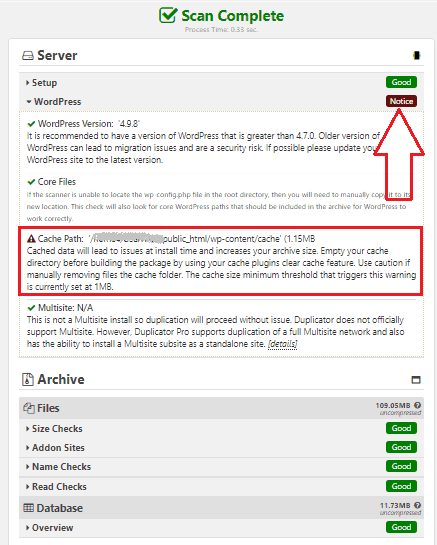
I have deleted that folder from File Manager. Clicked on Rescan option at the bottom.
Now I got everything Good. If you want, you can continue without removing the folder. You can just check the option below the results.
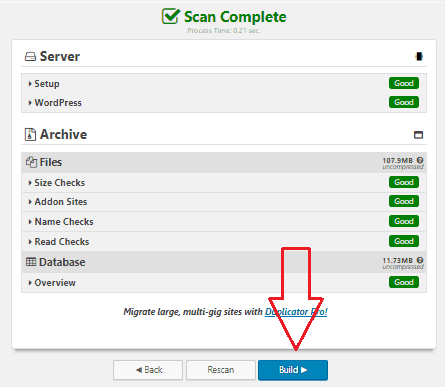
Click on Build option.
It will start building the package. You need to keep the window open until it builds.
You will see Installer and Archive files. You need to click on One-Click Download option to download both files.
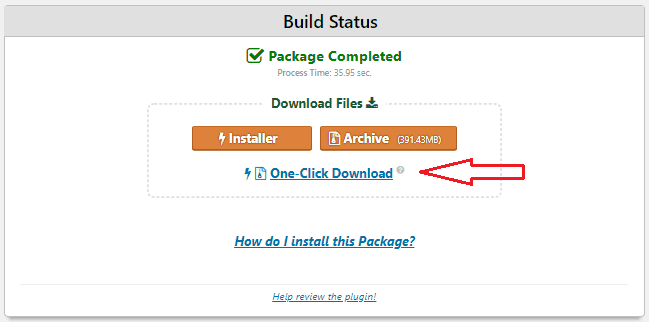
Installer file contains the necessary files to install Duplicator on the new server.
The archive file contains all your website files and the databases.
Wait until you download the file. It takes some time depends on your file size and your internet speed.
Step3: Upload files to Siteground server
You can use File Manager uploader or FTP to upload the files. If your file size is less, you can use File Manager uploader. Otherwise, it is recommended to use FTP. Because FTP is faster than File Manager Uploader.
You need to use the FTP clients like Filezilla to upload files. You can also read our guide on How to use FileZilla to upload files to the server.
Now it is the time to operate in the new Siteground account.
If you did not have the account, you can create a Siteground account by buying a plan.
Login into your Siteground account.
Go to My Accounts tab. Here you will see all options like your Nameservers, cPanel option, FTP details, Domain details, etc.,
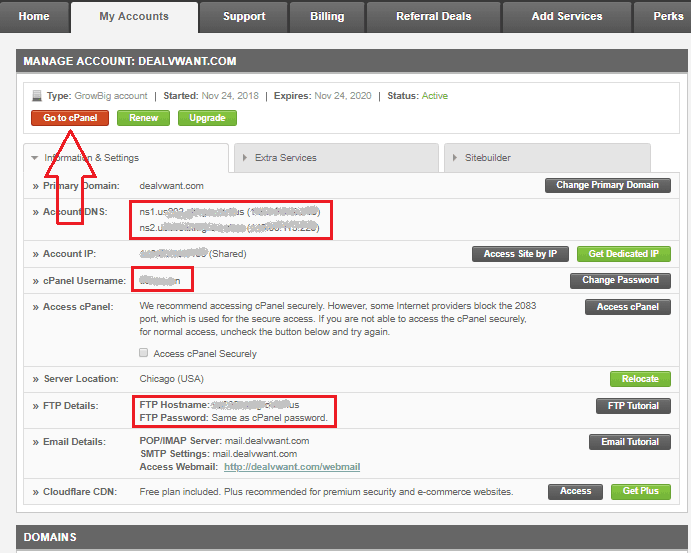
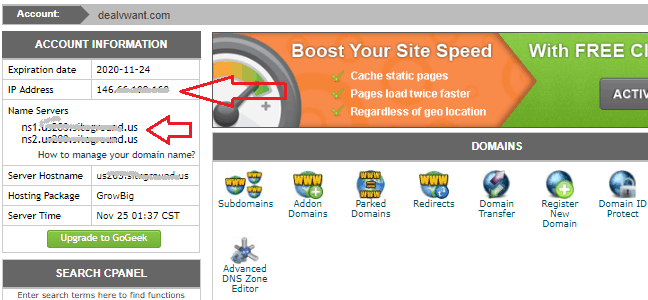
You need to note down Account DNS values(Nameservers) and FTP details. You need Nameserver values at the last step.
You can click on Go to cPanel option and go to File Manager to upload the files. But I don’t recommend that method. So I will explain the FTP method.
Right now you need FTP details to upload the downloaded files. Note down the FTP details. You need to note the Hostname. FTP Username and the password are the same as cPanel.
Download and install FileZilla client on your desktop.
Open the client.
Enter the Host name, Username of your cPanel, password of your cPanel, 21 at the Post. Click on Quickconnect.
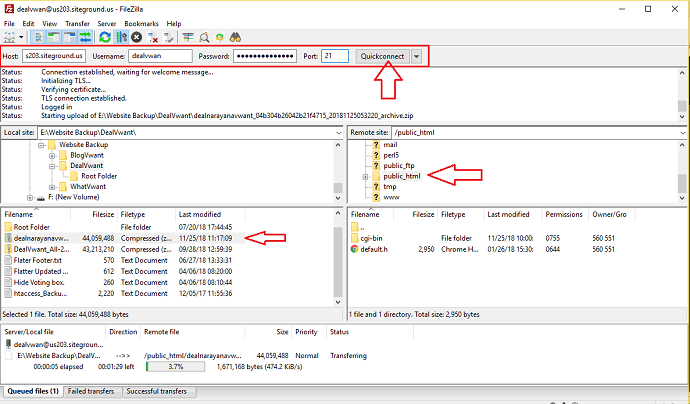
If you see the certificate error, just check the option I trust the certificate and continue.
Now you will see your server files at the right side. Your computer files at the left.
Select public_html a the right side(server side).
Browse for your downloaded files from the left side. Just drag the files from the left to the right.
It will start uploading. You can check the progress at the bottom.
Depends on the file size, it might take some time. Installer file will take less time to upload. Archive file might take some time to upload. By that time you can continue with the next step.
Step4: Create a database on Siteground
You need to create the database, user and add the user to the database on Siteground.
4.1: Create a database
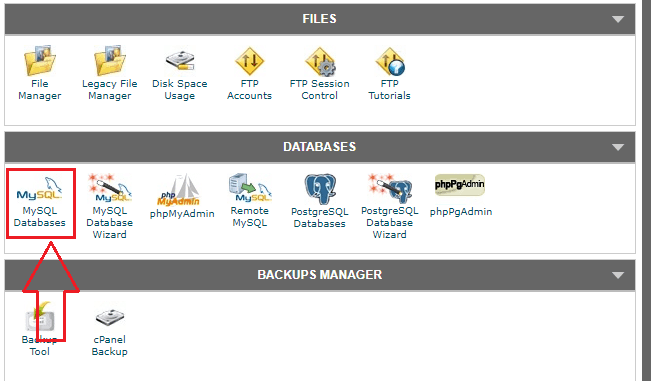
Go to cPanel from My Accounts tab or you can directly login into the cPanel.
Scroll down up to DATABASES. Click MySQL Databases.
Enter your website name or anything you need in the New Database field. Select Create database.
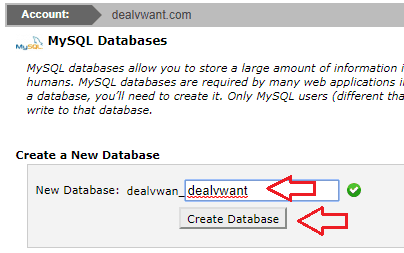
Your database will be created. Click Go Back option.
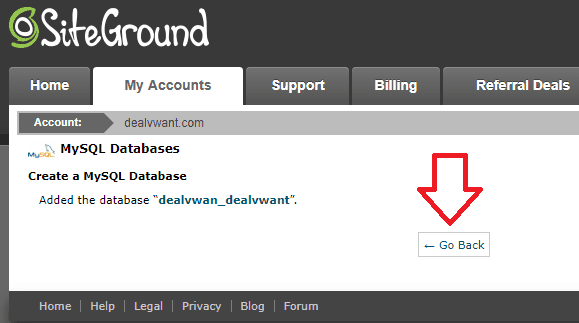
Now you will once again go back to MySQL Databases window.
4.2: Create a User
You need to create the user to this database.
Scroll down the page until Add a New User section.
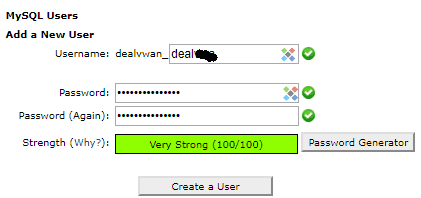
Type anything in the Username field and password fields. Note down the username and password in a separate sheet. You will need them later.
Click Create a User.
You will once again see the success window. Click Go Back option. One more time you will come back to the same MySQL Databases windows.
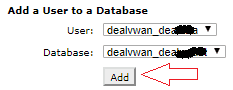
4.3: Add the user to the Database
Now you need to add the user to the database.
Scroll down the page to the last where you see Add a user to a database section. Your user and database are pre-selected. If you have more than one Users or databases, you need to select the particular ones from the drop-down.
Just click on Add button.
Select All Privileges option in the next screen. Select Make Changes.
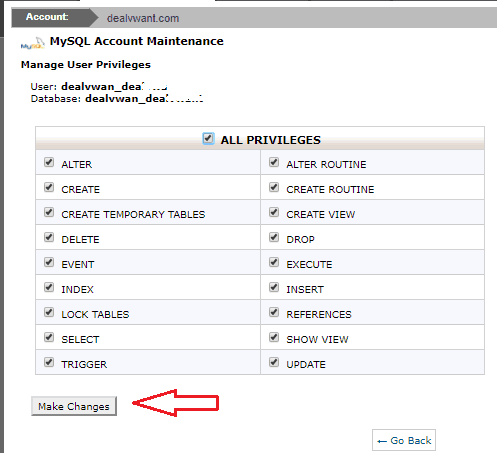
Now you have successfully created the database. You can click on Go Back option. You can also click on cPanel Home button at the top right corner to go to cPanel.
Step5: Install Duplicator and Files on the New server(Siteground)
Make sure the file was uploaded which was done in step 3 completed successfully.
Now you have Duplicator installer, your website files on your new server.
First, you need to install duplicator on the new server(Siteground). For that you need to access your server from your computer. For that you need to change your computer hosts file with the new server IP.
Edit hosts file
Open your Notepad app with the Administrator privileges. Just right click on Notepad app and select Run As Administrator.
Go to File -> Open.
Browse to C:/WIndows/System32/Drivers/etc.
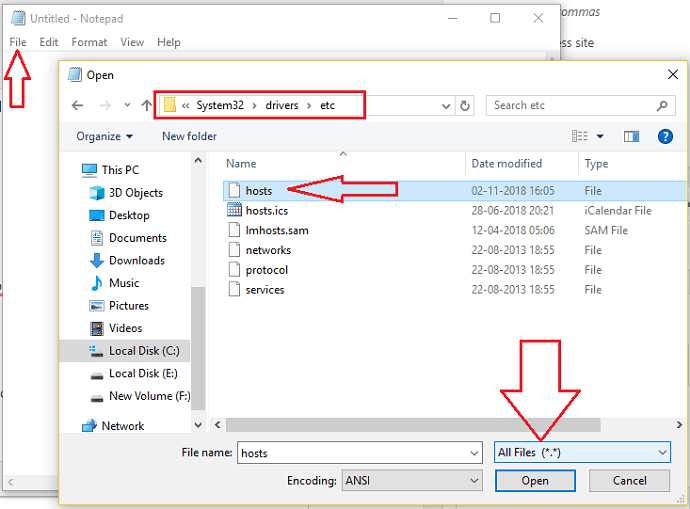
You will see nothing in the etc folder. Just select All Files option, then you will see hosts files. Double click on hosts to open the hosts file.
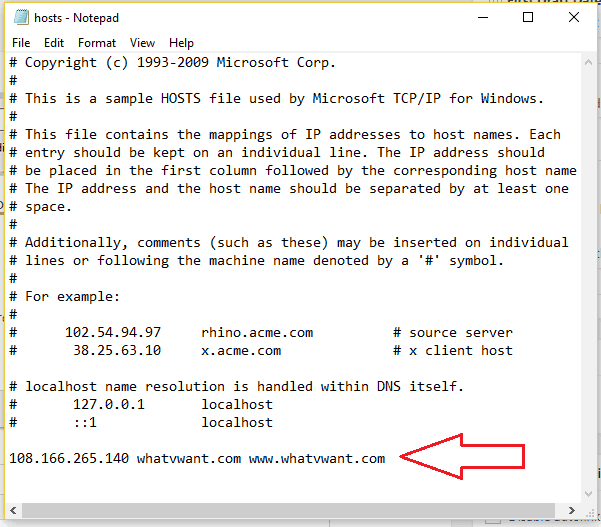
Add your Siteground server IP and your domain at the end of the hosts file. Save the file.
You can find your server IP at the left in cPanel or at the Account IP section in the My Accounts tab of your portal account.
Access yourwebsitename.com/installer.php from your browser. I have opened dealvwant.com/installer.php.
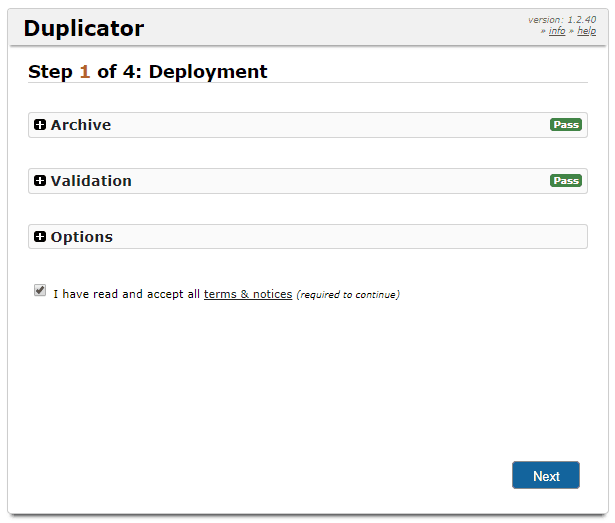
You will see below screen. Just check the terms box and click Next.
Enter your Database details which you have created in the Step4. Select the Test Database option.
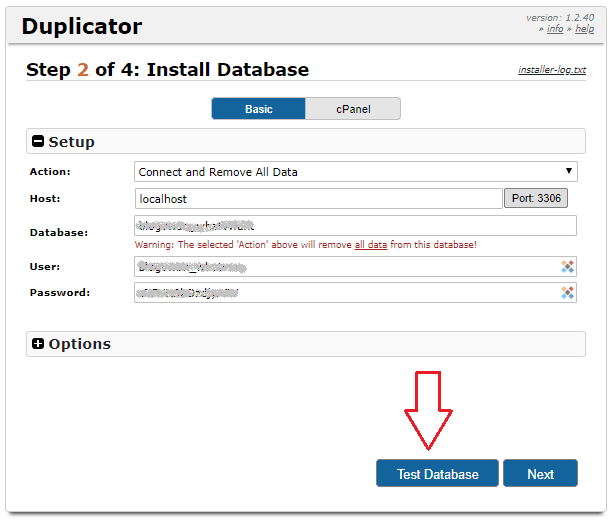
If you see the success message in the next screen. Select Next option.
Now your website will work fine. You can check the website by logging in to your WordPress dashboard.
If everything works fine, remove the extra link added in the hosts file and save the file.
When you remove that like, you will access your website from your old server.
Step6: Change the Nameservers
You need to change the nameservers to access the website from the new server.
Probably, you might have registered the domain in Bluehost. Even if you close your hosting account, you can keep the domain at Bluehost.
Login into your Bluehost account.
Scroll down the page and check the box left to your domain.
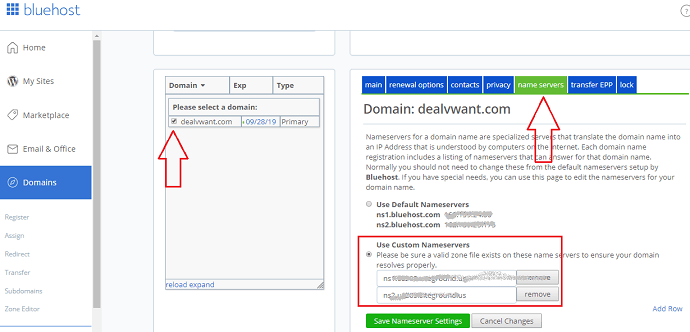
Select Nameservers-> Select Use Custom Nameservers option.
Enter the Siteground nameservers which you have collected in step3.
Select Save Nameservers option.
Now, wait for one day. It takes at least 24 to 48 hours to propagate your DNS change. Until then, you might see a little break in your website.
Extra Tips
Siteground gives some additional features like server-side cache, free SSL, and CloudFlare CDN.
You need to Install SG Optimizer plugin. And you should activate Static, Dynamic, and Memcached cache modules using SuperCacher option from Siteground cPanel. You should activate the same options in the SG Optimizer plugin.
Install SSL. You can read our Guide to Install SSL on Siteground server.
You can Activate free CloudFlare CDN from Siteground cPanel itself.
If you like this tutorial about How to Transfer WordPress site from Bluehost to Siteground, please share this article. If you need more WordPress tips, please follow BlogVwant on Facebook and Twitter.