
Do you want to add sponsored attribute automatically for all existing affiliate links on your WordPress website as Google said?
Hint: Everyone loves to have a fast and secure website. We suggest Rocket.net, the most secured and fastest managed WordPress hosting service that gives you a Cloudflare Enterprise plan for free. Our readers get a special 50% discount on all Rocket.net plans using the coupon code: VWANT50.
Now let’s go through this article, to learn how to add rel=”sponsored” for a particular affiliate link when you create on your WordPress site. Further, you can also learn how to add rel=”sponsored” automatically for all existing affiliate links on your WordPress site.
- Most recommended guide: RankMath SEO Vs Yoast SEO: In depth comparison
What is an affiliate link?
An affiliate link is a unique URL attributed to a particular affiliate.
An affiliate link consists of the affiliate’s ID or username.
Advertisers usually use affiliate links in the affiliate program, to register the traffic which is forwarded to the advertiser’s website.
Affiliate agreements usually state that an affiliate is responsible to arrange its own affiliate link and make sure that it connects to the advertiser’s website.
What are Google’s new attributes to identify the nature of the links?
In 2005, nofollow attribute was introduced for aiding fight comment spam. Later, it quickly became one of the great ways as recommended by Google for flagging advertising or sponsored-related links. Then Google would not include Nofollow links attributes as hints for ranking purposes.
But this has changed now. On September 10, 2019, Google has introduced two new attributes sponsored and ugc. And Google uses these two new attributes along with the nofollow as hints to incorporate for ranking purposes.
Further, the two new link attributes provide additional ways for webmasters to identify the nature of particular links to Google Search.
rel=”sponsored”:
You can use this attribute value on your website for paid links that are related to advertisements, sponsorships, and other compensation agreements.
rel=”ugc”:
UGC stands for User Generated Content.
You can use this ‘ugc’ attribute value for links within user-generated content like comments and forum posts.
Why should I bother using any of these new attributes?
Previously, when nofollow was introduced in 2005, Google would not include the nofollow links for ranking purposes.
But this has changed now. On September 10, 2019, Google introduced the two new attributes rel=”sponsored” and rel=”ugc”.
And Google uses all the link attributes along with the other signals as hints to incorporate for ranking purposes. And for better processing the links for analysis of the web.
Further, these attributes are additional ways for you to tell Google about your relationship with the links that you use on your website.
That can include your own content if someone who links to you makes use of these two attributes.
When do these attributes and changes go into effect?
All the link attributes — sponsored, ugc, and nofollow — start working from September 10, 2019.
And Google uses all these link attributes as hints to incorporate for ranking purposes.
Further, from March 1, 2020, onwards, Google treats nofollow link attribute as a hint for crawling and indexing purposes, rather than a directive.
- You Might Like: ThirstyAffiliates Review: The Best Affiliate Marketing WordPress Plugin
- Easy Method to Geotarget affiliate links in WordPress Website
Methods to add sponsored attribute to affiliate links
Previously, when nofollow was introduced in 2005, Google would not include the nofollow links for ranking purposes and count any link marked this way as a signal to use within its search algorithms. But this has changed now. On September 10, 2019, Google introduced the two new attributes sponsored and ugc. And Google uses all three link attributes along with the nofollow as hints to incorporate for ranking purposes.
Previously, you have used nofollow attribute for ads or sponsored-related links. But according to Google’s Statement on September 10, 2019, you have to use rel=”sponsored” for all advertisements or sponsored-related links on your WordPress site. So, now see methods to add rel=”sponsored” attribute for all ads, sponsored-related, and other compensation agreements on your WordPress site.
1. How to add rel=”sponsored” attribute to a single affiliate link in WordPress Gutenberg

- If you are using Gutenberg editor for your WordPress post & page editors, then you can easily add rel=”sponsored” by using Ran Math plugin.
- First, install and activate the Rank Math free plugin on your WordPress site.
- To install it, go to your WordPress site admin dashboard >> Plugins >> Add New.
- Next, search for Rank Math. Then install and activate this plugin.
- Next, go to your WordPress site admin dashboard >> Post & Page Builder >> Settings. Then select WordPress and Custom Post Types as WordPress Editor (Gutenburg).
- Now let’s follow the below steps to add rel=”sponsored” attribute in various posts of your WordPress site.
Step1: Go to your WordPress site admin dashboard >> Posts >> Add New.
Step2: Next, on this page, complete writing and select some text, and then click the Anchor/ Add Link icon.
Step3: Next, you can view a text field just below the selected text.
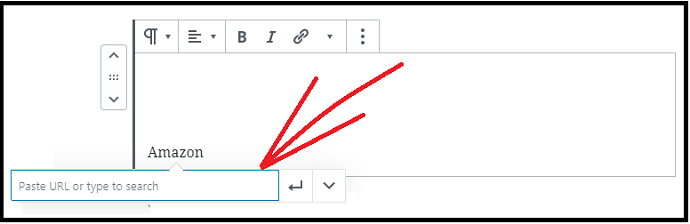
Step4: Next, directly paste or type your desired URL link in the box.
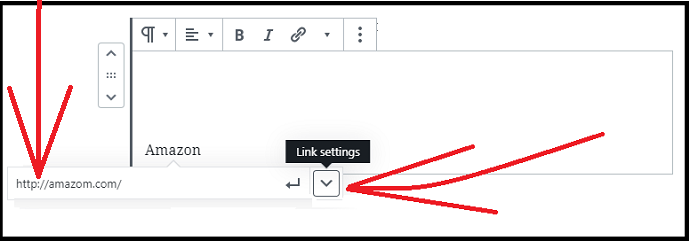
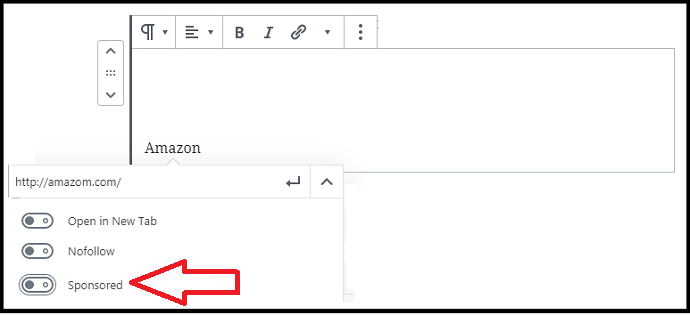
Step5: Next, click on the Link settings (down arrow) button. Then you can view three toggle buttons.
- Open in New Tab.
- Opens your external link in the new tab.
- Nofollow.
- Adds rel=”nofollow” attribute to your external link.
- Sponsored.
- Adds rel=”sponsored” attribute to your external link.
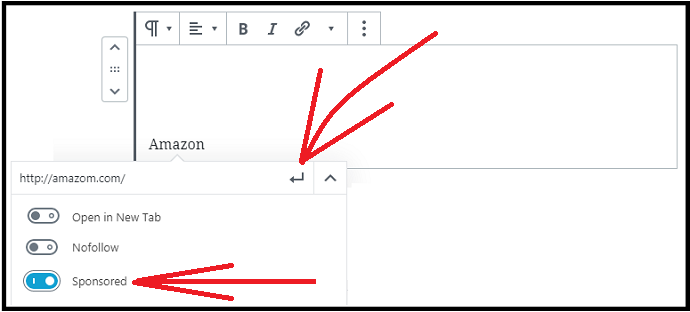
Step6: Next, click on Sponsored toggle buttons. And then on the Apply or Enter Icon. Then your desired affiliated link adds to the text that you have selected so far. Here, it is recommended to click on Open in New Tab, because whenever someone clicks your link, then it opens in a new tab. And this way reduces the bounce rate and keeps your visitors from leaving your website. But for time being and to explain the present concept clearly, here we have clicked on the Sponsored toggle button and not on Open in New Tab toggle button.
Step7: Next, rel=”sponsored” attribute is added to your desired affiliated link. And whenever someone clicks this link then your desired affiliated link opens in the same tab.
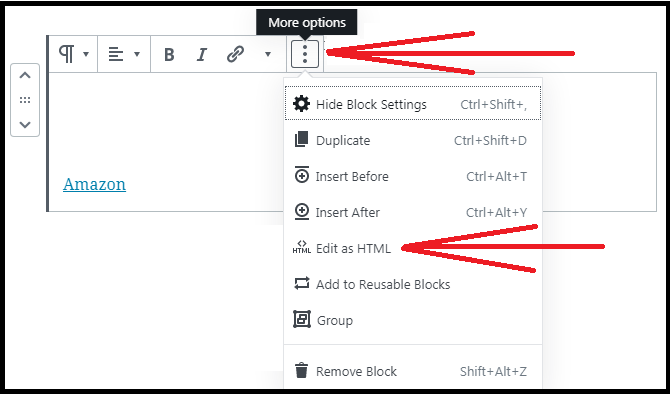
Step8: Now to check whether rel=”sponsored” attribute is added to your desired external link, do the following:
- Click on the More options (Three Vertical Dots) button present at the top bar.
- Next, click on the Edit as HTML.
Step9: Next, you can view the HTML code of your recently added link.
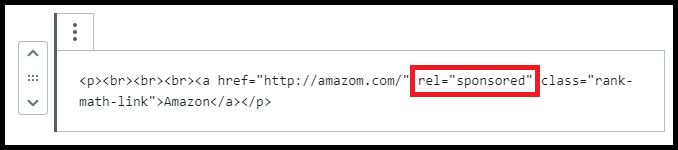
In the HTML code, you can view the rel=”sponsored” attribute for your link.
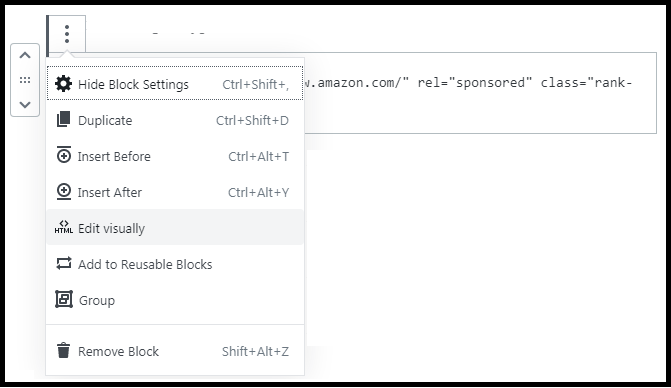
Step10: Next, again click on the More options (Three Vertical Dots) button present at the top bar. And then on Edit visually.
That’s It! You have now added rel=”sponsored” attribute for your desired link in your WordPress post or page by using Rank Math plugin and Gutenberg editor.
In a similar way, you can add rel=”sponsored” for your links in various posts of WordPress site pages.
2. How to Add rel=”sponsored” to a single affiliate link in WordPress Classic Editor
- Though the new version of WordPress Editor is available, some users still use WordPress Classic Editor for writing their posts.
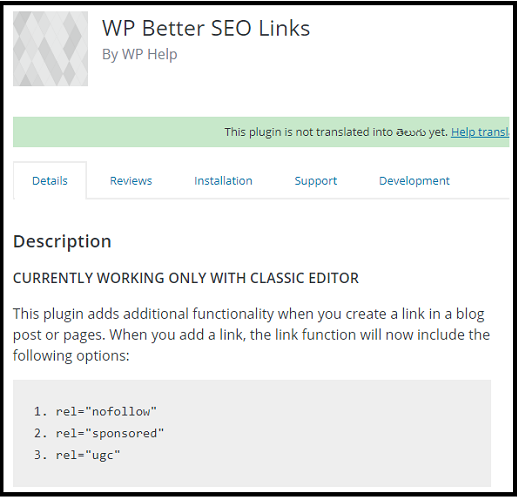
- If you also use WordPress Classic Editor, then you can add rel=”sponsored” attribute for any link in your posts or pages by using the WP Better SEO Links plugin.
- Now, go to your WordPress site admin dashboard >> Plugins >> Add New.
- Next, search for WP Better SEO Links. Then install and activate this plugin.
- Now let’s go through the following steps to add rel=”sponsored” attribute in various posts of your WordPress site using WP Better SEO Links plugin.
Step1: Go to your WordPress site admin dashboard >> Posts >> Add New.
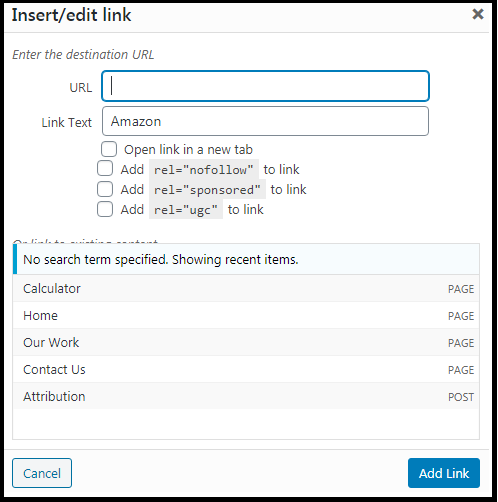
Step2: Next, on this page, complete writing and select some text, and then click the Insert/edit link icon.
Step3: Next, click on the Links options/ Gear icon.
Step4: Next, you can view the following:
- URL field:
- Type URL in this field.
- Link Text
- Open link in a new tab
- Opens the link in a new tab.
- Add rel=”nofollow” to link
- Add rel=”sponsored” to link
- Add rel=”ugc” to link
Step5: Next, type in URL of the external link in the URL field. And click the checkbox of Add rel=’sponsored” to link
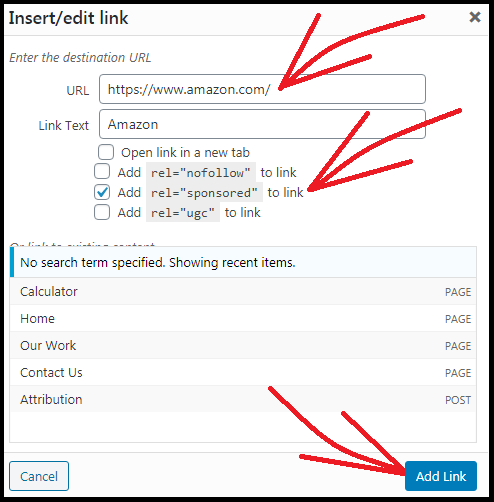
Step6: Next, click on the Add Link button. Then your desired external link adds to the text that you have selected so far.
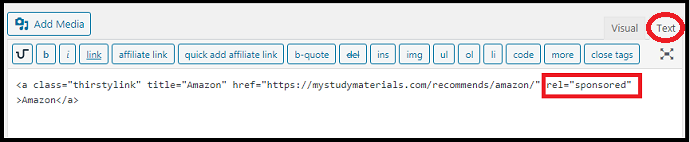
Step7: Now to check whether rel=”sponsored” attribute is added to your desired external link, click on the Text present on the top right bar.
Step8: Next, you can view the HTML code of your recently added link.

In the HTML code, you can view the rel=”sponsored” attribute for your link.
Step9: Next, click on the Visual present at the top right bar. Then you can view the text visually or normally.

That’s It! You have now added rel=”sponsored” attribute for your desired link in your WordPress post or page by using WP Better SEO Links plugin and Classic editor.
Recommended: 6 Best WordPress Coupon Themes To Start Affiliate Site
3. How to Automatically add sponsored attribute For All Affiliate Links Using ThirstyAffiliates
Video Tutorial:
For the reader’s convenience, we always create a video tutorial. Either you can watch and learn or simply skip the video and continue with the steps mentioned afterward.
If you have a large website and have tons of affiliate links, Adding an attribute to every link is not possible. So you need to add the sponsored attribute automatically to all existing links.
For that, you need to use the ThirstyAffiliates plugin which is the best affiliate plugin for WordPress. The affiliate clock plugin is one of the most essential plugins to use on all WordPress websites. We are using it for some years. We feel like every affiliate marketer must use this plugin on their WordPress website.
It gives many features like affiliate link click tracking, auto-linking, geo-target, etc., It has free and Pro versions. You can read our Thirstyaffiliates review for complete details. You need to use the pro version to add rel=’sponsored’ attribute to all affiliate links.
In this section, you can learn how to install, activate, and use ThirstyAffiliates to automatically add ‘sponsored’ attribute to all affiliated links in your WordPress site.
Total Time: 7 minutes
Step1: Install And Activate ThirstyAffiliates Plugin
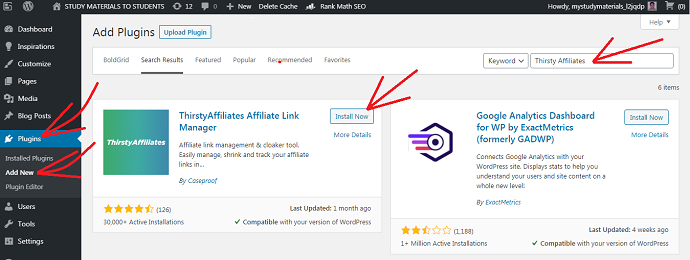
Go to your WordPress admin dashboard >> Plugins >> Add New.
And type in ThirstyAffiliate on the search plugins bar. Next, click on the Install Now button present beside the ThirstyAffiliates Affiliate Link Manager plugin. Once installation completes, then click on the Activate button to activate this plugin on your WordPress site.
Step2: Purchase and Download ThirstyAffiliates Pro Addon
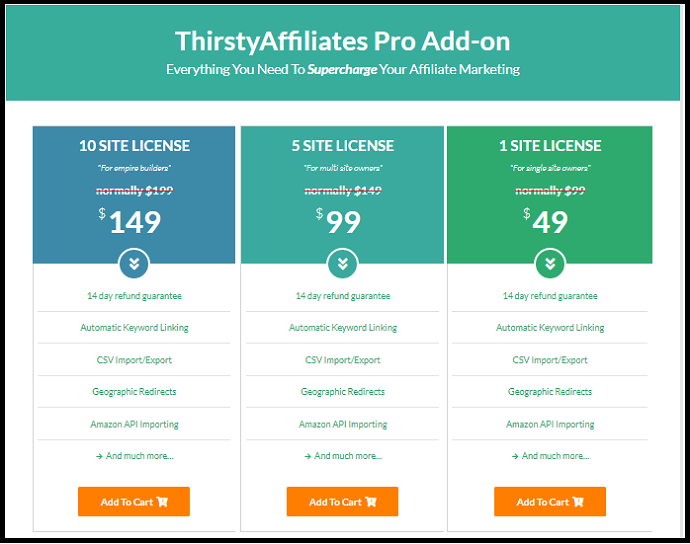
Now go to the ThirstyAffiliates website and purchase its pro addon. It provides its pro addon for 1 site, 5 sites, and 10 sites. Based on your requirement, purchase anyone and download ThirstyAffiliates Pro Addon zip file.
Step3: Upload, Install, And Activate ThirstyAffiliates Pro Addon
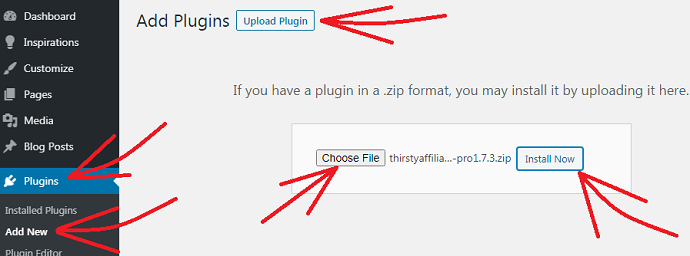
Next, go to your WordPress site admin dashboard >> Plugins >> Add New. Then click on the Upload Plugin button and Choose File button to upload your ThirstyAffiliates Pro Addon zip file. Next, click on the Install Now button to install ThirstyAffiliates Pro Addon on your WordPress site. Once installation completes, then click on the Activate Plugin button.
Step4: Activate License of Your ThirstyAffiliates Pro Addon
Next, move to your WordPress Admin Dashboard >> ThirstyAffiliates >> Settings. And click on the License tab. Next, type in your Activation Email and License Key in the respective fields and click on the Activate License button. Then ThirstyAffiliates Pro Addon completely activates with the license on your WordPress site.
Step5: How To Automatically Add rel=”sponsored” attribute To All Sponsored Affiliated links

Next, go to your WordPress Site Admin Dashboard >> ThirstyAffiliates >> Settings >> Link Appearance. Then scroll down the page to view the field Additional rel attribute tags. Next, type in sponsored in this field. And click on the Save Changes button. Then ThirstyAffiliates plugin automatically adds rel=”sponsored” attribute to all external links in your WordPress site.
Step6: Create an Sponsored Affiliated link Using ThirstyAfffiliates
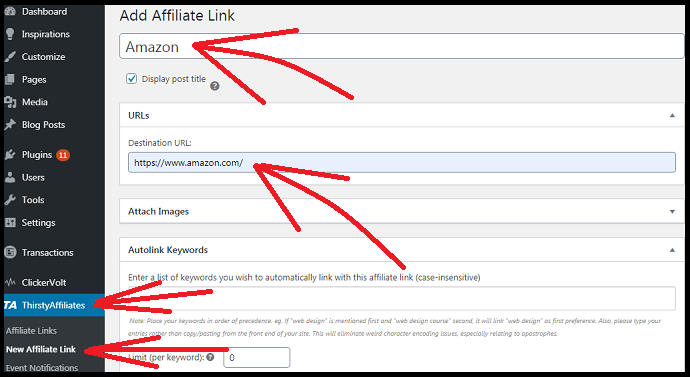
Go to your WordPress Admin Dashboard >> ThirstyAffiliates >> New Affiliate Link. Next, fill the fields Add title and Destination URL as Amazon and https://www.amazon.com respectively. And scroll down the page to view the Link Options on the right side of the webpage. Under this, Additional rel tags field, by default, is filled with Sponsored. This is because, in the previous step, you have added sponsored in the Additional rel attributes tags field. Next, click on the Save Link present on the top right side of the page. Then Amazon affiliate link is created.
Step7: Check Whether rel=”sponsored” Automatically Adds To Affiliated Links
To check quickly, open class editor on your WordPress site and type a text like Amazon and select it. Then click on the TA icon and type in Amazon in the filed box and wait for a few seconds. Then Amazon is displayed below it. Next, click on it and then on Enter/Apply Affiliate Link icon. Then Amazon affiliated link is added to the selected text. Next, click on Text to view the HTML code. Then rel=”sponsored” is added to your affiliate link. Likewise, rel=”sponsored” attribute will add automatically to all sponsored affiliate links, when you create on your WordPress site. Alternatively, you can also check, by right-clicking your mouse on your webpage and then clicking View page source.
Here don’t think that ThirstyAffiliates only for Classic Editor, but it works well for Gutenberg Editor too. For time being, here, classic editor is chosen.
That’s it! You have now learned how to use ThirstyAffiliates plugin to automatically add rel=”sponsored” for all ads or sponsored-related links on your WordPress site.
Offer: First-time customer will get $50 discount on all ThirstyAffiliates plans through this pricing page.
Consider This: What is VigLink? Complete Review To Make Money With Your Existing Content
What are the attributes you should use to qualify your outbound links to Google? (Bonus)
According to Google’s Statement on September 10, 2019, it uses all link attributes — sponsored, ugc, and nofollow — as hints to incorporate for ranking purposes. Further, you can use these attributes, to tell Google about your relationship with all the links on your website except for regular links. To use these attributes, you have to add rel attribute value in the <a> tag.
However, for regular links, which you might want Google to follow without any qualifications, you don’t need to use any rel attribute. For example: Our children holiday spot is the “<a href=”https://animals.example.com/Zoo”>zoo</a>”
For all other links, you should use any one of the following rel attribute value.
| rel Value | Description |
|---|---|
| rel=”sponsored” | You can use this attribute value on your website for paid links that are related to advertisements, sponsorships, and other compensation agreements. |
| rel=”ugc” | UGC stands for User Generated Content. You can use this ‘ugc’ attribute value for links within user-generated content like comments and forum posts. |
| rel=”nofollow” | You can use this attribute when other values won’t apply. And when you don’t want Google to crawl the linked page from your site. |
| Multiple Values | You can also use multiple rel values on a single link each separated by a space or comma. For example: 1. <a href=”https://www.amazon.com/” rel=”nofollow sponsored“>Amazon</a></p> 2. <a href=”https://www.amazon.com/” rel=”nofollow, sponsored“>Amazon</a></p> |
Therefore, a rel attribute value aids Google to identify the type of links present on your website. And Google uses all rel attributes as hints to incorporate for ranking purposes.
Final Thoughts On Methods To add rel=”sponsored” To Affiliate Links As Google Wants
You can now add rel=”sponsored” link attribute for all advertisements or sponsored-related affiliated links on your WordPress website by using ThirstyAffiliates plugin. And according to Google, everyone must do this, now or then, when it is convenient. So, soon change over to rel=”sponsored” instead of rel=”nofollow” for all advertisements or sponsored-related affiliated links on your WordPress site by using ThirstyAffiliates.
At last, you must say thanks to ThirstyAffiliates, because this is a great and easy way for you to automatically add rel=”sponsored” link attribute for all advertisements or sponsored-related links on your WordPress site.
- Read Next: 10 Essential WordPress Plugins List You Must Have
- What are Follow and Nofollow links? Do Nofollow Links Help SEO?
I believe that this article can definitely aid you to learn how to easily and automatically add sponsored attribute for all ads or sponsored-related affiliated links on your WordPress site using the ThirstyAffiliates plugin. If you like this article, do a favor by sharing this article and follow BlogVwant on Facebook and Twitter and YouTube.
Add sponsored attribute – FAQs
What are Google’s new link attributes?
rel=”sponsored” and rel=”ugc” are the two new link attributes introduced by Google on September 10, 2019.
Do I need to change existing nofollows?
No. If you use nofollow link attribute now as a method to prevent sponsored links or to signify that you don’t confirm for a page you link to, then that will continue to be supported. And there is definitely no need to switch any nofollow links that you already have.
Can I use multiple rel values on a single link?
Yes. You can use multiple rel values on a single link each separated by a space or comma. For example:
1. <a href=”https://www.amazon.com/” rel=”nofollow sponsored“>Amazon</a></p>.
2. <a href=”https://www.amazon.com/” rel=”nofollow, sponsored”>Amazon</a></p>.
Do I still need to flag ad or sponsored links?
Yes. If you need to avoid a possible link scheme action, then you must use rel=“sponsored” or rel=“nofollow” link attributes to flag ads or sponsored links. However, Google prefers you to use rel= “sponsored”. But anyone is fine and will be treated the same, for this purpose.
If I use nofollow for ads or sponsored links, do I need to change those?
No. You can continue to use nofollow link attribute as a way for flagging ads or sponsored links to avoid possible link scheme penalties. And you don’t need to alter any existing markup. However, Google recommends switching over to rel=”sponsored” link attribute if or when it is convenient.