Do you want to know How to add Affiliate Disclosure to WordPress site posts/ pages automatically and more where you use affiliate links so as to keep your site compliant with FTC guidelines? Now go through this article to learn how to automatically add affiliate disclosure for all your site pages, posts, and more where you use affiliate links.
Hint: Everyone loves to have a fast and secure website. We suggest Rocket.net, the most secured and fastest managed WordPress hosting service that gives you a Cloudflare Enterprise plan for free. Our readers get a special 50% discount on all Rocket.net plans using the coupon code: VWANT50.
What is an Affiliate Disclosure?
Affiliate Disclosure is simply a short disclosure statement displayed to users and potential buyers nearby the products saying that you are getting paid for endorsing the products or services via affiliate links.
Why should I add Affiliate Disclosure?
If you are running a blog or website or using social media platforms for endorsing the products or services via affiliate links. And you are getting paid for such endorsements. Then you need to display or add an Affiliate Disclosure for all such pages, posts, and more where you use affiliate links to promote the products.
This is because according to rules and regulations of FTC (Federal Trade Commission). And affiliate marketing companies do recommend this.
Suppose you didn’t add affiliate disclosure notice or even not properly disclosed the affiliate disclosure. Then affiliate marketing companies crackdown you. And FTC imposes fine on you for violating its guidelines.
Therefore, if you are an affiliate marketer, getting paid for endorsing or reviewing the products or services via affiliate links on your blog or website or on social media platforms. Then you should display or add an Affiliate Disclosure for all such pages, posts, and more where you use affiliate links to promote the products.
- You Might Like: ThirstyAffiliates Review: The Best Affiliate Marketing WordPress Plugin
- Methods to add rel=”sponsored” to affiliate links as Google Wants
How to add Affiliate Disclosure to WordPress Automatically
However, adding affiliate disclosure manually for each post or page is cumbersome. So, you need to automatically add affiliate disclosure for each post and page. This can be done by using the following two plugins:
- ThirstyAffiliates (The Most Recommended Plugin)
- WPEka WP Legal Pages Pro
- Ad Inserter.
Here, the first method is a worthy and most recommended method. Because ThirstyAffiliates is the world’s best affiliate link cloaking plugin for WordPress. Using this, you can not only automatically add affiliate disclosure for all pages and posts but also do auto-linking of keywords, link scheduling, geo-targeting, and more.
1. How To Automatically Add Affiliate Disclosure to WordPress Page, Post, And More Using ThirstyAffiliates
Video Tutorial:
For your convenience, we have explained the whole process in a video. You can watch it or just continue with the steps mentioned after the video.
ThirstyAffiliates is the World’s best affiliate link cloaking plugin for WordPress. With this plugin, you can automatically add your affiliate disclosure notice for every page, post, and more on your WordPress site. Besides this, ThirstyAffiliates provides mindblowing features needed for your WordPress site like Autolink Keywords, Automatically add nofollow, sponsored, and ugc links, Shortening / Destination Cloaking, Automatic Affiliate Disclosure, Affiliate link click tracking, Geo-targeting, and more.
In this section, you can view how to automatically add your affiliate disclosure notice to every page, post, and more using ThirstyAffiliates, the world’s best affiliate link cloaking plugin for WordPress.
Total Time: 5 minutes
Step1: Buy ThirstyAffiliates Pro Addon. And download ThirstyAffiliates Pro Addon zip file
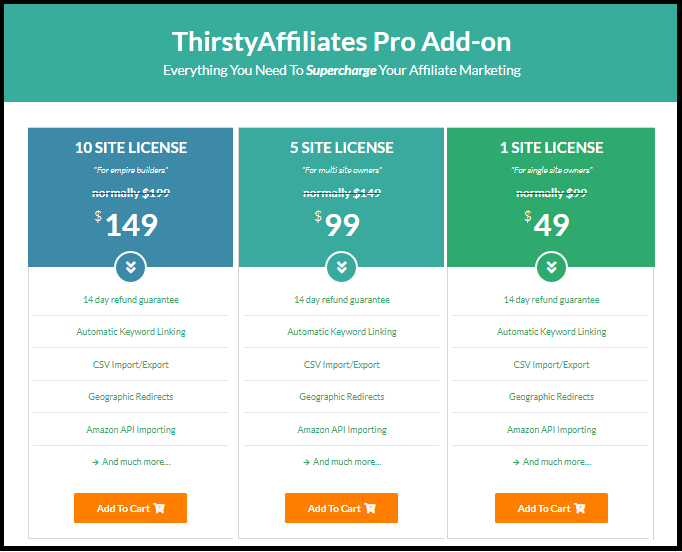
1. First, you need to purchase ThirstyAffiliates Pro Addon.
2. Go to ThirstyAffiliates site. And buy its pro plan.
3. Currently, ThirstyAffiliates provides its pro addon for 1 site, 5 sites, and 10 sites.
4. According to your requirement, choose and purchase anyone.
5. The cost of its pro addon for 1 site is just $49 per year. And at this lower price, you can enjoy great features needed for your WordPress like:
Autolink Keywords,
Automatically add nofollow, sponsored, and ugc links,
Shortening / Destination Cloaking,
Automatic Affiliate Disclosure,
Affiliate link click tracking,
Geographic redirects, and more.
6. Download ThirstyAffiliates Pro addon zip file.
Step2: Install ThirstyAffiliates Pro Addon on your WordPress

1. On your WordPress dashboard, go to Plugins >> Add New >> Upload Plugin.
2. Click the Choose File button.
3. Upload the downloaded ThirstyAffiliates Pro addon zip file.
4. Click the Install Now button.
5. Click Activate Plugin.
Step3: Activate ThirstyAffiliate Pro Add-on Licenses
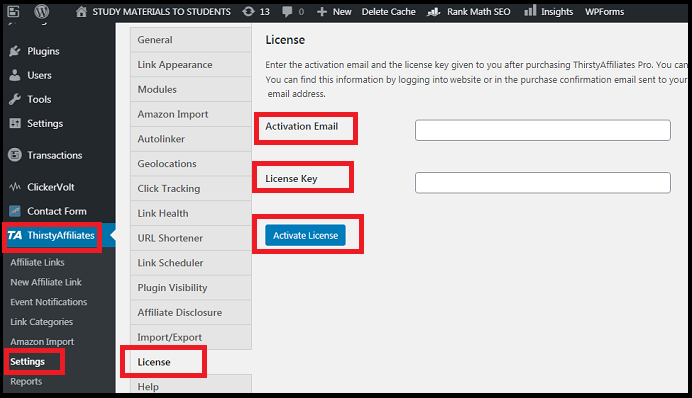
1. On your WordPress dashboard, navigate to ThirstyAffiliates >> Settings >> License tab.
2. Type in your Activation Email and License Key in the respective fields.
3. Click the Activate License button.
Step4: How To Automatically Add Affiliate Disclosure For Every Page, Post, And More Using ThirstyAffiliates
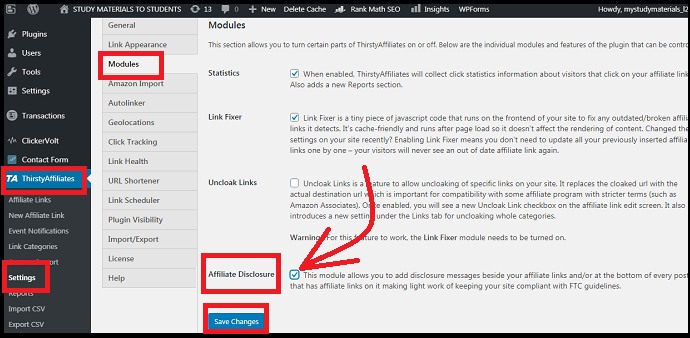
1. On your WordPress, go to ThirstyAffiliates >> Settings >> Modules.
2. Select the checkbox of Affiliate Disclosure.
3. Click the Save Changes button.
Now Affiliate Disclosure option added to the left side of the ThirtyAffiliates Settings menu.
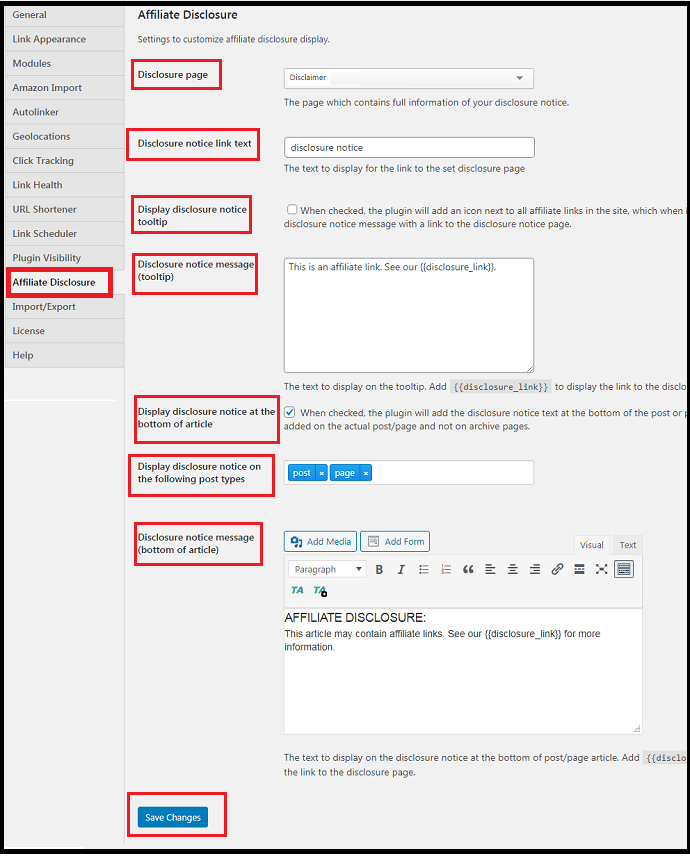
Step5: Customize your Affiliate Disclosure display
Now click Affiliate Disclosure. Then follow the settings under it and custom them.
1. Disclosure page: Choose the page that contains complete disclosure notice information.
2. Disclosure notice link text: Type in here the hyperlink text like ‘Click Here For Complete Disclosure’ that sends users to your complete disclosure notice information page, when they click it.
3. Display disclosure notice tooltip: Uncheck this option. If you check, it adds an icon next to all affiliate links in your site, which when hovered displays the disclosure notice message with a link to the disclosure notice page.
4. Disclosure notice message (tooltip): Type in here, the text that you want to display on the tooltip. And you must add ‘{{disclosure_link}}’ to display the link to the disclosure page.
5. Display disclosure notice at the bottom of article: Check this to add the disclosure notice message at the bottom of the post or page. This will add the notice message only on the actual post/page and not on archive pages.
6. Display disclosure notice on the following post types: Click this field and select page, post, and more where you want to display disclosure notice.
7. Disclosure notice message (bottom of article):
Type in here, the text that you want to display at the disclosure notice message at the bottom of the post or page. Here you can use Add Media and Add Form button to customize. And you should add ‘{{disclosure_link}}’ to display the link to the disclosure page.
8. After customizing all the affiliate disclosure settings, click the Save Changes button at the bottom of the page.
That’s it! Now your ThirstyAffiliates plugin automatically adds your Affiliate Disclosure message beside your affiliate links or at the bottom of every post that has your affiliate links. And keeps your site compliant with FTC guidelines.
ThirstyAffiliates Pro Discount
Vwant Special Offer: First-time customers will get the $50 discount on all ThirstyAffiliates plans through This ThristyAffiliates discounted pricing page.
Read It: Top 15 Best Affiliate Programs You Must Join Today To Boost Your Blog Revenue
2.How to add affiliate disclosure using WPEka WP legal pages Pro
WP Legal Pages is a must-have if you are participating in an affiliate program. It is a legal requirement. FTC mandates all the websites that have any paid relationship with any business organization to publish a disclosure making the relationship clear to the visitors. WP Legal Pages helps you to create an affiliate disclosure or generate an affiliate policy with just a few clicks.
All you need to do is just install and update the plugin. The rest will be done automatically. The disclosure will be automatically appended to your affiliate reviews and promotional articles. WP Legal Page also helps you generate 25+ attorney-level legal policy pages on your website automatically. The plugin is beginner-friendly and easy to use.
It has both free and premium versions. Its free version gives only 3 templates. You need to go with the premium version for complete features.
Step 1: Installing the plugin
- First, download the WP Legal Pages plugin from the WordPress.org plugin repository. If you need the premium version you can visit the WP LegalPages Pro page.
- Go to your WordPress Admin Dashboard
- Go to ‘Plugins’
- Go to ‘Add New’
- Click on ‘Upload Plugin’ button at the top
- Upload the downloaded WPLegalPages zip
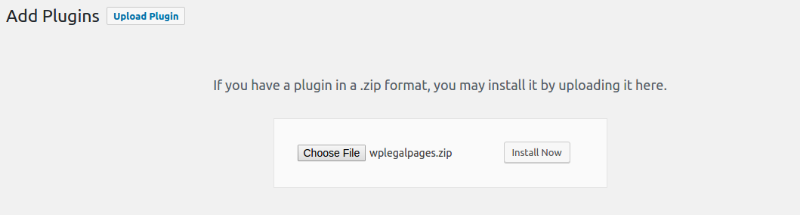
- Click install now and activate the plugin.
The plugin is now activated.
To use WPLegal Pages you need to accept the disclaimer first.

Once you accept it you will redirect you to General Settings.
Step 2: Setting Up
The legal templates included in the WP Legal Pages plugin uses business data automatically using shortcodes.
All these business data is captured in the general settings. You just need to enter the following information on this page.
- Domain Name of your website
- Business Name
- Phone number
- Street number
- City, State, ZIP code
- Country
- Email Address
- Full Mailing Address
- Niche of your website
- Facebook Page URL
- Google Page URL
- Twitter Page URL
- LinkedIn Page URL
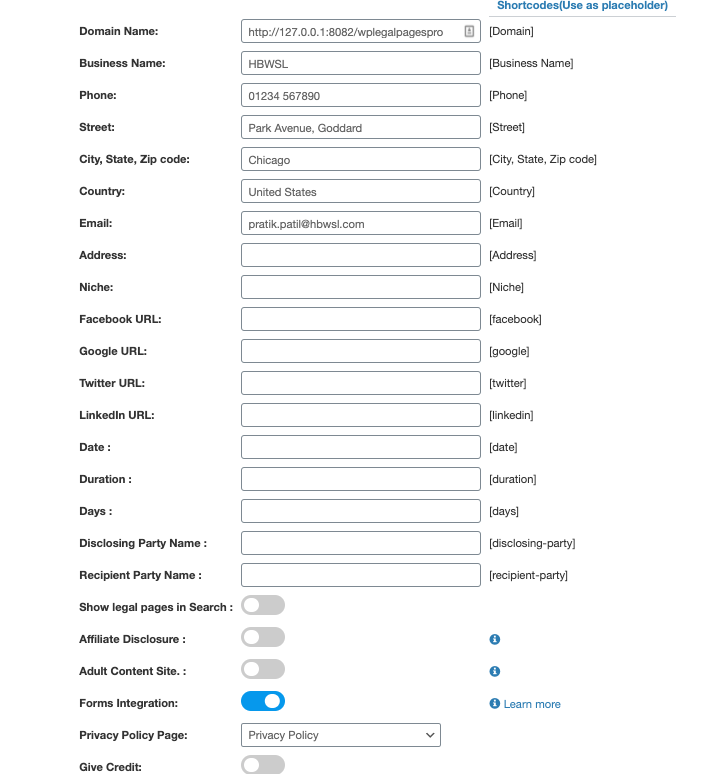
Apart from this, there are a few other settings you will see.
- Show legal pages in search – This option will enable your website users to search your legal pages using your website search. If you don’t want to make your legal pages searchable, you can disable it.
- Affiliate Disclosure – If you have an affiliate site, you can easily add an affiliate disclosure right from your WordPress post editor.
- Adult Content Site – If you own an adult content site, enabling this will enable a popup on your site, asking your user to confirm their age.
- Forms Integration – You cab enable this field to display – what data is captured as part of the privacy policy. This setting makes it easier to have the user aware of the details before submission of the form. This option perfectly works with WPForms, Gravity Forms & Contact 7 Forms plugins.
- Privacy Policy Page – This setting allows you to select the page which describes what personal data is captured (Usually your Privacy Policy Page).
- Give Credit – This option will add a small credit note at the end of each legal page on your site of “Generated by WPLegalPages”. If you don’t want to show it, you can disable it.
Once you are done, save the settings.
Step 3: Creating Affiliate Disclaimer
- Go to Legal Pages > Create Page

- Next, on the right-hand side of the dashboard, you can see a list of templates.

- Select the template “Affiliate Disclosure” and the content of the Affiliate Disclosure will be displayed in the editor.
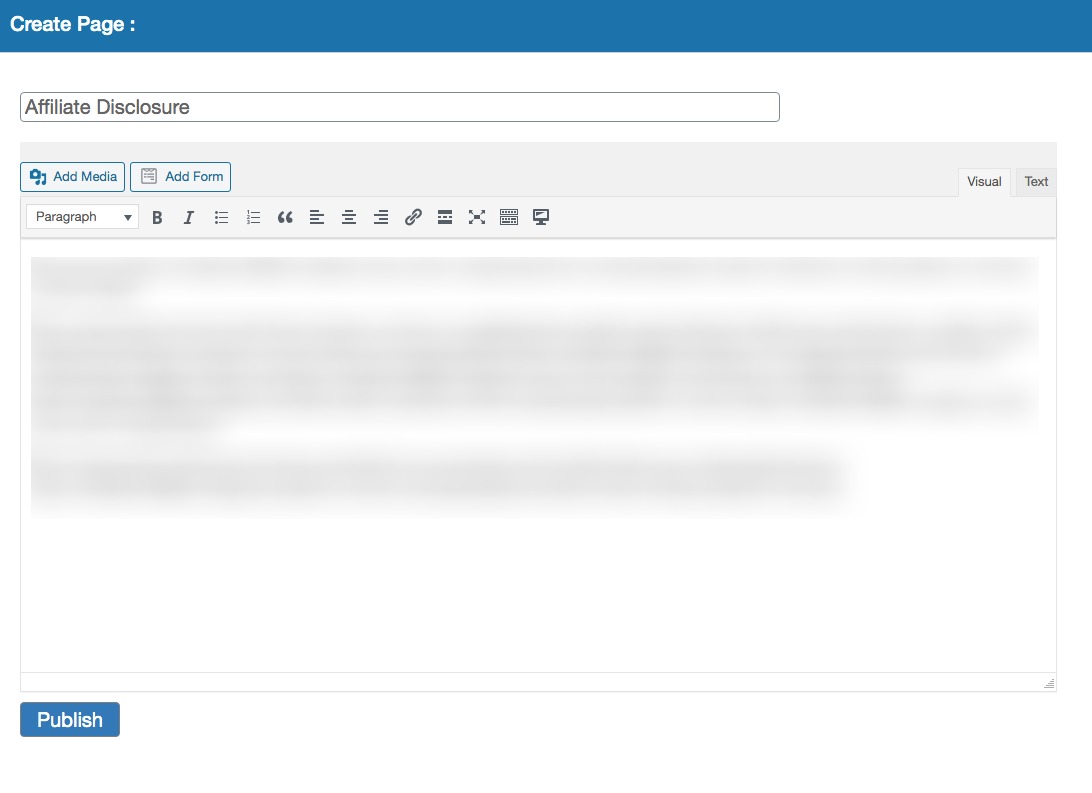
- Once you have selected the template, you can edit the template as you want, if anything is not applicable for your site
- Next, click on the “Publish” button to publish your Affiliate Disclosure.
15% OFF – WPEka WP Legal Pages Discount Coupon
Our readers get a special 15% discount on all WPEka products. Just use the Coupon Code: VWANT15 at the checkout to get the 15% discount on WPEka WP Legal Pages.
3. How To Automatically Add Affiliate Disclosure For Every Page, Post, And More Using Ad Inserter Plugin
Ad Inserter is another WordPress affiliate disclosure plugin used to automatically add affiliate disclosure notice to all your blog posts and pages. Now, let’s go through the following steps to do this:
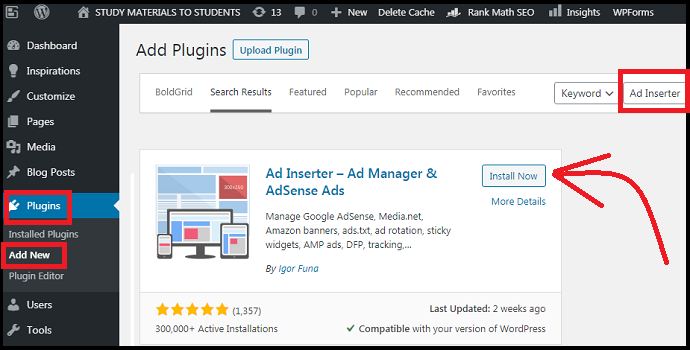
Step1: On your WordPress site dashboard, go to Plugins >> Add New. And search for Ad Inserter. Then install and activate Ad Inserter plugin on your WordPress.
Step2: Next, go to Settings >> Ad Inserter. Then by default, Block 1 appears. There type your Affiliate Disclosure Notice followed by a hyperlink text. For example, look at this:
This site consists of affiliate links. And I will get a small compensation when you click these links. Please see my <a href=”http://yourwebsite.com/affiliate disclaimer”> affiliate disclaimer page for complete information </a>.
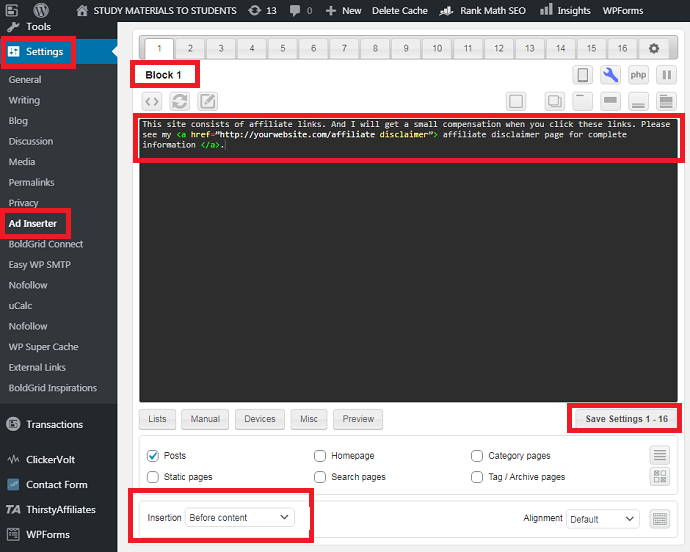
Step3: Scroll down and select the Insertion option as Before Content. And click Save Settings.
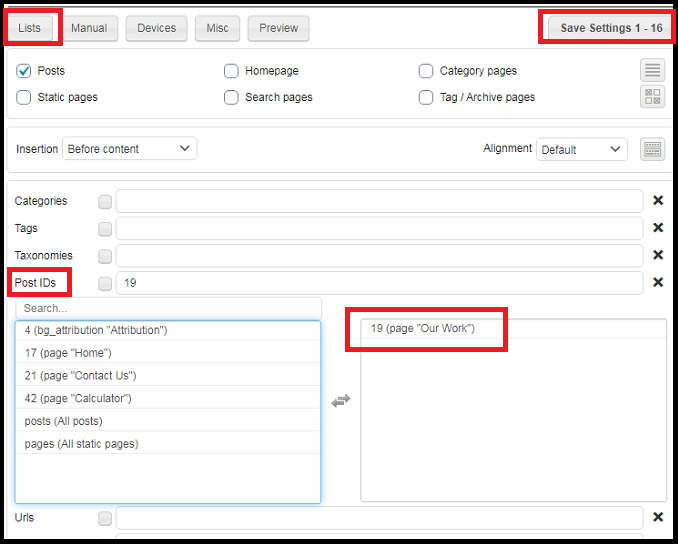
That’s it! Now your affiliate disclosure notice appears before the content of every post.
If you want to turn off affiliate disclosure for a particular post, click Lists, select Post IDs option, select the post, and click Save Settings. Then for the selected post, your affiliate disclosure notice will not appear.
Bonus 1: What are FTC guidelines for an affiliate marketer?
- If you are getting paid for endorsing products or services on your website or blog or on social media platforms. Then you should disclose this to your viewers, customers, and readers to know.
- You should replicate disclosures for all endorsements you do on your blogs, websites, Twitter, Facebook, Instagram, and other social media platforms. And don’t think that a single disclosure statement covers all the other posts you made: no, this is not so.
- Suppose you are promoting the products on social media, and your social media platforms permit words like ‘Sponsored’, ‘Paid Ad’, ‘Ad’. Or even hashtags like ‘#ad’ or ‘#advertisement’. Then you use those words. And these short words can clearly convey the message to customers that you are getting paid for such promotions.
- If you post a picture of a product or service on your blog or website or on a social media platform, it is considered to be an endorsement of that particular product or service. And you must disclose this appropriately.
- Your disclosure statements should be clear and easy to read, so:
- Disclosure Statements must be at the top of the post or page. It must not be incorporated into the text, must not be placed within the hashtags, and must not be placed at the bottom of the page.
- Your disclosure statement should be clear with legible font, both in terms of font size and font type.
- Ensure that the colors of the text and the background contrast should be clear and legible.
- Don’t hide your disclosure statement under any circumstances.
Bonus 2: How comply with the EU GDPR’s cookie consent and CCPA’s
WPEka WP GDPR Cookie Consent plugin helps you make your website comply with the EU GDPR’s cookie consent and CCPA’s “Do Not Sell” Opt-Out regulations.
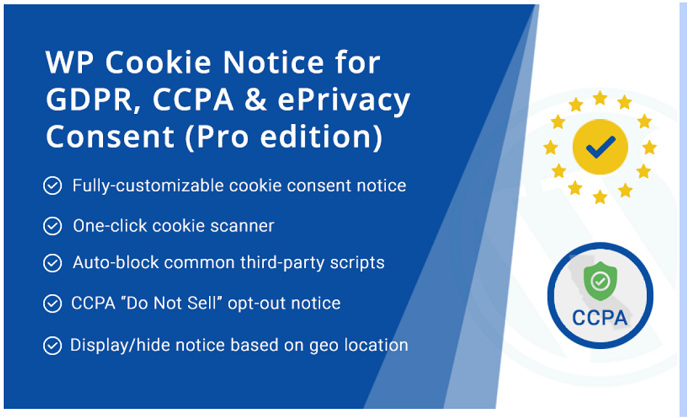
It goes hand-in with WP Legal Pages. It’s a proven WordPress plugin that helps you comply with the EU GDPR’s cookie consent and CCPA’s “Do Not Sell” Opt-Out regulations.
- Get visitor consent for cookies using a fully customizable cookie consent bar on your website. Helps you comply with EU GDPR.
- Display a fully customizable notice with a ‘Do Not Sell’ link on your website. Helps you comply with CCPA.
- Supports WPML so your translation needs are covered.
Final Thoughts On Methods To Add Affiliate Disclosure
Now you can automatically add affiliate disclosure to all the pages, posts, and more on your site where you use affiliate links using ThirstyAffiliates, the world’s best affiliate link cloaking plugin for WordPress. And according to FTC and affiliate marketing companies’ rules and regulations, you must do this to avoid crackdown and possible penalties. And by doing so, you can keep your site compliant with the FTC guidelines.
Finally, you must say thanks to ThirstyAffiliates plugin that not only aids you to automatically add affiliate disclosure for all pages, posts, and more on your WordPress site, where you use affiliate links. But also provides mindblowing features needed for your WordPress site like Autolink Keywords, Automatically add nofollow, sponsored, and ugc links, Shortening / Destination Cloaking, Automatic Affiliate Disclosure, Affiliate link click tracking, Geo-targeting, and more.
- Read Next: What is VigLink? Complete Review To Make Money With Your Existing Content
- 10 Essential WordPress Plugins List You Must Have
I confirm that this article Methods To Add Affiliate Disclosure is a quick guide for you to learn how to automatically add your affiliate disclosure notice for all your blog posts, pages, and more using ThirstyAffiliates plugin. If you like this article, do a favor by sharing this article and follow BlogVwant on Facebook, Twitter, and YouTube for more tips.
How To Add Affiliate Disclosure: FAQs
Where do you put affiliate disclosure?
Disclosure Statements must be at the top of the post or page. It must not be incorporated into the text, must not be placed within the hashtags, and must not be placed at the bottom of the page.
Do you have to disclose affiliate links?
Yes.
This is because according to rules and regulations of FTC (Federal Trade Commission). And affiliate marketing companies do recommend this.
Is Disclosure Statement needs to be clear and easy to read?
Yes.
Your disclosure statement should be clear with legible font, both in terms of font size and font type.
Ensure that the colors of the text and the background contrast should be clear and legible.
Finally, your disclosure statement should be clear and easy to read.
Do I need to include a disclosure statement when using social media to promote products?
Yes.