Want to make your WordPress website multilingual? If your website has multilingual visitors from various parts of the world. Then you definitely need to have a multi-language site. And this makes your readers feel easy to read and understand the content of your website in their native language. And it is no more an arduous task unless you know about the translator plugin named Weglot.
In this article, we will show you the 3 best ways to make your WordPress website multilingual. Out of 3, we strongly recommend you to use the Weglot plugin. Go through this article to know more information like installation, pricing, and features of the Weglot plugin.
What is Translation and Why it is important?
The translation is the conversion of content or any matter from one language to another language without changing the meaning of the content. As readers visit your website from all over the world, they feel comfortable to read the website content in their local language. If you are not much fluent in other than your local languages, creating your website content in all languages is a very tough job. So, to make it easier, you need to use the translation technique.
Further, if you want to target audience at various locations, boosts traffic, increase sales, boosts SEO, and improve user experience. Then you need to make your website available for several languages.
- READ MORE- 5 Best WordPress Language Translation Plugins To Create Multilingual Site
- Bablic Review: What Makes Bablic Better Than its Contemporaries?
Method 1: How to make your WordPress website Multilingual Using Weglot
What is Weglot

Weglot is a translator plugin, that allows you to make your website available in different languages. It provides nearly 100+ languages to translate. This translator plugin requires no coding to make your website multilingual. Further, this plugin works in major CMS platforms like WordPress, Shopify, Wix, Squarespace, Jimdo, Bigcommerce, and many more. It has the best WordPress rating of 4.9 out of 5.
Weglot Features
- Easy installation and Compatibility
You can install Weglot can in just minutes. And it is compatible with mostly used CMS and website Technologies like WordPress, Shopify, Wix, and more. Further, it is also compatible with 99% of all the themes/plugins/apps.
- Integration
Integration of the website is done within minutes after providing the API key to the Weglot Plugin. It automatically detects the content and translates it to the destination language. It also detects dynamic data, SEO metadata, and media.
- Content Control
It has a simple interface that allows you to review and edit the translated content. It supports 100+ languages.
- Increased Visibility
Your pages are automatically indexed by considering Google’s best practices regarding multilingual SEO. Based on the browser setting, the content will be automatically translated and serves the pages in your audience language.
- Support
It has well skilled support team to resolve the issues. Instead of chatbots, Weglot uses actual humans in their support team.
- Free Trial
Weglot offers a 10-day free trial, including all the features of its paid plan.
Weglot Plans and Pricing
Weglot is available in 5 plans and you can do the payment on a monthly or yearly basis.
And it offers 2 Months of free usage for its yearly payment users.
The below screenshot shows its Yearly Prices.

Monthly Prices:
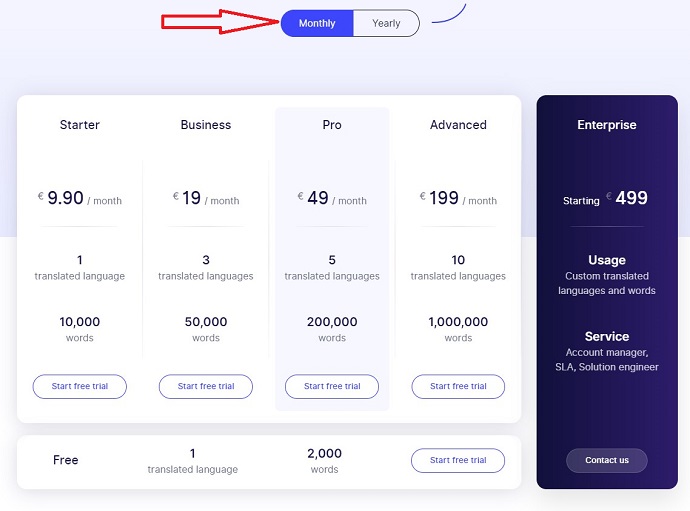
The below screen shot shows the features comparison of all the 5 plans.
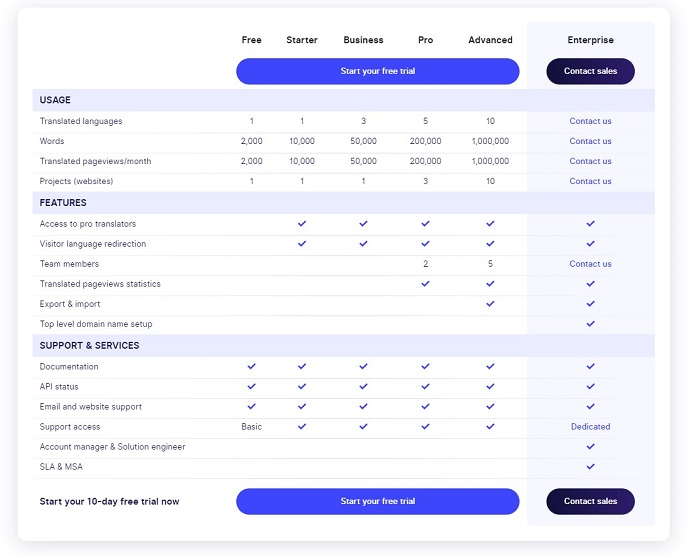
Select the suitable plan for your website that suited best.
How to create account in Weglot
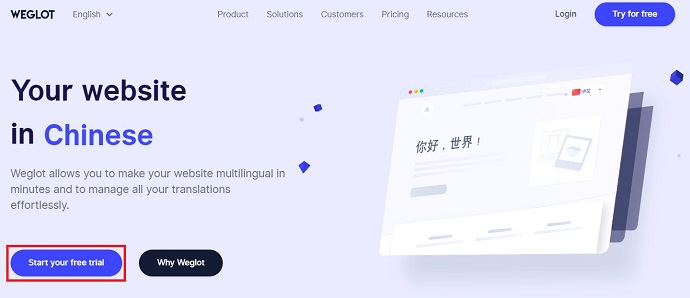
Step1: Visit Weglot official Website, and click on Start your free trail.
Step2: Enter your Email id and choose a Password for Weglot account. Then click on Start free trial.

Step3: Next, it sends a confirmation email to validate your email. Then validate your email simply by clicking the link. Now your account creates in Weglot. Then it will show you the API key. This API key is necessary if you want to configure the settings of this plugin on your WordPress site dashboard.

How to make your WordPress Website Multilingual
Video Tutorial:
For the reader’s convenience, we always create a video tutorial. Either you can watch and learn or simply skip the video and continue with the steps mentioned afterward.
In this section, you can view how to make your Website Multilingual using Weglot plugin.
Total Time: 5 minutes
STEP-1: Go to your WordPress site Dashboard
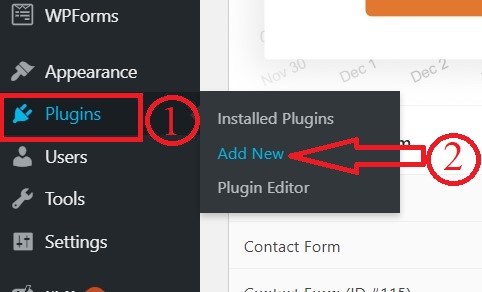
Go to your WordPress site Dashboard and click on “Plugins”. Then on “Add New”.
STEP-2: Install Weglot plugin

Search for the Keyword “Weglot”.
Find Weglot translate plugin. And click on “Install Now” button to install it.
STEP-3: Activate Weglot plugin
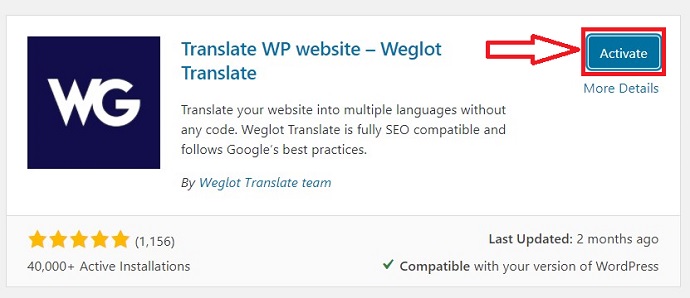
Now click on the Activate button to activate Weglot plugin.
STEP-4: Click on Weglot to open the main configuration menu

On your WordPress dashboard, click on Weglot.
Then its main configuration menu appears.
Here you need to configure API Key, Original language, Destination languages, etc.
STEP-5: Configure the settings like API Key, Original language, Destination languages, etc.
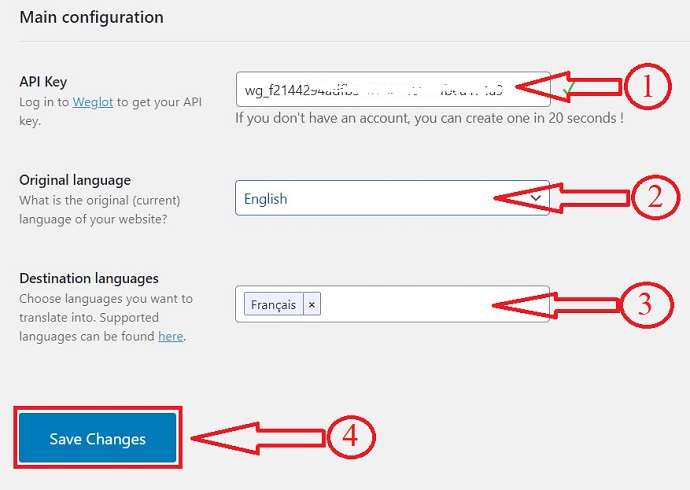
1. First, you need to enter your API Key. To get API key, login to Weglot in another tab. Then find your API Key and copy it.
2. Next, come back to the Weglot main configuration settings page and paste it in the corresponding field.
3. Next, select the Original language from the drop-down menu. Suppose you are using English in your blog. Then select English as the original language.
4. Next, add the destination language(s). In its free version, you can add just one destination language. Suppose you want to translate your site into more languages. Then you need to upgrade to its premium version.
5. Next, scroll down to the bottom of the settings page and click on Save Changes button.
That’s it! Now your website is multilingual.
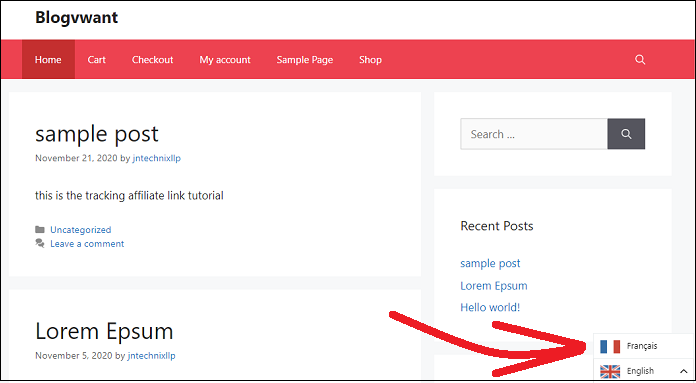
STEP-6: Check your Website for the Translate button on the right bottom.

1. Now your site visitors can view the flag icon (translate language button) on the right bottom of your WordPress site. To confirm this, open your website in the new tab.
2. Suppose you click on the other flag icons (other than English here). Then your website translates into that language. 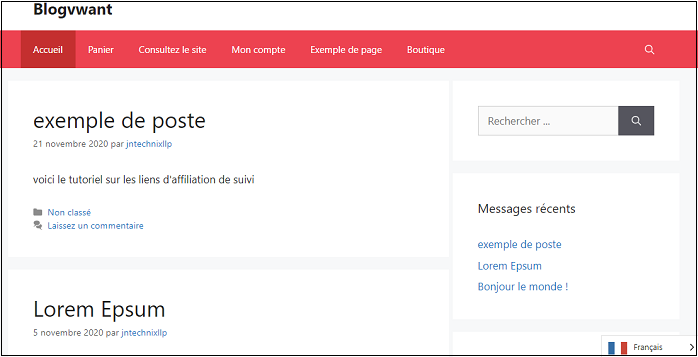
Method 2: How to translate your WordPress website Using WP Google Translate
What is WP Google Translate

WP Google Translate is one of the best WordPress Translation plugins to make our website content multilingual. This plugin provides 80+ languages to translate. As this product is from Google, we can expect the best translations. Further, this plugin is available both in free and paid versions.
WP Google Translate Features
- Instant download, installation, and activation of Plugin.
- Compatible with the latest version of WordPress and supports all WordPress themes.
- 30 days money-back guarantee.
- Secured and optimized code.
- Easy to customize the button.
- It links with Google Analytics to gather audience data.
- 24/7/365 Support.
WP Google Translate Plans and Pricings
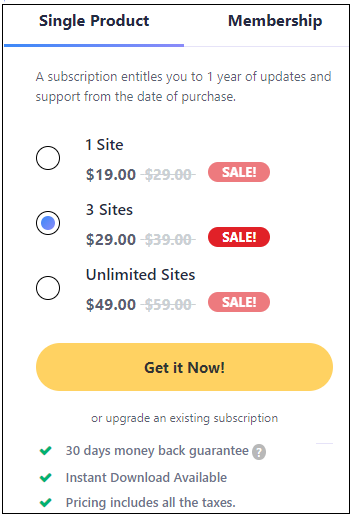
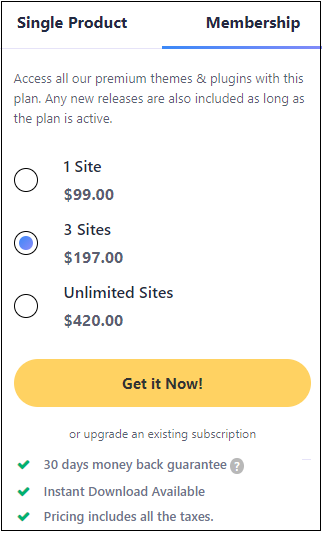
WP Google Translate Plugin offers two annual plans, Single Product and Membership. And both the plans are available for 1 site, 3 sites, and unlimited sites. Based on your requirement, you can go purchasing 1 site, or 3 sites, or unlimited sites’ license.
Pricing of Single Product Plan:
Pricing of Membership Plan:
You can upgrade the plan anytime.
How to make your website multilingual using WP Google Translate
STEP-1: visit mythemeshop. Search for “WP Google Translate“ and click on it.

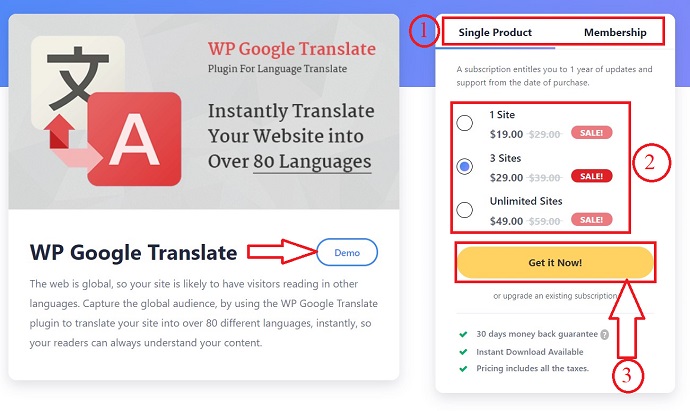
STEP-2: Choose a suitable plan that suits you best, and click on Get it Now. If you want to check how the Translator looks on the website, click on Demo.
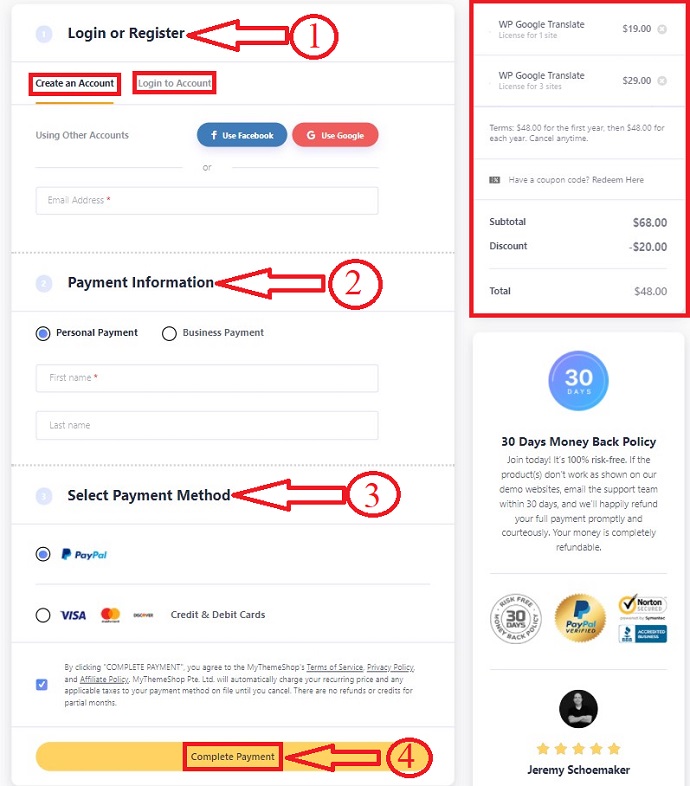
STEP-3: Now, you redirect to the Payment page. Here, In the first section, login to your account in mythemeshop, or else create a new account on this page itself.
On the top right, you will find your Order Details.
In the Second section, choose the Payment information.
In the Third section, select PayPal or Debit and credit cards option as Payment Method. and click on Complete Payment.
STEP-4: After completion of payment, it allows you to download, install, and activate the plugin on your website.
Once you completely activated this plugin on your WordPress site. Then navigate to your WordPress site Dashboard >> Plugins >>Installed Plugins to view WP Google Translate plugin.

STEP-5: Next, visit your website. Then you can view the Select Language button on the top right side of your website page. Simply click on it and choose the language you want your website to translate into.

Why Weglot is best compared to WP Google Translate
Though there are several free translate plugins available for WordPress, most of the users recommend and use Weglot as a tool to translate their website. This is all because of its performance and output to its user. Also, Weglot provides 100+ languages to translate into whereas, WP Google translate provides fewer languages compared to Weglot.
Method 3: How to Create a Multilingual WordPress website using Jetpack Google Translate widget
What is Jetpack Google Translate Widget

Jetpack is a multi-functional plugin installed on a WordPress website. It is available both in the free version with standard features and in the paid version with premium features. The primary function of the jetpack is to secure the site, improve the performance, and also to act as a marketing tool. This is the highly recommended plugin by WordPress experts.
This plugin provides a lot of widgets that are useful to the website to improve performance and gain more traffic. Of those widgets, Google Translate is also one. By enabling this widget to your site, readers visiting your site can translate the content into their own local language. As the readers are from all over the world and everyone likes to read the content in their own language for better understanding. So, providing the translate option to the website will improve the website’s reach to the readers.
As this is a widget from Jetpack, no need to install a separate plugin to translate. So that site performance will not be effected.
Jetpack Features
- It requires no additional Plugin.
- Google Translate widget is available in its free version.
- Automatic translates your website content to the language based on browser default language.
Jetpack Plans and Pricing
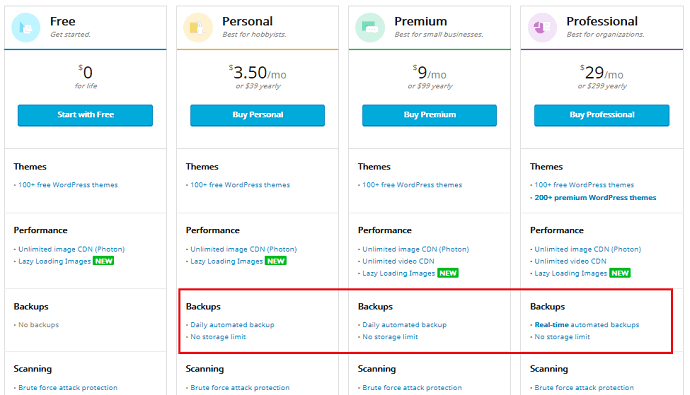
As the Translate widget is available in the Jetpack plugin. You need to purchase the Jetpack. It offers 3 premium plans along with a free plan. Those are Personal, Premium, and Professional. The below screenshot provides the prices and plans of Jetpack.
How to Enable Jetpack Google Translate Widget
Most of the time, Jetpack would be installed during the installing process of WordPress. If so, start from STEP-3. If you want to know how to install JetPack on your site, then start from STEP-1.
STEP-1: If you haven’t installed jetpack plugin, then click on Plugins and Add New.

STEP-2: Search for the Keyword “JetPack” and click on install and then on activate.

STEP-3: Next on your WordPress dashboard, navigate to Jetpack >> Settings >> Writing.

STEP-4: Scroll down to widgets section. There, you will find an option as shown in the below screenshot and enable it by clicking on the slider.

STEP-5: After enabling, click on Appearance and select Widget.

STEP-6: From the widgets list, drag the Jetpack Translate Widget to the convenient placement.
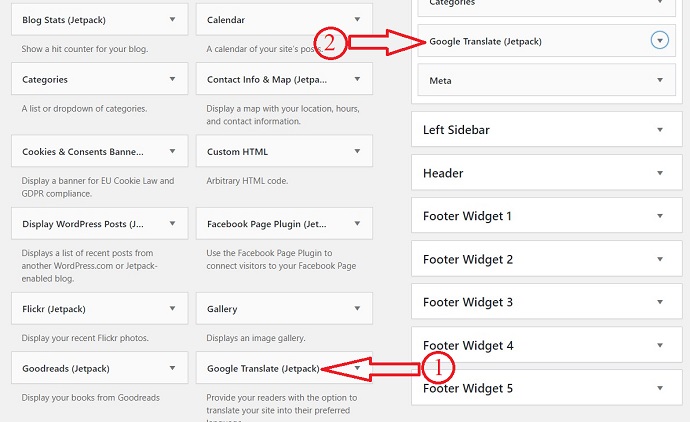
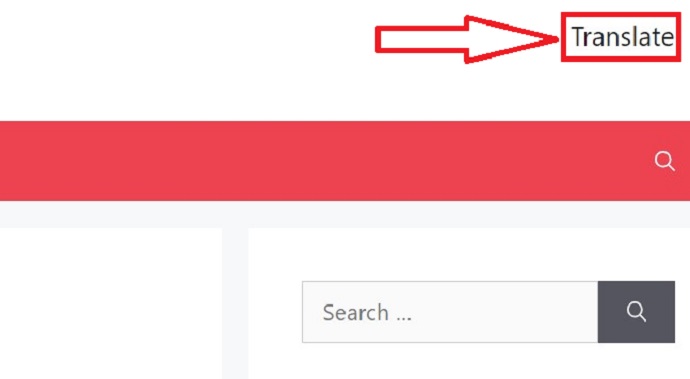
That’s it, Jetpack’s Google Translate adds to your site. And you can now see a Translate button on the top right side of your website page. Click on it and start viewing your website content in your preferred language.
Is Jetpack Google translate widget best compared to Weglot ?
Though Jetpack offers the inbuilt feature of a Google Translate Widget to its users and even it needs no additional plugin to install for translation. Most WordPress users prefer to use Weglot. This is because of its easy interface and customization. By taking the performance into consideration, the Weglot plugin is best compared to the Jetpack Google Translate Widget.
- READ MORE – How to use Jetpack publicize for Auto Publish Posts to Social Media
- Does Your Jetpack Publicize Not Working? 2020 Fix
Comparison between Weglot Translate and GTranslate
| Feature | Weglot Translate | Google Translate |
| 5 Minute Installation | ✔ | ❌ |
| Customization | ✔ | ❌ |
| Multilingual SEO | ✔ | ❌ |
| Automatic Translation | ✔ | ❌ |
| Free Trial with all features of a paid plan | ✔ | ❌ |
Conclusion
As everyone likes to read the content in their local language for better understanding. It is a basic thing to provide a translate button to our site that helps in improving our site traffic. So, it is important to choose the best translator. And, from the above stated three methods, I prefer and recommend the Weglot plugin to experience the best translation and also to gain more traffic with its inbuilt SEO and advanced features. Also, it provides 100+ languages to translate into.
After reading this article on “How to Make Your WordPress Site Multilingual“, you got to know about the best WordPress multilingual plugin to use and how to use it. I hope you like this article. If you like this article, please share it with your friends. If you want more blogging tips, follow BlogVwant on Facebook, Twitter, and YouTube.
How to Make your site Multilingual – FAQs
What is Multilingual Website?
A multilingual website is a site that provides translated content in more than one language. For example, English, French, Spanish, etc.
How can I make my Website available in different languages?
By using Translation plugins and widgets you can make your website multilingual.
Is Google Translator accurate?
Yes, Google Translator is pretty accurate and it can translate words, phrases, and the whole webpages into 100+ languages. Further, it is a free service.
How does Weglot works?
Weglot adds a language switch button on your website and allows to translate your content into other languages with no coding.
