Do you want to Schedule Affiliate Links In WordPress? Now go through this article to learn how to easily schedule your affiliate links in your WordPress site in less than a minute using two plugins ThristyAffiliates and Pretty Links.
What is an Affiliate Link Scheduling?
Scheduling when your affiliate links have to become active and when to expire is called Link Scheduling. That is, you need to set the starting date and finishing date to schedule the affiliate links. And you need to specify where to send users and visitors before and after scheduling.
Why Schedule Affiliate Links?
If you are an affiliate marketer, you should schedule affiliate links in the following conditions to make more money online.
Limited Time Deal Offers:
If your affiliate marketing companies offering a limited time deal offers on the products. Then you need to schedule the affiliate links pertaining to such products. Once the offer expires, you need to redirect the users from the offer page to the main page of the website.
A New Product Coming Out:
Whenever your affiliate marketing company releasing a new product for limited sales to test it. Then also you should schedule affiliate links related to such types of products.
Weekend Offers:
Suppose your affiliate marketing companies offer weekend offers on the products. Then you can schedule affiliate links related to such products. And after the weekend, you can redirect the users from the offer page to the main page of the website.
Special Festive Offers:
During or prior to festivals, your affiliate marketing companies offer special festive offers for 1 week or more on the products. In such cases also, you need to schedule affiliate links related to such products. Once the festive offer ends you can redirect the users from the offer page to the main page of the website.
Discount Coupons:
Sometimes your affiliate marketing companies offer discount coupons for a limited time period. In such cases also, you need to schedule the affiliate links related to such discount coupons for a specific time period.
Methods To Schedule Affiliate Links In WordPress
If you are an affiliate marketer, then to make your affiliate marketing success you need to schedule affiliate links related to discounts, limited-time deals, festive offers, weekend offers, and more. And once the offer expires, you need to redirect the users from the offer page to the main page of the website.
Now you can perform this task by using the following plugins:
- ThirstyAffiiates Pro (Recommended).
- Pretty Links Pro.
Here, the first plugin is the best one. Because using this you can schedule when your affiliate links should start being active and when to stop. That is, you can set the start date and expire date for the affiliate links. And you can add two URLs where to send users before and after scheduling. Further, this is the World’s No.01 affiliate link cloaking plugin for WordPress. So, many affiliate marketing experts recommend this plugin for affiliate links scheduling.
But in the second method, you can set only the expiry date of the affiliate link. And no option to set a start date. And your affiliate link becomes active once you create it in your WordPress using Pretty Links. However, you can add a URL to send users to this URL once the affiliate link has expired.
What is ThirstyAffiliates?
ThirstyAffiliates is the World’s No.01 affiliate link management and cloaking plugin for WordPress. And it permits you to easily create, manage, and insert affiliate links into WordPress posts, pages, and more.
It provides all features needed for affiliate marketers to make their affiliate marketing successful like Autolink Keywords, Geo-targeting, Shortening / Destination Cloaking, Link Categorization, Advanced Statistics Reports, Automatic Affiliate Disclosure, Amazon API Importing, and more.
ThirstyAffiliates Discount
First-time customers will get the $50 discount on all ThirstyAffiliates plans through This ThristyAffiliates discounted pricing page.
- You Might Like: ThirstyAffiliates Review: The Best Affiliate Marketing WordPress Plugin
- Methods to add rel=”sponsored” to affiliate links as Google Wants
1. Schedule Affiliate Links In WordPress Using ThirtsyAffiliates Pro (One And Only Easiest Method)
Video Tutorial:
For the reader’s convivence, we always try to create a video tutorial. You can watch it to understand the process clearly, or just skip it and continue with the steps mentioned after it.
In this section, you can view how to schedule your specific affiliate links using ThirstyAffiliates.
Total Time: 1 minute
Step1: Get ThirstyAffiliates Pro. And download ThirstyAffiliates Pro Addon zip file
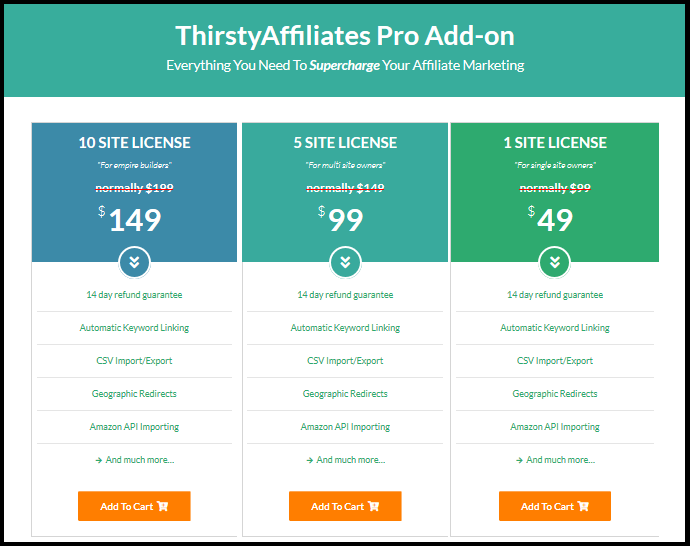
1. The first and foremost step is you need to get ThirstyAffiliates Pro.
2. Visit the ThirstyAffiliates website and buy ThirstyAffiliate Pro.
3. This pro addon is now available for 1 site, 5 sites, and 10 sites.
4. Its cost depends on whether you select 1 site license, 5 sites license, or 10 site license.
5. Its cost for 1 site license is just $49 per year. At this low price, it provides mind-blowing features required for your WordPress such as Autolink Keywords, Links Scheduling, Geo-targeting, Shortening / Destination Cloaking, Link Categorization, Advanced Statistics Reports, Automatic Affiliate Disclosure, Amazon API Importing, and more.
6. Next, download the ThirstyAffiliates Pro addon zip file.
Step2: Install ThirstyAffiliates Pro Addon on your WordPress
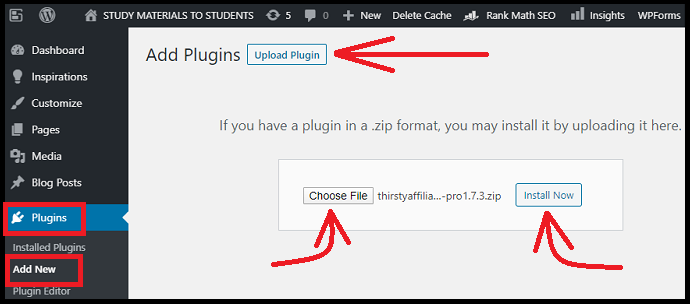
1. Go to your WordPress site dashboard.
2. Navigate to Plugins >> Add New >> Upload Plugin.
3. Click on the Choose File button.
4. Upload ThirstyAffiliates Pro addon zip file.
5. Click on the Install Now.
6. Click the Activate Plugin.
Step3: Activate the licenses of your ThirstyAffiliates Pro addon
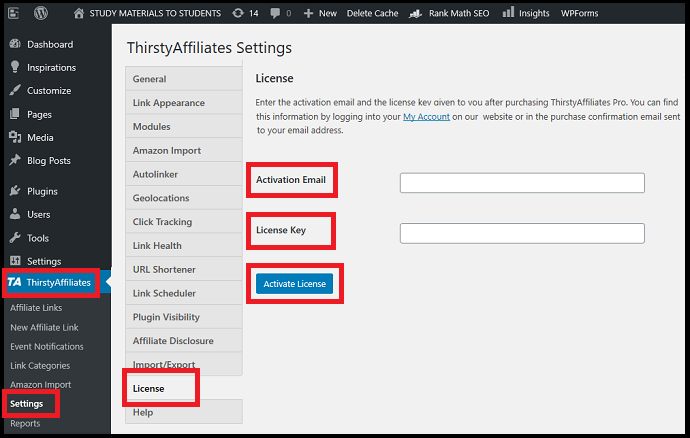
1. Go to ThirstyAffiliates >> Settings >> License tab.
2. Fill the Activation Email and License Key fields with your activation email and ThirstyAffiliates Pro license key.
3. Click on the Activate License button.
Step4: Set up Link Scheduling to your affiliate links in WordPress using ThirstyAffiliates Pro

You can easily setup link scheduling for your affiliate links on your WordPress site dashboard while you create them using ThirstyAffiliates Pro.
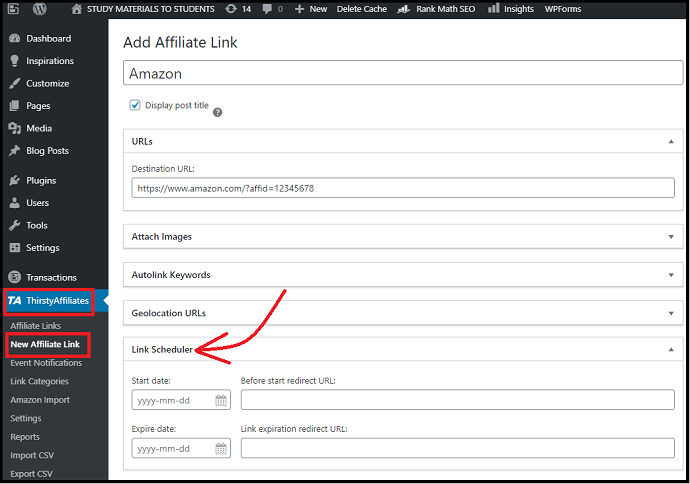
For this, navigate to ThirstyAffiliates >> New Affiliate Link. And do the following:
1. Add the title of your affiliate link like Amazon in the Add title field.
2. Add the URL of your affiliate link in the Destination URL field.
3. Scroll down the page and click the Link Scheduler section and customize the following 4 fields to schedule your affiliate link.
Start date: Set start date when your affiliate link should start being active.
Before start redirect URL: Add your desired URL to send users to this URL if they click the affiliate link before it is active.
Expire date: Set expire date when your affiliate link has to stop.
Link expiration redirect URL: Add your desired URL to send users to this URL if they click the affiliate link after it expires.
After customizing, click Save Link button present on the top right side of the page.
That’s it! You have now learned how to easily setup link scheduling to your new affiliate links in your WordPress site using ThirstyAffiliates Pro.
In a similar way, you can also setup link scheduling for any existing specific affiliate links on your site.
For this, you need to edit that specific affiliate link on your WordPress site, by navigating to ThirstyAffiliates >> Affiliate Links. Then you can setup link scheduling for that specific affiliate link.
Read It: Top 15 Best Affiliate Programs You Must Join Today To Boost Your Blog Revenue
2. Schedule Affiliate Links In WordPress Using Pretty Links Pro
Pretty Links is another affiliate link cloaking plugin for WordPress. But it lags in many features as compared to ThirstyAffiliates. However, you can use it for affiliate link scheduling. Though this plugin cannot provide the option of the start date, you can set the expiry date for the affiliate link. And the affiliate link becomes active once you create and publish it in your WordPress site dashboard using Pretty Links. And you can add a URL to send users to this URL once the affiliate link has expired.
Now go through the following steps to schedule affiliate links using Pretty Links.
Step1: Purchase Pretty Links Pro. And download Pretty Links Pro Zip file
- Go to the Pretty Links website and purchase Pretty Links Pro.
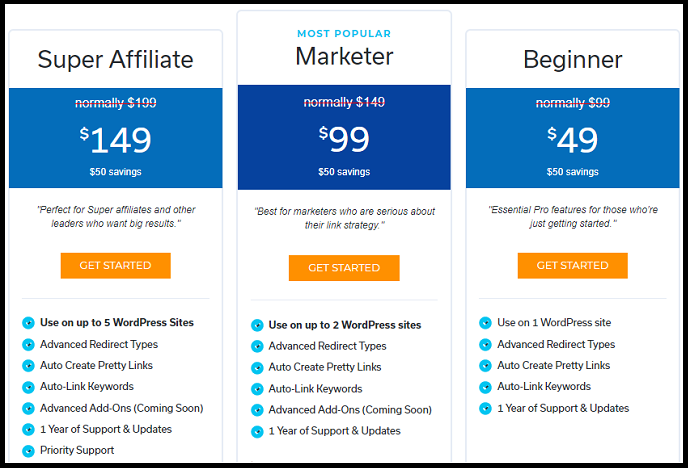
- It provides three premium annual plans like Beginner, Marketer, Super Affiliate for 1 site, 2 sites, and 5 sites respectively.
- Its cost depends on the number of sites you need to use this plugin.
- Its cost for 1 site is $49 per year. Based on your requirement choose and buy any plan.
- And download the Pretty Links pro zip file.
Step2: Install Pretty Links Pro Plugin in WordPress
- On your WordPress site dashboard, go to Plugins >> Add New >> Upload Plugin.
- Click the Choose File button.
- Upload the downloaded Pretty Links pro zip file.
- Click Install Now and then the Activate Plugin.
Step3: Activate the licenses of Pretty Links in WordPress
On your WordPress site dashboard, navigate to Pretty Links >> Activate. Then enter your Pretty Links Pro license key.
Step4: Schedule Affiliate Link in WordPress
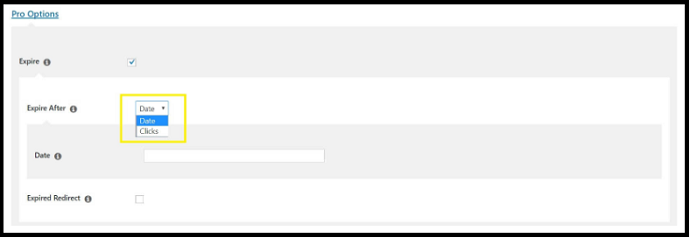
- On your WordPress site dashboard, go to Pretty Links >> Add New.
- Click Pro Options to expand it.
- Select the checkbox next to Expire. Then you can see a few new settings appear below it.
- Select Date next to Expire After.
- Select the checkbox next to Expired Redirect.
- Next, add URL to send users to this URL once the affiliate link expires.
Final Thoughts On Affiliate Links Scheduling
Now you know how to easily schedule your affiliate links in less than a minute in your WordPress site using ThirstyAffiliates Pro.
At last, you must say thanks to ThirstyAffiliates Pro for providing a great Link Scheduling feature. With this, you can easily set when affiliate links have to become active and when to expire. That is, you can set the start date and expire date for the affiliate links. And you can add two URLs where to send users before and after scheduling. Further, this is the World’s No.01 affiliate link cloaking plugin for WordPress. And many affiliate marketing experts recommend this plugin for affiliate links scheduling and managing. So, you can too use this plugin now for affiliate links scheduling and managing.
- Read Next: What is VigLink? Complete Review To Make Money With Your Existing Content
- 10 Essential WordPress Plugins List You Must Have
I confirm this article, How To Easily Schedule Affiliate Links In WordPress In Less Than One Minute, is a quick guide for you to learn how to easily schedule your specific affiliate links using ThirstyAffiliates Pro, the one and only plugin that offers ‘Link Scheduling’ feature. If so, do a favor by sharing this article and follow BlogVwant on Facebook, Twitter, and Youtube for more tips.
Schedule Affiliate Links in WordPress: FAQs
How do you make a link expire?
You can do this by using the ThirstyAffiliates Pro plugin. For this, go through the following for a quick guide.
1. On your WordPress site, go to ThirstyAffiliates >> New Affiliate Link.
2. Add your affiliate link in the Destination URL field.
3. Scroll down the page and click the Link Scheduler section.
4. Set the Start date and Expire date.
5. You can also set the URLs to send users to these URLs before and after scheduling.
Further, you can also schedule your existing affiliate links using ThirstyAffiliates Pro.
Why you prefer ThirstyAffiliates for Affiliate Links Scheduling?
Because this is the only plugin that provides Link Scheduling feature. With this feature, you can set the start date and expire date to your affiliate links.
And most of the affiliate link plugins provide only the expire date option but no start date option.
What is the best affiliate plugin for WordPress?
ThirstyAffiliates Pro is the best and World’s No.01 affiliate link management and cloaking plugin for WordPress.
