Are you Not Receiving a WP Confirmation Email To Change the Admin Email address? And are annoyed by this?
Then you can fix this issue easily and simply by using free and popular SMTP plugins like WP Mail SMTP by WPForms, Easy WP SMTP, Brevo(Formerly SendInbue), and more.
Now let’s go through this article, to learn how to use WP Mail SMTP, Easy WP SMTP, and Brevo(Formerly SendInblue) plugins to fix the WordPress email deliverability issue so that WordPress sends confirmation email messages immediately when you prompt it for admin email change.
- Most Recommended article: RankMath SEO Vs Yoast SEO: In-depth comparison
When should I change the WordPress admin email?
- Suppose you are new to WordPress, then by default, you may use your personal email while installing WordPress for the first time. Moreover, most WordPress hosting companies possess auto-installers that automatically use your hosting account email address during the installation.
- Then WordPress uses this email address as your website’s email address. And also uses this email address for the first admin account.
- Further, WordPress starts using this email address to send important notification email messages to you and your users, if any. And you can too use this email address, to retrieve lost passwords and for many more activities.
- But quickly you can realize that you need to use a professional email address like xxxxx@yourwebsite.com instead of a generic personal free email address like xxxxx@gmail.com.
- Then you can begin thinking about how to alter the WordPress admin email of your website. And also the email address of the first admin user.
RELATED – How to Change WordPress Admin Email With and without confirmation
Why I am not Not Receiving WP Confirmation Email To Change Admin Email?
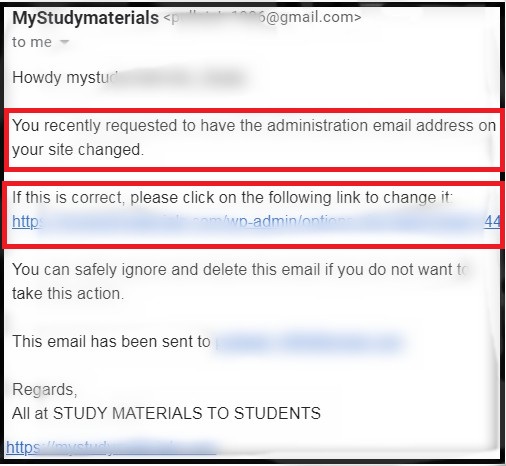
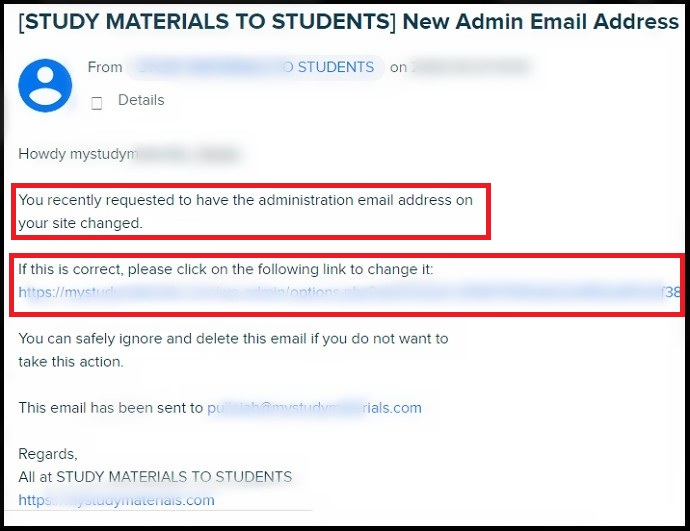
If you change your WordPress admin email by navigating to your WordPress site admin dashboard >> Settings >> General. Then you will get a confirmation message from WordPress immediately to your new email address. Suppose, if any confirmation email does not come to your new email address, then this happens because of the following reasons.
- Like many web applications, by default, WordPress uses the PHP Mail function to send email notifications generated by itself or any contact form plugin.
- But most of the WordPress hosting service providers restrict usage of this PHP Mail function temporarily or permanently to reduce automated spam.
- Further, most of the popular email service providers use spam filters to check all incoming emails as if they are sent from proper authentic mail servers. But default WordPress emails fail this test. And sometimes these default WordPress emails may not even succeed to go to the spam folder also.
Because of the above reason, sometimes, you can’t receive the admin email change confirmation message to your inbox or even spam folder from WordPress though you attempted to change your WordPress admin email in General Settings.
- RELATED – Why My WordPress Not Sending Emails? Quick Solution
- How to Set Up WordPress SMTP Using Amazon SES
Hint: Everyone loves to have a fast and secure website. We suggest Rocket.net, the most secured and fastest managed WordPress hosting service that gives you a Cloudflare Enterprise plan for free. Our readers get a special 50% discount on all Rocket.net plans using the coupon code: VWANT50.
Not Receiving WP Confirmation Email To Change Admin Email Address: 3 Methods to get a confirmation email from WordPress for the admin email change?
When you change your WordPress admin email via General Settings on your WordPress site admin dashboard area, then sometimes WordPress won’t send any confirmation emails to you. Then you can use the following free and most popular SMTP plugins to get a confirmation email message from WordPress to your new email as soon as you change the WordPress admin email via General Settings on your WordPress site admin dashboard.
Video Tutorial:
For the reader’s convenience, we always create a video tutorial. Either you can watch and learn or simply skip the video and continue with the steps mentioned afterward.
1. Use WP Mail SMTP Plugin To Get Confirmation Email Message From WordPress For Admin Email Change
WP Mail SMTP plugin is the World’s No.01 SMTP plugin used by more than 1 million WordPress users all over the world for sending emails reliably. This is possible because it permits you to send emails from your WordPress Site through one of your preferred SMTP servers like your WordPress Hosting Server, Gmail/Gsuite Server, and more.
In this section, you can learn how to use the Other SMTP Mailer option in WP Mail SMTP on your WordPress site to solve the WordPress email deliverability issue so that WordPress sends confirmation email messages instantly whenever you prompt it for admin email change.
Total Time: 5 minutes
STEP-1: Install and activate WP Mail SMTP on your WordPress
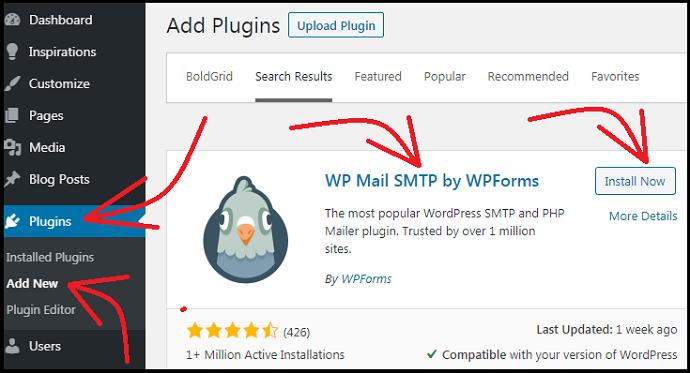
On your WordPress site admin area, go to Plugins >> Add New. And type in WP Mail SMTP on the search plugins bar. Next, install and activate WP Mail SMTP by WPForms plugin on your WordPress site.
STEP-2: Configure the WP Mail SMTP plugin Settings
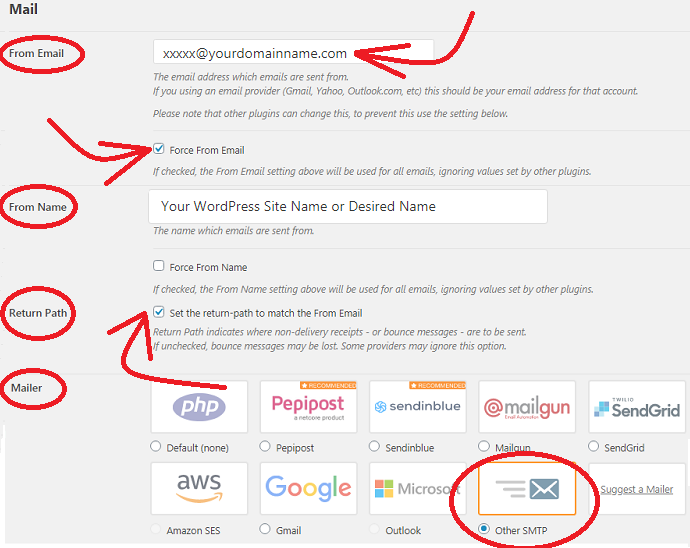
After activation, go to WP Mail SMTP >> Settings, to configure the following plugin settings.
From Email: Enter your email address like xxxxx@yourdomainname.com.
Force From Email: Check this box.
From Name: Enter a name you would like to appear as being sent FROM.
Force From Name: Check this if you want to force the FROM name.
Mailer: Choose ‘Other SMTP’.
Return-Path: Check this box.
STEP-3: Configure ‘Other SMTP’ Settings with DreamHost

Next, scroll down the page to view the Other SMTP section. Under this section, you have to enter the SMTP server settings provided by your Webhosting company. Suppose if DreamHost hosts your site, then you have to enter the SMTP server settings provided by DreamHost. The following are the DreamHost SMTP settings you need to enter under this section.
SMTP Host: smtp.dreamhost.com
Encryption: Use SSL encryption
SMTP Port: 465
Username: Enter your email address like xxxxx@yourdomainname.com
Password: Enter your email address Password
Further, make:
Auto TLS: OFF
Authentication: ON
Next, click on the Save Settings button at the bottom of the page.
STEP-4: Configure ‘Other SMTP’ Settings with Bluehost, SiteGround, and HostGator
Suppose you are using other Webhosting Service Providers like BlueHost, SiteGround, or HostGator, then SMTP settings can vary.
The Bluehost SMTP Settings are:
SMTP Host: mail.yourdomainname.com
Encryption: Use TLS encryption
SMTP Port: 587
Username: Enter your email address like xxxxx@yourdomainname.com
Password: Enter your email address Password.
The SiteGround SMTP Settings are:
SMTP Host: yourdomainname.com
Encryption: Use TLS encryption
SMTP Port: 587
Username: Enter your email address like xxxxx@yourdomainname.com
Password: Enter your email address Password.
The HostGator SMTP Settings are:
SMTP Host: full.hostgator.com
Encryption: Use SSL encryption
SMTP Port: 465
Username: Enter your email address like xxxxx@yourdomainname.com
Password: Enter your email address Password.
Next, click on the Save Settings button at the bottom of the page.
STEP-5: Change your WordPress admin email and check your email for a WordPress confirmation message
After filling in the SMTP settings fields under the Other SMTP section, next, go to Settings >> General on your WordPress site admin dashboard. And change the WordPress admin email in the Administration Email Address field.
Next, go to your email. Then you can view the WordPress confirmation message straight into your inbox. But not in the spam folder.
That’s it! You have now configured the WP Mail SMTP plugin with DreamHost and succeeded in getting a confirmation email Message from WordPress to change your website admin email.
STEP-6: Configure ‘Other SMTP’ Settings with Gmail/Gsuite
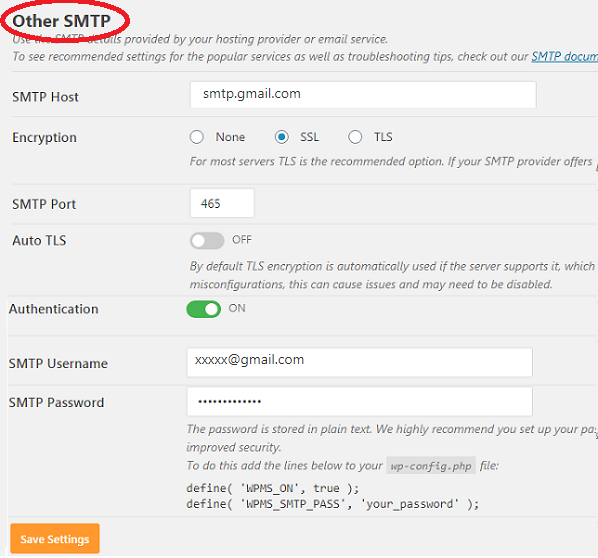
You can also use your normal Gmail/GSuite account to configure Other SMTP settings with Gmail. For this, go to WP Mail SMTP >> Settings. And select Other SMTP in the Mailer field. Then scroll down the page to view the Other SMTP section.
Under this section, you have to fill in the following fields:
SMTP Host: smtp.gmail.com
Encryption: Use SSL encryption
SMTP Port: 465
Username: Enter your Gmail address like xxxxx@gmail.com
Password: Enter your Gmail password
Further, make:
Auto TLS: OFF
Authentication: ON
In the above settings you can call Gmail/GSuite SMTP Settings.
Next, click on the Save Settings button at the bottom of the page.
STEP-7: Enable Less Secure Apps On Your Email Account
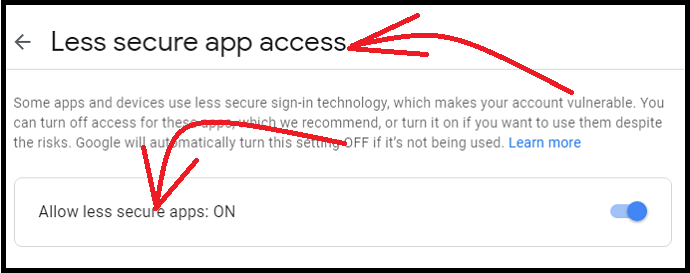
If you want to use SMTP on your WordPress site, then you have to enable less secure apps in your email account. For this, click this link. And turn on the toggle switch next to Allow less secure apps. If you have enabled the two-factor authentication for your email account, then disable that option. Next, again click the above link to enable less secure apps.
STEP-8: Change your WordPress admin email and check your email for a WordPress confirmation message
Now go to your WordPress site admin dashboard, then navigate to Settings >> General. And change the WordPress admin email in the Administration Email Address field.
Next, go to your email. Then you can view the WordPress confirmation message straight into your inbox. But not in the spam folder.
That’s it! You have now configured the WP Mail SMTP plugin with Gmail/GSuite and succeeded in getting a confirmation email Message from WordPress to change your website admin email.
RELATED – How to Set Up WordPress Email Logs
2. Use Easy WP SMTP Plugin To Get Confirmation Email Message From WordPress For Admin Email Change
Easy WP SMTP plugin is also another popular SMTP plugin used by more than 400K WordPress users all over the world to send emails reliably. This plugin also permits you to send emails from your WordPress Site through one of your preferred SMTP servers like your WordPress Hosting Server, Gmail/Gsuite Server, and more.
In this section, you can learn how to use Easy WP Mail SMTP on your WordPress site to solve the email deliverability issue so that WordPress sends a confirmation email message instantly whenever you prompt it for an admin email change.
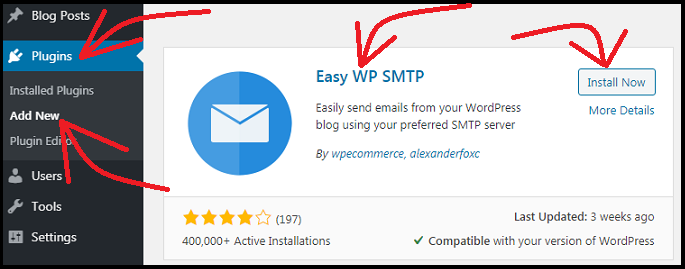
STEP-1: On your WordPress site admin dashboard area, go to Plugins >> Add New. And type in Easy WP SMTP on the search plugins bar.
STEP-2: Next, install and activate the Easy WP SMTP plugin on your WordPress site.
STEP-3: Next, go to Plugins >> Installed Plugins on your WordPress site Admin dashboard area. And scroll down the page to view the Easy WP SMTP plugin. Then click on Settings present under Easy WP SMTP.

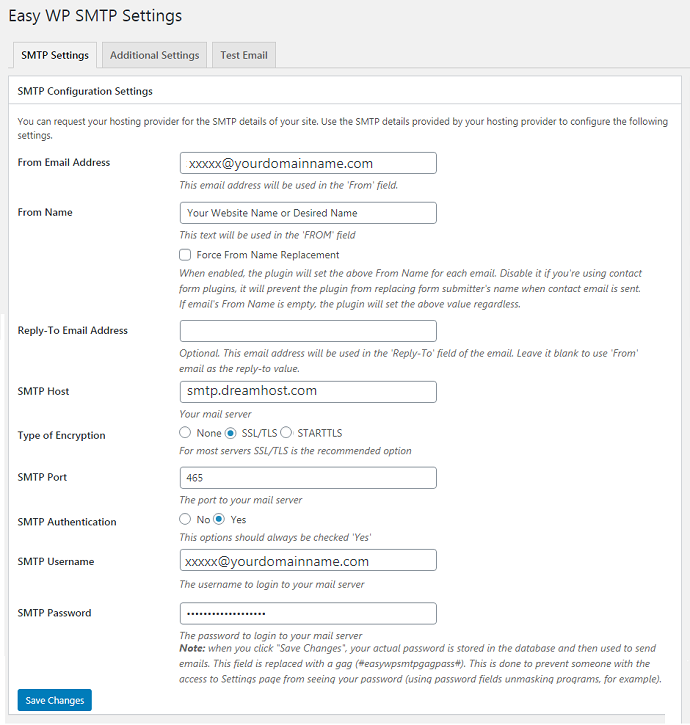
STEP-4: Next, click on the SMTP Settings under Easy WP SMTP Settings. Now you have to configure the Easy WP SMTP Settings with your Webhosting providers like DreamHost, BlueHost, or SiteGround.
If you use DreamHost Webhosting for your WordPress site, then fill in the SMTP Settings fields as given below:
- From Email: Enter your email address like xxxxx@yourdomainname.com.
- From Name: Enter a name you would like to appear as being sent FROM.
- Force From Name: Check this if you want to force the FROM name.
- Reply-To Email Address: Leave this field.
- SMTP Host: smtp.dreamhost.com
- Type of Encryption: Select SSL/TLS encryption.
- SMTP Port: 465
- SMTP Authentication: Click on the “Yes” option.
- SMTP Username: Enter your email address like xxxxx@yourdomainname.com.
- SMTP Password: Enter your email address Password.
- Next, click on the Save Settings button at the bottom of the page.
STEP-5: Suppose you are using other Webhosting Providers like BlueHost, SiteGround, or HostGator, then SMTP settings can vary. The SMTP settings of BlueHost, SiteGround, and HostGator are the same as those used earlier for the WP Mail SMTP plugin.
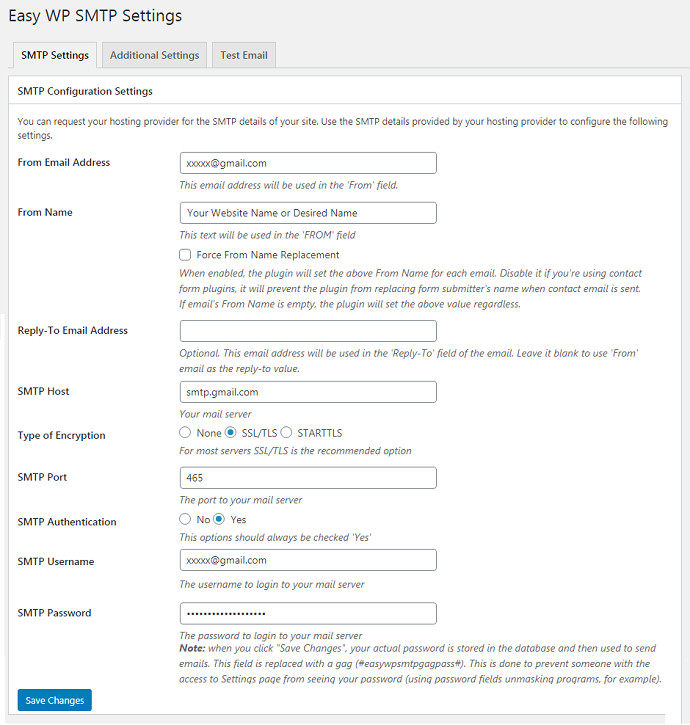
STEP-6: You can also use your Gmail/GSuite account to configure the Easy WP SMTP Settings. The Gmail/GSuite SMTP server settings are the same as you used earlier for the WP Mail SMTP plugin. And here also you have to enable less secure apps on your email account.
STEP-7: After filling in the SMTP settings fields under the SMTP Settings section, next, go to Settings >> General on your WordPress site admin dashboard. And change the WordPress admin email in the Administration Email Address field.
Next, go to your email. Then you can view the WordPress confirmation message straight into your inbox. But not in the spam folder.
That’s it! You have now configured the Easy WP SMTP plugin with your WordPress Webhosting Provider like DreamHost, BlueHost, SiteGround, and HostGator or Gmail/Gsuite and succeeded in getting a confirmation email message from WordPress to change your website admin email.
3. Use Brevo(Formerly SendInblue) SMTP Plugin To Get a Confirmation Email Message From WordPress For Admin Email Change
- Brevo(Formerly SendInblue) is an all-in-one marketing plugin because it offers Newsletter, SMTP, Email Marketing, and Subscription Forms services to its users.
- Further, When you install and activate Brevo on your WordPress site. Then, the wp_mail () function on your WordPress site automatically uses Brevo’s SMTP to enhance email deliverability. This is what you require here.
- Now let’s see how to create and activate a Brevo account on your WordPress site to improve email deliverability so that WordPress sends a confirmation email message instantly whenever you prompt it for admin email change.
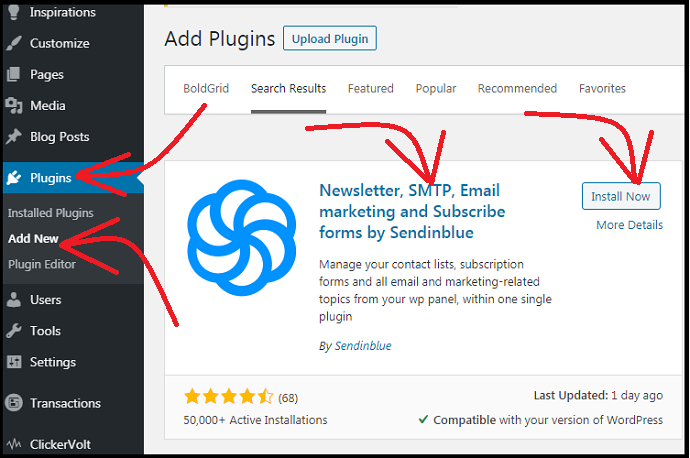
STEP-1: On your WordPress site admin dashboard area, go to Plugins >> Add New. And type in Brevo on the search plugins bar.
STEP-2: Next, install and activate the Brevo plugin on your WordPress site.
STEP-3: Next, go to Brevo >> Home. Then the Brevo home page appears to create and activate its account on your WordPress site.
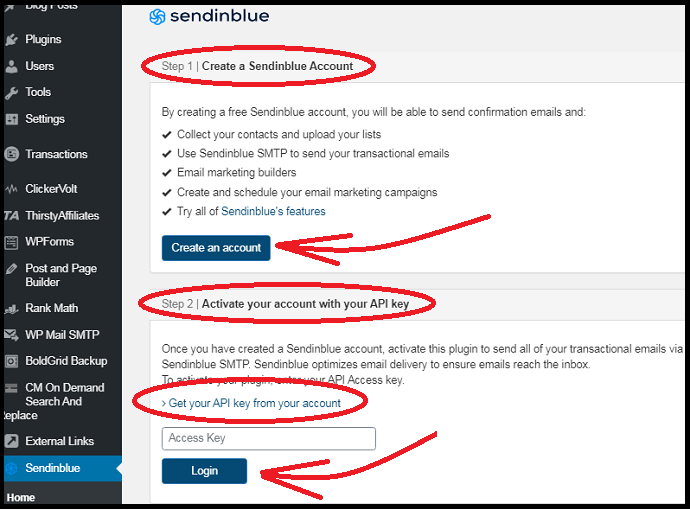
STEP-4: Next, click on Create an account button. Then it redirects to the Brevo signup page. Now you can sign up with your company and email address. Or you can signup with your Google account also.
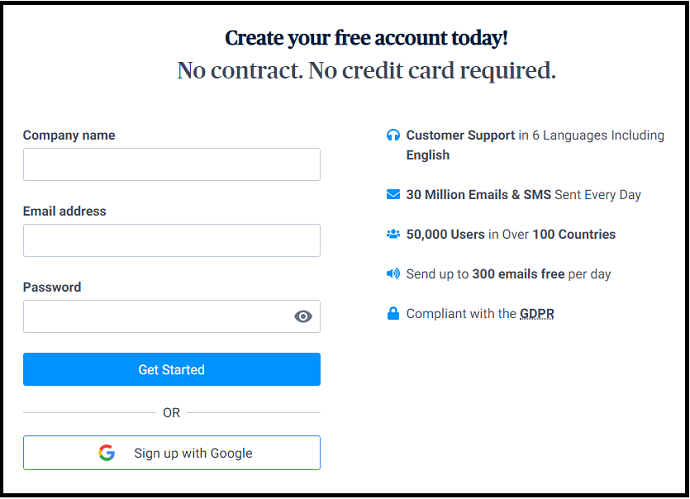
STEP-5: Next, a profile page opens, where you have to fill in various fields related to your name, phone number, website, and other details. After that follow a few steps.
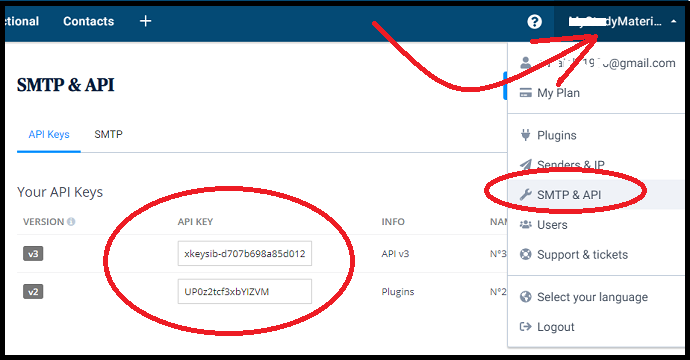
STEP-6: Next, click on your Brevo profile name present on the top right side of your Brevo webpage. And then on SMTP & API. Now SMTP & API page opens where you can view your API Keys which are required to activate your Brevo account on your WordPress site.
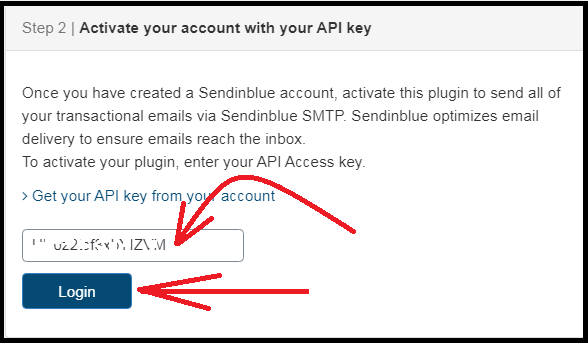
STEP-7: Next, go back to your WordPress site admin dashboard area, and navigate to Brevo >> Home. Then copy one of your Brevo API Keys and paste it on the Access Key field on your WordPress site Brevo Home page. And click on the Login button.
STEP-8: Now you have created and activated your Brevo account on your WordPress site. Next, the wp_mail () function on your WordPress site automatically uses Brevo’s SMTP to enhance email deliverability.
STEP-9: Next, go to Settings >> General on your WordPress site admin dashboard. And change the WordPress admin email in the Administration Email Address field.
Next, go to your email. Then you can view the WordPress confirmation message straight into your inbox. But not in the spam folder.
That’s it! You have now created and activated your Brevo account on your WordPress site and succeeded in getting a confirmation email Message from WordPress to change your website admin email.
Final Thoughts on Methods To Get WordPress Admin Email Change Confirmation Message
You have now fixed the WordPress email deliverability issue by using free and popular SMTP plugins like WP Mail SMTP, Easy WP SMTP, and Brevo(Formerly SendInblue). So that WordPress sends a confirmation email message instantly whenever you prompt it for an admin email change.
Now you can be free from “WordPress not sending admin email change confirmation messages”. And you can’t hear this message in the future too.
Here, most WordPress experts suggest the WP Mail SMTP plugin because:
- It ensures email deliverability.
- More than 1 million WordPress users are now using it.
- It permits you to send emails straight from your WordPress site through one of your desired SMTP servers like your WordPress Hosting Server, Gmail/Gsuite Server, and more.
- It fixes all WordPress email deliverability issues.
- It is free to use.
- RELATED – How to Easily Build Spam-Free WordPress Contact Forms – An Ultimate Way To Put An End To All Automated Spambots
- 7 Best Amazon SES Email Marketing Software Or Services to Send Emails For Very Low Price
I confirm this article is a great aid for you to resolve WordPress email deliverability issues. And you can learn how to use WP Mail SMTP, Easy WP SMTP, and Brevo(Formerly SendInblue) on your WordPress site to get a confirmation email message from WordPress instantly whenever you prompt it for an admin email change. If you like this article, do a favor by sharing this article and following BlogVwant on Facebook, Twitter, and YouTube for more tips.
WordPress Not Sending Admin Email Change Confirmation Messages: FAQs
How do I fix WordPress’s not sending email problems?
Install and Activate SMTP plugins like WP Mail SMTP on your WordPress site. Next, configure WP Mail SMTP with one of your desired SMTP servers like your Webhosting server, Gmail/GSuite server, and more.
Then it fixes the WordPress email deliverability issues.
For complete details, go through this article once.
Not getting a confirmation email to change the admin email address in General Settings?
To solve the issue, just install and activate the WP Mail SMTP plugin on your WordPress site. Next, configure WP Mail SMTP with one of your desired SMTP servers like your Webhosting server, Gmail/GSuite server, and more.
Then it fixes the WordPress email deliverability issues and WordPress sends a confirmation email instantly whenever you prompt it for an admin email change.
For complete details, go through this article once.
Not receiving the confirmation email to change the admin email address?
To solve the issue, just install and activate one of best the SMTP plugins like WP Mail SMTP or Easy WP SMTP on your WordPress site. Next, configure that plugin with one of your desired SMTP servers like your Webhosting server, Gmail/GSuite server, and more.
Then it fixes the WordPress email deliverability issues and WordPress sends a confirmation email instantly whenever you prompt it for an admin email change.
For complete details, go through this article once.
Can WordPress send emails?
Yes. Like many web applications, by default, WordPress uses the PHP Mail function to send email notifications generated by itself or any contact form plugin.
But most of the WordPress hosting service providers restrict usage of this PHP Mail function temporarily or permanently to reduce automated spam.
So to improve email deliverability and send emails reliably, you have to use SMTP plugins like WP Mail SMTP on your WordPress site.
Thank you so much for this thorough explanation! I was tearing my hair out. It’s completely baffling that WordPress would be using a mail function that is so powerfully blocked by email service providers the emails don’t even make it to the spam folders. That’s exaclty what happened to me. I waited days for the admin confirmation email — and it was simply never going to arrive — but there was zero way for me to know that there was a problem.